

AUDIO PANEL AND CNS
4.3 NAV OPERATION
NAV RADIO SELECTION AND ACTIVATION
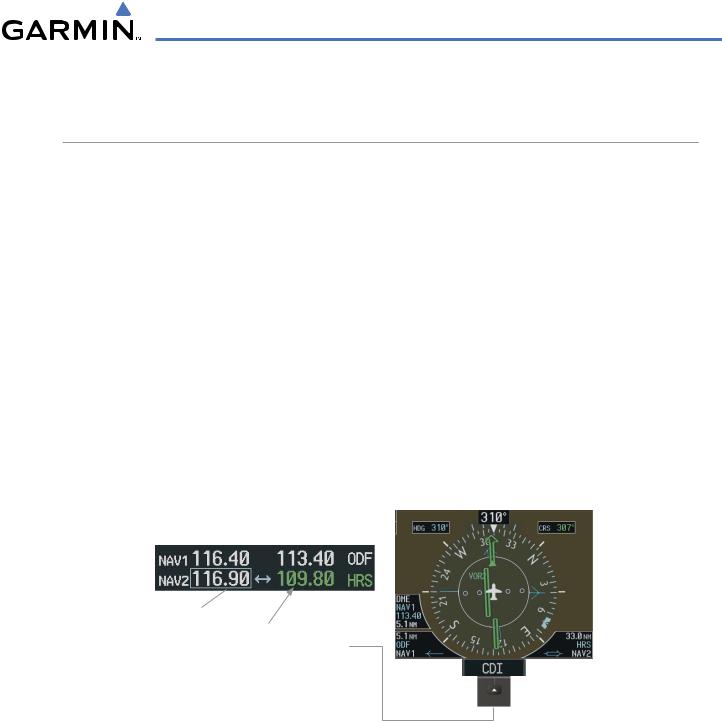
The NAV Frequency Box is composed of four fields; two standby fields and two active fields. The active frequencies are on the right side and the standby frequencies are on the left.
A NAV radio is selected for navigation by pressing the CDI Softkey located on the PFD. The active NAV frequency selected for navigation is displayed in green. Pressing the CDI Softkey once selects NAV1 as the navigation radio. Pressing the CDI Softkey twice selects NAV2 as the navigation radio. Pressing the CDI Softkey a third time activates GPS mode. Pressing the CDI Softkey again cycles back to NAV1.
While cycling through the CDI Softkey selections, the NAV Tuning Box and the Frequency Transfer Arrow are placed in the active NAV Frequency Field and the active NAV frequency color changes to green.
The three navigation modes that can be cycled through are:
•VOR1 (or LOC1) – If NAV1 is selected, a green single line arrow (not shown) labeled either VOR1 or LOC1 is displayed on the HSI and the active NAV1 frequency is displayed in green.
•VOR2 (or LOC2) – If NAV2 is selected, a green double line arrow (shown) labeled either VOR2 or LOC2 is displayed on the HSI and the active NAV2 frequency is displayed in green.
•GPS – If GPS Mode is selected, a magenta single line arrow (not shown) appears on the HSI and neither NAV radio is selected. Both active NAV frequencies are then displayed in white.
Standby |
|
Active |
||
Fields |
|
Fields |
||
|
|
|
|
|
|
|
|
|
|
Tuning Box
The NAV Radio is
Selected by Pressing
the CDI Softkey
Figure 4-17 Selecting a NAV Radio for Navigation
See the Flight Instruments Section for selecting the DME and Bearing Information windows and using VOR or ADF as the source for the bearing pointer.
190-00498-03 Rev A |
Garmin G1000 Pilot’s Guide for Cessna Nav III |
4-15 |
AUDIO PANEL AND CNS
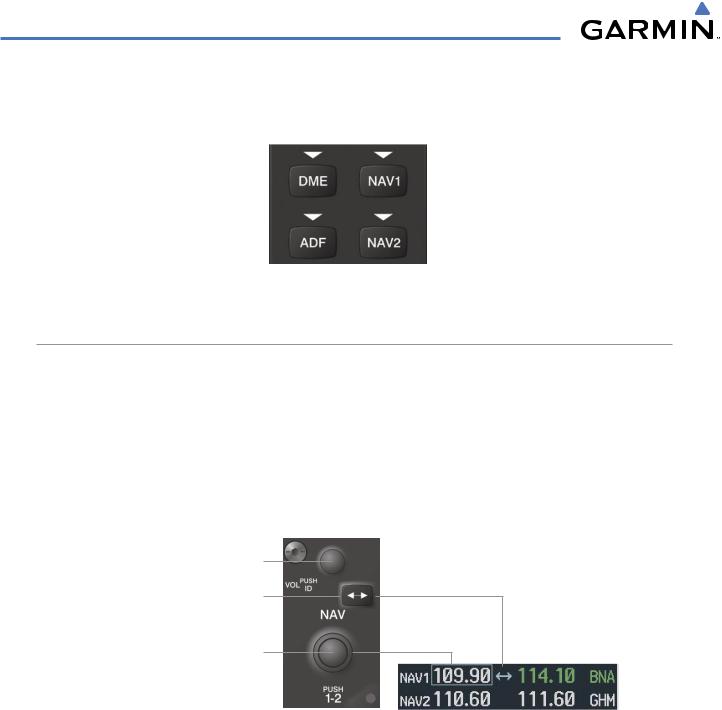
NAV radios are selected for listening by pressing the corresponding keys on the Audio Panel. Pressing the NAV1, NAV2, ADF, or DME Key selects and deselects the navigation radio source. Selected audio can be heard over the headset and the speaker (if selected). All radios can be selected individually or simultaneously.
Figure 4-18 Selecting a NAV Radio Receiver
NAV RECEIVER MANUAL TUNING
The NAV frequency controls and frequency boxes are on the left side of the MFD and PFD.
Manually tuning a NAV frequency:
1)Turn the NAV Knob to tune the desired frequency in the NAV Tuning Box.
2)Press the Frequency Transfer Key to transfer the frequency to the NAV Active Frequency Field.
3)Adjust the volume level with the NAV VOL/ID Knob.
4)Press the NAV VOL/ID Knob to turn the Morse code identifier audio on and off.
Turn VOL/ID Knob to adjust volume. Press Knob to Turn Morse Code On or Off.
Press the Frequency Transfer Key to Transfer NAV Frequencies Between Active and Standby Frequency Fields
Turn the NAV Knob to Tune the Frequency in the Tuning Box
Figure 4-19 NAV Frequency Tuning
4-16 |
Garmin G1000 Pilot’s Guide for Cessna Nav III |
190-00498-03 Rev A |
AUDIO PANEL AND CNS
SELECTING THE RADIO TO BE TUNED
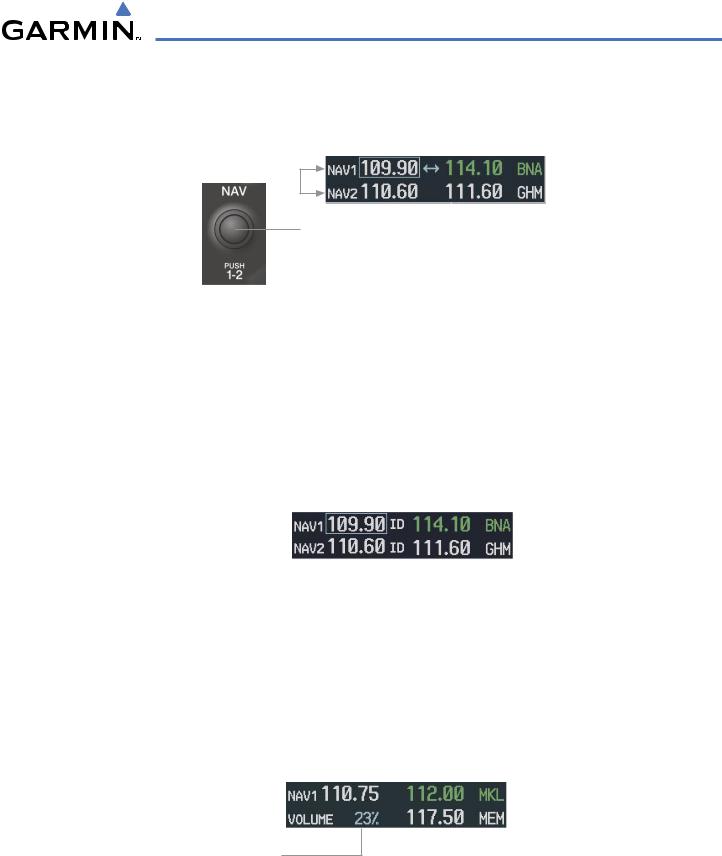
Press the small NAV Knob to transfer the frequency tuning box and Frequency Transfer Arrow between the upper and lower radio frequency fields.
Press the NAV Knob to
Switch the Tuning Box From
One NAV Radio to the Other
Figure 4-20 Switching NAV Tuning Boxes
VOR/LOC ID
When the Morse code Identifier audio is on for a NAV radio, a white ID appears to the left of the active NAV frequency.
In the example shown, in order to listen to either station identifier, press the NAV1 or NAV2 Key on the Audio Panel. Pressing the VOL/ID Knob turns off the Morse code audio only in the radio with the NAV Tuning Box. To turn off both NAV IDs, transfer the NAV Tuning Box between NAV1 and NAV2 with the small NAV Knob and press the VOL/ID Knob again to turn the Morse code off in the other radio.
The Morse Code Identifier |
|
|
|
Station |
|
|
|
|
|||
for the GHM VOR is On |
|
|
|
|
Identifier |
|
|
|
|
||
Figure 4-21 |
NAV Radio ID Indication |
||||
VOLUME
NAV Radio volume level can be adjusted from 0 to 100% using the VOL/ID Knob. Turning the knob clockwise increases volume, counterclockwise decreases volume.
When adjusting, the level is displayed in place of the standby frequencies. Volume level indication remains for two seconds after the change.
NAV Volume
Level Remains for Two Seconds
Figure 4-22 NAV Volume Levels
190-00498-03 Rev A |
Garmin G1000 Pilot’s Guide for Cessna Nav III |
4-17 |

AUDIO PANEL AND CNS
AUTO-TUNING A NAV FREQUENCY FROM THE MFD
NAV frequencies can be selected and loaded from the following MFD pages:
• WPT – Airport Information |
• NRST – Nearest VOR |
• WPT – VOR Information |
• NRST – Nearest Frequencies (FSS, WX) |
• NRST – Nearest Airports |
• NRST – Nearest Airspaces |
The MFD provides auto-tuning of NAV frequencies from waypoint and nearest pages. During enroute navigation, the NAV frequency is entered automatically into the NAV standby frequency field. During approach activation the NAV frequency is entered automatically into the NAV active frequency field.
Frequencies can be automatically loaded into the NAV Frequency Box from pages in the NRST or WPT page group by highlighting the frequency and pressing the ENT Key (Figures 4-23, 4-24, and 4-25).
Auto-tuning a NAV frequency from the WPT and NRST Pages:
1)From any page that the NAV frequency can be auto-tuned, activate the cursor by pressing the FMS Knob or the appropriate softkey.
2)Turn the FMS Knob to place the cursor on the desired NAV identifier.
3)Press the FREQ Softkey to place the cursor on the NAV frequency (Figure 4-25).
4)Press the ENT Key to load the NAV frequency into the standby field of the selected NAV radio.
5)Press the Frequency Transfer Key to transfer the frequency to the NAV Active Frequency Field.
Press the ENT Key to Load a Highlighted Frequency into the NAV Standby
Turn the FMS Frequency Box Knob to Scroll
Through a List
of Frequencies
Figure 4-23 NAV Frequency Auto-Tuning from the MFD
4-18 |
Garmin G1000 Pilot’s Guide for Cessna Nav III |
190-00498-03 Rev A |
AUDIO PANEL AND CNS
Or:
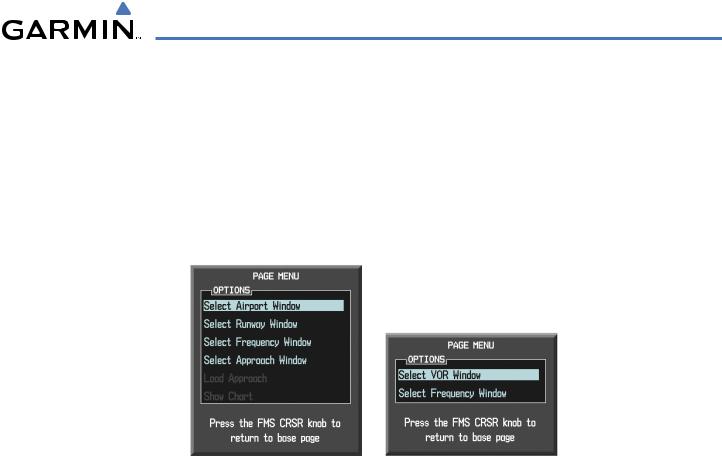
1)When on the NRST pages, press the MENU Key to display the page menu.
2)Turn the large FMS Knob to scroll through the menu options.
3)Press the ENT Key to place the cursor in the desired window.
4)Scroll through the frequency selections with the FMS Knob or the ENT Key.
5)Press the ENT Key to load the NAV frequency into the standby field of the selected NAV radio.
6)Press the Frequency Transfer Key to transfer the frequency to the NAV Active Frequency Field.
Nearest Airports Menu |
Nearest VOR Menu |
Figure 4-24 Nearest Pages Menus
190-00498-03 Rev A |
Garmin G1000 Pilot’s Guide for Cessna Nav III |
4-19 |

AUDIO PANEL AND CNS
In the example shown, the VOR list is selected with the VOR Softkey or from the page menu. The FMS Knob or ENT Key is used to scroll through the list. The cursor is placed on the frequency with the FREQ Softkey and loaded into the NAV Tuning Box with the ENT Key.
Press the ENT Key to Load the Frequency into the NAV Standby Field.
Press the VOR Softkey to Place the Cursor on the VOR Identifier
Press the FREQ Softkey to Place the Cursor on the VOR Frequency
Figure 4-25 Loading the NAV Frequency from the NRST – Nearest VOR Page
4-20 |
Garmin G1000 Pilot’s Guide for Cessna Nav III |
190-00498-03 Rev A |
AUDIO PANEL AND CNS
While enroute, NAV frequencies can also be auto-tuned from the NRST – Nearest Airports, WPT – Airport Information, WPT – VOR Information, and NRST – Nearest Frequencies Pages on the MFD in a similar manner using the appropriate softkeys or MENU Key, the FMS Knob, and the ENT Key.
Figure 4-26 NRST – Nearest Frequencies,WPT – VOR Information,WPT – Airport Information, and
NRST – Nearest Airports Pages
190-00498-03 Rev A |
Garmin G1000 Pilot’s Guide for Cessna Nav III |
4-21 |

AUDIO PANEL AND CNS
AUTO-TUNING NAV FREQUENCIES ON APPROACH ACTIVATION
 NOTE: The primary NAV frequency is auto-tuned upon loading a VOR or ILS/Localizer approach.
 NOTE: When an ILS/LOC approach has been activated in GPS Mode, the system switches to NAV Mode as the final approach course is intercepted (within 15 nm of the FAF). See the Flight Management Section for details.
NAV frequencies are automatically loaded into the NAV Frequency Box on approach activation.
WhenloadingoractivatingaVORorILS/LOCapproach,theapproachfrequencyisautomaticallytransferred to a NAV frequency field as follows:
•If the current CDI navigation source is GPS, the approach frequency is transferred to the NAV1 active frequency field. The frequency that was previously in the NAV1 active frequency field is transferred to standby.
•If the current CDI navigation source is GPS, and if the approach frequency is already loaded into the NAV1 standby frequency field, the standby frequency is transferred to active.
•If the current CDI navigation source is NAV1 or NAV2, the approach frequency is transferred to the standby frequency fields of the selected CDI NAV radio.
4-22 |
Garmin G1000 Pilot’s Guide for Cessna Nav III |
190-00498-03 Rev A |