

44 |
CHAPTER 2: Appeasing the Tiki Gods |
Bring It on Home
Pat yourself on the back. Although it may not seem like you accomplished all that much in this chapter, we actually covered a lot of ground. You learned about the iOS project templates, created an application, learned a ton about Xcode 4, started using Interface Builder, and learned how to set your application icon and bundle identifier.
The Hello, World program, however, is a strictly one-way application. We show some information to the users, but we never get any input from them. When you’re ready to see how to go about getting input from the user of an iOS device and taking actions based on that input, take a deep breath and turn the page.
www.it-ebooks.info
Chapter 3
Handling Basic
Interaction
Our Hello, World application was a good introduction to iOS development using Cocoa Touch, but it was missing a crucial capability: the ability to interact with the user. Without that, our application is severely limited in terms of what it can accomplish.
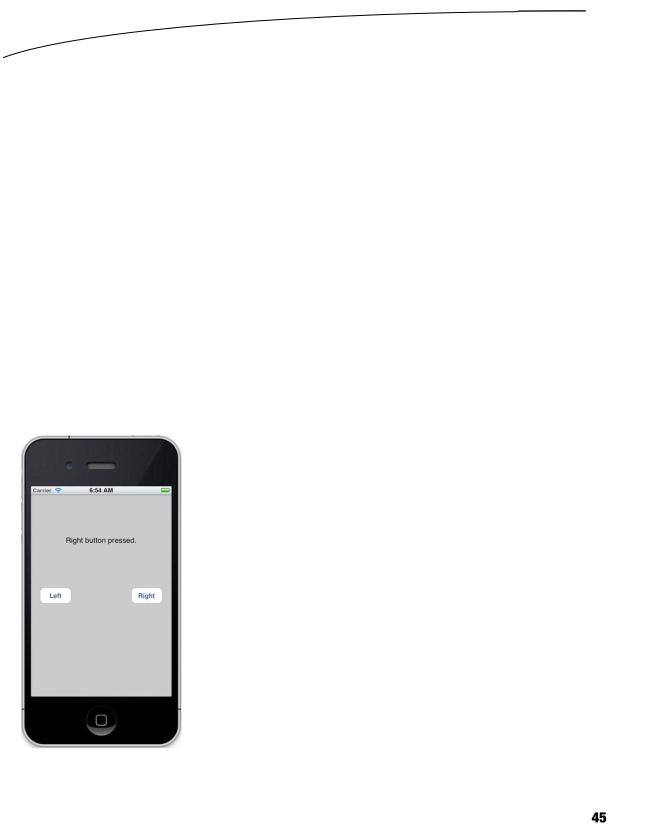
In this chapter, we’re going to write a slightly more complex application—one that will feature two buttons as well as a label, as shown in Figure 3–1. When the user taps either of the buttons, the label’s text will change. This may seem like a rather simplistic example, but it demonstrates the key concepts involved in creating interactive iOS apps.
Figure 3–1. The simple two-button application we will build in this chapter
D.Mark et al., Beginning iOS 5 Development
©Dave Mark, Jack Nutting, Jeff LaMarche 2011
www.it-ebooks.info

46 |
CHAPTER 3: Handling Basic Interaction |
The Model-View-Controller Paradigm
Before diving in, a bit of theory is in order. The designers of Cocoa Touch were guided by a concept called Model-View-Controller (MVC), which is a very logical way of dividing the code that makes up a GUI-based application. These days, almost all objectoriented frameworks pay a certain amount of homage to MVC, but few are as true to the MVC model as Cocoa Touch.
The MVC pattern divides all functionality into three distinct categories:
Model: The classes that hold your application’s data.
View: Made up of the windows, controls, and other elements that the user can see and interact with.
Controller: The code that binds together the model and view. It contains the application logic that decides how to handle the user’s inputs.
The goal in MVC is to make the objects that implement these three types of code as distinct from one another as possible. Any object you create should be readily identifiable as belonging in one of the three categories, with little or no functionality that could be classified as being either of the other two. An object that implements a button, for example, shouldn’t contain code to process data when that button is tapped, and an implementation of a bank account shouldn’t contain code to draw a table to display its transactions.
MVC helps ensure maximum reusability. A class that implements a generic button can be used in any application. A class that implements a button that does some particular calculation when it is clicked can be used only in the application for which it was originally written.
When you write Cocoa Touch applications, you will primarily create your view components using a visual editor within Xcode called Interface Builder, although you will also modify, and sometimes even create, your user interfaces from code.
Your model will be created by writing Objective-C classes to hold your application’s data or by building a data model using something called Core Data, which you’ll learn about in Chapter 13. We won’t be creating any model objects in this chapter’s application, because we do not need to store or preserve data, but we will introduce model objects as our applications get more complex in future chapters.
Your controller component will typically be composed of classes that you create and that are specific to your application. Controllers can be completely custom classes (NSObject subclasses), but more often, they will be subclasses of one of several existing generic controller classes from the UIKit framework, such as UIViewController, which you’ll see shortly. By subclassing one of these existing classes, you will get a lot of functionality for free and won’t need to spend time recoding the wheel, so to speak.
As we get deeper into Cocoa Touch, you will quickly start to see how the classes of the UIKit framework follow the principles of MVC. If you keep this concept in the back of your mind as you develop, you will end up creating cleaner, more easily maintained code.
www.it-ebooks.info
CHAPTER 3: Handling Basic Interaction |
47 |
Creating Our Project
It’s time to create our next Xcode project. We’re going to use the same template that we used in the previous chapter: Single View Application. By starting with this simple template again, it will be easier for you to see how the view and controller objects work together in an iOS application. We’ll use some of the other templates in later chapters.
Launch Xcode and select File New New Project... or press N. Select the Single View Application template, and then click Next.
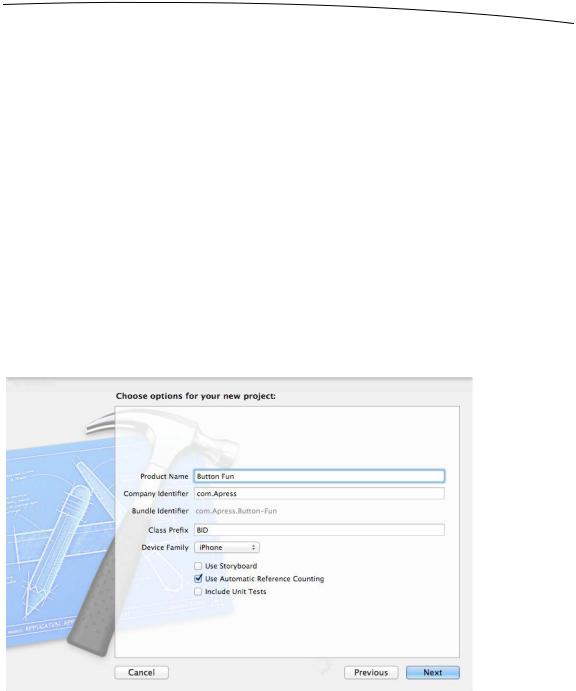
You’ll be presented with the same options sheet as you saw in the previous chapter. In the Product Name field, type the name of our new application, Button Fun. The Company Identifier field should still have the value you used in the previous chapter, so you can leave that alone. In the Class Prefix field, use the same value as you did in the previous chapter: BID.
Just as we did with Hello, World, we’re going to write an iPhone application, so select iPhone for Device Family. We’re not going to use storyboards or unit tests, so you can leave both of those options unchecked. However, we do want to use ARC, so check the Use Automatic Reference Counting box. We’ll explain ARC later in the chapter. Figure 3– 2 shows the completed options sheet.
Figure 3–2. Naming your project and selecting options
Hit Next, and you’ll be prompted for a location for your project. You can leave the Create local git repository checkbox unchecked. Save the project with the rest of your book projects.
www.it-ebooks.info