- •Contents at a Glance
- •About the Authors
- •About the Technical Reviewer
- •Acknowledgments
- •Preface
- •What This Book Is
- •What You Need
- •Developer Options
- •What You Need to Know
- •What’s Different About Coding for iOS?
- •Only One Active Application
- •Only One Window
- •Limited Access
- •Limited Response Time
- •Limited Screen Size
- •Limited System Resources
- •No Garbage Collection, but…
- •Some New Stuff
- •A Different Approach
- •What’s in This Book
- •What’s New in This Update?
- •Are You Ready?
- •Setting Up Your Project in Xcode
- •The Xcode Workspace Window
- •The Toolbar
- •The Navigator View
- •The Jump Bar
- •The Utility Pane
- •Interface Builder
- •New Compiler and Debugger
- •A Closer Look at Our Project
- •Introducing Xcode’s Interface Builder
- •What’s in the Nib File?
- •The Library
- •Adding a Label to the View
- •Changing Attributes
- •Some iPhone Polish—Finishing Touches
- •Bring It on Home
- •The Model-View-Controller Paradigm
- •Creating Our Project
- •Looking at the View Controller
- •Understanding Outlets and Actions
- •Outlets
- •Actions
- •Cleaning Up the View Controller
- •Designing the User Interface
- •Adding the Buttons and Action Method
- •Adding the Label and Outlet
- •Writing the Action Method
- •Trying It Out
- •Looking at the Application Delegate
- •Bring It on Home
- •A Screen Full of Controls
- •Active, Static, and Passive Controls
- •Creating the Application
- •Implementing the Image View and Text Fields
- •Adding the Image View
- •Resizing the Image View
- •Setting View Attributes
- •The Mode Attribute
- •Interaction Checkboxes
- •The Alpha Value
- •Background
- •Drawing Checkboxes
- •Stretching
- •Adding the Text Fields
- •Text Field Inspector Settings
- •Setting the Attributes for the Second Text Field
- •Creating and Connecting Outlets
- •Closing the Keyboard
- •Closing the Keyboard When Done Is Tapped
- •Touching the Background to Close the Keyboard
- •Adding the Slider and Label
- •Creating and Connecting the Actions and Outlets
- •Implementing the Action Method
- •Adding Two Labeled Switches
- •Connecting and Creating Outlets and Actions
- •Implementing the Switch Actions
- •Adding the Button
- •Connecting and Creating the Button Outlets and Actions
- •Implementing the Segmented Control Action
- •Implementing the Action Sheet and Alert
- •Conforming to the Action Sheet Delegate Method
- •Showing the Action Sheet
- •Spiffing Up the Button
- •Using the viewDidLoad Method
- •Control States
- •Stretchable Images
- •Crossing the Finish Line
- •The Mechanics of Autorotation
- •Points, Pixels, and the Retina Display
- •Autorotation Approaches
- •Handling Rotation Using Autosize Attributes
- •Configuring Supported Orientations
- •Specifying Rotation Support
- •Designing an Interface with Autosize Attributes
- •Using the Size Inspector’s Autosize Attributes
- •Setting the Buttons’ Autosize Attributes
- •Restructuring a View When Rotated
- •Creating and Connecting Outlets
- •Moving the Buttons on Rotation
- •Swapping Views
- •Designing the Two Views
- •Implementing the Swap
- •Changing Outlet Collections
- •Rotating Out of Here
- •Common Types of Multiview Apps
- •The Architecture of a Multiview Application
- •The Root Controller
- •Anatomy of a Content View
- •Building View Switcher
- •Creating Our View Controller and Nib Files
- •Modifying the App Delegate
- •Modifying BIDSwitchViewController.h
- •Adding a View Controller
- •Building a View with a Toolbar
- •Writing the Root View Controller
- •Implementing the Content Views
- •Animating the Transition
- •Switching Off
- •The Pickers Application
- •Delegates and Data Sources
- •Setting Up the Tab Bar Framework
- •Creating the Files
- •Adding the Root View Controller
- •Creating TabBarController.xib
- •The Initial Test Run
- •Implementing the Date Picker
- •Implementing the Single-Component Picker
- •Declaring Outlets and Actions
- •Building the View
- •Implementing the Controller As a Data Source and Delegate
- •Implementing a Multicomponent Picker
- •Declaring Outlets and Actions
- •Building the View
- •Implementing the Controller
- •Implementing Dependent Components
- •Creating a Simple Game with a Custom Picker
- •Writing the Controller Header File
- •Building the View
- •Adding Image Resources
- •Implementing the Controller
- •The spin Method
- •The viewDidLoad Method
- •Final Details
- •Linking in the Audio Toolbox Framework
- •Final Spin
- •Table View Basics
- •Table Views and Table View Cells
- •Grouped and Plain Tables
- •Implementing a Simple Table
- •Designing the View
- •Writing the Controller
- •Adding an Image
- •Using Table View Cell Styles
- •Setting the Indent Level
- •Handling Row Selection
- •Changing the Font Size and Row Height
- •Customizing Table View Cells
- •Adding Subviews to the Table View Cell
- •Creating a UITableViewCell Subclass
- •Adding New Cells
- •Implementing the Controller’s Code
- •Loading a UITableViewCell from a Nib
- •Designing the Table View Cell in Interface Builder
- •Using the New Table View Cell
- •Grouped and Indexed Sections
- •Building the View
- •Importing the Data
- •Implementing the Controller
- •Adding an Index
- •Implementing a Search Bar
- •Rethinking the Design
- •A Deep Mutable Copy
- •Updating the Controller Header File
- •Modifying the View
- •Modifying the Controller Implementation
- •Copying Data from allNames
- •Implementing the Search
- •Changes to viewDidLoad
- •Changes to Data Source Methods
- •Adding a Table View Delegate Method
- •Adding Search Bar Delegate Methods
- •Adding a Magnifying Glass to the Index
- •Adding the Special Value to the Keys Array
- •Suppressing the Section Header
- •Telling the Table View What to Do
- •Putting It All on the Table
- •Navigation Controller Basics
- •Stacky Goodness
- •A Stack of Controllers
- •Nav, a Hierarchical Application in Six Parts
- •Meet the Subcontrollers
- •The Disclosure Button View
- •The Checklist View
- •The Rows Control View
- •The Movable Rows View
- •The Deletable Rows View
- •The Editable Detail View
- •The Nav Application’s Skeleton
- •Creating the Top-Level View Controller
- •Setting Up the Navigation Controller
- •Adding the Images to the Project
- •First Subcontroller: The Disclosure Button View
- •Creating the Detail View
- •Modifying the Disclosure Button Controller
- •Adding a Disclosure Button Controller Instance
- •Second Subcontroller: The Checklist
- •Creating the Checklist View
- •Adding a Checklist Controller Instance
- •Third Subcontroller: Controls on Table Rows
- •Creating the Row Controls View
- •Adding a Rows Control Controller Instance
- •Fourth Subcontroller: Movable Rows
- •Creating the Movable Row View
- •Adding a Move Me Controller Instance
- •Fifth Subcontroller: Deletable Rows
- •Creating the Deletable Rows View
- •Adding a Delete Me Controller Instance
- •Sixth Subcontroller: An Editable Detail Pane
- •Creating the Data Model Object
- •Creating the Detail View List Controller
- •Creating the Detail View Controller
- •Adding an Editable Detail View Controller Instance
- •But There’s One More Thing. . .
- •Breaking the Tape
- •Creating a Simple Storyboard
- •Dynamic Prototype Cells
- •Dynamic Table Content, Storyboard-Style
- •Editing Prototype Cells
- •Good Old Table View Data Source
- •Will It Load?
- •Static Cells
- •Going Static
- •So Long, Good Old Table View Data Source
- •You Say Segue, I Say Segue
- •Creating Segue Navigator
- •Filling the Blank Slate
- •First Transition
- •A Slightly More Useful Task List
- •Viewing Task Details
- •Make More Segues, Please
- •Passing a Task from the List
- •Handling Task Details
- •Passing Back Details
- •Making the List Receive the Details
- •If Only We Could End with a Smooth Transition
- •Split Views and Popovers
- •Creating a SplitView Project
- •The Storyboard Defines the Structure
- •The Code Defines the Functionality
- •The App Delegate
- •The Master View Controller
- •The Detail View Controller
- •Here Come the Presidents
- •Creating Your Own Popover
- •iPad Wrap-Up
- •Getting to Know Your Settings Bundle
- •The AppSettings Application
- •Creating the Project
- •Working with the Settings Bundle
- •Adding a Settings Bundle to Our Project
- •Setting Up the Property List
- •Adding a Text Field Setting
- •Adding an Application Icon
- •Adding a Secure Text Field Setting
- •Adding a Multivalue Field
- •Adding a Toggle Switch Setting
- •Adding the Slider Setting
- •Adding Icons to the Settings Bundle
- •Adding a Child Settings View
- •Reading Settings in Our Application
- •Retrieving User Settings
- •Creating the Main View
- •Updating the Main View Controller
- •Registering Default Values
- •Changing Defaults from Our Application
- •Keeping It Real
- •Beam Me Up, Scotty
- •Your Application’s Sandbox
- •Getting the Documents Directory
- •Getting the tmp Directory
- •File-Saving Strategies
- •Single-File Persistence
- •Multiple-File Persistence
- •Using Property Lists
- •Property List Serialization
- •The First Version of the Persistence Application
- •Creating the Persistence Project
- •Designing the Persistence Application View
- •Editing the Persistence Classes
- •Archiving Model Objects
- •Conforming to NSCoding
- •Implementing NSCopying
- •Archiving and Unarchiving Data Objects
- •The Archiving Application
- •Implementing the BIDFourLines Class
- •Implementing the BIDViewController Class
- •Using iOS’s Embedded SQLite3
- •Creating or Opening the Database
- •Using Bind Variables
- •The SQLite3 Application
- •Linking to the SQLite3 Library
- •Modifying the Persistence View Controller
- •Using Core Data
- •Entities and Managed Objects
- •Key-Value Coding
- •Putting It All in Context
- •Creating New Managed Objects
- •Retrieving Managed Objects
- •The Core Data Application
- •Designing the Data Model
- •Creating the Persistence View and Controller
- •Persistence Rewarded
- •Managing Document Storage with UIDocument
- •Building TinyPix
- •Creating BIDTinyPixDocument
- •Code Master
- •Initial Storyboarding
- •Creating BIDTinyPixView
- •Storyboard Detailing
- •Adding iCloud Support
- •Creating a Provisioning Profile
- •Enabling iCloud Entitlements
- •How to Query
- •Save Where?
- •Storing Preferences on iCloud
- •What We Didn’t Cover
- •Grand Central Dispatch
- •Introducing SlowWorker
- •Threading Basics
- •Units of Work
- •GCD: Low-Level Queueing
- •Becoming a Blockhead
- •Improving SlowWorker
- •Don’t Forget That Main Thread
- •Giving Some Feedback
- •Concurrent Blocks
- •Background Processing
- •Application Life Cycle
- •State-Change Notifications
- •Creating State Lab
- •Exploring Execution States
- •Making Use of Execution State Changes
- •Handling the Inactive State
- •Handling the Background State
- •Removing Resources When Entering the Background
- •Saving State When Entering the Background
- •A Brief Journey to Yesteryear
- •Back to the Background
- •Requesting More Backgrounding Time
- •Grand Central Dispatch, Over and Out
- •Two Views of a Graphical World
- •The Quartz 2D Approach to Drawing
- •Quartz 2D’s Graphics Contexts
- •The Coordinate System
- •Specifying Colors
- •A Bit of Color Theory for Your iOS Device’s Display
- •Other Color Models
- •Color Convenience Methods
- •Drawing Images in Context
- •Drawing Shapes: Polygons, Lines, and Curves
- •The QuartzFun Application
- •Setting Up the QuartzFun Application
- •Creating a Random Color
- •Defining Application Constants
- •Implementing the QuartzFunView Skeleton
- •Creating and Connecting Outlets and Actions
- •Implementing the Action Methods
- •Adding Quartz 2D Drawing Code
- •Drawing the Line
- •Drawing the Rectangle and Ellipse
- •Drawing the Image
- •Optimizing the QuartzFun Application
- •The GLFun Application
- •Setting Up the GLFun Application
- •Creating BIDGLFunView
- •Updating BIDViewController
- •Updating the Nib
- •Finishing GLFun
- •Drawing to a Close
- •Multitouch Terminology
- •The Responder Chain
- •Responding to Events
- •Forwarding an Event: Keeping the Responder Chain Alive
- •The Multitouch Architecture
- •The Four Touch Notification Methods
- •The TouchExplorer Application
- •The Swipes Application
- •Automatic Gesture Recognition
- •Implementing Multiple Swipes
- •Detecting Multiple Taps
- •Detecting Pinches
- •Defining Custom Gestures
- •The CheckPlease Application
- •The CheckPlease Touch Methods
- •Garçon? Check, Please!
- •The Location Manager
- •Setting the Desired Accuracy
- •Setting the Distance Filter
- •Starting the Location Manager
- •Using the Location Manager Wisely
- •The Location Manager Delegate
- •Getting Location Updates
- •Getting Latitude and Longitude Using CLLocation
- •Error Notifications
- •Trying Out Core Location
- •Updating Location Manager
- •Determining Distance Traveled
- •Wherever You Go, There You Are
- •Accelerometer Physics
- •Don’t Forget Rotation
- •Core Motion and the Motion Manager
- •Event-Based Motion
- •Proactive Motion Access
- •Accelerometer Results
- •Detecting Shakes
- •Baked-In Shaking
- •Shake and Break
- •Accelerometer As Directional Controller
- •Rolling Marbles
- •Writing the Ball View
- •Calculating Ball Movement
- •Rolling On
- •Using the Image Picker and UIImagePickerController
- •Implementing the Image Picker Controller Delegate
- •Road Testing the Camera and Library
- •Designing the Interface
- •Implementing the Camera View Controller
- •It’s a Snap!
- •Localization Architecture
- •Strings Files
- •What’s in a Strings File?
- •The Localized String Macro
- •Real-World iOS: Localizing Your Application
- •Setting Up LocalizeMe
- •Trying Out LocalizeMe
- •Localizing the Nib
- •Localizing an Image
- •Generating and Localizing a Strings File
- •Localizing the App Display Name
- •Auf Wiedersehen
- •Apple’s Documentation
- •Mailing Lists
- •Discussion Forums
- •Web Sites
- •Blogs
- •Conferences
- •Follow the Authors
- •Farewell
- •Index
52 |
CHAPTER 3: Handling Basic Interaction |
code harder to read. We’re going to do our future selves a favor and delete what we don’t need.
Delete all the methods except for viewDidUnload. When you’re finished, your implementation should look like this:
#import "BIDViewController.h" @implementation BIDViewController
- (void)viewDidUnload
{
[super viewDidUnload];
//Release any retained subviews of the main view.
//e.g. self.myOutlet = nil;
}
@end
That’s much simpler, huh? Don’t worry about all those methods you just deleted. You’ll be introduced to most of them throughout the course of the book.
The method we’ve left in is one that every view controller with outlets should implement. When a view is unloaded, which can happen when the system needs to make additional memory available, it’s important to nil out your outlets. If you don’t, the memory used by those outlets will not be released. Fortunately, all we need to do is leave this empty implementation in place, and Xcode will take care of releasing any outlets we create, as you’ll see in this chapter.
Designing the User Interface
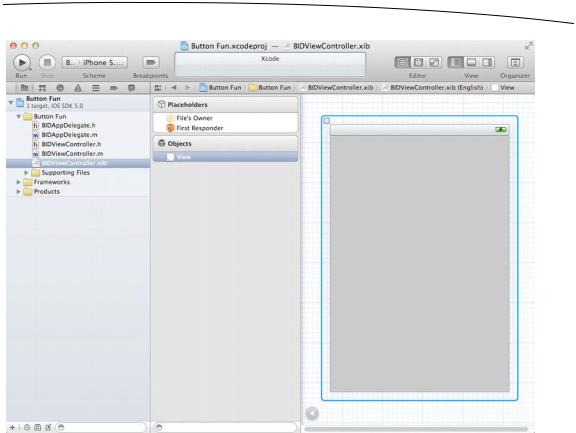
Make sure you save the changes you just made, and then single-click BIDViewController.xib to open your application’s view in Xcode’s Interface Builder (see Figure 3–4). As you’ll remember from the previous chapter, the gray window that shows up in the editor represents your application’s one and only view. If you look back at Figure 3–1, you can see that we need to add two buttons and a label to this view.
Let’s take a second to think about our application. We’re going to add two buttons and a label to our user interface, and that process is very similar to what we did in the previous chapter. However, we’re also going to need outlets and actions to make our application interactive.
The buttons will need to each trigger an action method on our controller. We could choose to make each button call a different action method, but since they’re going to do essentially the same task (update the label’s text), we will need to call the same action method. We’ll differentiate between the two buttons using that sender argument we discussed earlier in the section on actions. In addition to the action method, we’ll also need an outlet connected to the label so that we can change the text that the label displays.
www.it-ebooks.info
CHAPTER 3: Handling Basic Interaction |
53 |
Figure 3–4. BIDViewController.xib open for editing in Xcode’s Interface Builder
Let’s add the buttons first, and then place the label. We’ll create the corresponding actions and outlets as we design our interface. We could also manually declare our actions and outlets, and then connect our user interface items to them, but why do extra work when Xcode will do it for us?
Adding the Buttons and Action Method
Our first order of business is to add two buttons to our user interface. We’ll then have Xcode create an empty action method for us and connect both buttons to that action method. This will cause the buttons, when tapped by the user, to call that action method. Any code we place in that action method will be executed when the user taps the button.
Select View Utilities Show Object Library or press ^ 3 to open the object library. Type UIButton into the object library’s search box (you actually need to type only the first four characters, UIBu, to narrow down the list). Once you’re finished typing, only one item should appear in the object library: Round Rect Button (see Figure 3–5).
www.it-ebooks.info
54 |
CHAPTER 3: Handling Basic Interaction |
Figure 3–5. The Round Rect Button as it appears in the object library
Drag Round Rect Button from the library and drop it on the gray view. This will add a button to your application’s view. Place the button along the left side of the view, using the blue guidelines that appear to place it the appropriate distance from the left edge. For vertical placement, use the blue guideline to place the button halfway down in the view. You can use Figure 3–1 as a placement guide, if that helps.
NOTE: The little, blue guidelines that appear as you move objects around in Interface Builder are there to help you stick to the iOS Human Interface Guidelines (usually referred to as “the HIG”). Apple provides the HIG for people designing iPhone and iPad applications. The HIG tells you how you should—and shouldn’t—design your user interface. You really should read it, because it contains valuable information that every iOS developer needs to know. You’ll find it at http://developer.apple.com/iphone/library/documentation/UserExperience/ Conceptual/MobileHIG/.
Double-click the newly added button. This will allow you to edit the button’s title. Give this button a title of Left.
Now, it’s time for some Xcode 4 magic. Select View Assistant Editor Show Assistant Editor or press to open the assistant editor. You can also show and hide the assistant editor by clicking the middle editor button in the collection of seven buttons on the upper-right side of the project window (see Figure 3–6).
Figure 3–6. The Show the Assistant editor toggle button
Unless you specifically request otherwise (see the options in the Assistant Editor menu), the assistant editor will appear to the right of the editing pane. The left side will continue
www.it-ebooks.info
CHAPTER 3: Handling Basic Interaction |
55 |
to show Interface Builder, but the right will display BIDViewController.h, which is the header file for the view controller that “owns” this nib.
TIP: After opening the assistant editor, you may need to resize your window to have enough room to work. If you’re on a smaller screen, like the one on a MacBook Air, you might need to close the utility view and/or project navigator to give yourself enough room to use the assistant editor effectively. You can do this easily using the three view buttons in the upper-right side of
the project window (see Figure 3–6).
Remember the File’s Owner icon we discussed in the previous chapter? The object that loads a nib is considered its owner, and with the case of nibs like this one that define the user interface for one of an application’s views, the owner of the nib is the corresponding view controller class. Because our view controller class is the file’s owner, the assistant editor knows to show us the header of the view controller class, which is the most likely place for us to connect actions and outlets.
As you saw earlier, there’s really not much in BIDViewController.h. It’s just an empty UIViewController subclass. But it won’t be an empty subclass for long!
We’re now going to ask Xcode to automatically create a new action method for us and associate that action with the button we just created.
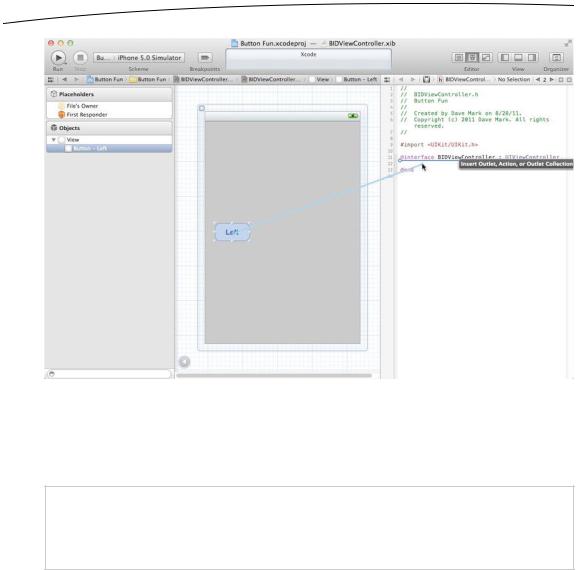
To do this, begin by clicking your new button so it is selected. Now, hold down the control key on your keyboard, and then click and drag from the button over to the source code in the assistant editor. You should see a blue line running from the button to your cursor (see Figure 3–7). This blue line is how we connect objects in nibs to code or other objects.
Tip. You can drag that blue line to anything you want to connect to your button: to the header file in the assistant editor, to the File’s Owner icon, to any of the other icons on the left side of the
editing pane, or even to other objects in the nib.
www.it-ebooks.info
56 |
CHAPTER 3: Handling Basic Interaction |
Figure 3–7. Control-dragging to source code will give you the option to create an outlet, action, or outlet collection.
If you move your cursor so it’s between the @interface and @end keywords (as shown in Figure 3–7), a gray box will appear, letting you know that releasing the mouse button will insert an outlet, an action, or an outlet collection for you.
NOTE: We make use of actions and outlets in this book, but we do not use outlet collections. Outlet collections allow you to connect multiple objects of the same kind to a single NSArray property, rather than creating a separate property for each object.
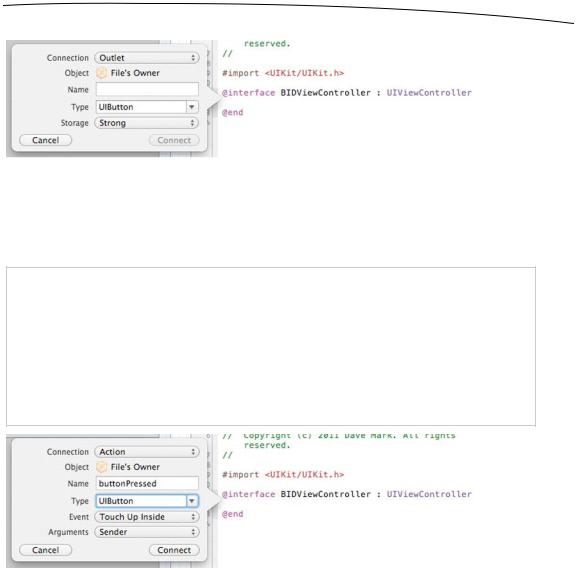
To finish this connection, release your mouse button, and a floating popup will appear, like the one shown in Figure 3–8. This window lets you customize your new action. In the window, click the popup menu labeled Connection, and change the selection from Outlet to Action. This tells Xcode that we want to create an action instead of an outlet.
www.it-ebooks.info
CHAPTER 3: Handling Basic Interaction |
57 |
Figure 3–8. The floating popup that appears after you control-drag to source code
The popup will change to look like Figure 3–9. In the Name field, type buttonPressed. When you’re finished, do not hit return. Pressing return would finalize our outlet, and we’re not quite ready to do that. Instead, press tab to move to the Type field and type in UIButton, replacing the default value of id.
NOTE: As you probably remember, an id is a generic pointer that can point to any Objective-C object. We could leave this as id, and it would work fine, but if we change it to the class we
expect to call the method, the compiler can warn us if we try to do this from the wrong type of object. There are times when you’ll want the flexibility to be able to call the same action method from different types of controls, and in those cases, you would want to leave this set to id. In our
case, we’re only going to call this method from buttons, so we’re letting the Xcode and LLVM
know that. Now, it can warn us if we unintentionally try to connect something else to it.
Figure 3–9. Changing the connection type to Action changes the appearance of the popup.
There are two fields below Type, which we will leave at their default values. The Event field lets you specify when the method is called. The default value of Touch Up Inside fires when the user lifts a finger off the screen if, and only if, the finger is still on the button. This is the standard event to use for buttons. This gives the user a chance to reconsider. If the user moves a finger off the button before lifting it off the screen, the method won’t fire.
The Arguments field lets you choose between the three different method signatures that can be used for action methods. We want the sender argument so that we can tell which button called the method. That’s the default, so we just leave it as is.
www.it-ebooks.info
58 |
CHAPTER 3: Handling Basic Interaction |
Hit the return key or click the Connect button, and Xcode will insert the action method for you. Your BIDViewController.h file should now look like this:
#import <UIKit/UIKit.h>
@interface BIDViewController : UIViewController - (IBAction)buttonPressed:(id)sender;
@end
NOTE: Over time, Apple will tweak both Xcode and the code templates we’ve been using. When that happens, you may need to make some adjustments to our step-by-step instructions. In the current example, we would expect to see UIButton instead of id in the declaration of the buttonPressed parameter. Likely, this will eventually be tweaked, and you’ll need to make a change or two to this approach. But this is no big deal; that’s the nature of the beast.
Xcode has now added a method declaration to your class’s header file for you. Singleclick BIDViewController.m to look at the implementation file, and you’ll see that it has also added a method stub for you.
- (IBAction)buttonPressed:(id)sender {
}
In a few moments, we’ll come back here to write the code that needs to run when the user taps either button. In addition to creating the method declaration and implementation, Xcode has also connected that button to this action method and stored that information in the nib file. That means we don’t need to do anything else to make that button call this method when our application runs.
Go back to BIDViewController.xib and drag out another button, this time placing the button on the right side of the screen. After placing it, double-click it and change its name to Right. The blue lines will pop up to help you align it with the right margin, as you saw before, and they will also help you align the button vertically with the other button.
TIP: Instead of dragging a new object out from the library, you could hold down the option key and drag the original object (the Left button in this example) over. Holding down the option key tells Interface Builder to make a copy of the object you drag.
This time, we don’t want to create a new action method. Instead, we want to connect this button to the existing one that Xcode created for us a moment ago. How do we do that? We do it pretty much the same way as we did for the first button.
After changing the name of the button, control-click the new button and drag toward your header file again. This time, as your cursor gets near the declaration of buttonPressed:, that method should highlight, and you’ll get a gray popup saying Connect Action (see Figure 3–10). When you see that popup, release the mouse button.
www.it-ebooks.info