


Chapter 2
Appeasing the Tiki Gods
As you’re probably well aware, it has become something of a tradition to call the first project in any book on programming “Hello, World.” We considered breaking this tradition, but were scared that the tiki gods would inflict some painful retribution on us for such a gross breach of etiquette. So, let’s do it by the book, shall we?
In this chapter, we’re going to use Xcode to create a small iOS application that will display the text “Hello, World!” We’ll look at what’s involved in creating an iOS application project in Xcode, work through the specifics of using Xcode’s Interface Builder to design our application’s user interface, and then run our application on the iOS simulator. After that, we’ll give our application an icon to make it feel more like a real iOS application.
We have a lot to do here, so let’s get going.
Setting Up Your Project in Xcode
By now, you should have Xcode and the iOS SDK installed on your machine. You should also download the book project archive from the book web site (http://www.iphonedevbook.com/forum/forum.php). The book forums are a great place to download the latest book source code, get your questions answered, and meet up with like-minded people. Of course, you can also find the source code on the Apress web site.
NOTE: Even though you have the complete set of project files at your disposal in this book’s
project archive, you’ll get more out of the book if you create each project by hand, rather than simply running the version you downloaded. By doing that, you’ll gain familiarity and expertise working with the various application development tools.
There’s no substitute for actually creating applications; software development is not a spectator
sport.
D.Mark et al., Beginning iOS 5 Development
©Dave Mark, Jack Nutting, Jeff LaMarche 2011
www.it-ebooks.info
14 |
CHAPTER 2: Appeasing the Tiki Gods |
The project we’re going to build in this chapter is contained in the 02 Hello World folder of the project archive.
Before we can start, we need to launch Xcode. Xcode is the tool that we’ll use to do most of what we do in this book, but it’s not installed in the /Applications folder as with most Mac applications. If you’ve already installed the developer tools as outlined in the previous chapter, you’ll find Xcode located in /Developer/Applications. You’ll be using Xcode a lot, so you might want to consider dragging it to your dock so you’ll have ready access to it.
If this is your first time using Xcode, don’t worry; we’ll walk you through every step involved in creating a new project. Apple recently released a new, completely rewritten version of Xcode that’s quite a bit different than the previous version. If you’re already an old hand but haven’t worked with Xcode 4, you will find that quite a bit has changed.
When you first launch Xcode, you’ll be presented with a welcome window like the one shown in Figure 2–1. From here, you can choose to create a new project, connect to a version-control system to check out an existing project, or select from a list of recently opened projects. The welcome window also contains links to iOS and Mac OS X technical documentation, tutorial videos, news, sample code, and other useful items. All of this functionality can be accessed from the Xcode menu as well, but this window gives you a nice starting point, covering some of the most common tasks you’re likely to want to do after launching Xcode. If you feel like poking through the information here for a few minutes, by all means, go right ahead. When you’re finished, close the window, and we’ll proceed. If you would rather not see this window in the future, just uncheck the
Show this window when Xcode launches checkbox before closing it.
Figure 2–1. The Xcode welcome window
www.it-ebooks.info
CHAPTER 2: Appeasing the Tiki Gods |
15 |
NOTE: If you have an iPhone, iPad, or iPod touch connected to your machine, you might see a message when you first launch Xcode asking whether you want to use that device for development. For now, click the Ignore button. Alternatively, the Organizer window, which shows
(among other things) the devices that have been synchronized with your computer, might appear. In that case, just close the Organizer window. If you choose to join the paid iOS Developer Program, you will gain access to a program portal that will tell you how to use your iOS device for
development and testing.
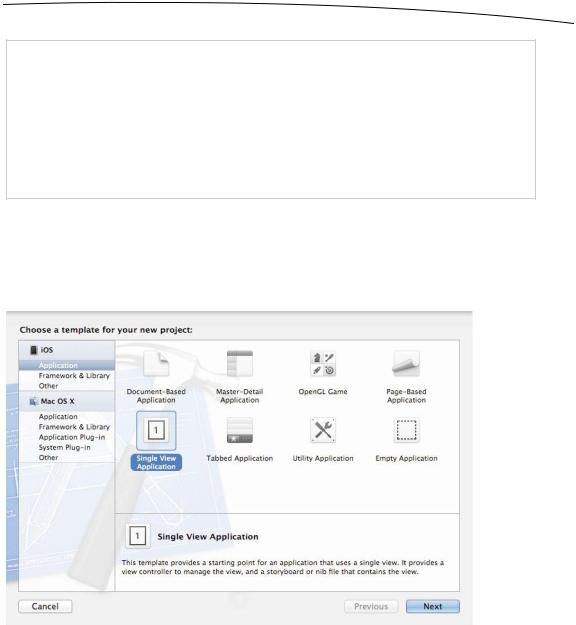
Create a new project by selecting New New Project... from the File menu (or by pressingN). A new project window will open, and will show you the project template selection sheet (see Figure 2–2). From this sheet, you’ll choose a project template to use as a starting point for building your application. The pane on the left side of the sheet is divided into two main sections: iOS and Mac OS X. Since we’re building an iOS application, select Application in the iOS section to reveal the iOS application templates.
Figure 2–2. The project template selection sheet lets you select from various templates when creating a new project.
Each of the icons shown in the upper-right pane in Figure 2–2 represents a separate project template that can be used as a starting point for your iOS applications. The icon labeled Single View Application is the simplest template and the one we’ll be using for the first several chapters. The other templates provide additional code and/or resources needed to create common iPhone and iPad application interfaces, as you’ll see in later chapters.
www.it-ebooks.info
16 CHAPTER 2: Appeasing the Tiki Gods
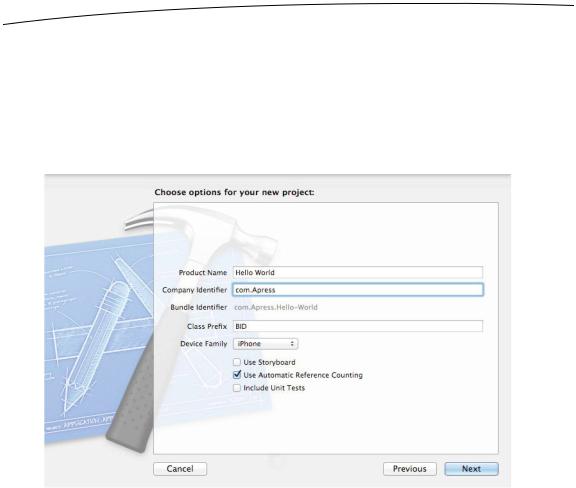
Click the Single View Application icon (as in Figure 2–2), and then click the Next button. You’ll see the project options sheet, which should look like Figure 2–3. On this sheet, you need to specify the Product Name and Company Identifier for your project. Xcode will combine the two of those to generate a unique Bundle Identifier for your app. Name your product Hello World, and then enter com.apress in the Company Identifier field, as shown in Figure 2–3. Later, after you’ve signed up for the developer program and learned about provisioning profiles, you’ll want to use your own company identifier. We’ll talk more about the bundle identifier later in the chapter.
Figure 2–3. Selecting a product name and company identifier for your project. Use these settings for now.
The next text box is labeled Class Prefix, and we should populate this with a sequence of at least three capital letters. These characters will be added to the beginning of the name of all classes that Xcode creates for us. This is done to avoid naming conflicts with Apple (who reserves the use of all two-letter prefixes) and other developers whose code we might use. In Objective-C, having more than one class with the same name will prevent your application from being built.
For the projects in the book, we’re going to use the prefix BID, which stands for Beginning iPhone Development. While there are likely to be many classes named, for example, ViewController, far fewer classes are likely to be named BIDMyViewController, which means a lot less chance of conflicts.
We also need to specify the Device Family. In other words, Xcode wants to know if we’re building an app for the iPhone and iPod touch, if we’re building an app for the iPad, or if we’re building a universal application that will run on all iOS devices. Select iPhone for the Device Family if it’s not already selected. This tells Xcode that we’ll be targeting this particular app at the iPhone and iPod touch, which have the same screen size. For the
www.it-ebooks.info

CHAPTER 2: Appeasing the Tiki Gods |
17 |
first part of the book, we’ll be using the iPhone device family, but don’t worry—we’ll cover the iPad also.
There are three checkboxes on this sheet. You should check the middle option, Use Automatic Reference Counting, but uncheck the other two. Automatic Reference Counting (ARC) is a new feature of the Objective-C language, introduced with iOS 5, that makes your life much easier. We’ll talk briefly about ARC in the next chapter.
The Use Storyboard option will be covered starting in Chapter 10. The other option— Include Unit Tests—will set up your project in such a way that you can add special pieces of code to your project, called unit tests, which are not part of your application, but run every time you create your application to test certain functionality. Unit tests allow you to identify when a change made to your code breaks something that was previously working. Although it can be a valuable tool, we won’t be using automated unit testing in this book, so you can leave its box unchecked.
Click Next again, and you’ll be asked where to save your new project using a standard save sheet, as shown in Figure 2–4. If you haven’t already done so, jump over to the Finder and create a new master directory for these book projects, and then return to Xcode and navigate into that directory. Before you click the Create button, be sure to uncheck the Create local git repository for this project checkbox. With the Source Control checkbox unchecked, create the new project by clicking the Create button.
NOTE: A source control repository is a tool used to keep track of changes made to an application’s source code and resources while it’s being built. It also facilitates multiple
developers working on the same application at the same time by providing tools to resolve conflicts when they arise. We won’t be using source control in this book, so you can leave its box
unchecked.
www.it-ebooks.info