- •Contents at a Glance
- •About the Authors
- •About the Technical Reviewer
- •Acknowledgments
- •Preface
- •What This Book Is
- •What You Need
- •Developer Options
- •What You Need to Know
- •What’s Different About Coding for iOS?
- •Only One Active Application
- •Only One Window
- •Limited Access
- •Limited Response Time
- •Limited Screen Size
- •Limited System Resources
- •No Garbage Collection, but…
- •Some New Stuff
- •A Different Approach
- •What’s in This Book
- •What’s New in This Update?
- •Are You Ready?
- •Setting Up Your Project in Xcode
- •The Xcode Workspace Window
- •The Toolbar
- •The Navigator View
- •The Jump Bar
- •The Utility Pane
- •Interface Builder
- •New Compiler and Debugger
- •A Closer Look at Our Project
- •Introducing Xcode’s Interface Builder
- •What’s in the Nib File?
- •The Library
- •Adding a Label to the View
- •Changing Attributes
- •Some iPhone Polish—Finishing Touches
- •Bring It on Home
- •The Model-View-Controller Paradigm
- •Creating Our Project
- •Looking at the View Controller
- •Understanding Outlets and Actions
- •Outlets
- •Actions
- •Cleaning Up the View Controller
- •Designing the User Interface
- •Adding the Buttons and Action Method
- •Adding the Label and Outlet
- •Writing the Action Method
- •Trying It Out
- •Looking at the Application Delegate
- •Bring It on Home
- •A Screen Full of Controls
- •Active, Static, and Passive Controls
- •Creating the Application
- •Implementing the Image View and Text Fields
- •Adding the Image View
- •Resizing the Image View
- •Setting View Attributes
- •The Mode Attribute
- •Interaction Checkboxes
- •The Alpha Value
- •Background
- •Drawing Checkboxes
- •Stretching
- •Adding the Text Fields
- •Text Field Inspector Settings
- •Setting the Attributes for the Second Text Field
- •Creating and Connecting Outlets
- •Closing the Keyboard
- •Closing the Keyboard When Done Is Tapped
- •Touching the Background to Close the Keyboard
- •Adding the Slider and Label
- •Creating and Connecting the Actions and Outlets
- •Implementing the Action Method
- •Adding Two Labeled Switches
- •Connecting and Creating Outlets and Actions
- •Implementing the Switch Actions
- •Adding the Button
- •Connecting and Creating the Button Outlets and Actions
- •Implementing the Segmented Control Action
- •Implementing the Action Sheet and Alert
- •Conforming to the Action Sheet Delegate Method
- •Showing the Action Sheet
- •Spiffing Up the Button
- •Using the viewDidLoad Method
- •Control States
- •Stretchable Images
- •Crossing the Finish Line
- •The Mechanics of Autorotation
- •Points, Pixels, and the Retina Display
- •Autorotation Approaches
- •Handling Rotation Using Autosize Attributes
- •Configuring Supported Orientations
- •Specifying Rotation Support
- •Designing an Interface with Autosize Attributes
- •Using the Size Inspector’s Autosize Attributes
- •Setting the Buttons’ Autosize Attributes
- •Restructuring a View When Rotated
- •Creating and Connecting Outlets
- •Moving the Buttons on Rotation
- •Swapping Views
- •Designing the Two Views
- •Implementing the Swap
- •Changing Outlet Collections
- •Rotating Out of Here
- •Common Types of Multiview Apps
- •The Architecture of a Multiview Application
- •The Root Controller
- •Anatomy of a Content View
- •Building View Switcher
- •Creating Our View Controller and Nib Files
- •Modifying the App Delegate
- •Modifying BIDSwitchViewController.h
- •Adding a View Controller
- •Building a View with a Toolbar
- •Writing the Root View Controller
- •Implementing the Content Views
- •Animating the Transition
- •Switching Off
- •The Pickers Application
- •Delegates and Data Sources
- •Setting Up the Tab Bar Framework
- •Creating the Files
- •Adding the Root View Controller
- •Creating TabBarController.xib
- •The Initial Test Run
- •Implementing the Date Picker
- •Implementing the Single-Component Picker
- •Declaring Outlets and Actions
- •Building the View
- •Implementing the Controller As a Data Source and Delegate
- •Implementing a Multicomponent Picker
- •Declaring Outlets and Actions
- •Building the View
- •Implementing the Controller
- •Implementing Dependent Components
- •Creating a Simple Game with a Custom Picker
- •Writing the Controller Header File
- •Building the View
- •Adding Image Resources
- •Implementing the Controller
- •The spin Method
- •The viewDidLoad Method
- •Final Details
- •Linking in the Audio Toolbox Framework
- •Final Spin
- •Table View Basics
- •Table Views and Table View Cells
- •Grouped and Plain Tables
- •Implementing a Simple Table
- •Designing the View
- •Writing the Controller
- •Adding an Image
- •Using Table View Cell Styles
- •Setting the Indent Level
- •Handling Row Selection
- •Changing the Font Size and Row Height
- •Customizing Table View Cells
- •Adding Subviews to the Table View Cell
- •Creating a UITableViewCell Subclass
- •Adding New Cells
- •Implementing the Controller’s Code
- •Loading a UITableViewCell from a Nib
- •Designing the Table View Cell in Interface Builder
- •Using the New Table View Cell
- •Grouped and Indexed Sections
- •Building the View
- •Importing the Data
- •Implementing the Controller
- •Adding an Index
- •Implementing a Search Bar
- •Rethinking the Design
- •A Deep Mutable Copy
- •Updating the Controller Header File
- •Modifying the View
- •Modifying the Controller Implementation
- •Copying Data from allNames
- •Implementing the Search
- •Changes to viewDidLoad
- •Changes to Data Source Methods
- •Adding a Table View Delegate Method
- •Adding Search Bar Delegate Methods
- •Adding a Magnifying Glass to the Index
- •Adding the Special Value to the Keys Array
- •Suppressing the Section Header
- •Telling the Table View What to Do
- •Putting It All on the Table
- •Navigation Controller Basics
- •Stacky Goodness
- •A Stack of Controllers
- •Nav, a Hierarchical Application in Six Parts
- •Meet the Subcontrollers
- •The Disclosure Button View
- •The Checklist View
- •The Rows Control View
- •The Movable Rows View
- •The Deletable Rows View
- •The Editable Detail View
- •The Nav Application’s Skeleton
- •Creating the Top-Level View Controller
- •Setting Up the Navigation Controller
- •Adding the Images to the Project
- •First Subcontroller: The Disclosure Button View
- •Creating the Detail View
- •Modifying the Disclosure Button Controller
- •Adding a Disclosure Button Controller Instance
- •Second Subcontroller: The Checklist
- •Creating the Checklist View
- •Adding a Checklist Controller Instance
- •Third Subcontroller: Controls on Table Rows
- •Creating the Row Controls View
- •Adding a Rows Control Controller Instance
- •Fourth Subcontroller: Movable Rows
- •Creating the Movable Row View
- •Adding a Move Me Controller Instance
- •Fifth Subcontroller: Deletable Rows
- •Creating the Deletable Rows View
- •Adding a Delete Me Controller Instance
- •Sixth Subcontroller: An Editable Detail Pane
- •Creating the Data Model Object
- •Creating the Detail View List Controller
- •Creating the Detail View Controller
- •Adding an Editable Detail View Controller Instance
- •But There’s One More Thing. . .
- •Breaking the Tape
- •Creating a Simple Storyboard
- •Dynamic Prototype Cells
- •Dynamic Table Content, Storyboard-Style
- •Editing Prototype Cells
- •Good Old Table View Data Source
- •Will It Load?
- •Static Cells
- •Going Static
- •So Long, Good Old Table View Data Source
- •You Say Segue, I Say Segue
- •Creating Segue Navigator
- •Filling the Blank Slate
- •First Transition
- •A Slightly More Useful Task List
- •Viewing Task Details
- •Make More Segues, Please
- •Passing a Task from the List
- •Handling Task Details
- •Passing Back Details
- •Making the List Receive the Details
- •If Only We Could End with a Smooth Transition
- •Split Views and Popovers
- •Creating a SplitView Project
- •The Storyboard Defines the Structure
- •The Code Defines the Functionality
- •The App Delegate
- •The Master View Controller
- •The Detail View Controller
- •Here Come the Presidents
- •Creating Your Own Popover
- •iPad Wrap-Up
- •Getting to Know Your Settings Bundle
- •The AppSettings Application
- •Creating the Project
- •Working with the Settings Bundle
- •Adding a Settings Bundle to Our Project
- •Setting Up the Property List
- •Adding a Text Field Setting
- •Adding an Application Icon
- •Adding a Secure Text Field Setting
- •Adding a Multivalue Field
- •Adding a Toggle Switch Setting
- •Adding the Slider Setting
- •Adding Icons to the Settings Bundle
- •Adding a Child Settings View
- •Reading Settings in Our Application
- •Retrieving User Settings
- •Creating the Main View
- •Updating the Main View Controller
- •Registering Default Values
- •Changing Defaults from Our Application
- •Keeping It Real
- •Beam Me Up, Scotty
- •Your Application’s Sandbox
- •Getting the Documents Directory
- •Getting the tmp Directory
- •File-Saving Strategies
- •Single-File Persistence
- •Multiple-File Persistence
- •Using Property Lists
- •Property List Serialization
- •The First Version of the Persistence Application
- •Creating the Persistence Project
- •Designing the Persistence Application View
- •Editing the Persistence Classes
- •Archiving Model Objects
- •Conforming to NSCoding
- •Implementing NSCopying
- •Archiving and Unarchiving Data Objects
- •The Archiving Application
- •Implementing the BIDFourLines Class
- •Implementing the BIDViewController Class
- •Using iOS’s Embedded SQLite3
- •Creating or Opening the Database
- •Using Bind Variables
- •The SQLite3 Application
- •Linking to the SQLite3 Library
- •Modifying the Persistence View Controller
- •Using Core Data
- •Entities and Managed Objects
- •Key-Value Coding
- •Putting It All in Context
- •Creating New Managed Objects
- •Retrieving Managed Objects
- •The Core Data Application
- •Designing the Data Model
- •Creating the Persistence View and Controller
- •Persistence Rewarded
- •Managing Document Storage with UIDocument
- •Building TinyPix
- •Creating BIDTinyPixDocument
- •Code Master
- •Initial Storyboarding
- •Creating BIDTinyPixView
- •Storyboard Detailing
- •Adding iCloud Support
- •Creating a Provisioning Profile
- •Enabling iCloud Entitlements
- •How to Query
- •Save Where?
- •Storing Preferences on iCloud
- •What We Didn’t Cover
- •Grand Central Dispatch
- •Introducing SlowWorker
- •Threading Basics
- •Units of Work
- •GCD: Low-Level Queueing
- •Becoming a Blockhead
- •Improving SlowWorker
- •Don’t Forget That Main Thread
- •Giving Some Feedback
- •Concurrent Blocks
- •Background Processing
- •Application Life Cycle
- •State-Change Notifications
- •Creating State Lab
- •Exploring Execution States
- •Making Use of Execution State Changes
- •Handling the Inactive State
- •Handling the Background State
- •Removing Resources When Entering the Background
- •Saving State When Entering the Background
- •A Brief Journey to Yesteryear
- •Back to the Background
- •Requesting More Backgrounding Time
- •Grand Central Dispatch, Over and Out
- •Two Views of a Graphical World
- •The Quartz 2D Approach to Drawing
- •Quartz 2D’s Graphics Contexts
- •The Coordinate System
- •Specifying Colors
- •A Bit of Color Theory for Your iOS Device’s Display
- •Other Color Models
- •Color Convenience Methods
- •Drawing Images in Context
- •Drawing Shapes: Polygons, Lines, and Curves
- •The QuartzFun Application
- •Setting Up the QuartzFun Application
- •Creating a Random Color
- •Defining Application Constants
- •Implementing the QuartzFunView Skeleton
- •Creating and Connecting Outlets and Actions
- •Implementing the Action Methods
- •Adding Quartz 2D Drawing Code
- •Drawing the Line
- •Drawing the Rectangle and Ellipse
- •Drawing the Image
- •Optimizing the QuartzFun Application
- •The GLFun Application
- •Setting Up the GLFun Application
- •Creating BIDGLFunView
- •Updating BIDViewController
- •Updating the Nib
- •Finishing GLFun
- •Drawing to a Close
- •Multitouch Terminology
- •The Responder Chain
- •Responding to Events
- •Forwarding an Event: Keeping the Responder Chain Alive
- •The Multitouch Architecture
- •The Four Touch Notification Methods
- •The TouchExplorer Application
- •The Swipes Application
- •Automatic Gesture Recognition
- •Implementing Multiple Swipes
- •Detecting Multiple Taps
- •Detecting Pinches
- •Defining Custom Gestures
- •The CheckPlease Application
- •The CheckPlease Touch Methods
- •Garçon? Check, Please!
- •The Location Manager
- •Setting the Desired Accuracy
- •Setting the Distance Filter
- •Starting the Location Manager
- •Using the Location Manager Wisely
- •The Location Manager Delegate
- •Getting Location Updates
- •Getting Latitude and Longitude Using CLLocation
- •Error Notifications
- •Trying Out Core Location
- •Updating Location Manager
- •Determining Distance Traveled
- •Wherever You Go, There You Are
- •Accelerometer Physics
- •Don’t Forget Rotation
- •Core Motion and the Motion Manager
- •Event-Based Motion
- •Proactive Motion Access
- •Accelerometer Results
- •Detecting Shakes
- •Baked-In Shaking
- •Shake and Break
- •Accelerometer As Directional Controller
- •Rolling Marbles
- •Writing the Ball View
- •Calculating Ball Movement
- •Rolling On
- •Using the Image Picker and UIImagePickerController
- •Implementing the Image Picker Controller Delegate
- •Road Testing the Camera and Library
- •Designing the Interface
- •Implementing the Camera View Controller
- •It’s a Snap!
- •Localization Architecture
- •Strings Files
- •What’s in a Strings File?
- •The Localized String Macro
- •Real-World iOS: Localizing Your Application
- •Setting Up LocalizeMe
- •Trying Out LocalizeMe
- •Localizing the Nib
- •Localizing an Image
- •Generating and Localizing a Strings File
- •Localizing the App Display Name
- •Auf Wiedersehen
- •Apple’s Documentation
- •Mailing Lists
- •Discussion Forums
- •Web Sites
- •Blogs
- •Conferences
- •Follow the Authors
- •Farewell
- •Index
74 |
CHAPTER 4: More User Interface Fun |
Now that you’ve created your project, let’s get the image we’ll use in our image view. The image must be imported into Xcode before it will be available for use inside Interface Builder, so we’ll import it now. You can use the image named apress_logo.png in the project archives in the 04 - Control Fun folder, or you can use an image of your own choosing. If you use your own image, make sure that it is a .png image sized correctly for the space available. It should be fewer than 100 pixels tall and a maximum of 300 pixels wide so that it can fit comfortably at the top of the view without being resized.
Add the image to the Supporting Files folder of your project by dragging the image from the Finder to the Supporting Files folder in the project navigator. When prompted, check the checkbox that says Copy items into destination group’s folder (if needed), and then click Finish.
Implementing the Image View and Text Fields
With the image added to your project, your next step is to implement the five interface elements at the top of the application’s screen: the image view, the two text fields, and the two labels (see Figure 4–5).
Figure 4–5. The image view, labels, and text fields we will implement first
Adding the Image View
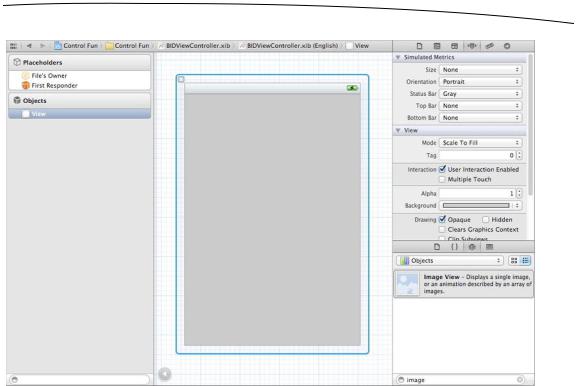
In the project navigator, click BIDViewController.xib to open the file in Interface Builder, Xcode’s nib editor. You’ll see the familiar graph paper background and single gray view where you can lay out your application’s interface.
If the object library is not open, select View Utilities Show Object Library to open it. Scroll about one-fourth of the way through the list until you find Image View (see Figure 4–6), or just type image view in the search field. Remember that the object library is the third icon on top of the library pane. You won’t find Image View under any of the other icons.
www.it-ebooks.info
CHAPTER 4: More User Interface Fun |
75 |
Figure 4–6. The Image View element in Interface Builder’s library
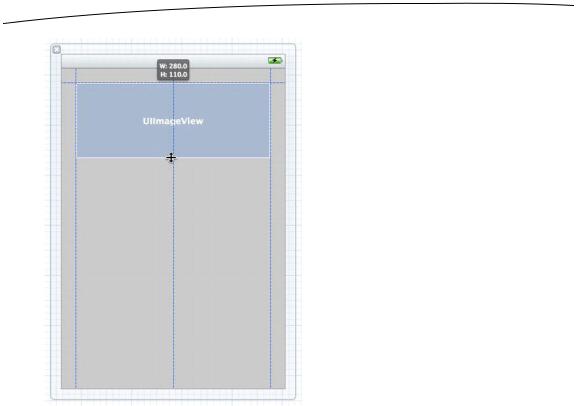
Drag an image view onto the view in the nib editor. Notice that as you drag your image view out of the library, it changes size twice. As the drag makes its way out of the library pane, it takes the shape of a horizontal rectangle. Then, when your drag enters the frame of the view, the image view resizes to be the size of the view, minus the status bar at the top. This behavior is normal and, in many cases, exactly what you want, as often the first image you place in a view is a background image. Release the drag inside the view, taking care to be sure that the new UIImageView snaps to the sides and bottom of the surrounding view. In this particular case, we actually don’t want our image view to take the entire space, so use the drag handles to resize the image view to the approximate size of the image you imported into Xcode. Don’t worry about getting it exactly right yet; we’ll take care of that in the next section. Figure 4–7 shows our resized UIImageView.
www.it-ebooks.info
76 |
CHAPTER 4: More User Interface Fun |
Figure 4–7. Our resized UIImageView, sized to accommodate the image we will place here
Remember that if you ever encounter difficulty selecting an item in the nib editor, you can switch the nib editor’s dock to list view by clicking the small triangle icon below the dock. Now, click the item you want selected in the list and, sure enough, that item will be selected in the nib editor.
To get at an object that is nested inside another object, click the disclosure triangle to the left of the enclosing object to reveal the nested object. In our case, to select the image view, first click the disclosure triangle to the left of the view. Then, when the image view appears in the dock, click it, and the corresponding image view in the nib editor will be selected.
With the image view selected, bring up the object attributes inspector by pressing 4, and you should see the editable options of the UIImageView class, as shown in Figure 4–8.
www.it-ebooks.info
CHAPTER 4: More User Interface Fun |
77 |
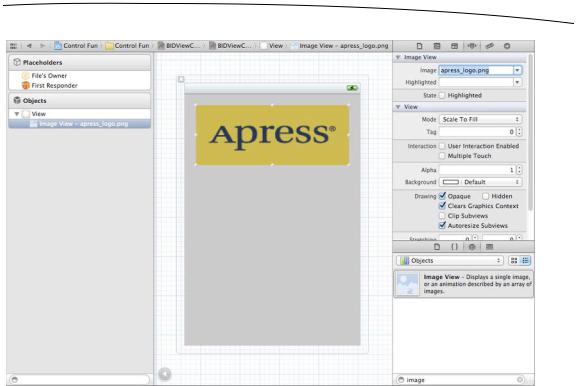
Figure 4–8. The image view attributes inspector. We selected our image from the Image popup at the top of the inspector, and this populated the image view with our image.
The most important setting for our image view is the topmost item in the inspector, labeled Image. Click the little arrow to the right of the field to see a popup menu listing the available images, which should include any images you added to your Xcode project. Select the image you added earlier. Your image should now appear in your image view.
Resizing the Image View
As it turns out, the image we used is a fair amount smaller than the image view in which it was placed. If you take another look at Figure 4–8, you’ll notice that the image we used was scaled to completely fill the image view. A big clue that this is so is the Mode setting in the attributes inspector, which is set to Scale To Fill.
Though we could keep our app this way, it’s generally a good idea to do any image scaling before runtime, as image scaling takes time and processor cycles. Let’s resize our image view to the exact size of our image.
Make sure the image view is selected and that you can see the resize handles. Now select the image view one more time. You should see the outline of the image view replaced by a thick, gray border. Finally, press = or select Editor Size to Fit Content. This will resize the image view to match the size of its contents.
www.it-ebooks.info
78 CHAPTER 4: More User Interface Fun
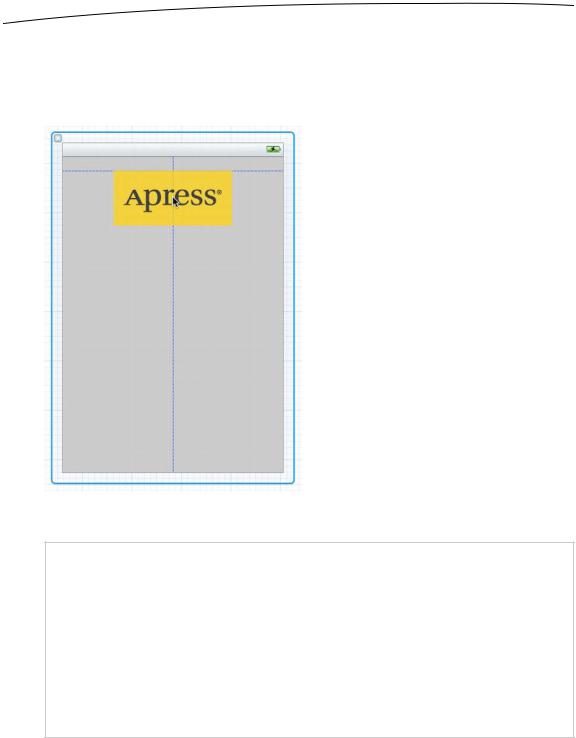
Now that the image view is resized, move it into its final position. You’ll need to click off it, and then click it again to reselect it. Now drag the image view so the top hits the blue guideline toward the top of your view and it is centered according to the centering blue guideline (see Figure 4–9). Note that you can also center an item in its containing view by choosing Editor Alignment Align Horizontal Center in Container.
Figure 4–9. Once we have resized our image view to fit the size of its image, we drag it into position using the view’s blue guidelines.
TIP: Dragging and resizing views in Interface Builder can be tricky. Don’t forget about the hierarchical list mode, activated by clicking the small triangle icon at the bottom of the nib editor’s dock. When it comes to resizing, hold down the option key, and Interface Builder will draw some helpful red lines on the screen that make it much easier to get a sense of the image view’s size. This trick won’t work with dragging, since the option key will prompt Interface Builder to make a copy of the dragged object. However, if you select Editor Canvas Show Bounds Rectangles, Interface Builder will draw a line around all of your interface items, making them easier to see. You can turn off those lines by selecting Show Bounds Rectangles a second time.
www.it-ebooks.info