


CHAPTER 5: Autorotation and Autosizing |
115 |
Fortunately, you don’t need to do a thing in most situations to account for this. When we work with on-screen elements, we specify dimensions and distances in points, not in pixels. For older iPhones and all iPads, points and pixels are equivalent. One point is one pixel. On more recent model iPhones and iPod touches, however, a point equates to 4 pixels and the screen is still 320 × 480 points, even though there are actually 640
× 960 pixels. Think of it as a “virtual resolution,” with iOS automatically mapping points to the physical pixels of your screen. We’ll talk more about this in Chapter 16.
In typical applications, most of the work in actually moving the pixels around the screen is managed by iOS. Your application’s main job in all this is making sure everything fits nicely and looks proper in the resized window.
Autorotation Approaches
Your application can take three general approaches when managing rotation. Which one you use depends on the complexity of your interface. We’ll look at all three approaches in this chapter.
With simpler interfaces, you can specify the correct autosize attributes for all of the objects that make up your interface. Autosize attributes tell the iOS device how your controls should behave when their enclosing view is resized. If you’ve worked with Cocoa on Mac OS X, you’re already familiar with the basic process, because it is the same one used to specify how Cocoa controls behave when the user resizes the window in which they are contained.
Autosize attributes are quick and easy to use, but they aren’t appropriate for all applications. More complex interfaces must handle autorotation in a different manner. For more complex views, you have two additional approaches:
Manually reposition the objects in your view in code when notified that your view is rotating.
Actually design two different versions of your view in Xcode’s Interface Builder: one view for portrait mode and a separate view for landscape mode.
In both cases, you will need to override methods from UIViewController in your view’s controller class.
Let’s get started, shall we? We’ll look at autosizing first.
Handling Rotation Using Autosize Attributes
We’ll create a simple app to demonstrate using autosize attributes. Start a new Single View Application project in Xcode, and call it Autosize. Choose iPhone as the Device Family and make sure to use ARC. Before we lay out our GUI in a nib file, we need to tell iOS that our view supports autorotation. We do that by modifying the view controller class.
www.it-ebooks.info
116 |
CHAPTER 5: Autorotation and Autosizing |
Configuring Supported Orientations
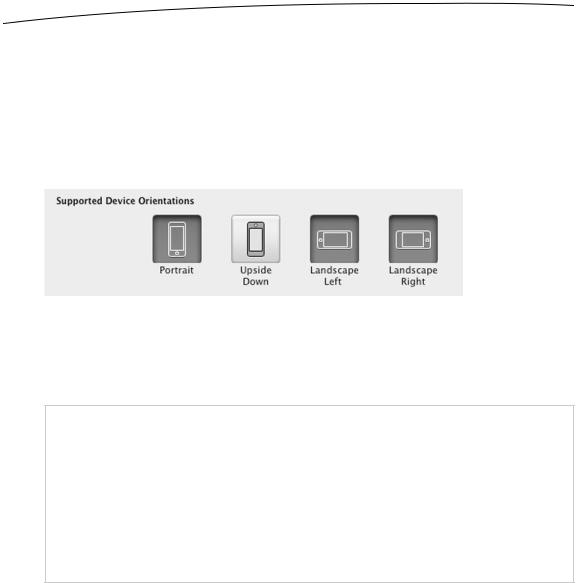
First, we need to specify which orientations our application supports. When your window appeared, it should have opened to your project settings. If not, click the top line in the project navigator (the one named after your project), and then make sure you’re on the Summary tab. Among the options available in the summary, you should see a section called iPhone / iPod Deployment Info and, within that, a section called
Supported Device Orientations (see Figure 5–2).
Figure 5–2. The Summary tab for our project shows, among other things, the supported device orientations.
This is how you identify which orientations your application supports. It doesn’t necessarily mean that every view in your application will use all of the selected orientations, but if you’re going to support an orientation in any of your application’s views, that orientation must be selected here.
NOTE: The four buttons shown in Figure 5–2 are actually just a shortcut to adding and deleting entries in your application’s Info.plist file. If you single-click Autosize-Info.plist in the Supporting
Files folder in the project navigator, you should see an entry called either
UISupportedInterfaceOrientations or Supported interface orientations, with three subentries for the three orientations currently selected. Selecting and deselecting those buttons in the project
summary simply adds and removes items from this array. Using the buttons is easier and less prone to error, so we definitely recommend using the buttons, but we thought you should know
what they do.
Have you noticed that the Upside Down orientation is off by default? That’s because if the phone rings while it is being held upside down, the phone is likely to remain upside down when you answer it. iPad app projects default to all four orientations being supported because the iPad is meant to be used in any orientation. Since our project is an iPhone project, we can leave the buttons as they are set.
We’ve identified the orientations our app will support, but that’s not all we need to do. We also must specify for each view controller which orientations are supported, and that must be a subset of the orientations selected here.
www.it-ebooks.info

CHAPTER 5: Autorotation and Autosizing |
117 |
Specifying Rotation Support
Single-click BIDViewController.m. In the code that’s already there, you’ll see a method called shouldAutorotateToInterfaceOrientation: provided for you, courtesy of the template:
- (BOOL)shouldAutorotateToInterfaceOrientation: (UIInterfaceOrientation)interfaceOrientation {
// Return YES for supported orientations
return (interfaceOrientation != UIInterfaceOrientationPortraitUpsideDown);
}
This method is iOS’s way of asking a view controller if it’s OK to rotate to a specific orientation. Four defined orientations correspond to the four general ways that an iOS device can be held:
UIInterfaceOrientationPortrait
UIInterfaceOrientationPortraitUpsideDown
UIInterfaceOrientationLandscapeLeft
UIInterfaceOrientationLandscapeRight
In the case of the iPhone, the template defaults to supporting all orientations except upside down, just as you saw in the supported orientations. If we had instead created an iPad project, the default version of the shouldAutorotateToInterfaceOrientation: method created by the template would just return YES.
When the iOS device is changed to a new orientation, the shouldAutorotateToInterfaceOrientation: method is called on the active view controller. The parameter interfaceOrientation will contain one of the four values in the preceding list, and this method needs to return either YES or NO to signify whether the application’s window should be rotated to match the new orientation. Because every view controller subclass can implement this differently, it is possible for one application to support autorotation with some of its views but not with others, or for one view controller to support certain orientations under certain conditions.
Code Sense in Action
Have you noticed that the defined system constants on the iPhone are always designed so that values that work together start with the same letters? One reason why UIInterfaceOrientationPortrait,
UIInterfaceOrientationPortraitUpsideDown, UIInterfaceOrientationLandscapeLeft, and UIInterfaceOrientationLandscapeRight all begin with UIInterfaceOrientation is to let you take advantage of Xcode’s Code Sense feature.
You’ve probably noticed that as you type, Xcode frequently tries to complete the word you are typing. That’s Code Sense in action.
www.it-ebooks.info

118 |
CHAPTER 5: Autorotation and Autosizing |
Developers cannot possibly remember all the various defined constants in the system, but you can remember the common beginning for the groups you use frequently. When you need to specify an orientation, simply type UIInterfaceOrientation (or even UIInterf), and then press the escape key to bring up a list of all matches. (In Xcode’s preferences, you can change that matching key from escape to something else.) You can use the arrow keys to navigate the list that appears and make a selection by pressing the tab or return key. This is much faster than needing to look up the values in the documentation or header files.
Once again, the template has predicted what we would need, so we can leave this code untouched for now. However, feel free to play around with this method by returning YES or NO for different orientations.
NOTE: iOS actually has two different types of orientations. The one we’re discussing here is the interface orientation. There’s also a separate but related concept of device orientation. Device orientation specifies how the device is currently being held. Interface orientation is which way the stuff on the screen is rotated. If you turn a standard iPhone app upside down, the device
orientation will be upside down, but the interface orientation will be one of the other three, since
iPhone apps typically don’t support portrait upside down.
Designing an Interface with Autosize Attributes
In Xcode, select BIDViewController.xib to edit the file in Interface Builder. One nice thing about using autosize attributes is that they require very little code. We do need to specify which orientations we support in code, but the rest of the autoresize implementation can be done right here in Interface Builder.
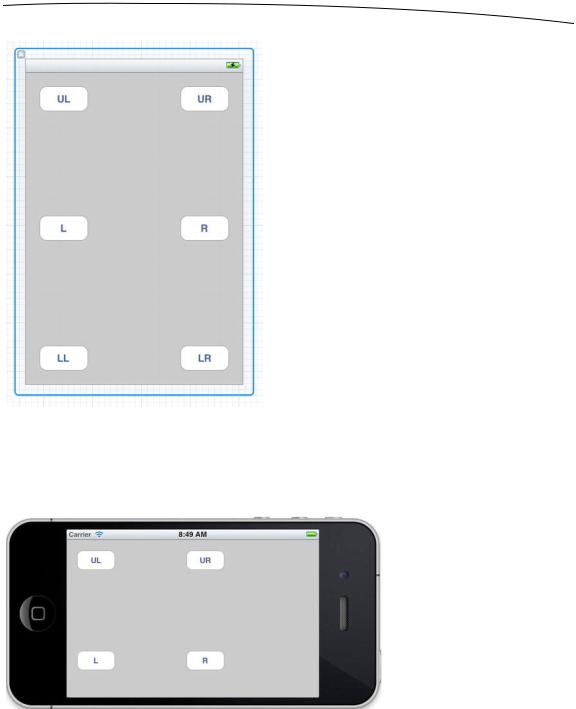
To see how this works, drag six Round Rect Buttons from the library over to your view, and place them as shown in Figure 5–3. Double-click each button, and assign a title to each one so you can tell them apart later. We’ve used UL for the upper-left button, UR for the upper-right button, L for the middle-left button, R for the middle-right button, LL for the lower-left button, and LR for the lower-right button.
www.it-ebooks.info
CHAPTER 5: Autorotation and Autosizing |
119 |
Figure 5–3. Adding six labeled buttons to the interface
Let’s see what happens now that we’ve specified that we support autorotation but haven’t set any autosize attributes. Build and run the app. Once the iPhone simulator comes up, select Hardware Rotate Left, which will simulate turning the iPhone to landscape mode. Take a look at Figure 5–4. Oh, dear.
Figure 5–4. Well, that’s not very useful, is it? Where are buttons LL and LR?
Most controls default to a setting that has them stay where they are in relation to the left side and top of the screen. There are some exceptions to that rule, but it’s usually true.
www.it-ebooks.info