


120 |
CHAPTER 5: Autorotation and Autosizing |
For some controls, this is perfectly appropriate. The upper-left button (UL), for example, is probably right where we want it to appear. The rest of them, however, do not fare as well.
Quit the simulator, and let’s get to work fixing the GUI so that it adapts to the screen size in a sensible way.
Using the Size Inspector’s Autosize Attributes
Single-click the upper-left button on your view, and then press 5 to bring up the size inspector, which should look like Figure 5–5.
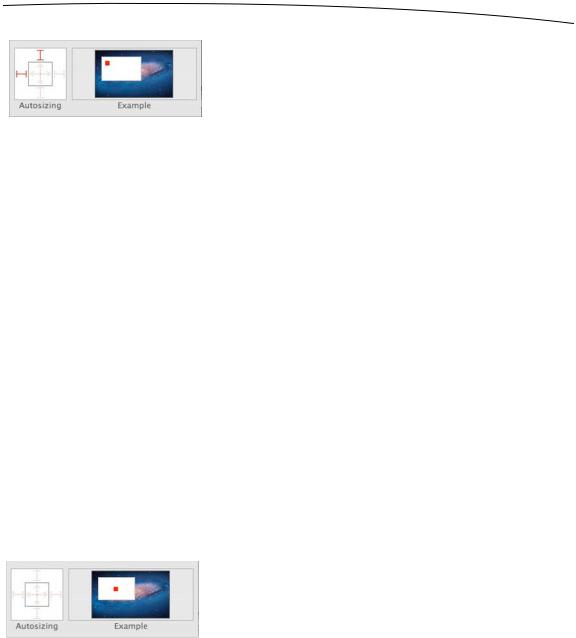
Figure 5–5. The size inspector allows you to set an object’s autosize attributes.
The size inspector allows you to set, among other things, an object’s autosize attributes. The box on the left in Figure 5–6 is where you actually set the attributes. The box on the right runs a little animation (move your cursor over the box to bring the animation to life) that will show you how the object will behave during a resize. In the box on the left, the inner square represents the current object. If a button is selected, the inner square represents that button.
www.it-ebooks.info
CHAPTER 5: Autorotation and Autosizing |
121 |
Figure 5–6. The Autosizing section of the size inspector
The red arrows inside the inner square represent the horizontal and vertical space inside the selected object. Clicking either arrow will change it from dashed to solid or from solid back to dashed. If the horizontal arrow is solid, the width of the object is free to change as the window resizes; if the horizontal arrow is dashed, iOS will try to keep the width of the object at its original value if possible. The same is true for the height of the object and the vertical arrow.
The four red I shapes outside the inner box represent the distance between the edge of the selected object and the same edge of the view that contains it. If the I is dashed, the space is flexible; if it’s solid red, the amount of space should be kept constant if possible.
Huh?
Perhaps this concept will make a little more sense if you actually see it in action. Figure 5–6 represents the default autosize settings, which specify that the object’s size will remain constant as its superview is resized, and that the distance from the left and top edges should also stay constant. If you look at the animation next to the autosize control, you can see how the object will behave during a resize. Notice that the inner box stays in the same place relative to the left and top edges of the parent view as the parent view changes in size.
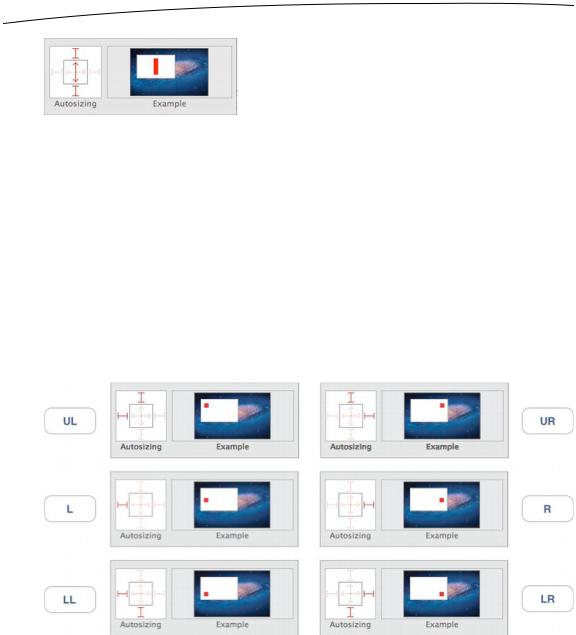
Try this experiment. With your upper-left (UL) button selected, click both of the solid red I shapes (to the top and left of the inner box) so they become dashed and look like the ones shown in Figure 5–7. With all possible lines set to dashed, the size of the object will be kept the same, and it will float in the middle of the superview as the superview is resized.
Figure 5–7. With all dashed lines, your control floats in the parent and keeps its size.
Now, click the vertical arrow inside the box and the I shape both above and below the box so that your autosize attributes look like the ones shown in Figure 5–8.
www.it-ebooks.info
122 |
CHAPTER 5: Autorotation and Autosizing |
Figure 5–8. This configuration allows the vertical size of the object to change.
Here, we are indicating that the vertical size of our object can change, and that the distance from the top of our object to the top of the window and the distance from the bottom of our object to the bottom of the window should stay constant. With this configuration, the width of the object won’t change, but its height will.
Change the autosize attributes a few more times, and watch the animation until you grok how different settings will impact the behavior when the view is rotated and resized.
Setting the Buttons’ Autosize Attributes
Now, let’s set the autosize attributes for our six buttons. Go ahead and see if you can figure them out. If you get stumped, take a look at Figure 5–9, which shows the autosize attributes needed for each button in order to keep all of the buttons on the screen when the phone is rotated.
Figure 5–9. Autosize attributes for all six buttons
Once you have the attributes set as shown Figure 5–9, save the nib file, and then build and run the app. This time, when the iPhone simulator comes up, you should be able to select Hardware Rotate Left or Rotate Right and have all the buttons stay on the screen (see Figure 5–10). If you rotate back, they should return to their original positions. This technique will work for a great many applications.
www.it-ebooks.info