


230 |
CHAPTER 8: Introduction to Table Views |
from UITableViewDelegate. Unlike picker views, simpler table views don’t require the use of a delegate in order to do their thing. The data source provides all the data needed to draw the table. The purpose of the delegate is to configure the appearance of the table view and to handle certain user interactions. Let’s take a look at a few of the configuration options now. We’ll discuss a few more in the next chapter.
Setting the Indent Level
The delegate can be used to specify that some rows should be indented. In the file BIDViewController.m, add the following method to your code, just above the @end declaration:
#pragma mark -
#pragma mark Table Delegate Methods
-(NSInteger)tableView:(UITableView *)tableView indentationLevelForRowAtIndexPath:(NSIndexPath *)indexPath {
NSUInteger row = [indexPath row];
return row;
}
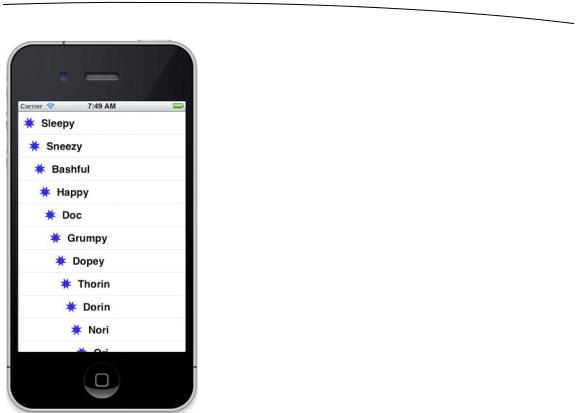
This method sets the indent level for each row to its row number, so row 0 will have an indent level of 0, row 1 will have an indent level of 1, and so on. An indent level is simply an integer that tells the table view to move that row a little to the right. The higher the number, the further to the right the row will be indented. You might use this technique, for example, to indicate that one row is subordinate to another row, as Mail does when representing subfolders.
When you run the application again, you can see that each row is now drawn a little farther to the right than the last one (see Figure 8–11).
www.it-ebooks.info
CHAPTER 8: Introduction to Table Views |
231 |
Figure 8–11. Each row of the table is drawn with an indent level higher than the row before it.
Handling Row Selection
The table’s delegate can use two methods to determine if the user has selected a particular row. One method is called before the row is selected and can be used to prevent the row from being selected, or even change which row gets selected. Let’s implement that method and specify that the first row is not selectable. Add the following method to the end of BIDViewController.m, just before the @end declaration:
- (NSIndexPath *)tableView:(UITableView *)tableView willSelectRowAtIndexPath:(NSIndexPath *)indexPath {
NSUInteger row = [indexPath row];
if (row == 0) return nil;
return indexPath;
}
This method is passed indexPath, which represents the item that’s about to be selected. Our code looks at which row is about to be selected. If the row is the first row, which is always index zero, then it returns nil, which indicates that no row should actually be
www.it-ebooks.info

232 |
CHAPTER 8: Introduction to Table Views |
selected. Otherwise, it returns indexPath, which is how we indicate that it’s OK for the selection to proceed.
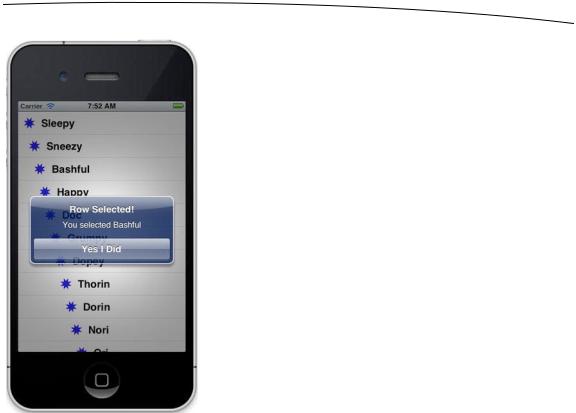
Before you compile and run, let’s also implement the delegate method that is called after a row has been selected, which is typically where you’ll actually handle the selection. This is where you take whatever action is appropriate when the user selects a row. In the next chapter, we’ll use this method to handle the drill-downs, but in this chapter, we’ll just put up an alert to show that the row was selected. Add the following method to the bottom of BIDViewController.m, just before the @end declaration again:
- (void)tableView:(UITableView *)tableView didSelectRowAtIndexPath:(NSIndexPath *)indexPath {
NSUInteger row = [indexPath row];
NSString *rowValue = [listData objectAtIndex:row];
NSString *message = [[NSString alloc] initWithFormat: @"You selected %@", rowValue];
UIAlertView *alert = [[UIAlertView alloc] initWithTitle:@"Row Selected!"
message:message
delegate:nil cancelButtonTitle:@"Yes I Did" otherButtonTitles:nil];
[alert show];
[tableView deselectRowAtIndexPath:indexPath animated:YES];
}
Once you’ve added this method, compile and run the app, and take it for a spin. See whether you can select the first row (you shouldn’t be able to), and then select one of the other rows. The selected row should be highlighted, and then your alert should pop up, telling you which row you selected, while the selected row fades in the background (see Figure 8–12).
www.it-ebooks.info
CHAPTER 8: Introduction to Table Views |
233 |
Figure 8–12. In this example, the first row is not selectable, and an alert is displayed when any other row is selected. This was done using the delegate methods.
Note that you can also modify the index path before you pass it back, which would cause a different row and/or section to be selected. You won’t do that very often, as you should have a very good reason for changing the user’s selection. In the vast majority of cases, when you use this method, you will either return indexPath unmodified to allow the selection or return nil to or disallow it.
Changing the Font Size and Row Height
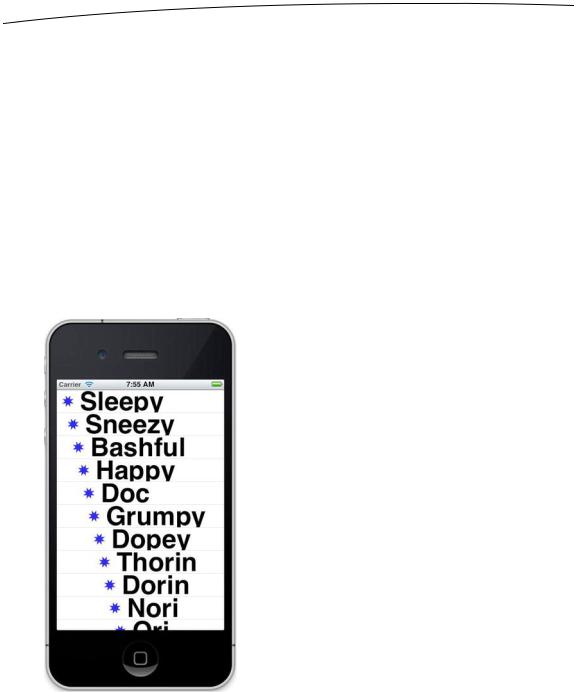
Let’s say that we want to change the size of the font being used in the table view. In most situations, you shouldn’t override the default font; it’s what users expect to see. But sometimes there are valid reasons to change the font. Add the following line of code to your tableView:cellForRowAtIndexPath: method:
- (UITableViewCell *)tableView:(UITableView *)tableView cellForRowAtIndexPath:(NSIndexPath *)indexPath
{
static NSString *SimpleTableIdentifier = @"SimpleTableIdentifier";
UITableViewCell *cell = [tableView dequeueReusableCellWithIdentifier: SimpleTableIdentifier];
if (cell == nil) {
www.it-ebooks.info
234 |
CHAPTER 8: Introduction to Table Views |
cell = [[UITableViewCell alloc] initWithStyle:UITableViewCellStyleDefault reuseIdentifier: SimpleTableIdentifier];
}
UIImage *image = [UIImage imageNamed:@"star.png"]; cell.image = image;
NSUInteger row = [indexPath row]; cell.textLabel.text = [listData objectAtIndex:row];
cell.textLabel.font = [UIFont boldSystemFontOfSize:50];
if (row < 7)
cell.detailTextLabel.text = @"Mr. Disney";
else
cell.detailTextLabel.text = @"Mr. Tolkein"; return cell;
}
When you run the application now, the values in your list are drawn in a really large font size, but they don’t exactly fit in the row (see Figure 8–13).
Figure 8–13. Look how nice and big! But, um, it would be even nicer if we could see everything.
Well, here comes the table view delegate to the rescue! The table view delegate can specify the height of the table view’s rows. In fact, it can specify unique values for each
www.it-ebooks.info