


30 |
CHAPTER 2: Appeasing the Tiki Gods |
NOTE: The “folders” in the navigator area do not necessarily correspond to folders in your Mac’s file system. These are logical groupings within Xcode to help you keep everything organized, and to make it faster and easier to find what you’re looking for while working on your application. Often,
the items contained in those two project folders are stored directly in the project’s directory, but you can store them anywhere—even outside your project folder if you want. The hierarchy inside Xcode is completely independent of the file system hierarchy, so moving a file out of the Classes folder in
Xcode, for example, will not change the file’s location on your hard drive.
It is possible to configure a group to use a specific file system directory using the utility pane. However, by default, new groups added to your project are completely independent of the file
system, and their contents can be contained anywhere.
Introducing Xcode’s Interface Builder
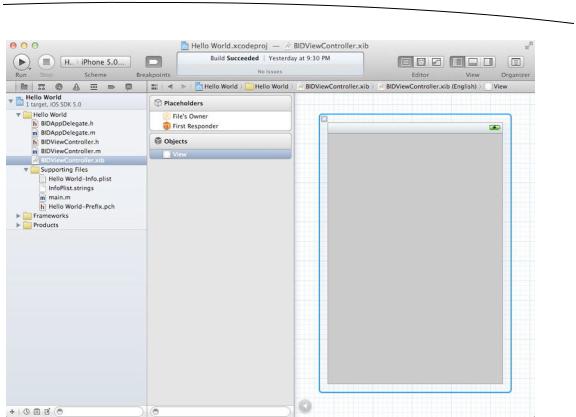
In your workspace window’s project navigator, expand the Hello World group, if it’s not already open, and then select the file BIDViewController.xib. As soon as you do, the file will open in the editor pane, as shown in Figure 2–15. You should see a graph paper background, which makes a nice backdrop for editing interfaces. This is Xcode’s Interface Builder (sometimes referred to as IB), which is where you’ll design your application’s user interface.
Interface Builder has a long history. It has been around since 1988 and has been used to develop applications for NeXTSTEP, OpenStep, Mac OS X, and now iOS devices such as iPhone and iPad. As we noted earlier, before Xcode 4, Interface Builder was a separate application that was installed along with Xcode and worked in tandem with it. Now, Interface Builder is fully integrated into Xcode.
Interface Builder supports two file types: an older format that uses the extension .nib and a newer format that uses the extension .xib. The iOS project templates all use .xib files by default, but for the first 20 years it existed, all Interface Builder files had the extension .nib, and as a result, most developers took to calling Interface Builder files “nib files.” Interface Builder files are often called nib files regardless of whether the extension actually used for the file is .xib or .nib. In fact, Apple still uses the terms nib and nib file throughout its documentation.
The gray vertical bar on the left edge of the graph paper is known as the dock. The dock contains an icon for each top-level object in the nib file. If you click the triangle-in-a- circle icon just to the right of the bottom of the dock, you’ll see a list view representation of those objects. Click the icon again to return to the icon view.
www.it-ebooks.info
CHAPTER 2: Appeasing the Tiki Gods |
31 |
Figure 2–15. We selected BIDViewController.xib in the project navigator. This opened the file in Interface Builder. Note the graph paper background in the editor pane. The gray vertical bar to the left of the graph paper is called the dock.
The top two icons in the nib file are called File’s Owner and First Responder, which are special items that every nib file has and which we’ll talk about more in a moment. Each of the remaining icons represents a single instance of an Objective-C class that will be created automatically for you when this nib file is loaded. Our nib file has one additional icon beyond the required File’s Owner and First Responder. That third icon—the one below the horizontal line—represents a view object. This is the view that will be shown when our application launches, and it was created for us when we selected the Single View Application template.
Now, let’s say that you want to create an instance of a button. You could create that button by writing code, but creating an interface object by dragging a button out of a library and specifying its attributes is so much simpler, and it results in exactly the same thing happening at runtime.
The BIDViewController.xib file we are looking at right now is loaded automatically when your application launches—for the moment, don’t worry about how—so it is the right place to add the objects that make up your application’s user interface. When you create objects in Interface Builder, they’ll be instantiated in your program when that nib file is loaded. You’ll see many examples of this process throughout this book.
www.it-ebooks.info

32 |
CHAPTER 2: Appeasing the Tiki Gods |
What’s in the Nib File?
As we mentioned earlier, the contents of the nib file are represented by icons or a list in the dock immediately to the left of the editor pane (see Figure 2–15). Every nib file starts off with the same two icons: File’s Owner and First Responder. These two are created automatically and cannot be deleted. Furthermore, they are visually separated from the objects you add to the nib file by a divider. From that, you can probably guess that they are important.
File’s Owner represents the object that loaded the nib file from disk. In other words, File’s Owner is the object that “owns” this copy of the nib file.
First Responder is, in very basic terms, the object with which the user is currently interacting. If, for example, the user is currently entering data into a text field, that field is the current first responder. The first responder changes as the user interacts with the user interface, and the First Responder icon gives you a convenient way to communicate with whatever control or other object is the current first responder, without needing to write code to determine which control or view that might be.
We’ll talk more about these objects starting in the next chapter, so don’t worry if you’re a bit fuzzy right now on when you would use First Responder or what constitutes the “owner” of a nib.
Every other icon in this window, other than these first two special cases, represents an object instance that will be created when the nib file loads, exactly as if you had written code to alloc and init a new Objective-C object. In our case, there is a third icon called View (see Figure 2–15).
The View icon represents an instance of the UIView class. A UIView object is an area that a user can see and interact with. In this application, we will have only one view, so this icon represents everything that the user can see in our application. Later, we’ll build more complex applications that have more than one view. For now, just think of this as what the user can see when using your application.
NOTE: Technically speaking, our application will actually have more than one view. All user interface elements that can be displayed on the screen—including buttons, text fields, and labels—are descendents of UIView. When you see the term view used in this book, however, we will generally be referring to only actual instances of UIView, and this application has only one of those.
If you click the View icon, a depiction of an iPhone-sized screen will open (if it’s not already displayed). This is where you can design your user interface graphically.
www.it-ebooks.info
CHAPTER 2: Appeasing the Tiki Gods |
33 |
The Library
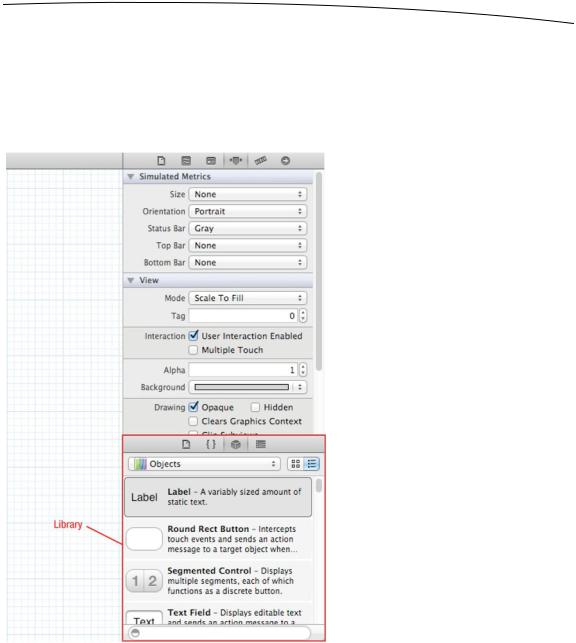
As shown in Figure 2–16, the utility view, which makes up the right side of the workspace, is divided into two sections. If you’re not currently seeing the utility view, click the rightmost of the three View buttons in the toolbar, select View Utilities Show Utilities, or press 0 (option- command-zero).
Figure 2–16. The library is where you’ll find stock objects from the UIKit that are available for use in Interface Builder. Everything above the library but below the toolbar is known collectively as the inspector.
The bottom half of the utility view is called the library pane, or just plain library. The library is a collection of reusable items you can use in your own programs. The four icons in the bar at the top of the library pane divide the library into four sections:
www.it-ebooks.info