- •Contents at a Glance
- •About the Authors
- •About the Technical Reviewer
- •Acknowledgments
- •Preface
- •What This Book Is
- •What You Need
- •Developer Options
- •What You Need to Know
- •What’s Different About Coding for iOS?
- •Only One Active Application
- •Only One Window
- •Limited Access
- •Limited Response Time
- •Limited Screen Size
- •Limited System Resources
- •No Garbage Collection, but…
- •Some New Stuff
- •A Different Approach
- •What’s in This Book
- •What’s New in This Update?
- •Are You Ready?
- •Setting Up Your Project in Xcode
- •The Xcode Workspace Window
- •The Toolbar
- •The Navigator View
- •The Jump Bar
- •The Utility Pane
- •Interface Builder
- •New Compiler and Debugger
- •A Closer Look at Our Project
- •Introducing Xcode’s Interface Builder
- •What’s in the Nib File?
- •The Library
- •Adding a Label to the View
- •Changing Attributes
- •Some iPhone Polish—Finishing Touches
- •Bring It on Home
- •The Model-View-Controller Paradigm
- •Creating Our Project
- •Looking at the View Controller
- •Understanding Outlets and Actions
- •Outlets
- •Actions
- •Cleaning Up the View Controller
- •Designing the User Interface
- •Adding the Buttons and Action Method
- •Adding the Label and Outlet
- •Writing the Action Method
- •Trying It Out
- •Looking at the Application Delegate
- •Bring It on Home
- •A Screen Full of Controls
- •Active, Static, and Passive Controls
- •Creating the Application
- •Implementing the Image View and Text Fields
- •Adding the Image View
- •Resizing the Image View
- •Setting View Attributes
- •The Mode Attribute
- •Interaction Checkboxes
- •The Alpha Value
- •Background
- •Drawing Checkboxes
- •Stretching
- •Adding the Text Fields
- •Text Field Inspector Settings
- •Setting the Attributes for the Second Text Field
- •Creating and Connecting Outlets
- •Closing the Keyboard
- •Closing the Keyboard When Done Is Tapped
- •Touching the Background to Close the Keyboard
- •Adding the Slider and Label
- •Creating and Connecting the Actions and Outlets
- •Implementing the Action Method
- •Adding Two Labeled Switches
- •Connecting and Creating Outlets and Actions
- •Implementing the Switch Actions
- •Adding the Button
- •Connecting and Creating the Button Outlets and Actions
- •Implementing the Segmented Control Action
- •Implementing the Action Sheet and Alert
- •Conforming to the Action Sheet Delegate Method
- •Showing the Action Sheet
- •Spiffing Up the Button
- •Using the viewDidLoad Method
- •Control States
- •Stretchable Images
- •Crossing the Finish Line
- •The Mechanics of Autorotation
- •Points, Pixels, and the Retina Display
- •Autorotation Approaches
- •Handling Rotation Using Autosize Attributes
- •Configuring Supported Orientations
- •Specifying Rotation Support
- •Designing an Interface with Autosize Attributes
- •Using the Size Inspector’s Autosize Attributes
- •Setting the Buttons’ Autosize Attributes
- •Restructuring a View When Rotated
- •Creating and Connecting Outlets
- •Moving the Buttons on Rotation
- •Swapping Views
- •Designing the Two Views
- •Implementing the Swap
- •Changing Outlet Collections
- •Rotating Out of Here
- •Common Types of Multiview Apps
- •The Architecture of a Multiview Application
- •The Root Controller
- •Anatomy of a Content View
- •Building View Switcher
- •Creating Our View Controller and Nib Files
- •Modifying the App Delegate
- •Modifying BIDSwitchViewController.h
- •Adding a View Controller
- •Building a View with a Toolbar
- •Writing the Root View Controller
- •Implementing the Content Views
- •Animating the Transition
- •Switching Off
- •The Pickers Application
- •Delegates and Data Sources
- •Setting Up the Tab Bar Framework
- •Creating the Files
- •Adding the Root View Controller
- •Creating TabBarController.xib
- •The Initial Test Run
- •Implementing the Date Picker
- •Implementing the Single-Component Picker
- •Declaring Outlets and Actions
- •Building the View
- •Implementing the Controller As a Data Source and Delegate
- •Implementing a Multicomponent Picker
- •Declaring Outlets and Actions
- •Building the View
- •Implementing the Controller
- •Implementing Dependent Components
- •Creating a Simple Game with a Custom Picker
- •Writing the Controller Header File
- •Building the View
- •Adding Image Resources
- •Implementing the Controller
- •The spin Method
- •The viewDidLoad Method
- •Final Details
- •Linking in the Audio Toolbox Framework
- •Final Spin
- •Table View Basics
- •Table Views and Table View Cells
- •Grouped and Plain Tables
- •Implementing a Simple Table
- •Designing the View
- •Writing the Controller
- •Adding an Image
- •Using Table View Cell Styles
- •Setting the Indent Level
- •Handling Row Selection
- •Changing the Font Size and Row Height
- •Customizing Table View Cells
- •Adding Subviews to the Table View Cell
- •Creating a UITableViewCell Subclass
- •Adding New Cells
- •Implementing the Controller’s Code
- •Loading a UITableViewCell from a Nib
- •Designing the Table View Cell in Interface Builder
- •Using the New Table View Cell
- •Grouped and Indexed Sections
- •Building the View
- •Importing the Data
- •Implementing the Controller
- •Adding an Index
- •Implementing a Search Bar
- •Rethinking the Design
- •A Deep Mutable Copy
- •Updating the Controller Header File
- •Modifying the View
- •Modifying the Controller Implementation
- •Copying Data from allNames
- •Implementing the Search
- •Changes to viewDidLoad
- •Changes to Data Source Methods
- •Adding a Table View Delegate Method
- •Adding Search Bar Delegate Methods
- •Adding a Magnifying Glass to the Index
- •Adding the Special Value to the Keys Array
- •Suppressing the Section Header
- •Telling the Table View What to Do
- •Putting It All on the Table
- •Navigation Controller Basics
- •Stacky Goodness
- •A Stack of Controllers
- •Nav, a Hierarchical Application in Six Parts
- •Meet the Subcontrollers
- •The Disclosure Button View
- •The Checklist View
- •The Rows Control View
- •The Movable Rows View
- •The Deletable Rows View
- •The Editable Detail View
- •The Nav Application’s Skeleton
- •Creating the Top-Level View Controller
- •Setting Up the Navigation Controller
- •Adding the Images to the Project
- •First Subcontroller: The Disclosure Button View
- •Creating the Detail View
- •Modifying the Disclosure Button Controller
- •Adding a Disclosure Button Controller Instance
- •Second Subcontroller: The Checklist
- •Creating the Checklist View
- •Adding a Checklist Controller Instance
- •Third Subcontroller: Controls on Table Rows
- •Creating the Row Controls View
- •Adding a Rows Control Controller Instance
- •Fourth Subcontroller: Movable Rows
- •Creating the Movable Row View
- •Adding a Move Me Controller Instance
- •Fifth Subcontroller: Deletable Rows
- •Creating the Deletable Rows View
- •Adding a Delete Me Controller Instance
- •Sixth Subcontroller: An Editable Detail Pane
- •Creating the Data Model Object
- •Creating the Detail View List Controller
- •Creating the Detail View Controller
- •Adding an Editable Detail View Controller Instance
- •But There’s One More Thing. . .
- •Breaking the Tape
- •Creating a Simple Storyboard
- •Dynamic Prototype Cells
- •Dynamic Table Content, Storyboard-Style
- •Editing Prototype Cells
- •Good Old Table View Data Source
- •Will It Load?
- •Static Cells
- •Going Static
- •So Long, Good Old Table View Data Source
- •You Say Segue, I Say Segue
- •Creating Segue Navigator
- •Filling the Blank Slate
- •First Transition
- •A Slightly More Useful Task List
- •Viewing Task Details
- •Make More Segues, Please
- •Passing a Task from the List
- •Handling Task Details
- •Passing Back Details
- •Making the List Receive the Details
- •If Only We Could End with a Smooth Transition
- •Split Views and Popovers
- •Creating a SplitView Project
- •The Storyboard Defines the Structure
- •The Code Defines the Functionality
- •The App Delegate
- •The Master View Controller
- •The Detail View Controller
- •Here Come the Presidents
- •Creating Your Own Popover
- •iPad Wrap-Up
- •Getting to Know Your Settings Bundle
- •The AppSettings Application
- •Creating the Project
- •Working with the Settings Bundle
- •Adding a Settings Bundle to Our Project
- •Setting Up the Property List
- •Adding a Text Field Setting
- •Adding an Application Icon
- •Adding a Secure Text Field Setting
- •Adding a Multivalue Field
- •Adding a Toggle Switch Setting
- •Adding the Slider Setting
- •Adding Icons to the Settings Bundle
- •Adding a Child Settings View
- •Reading Settings in Our Application
- •Retrieving User Settings
- •Creating the Main View
- •Updating the Main View Controller
- •Registering Default Values
- •Changing Defaults from Our Application
- •Keeping It Real
- •Beam Me Up, Scotty
- •Your Application’s Sandbox
- •Getting the Documents Directory
- •Getting the tmp Directory
- •File-Saving Strategies
- •Single-File Persistence
- •Multiple-File Persistence
- •Using Property Lists
- •Property List Serialization
- •The First Version of the Persistence Application
- •Creating the Persistence Project
- •Designing the Persistence Application View
- •Editing the Persistence Classes
- •Archiving Model Objects
- •Conforming to NSCoding
- •Implementing NSCopying
- •Archiving and Unarchiving Data Objects
- •The Archiving Application
- •Implementing the BIDFourLines Class
- •Implementing the BIDViewController Class
- •Using iOS’s Embedded SQLite3
- •Creating or Opening the Database
- •Using Bind Variables
- •The SQLite3 Application
- •Linking to the SQLite3 Library
- •Modifying the Persistence View Controller
- •Using Core Data
- •Entities and Managed Objects
- •Key-Value Coding
- •Putting It All in Context
- •Creating New Managed Objects
- •Retrieving Managed Objects
- •The Core Data Application
- •Designing the Data Model
- •Creating the Persistence View and Controller
- •Persistence Rewarded
- •Managing Document Storage with UIDocument
- •Building TinyPix
- •Creating BIDTinyPixDocument
- •Code Master
- •Initial Storyboarding
- •Creating BIDTinyPixView
- •Storyboard Detailing
- •Adding iCloud Support
- •Creating a Provisioning Profile
- •Enabling iCloud Entitlements
- •How to Query
- •Save Where?
- •Storing Preferences on iCloud
- •What We Didn’t Cover
- •Grand Central Dispatch
- •Introducing SlowWorker
- •Threading Basics
- •Units of Work
- •GCD: Low-Level Queueing
- •Becoming a Blockhead
- •Improving SlowWorker
- •Don’t Forget That Main Thread
- •Giving Some Feedback
- •Concurrent Blocks
- •Background Processing
- •Application Life Cycle
- •State-Change Notifications
- •Creating State Lab
- •Exploring Execution States
- •Making Use of Execution State Changes
- •Handling the Inactive State
- •Handling the Background State
- •Removing Resources When Entering the Background
- •Saving State When Entering the Background
- •A Brief Journey to Yesteryear
- •Back to the Background
- •Requesting More Backgrounding Time
- •Grand Central Dispatch, Over and Out
- •Two Views of a Graphical World
- •The Quartz 2D Approach to Drawing
- •Quartz 2D’s Graphics Contexts
- •The Coordinate System
- •Specifying Colors
- •A Bit of Color Theory for Your iOS Device’s Display
- •Other Color Models
- •Color Convenience Methods
- •Drawing Images in Context
- •Drawing Shapes: Polygons, Lines, and Curves
- •The QuartzFun Application
- •Setting Up the QuartzFun Application
- •Creating a Random Color
- •Defining Application Constants
- •Implementing the QuartzFunView Skeleton
- •Creating and Connecting Outlets and Actions
- •Implementing the Action Methods
- •Adding Quartz 2D Drawing Code
- •Drawing the Line
- •Drawing the Rectangle and Ellipse
- •Drawing the Image
- •Optimizing the QuartzFun Application
- •The GLFun Application
- •Setting Up the GLFun Application
- •Creating BIDGLFunView
- •Updating BIDViewController
- •Updating the Nib
- •Finishing GLFun
- •Drawing to a Close
- •Multitouch Terminology
- •The Responder Chain
- •Responding to Events
- •Forwarding an Event: Keeping the Responder Chain Alive
- •The Multitouch Architecture
- •The Four Touch Notification Methods
- •The TouchExplorer Application
- •The Swipes Application
- •Automatic Gesture Recognition
- •Implementing Multiple Swipes
- •Detecting Multiple Taps
- •Detecting Pinches
- •Defining Custom Gestures
- •The CheckPlease Application
- •The CheckPlease Touch Methods
- •Garçon? Check, Please!
- •The Location Manager
- •Setting the Desired Accuracy
- •Setting the Distance Filter
- •Starting the Location Manager
- •Using the Location Manager Wisely
- •The Location Manager Delegate
- •Getting Location Updates
- •Getting Latitude and Longitude Using CLLocation
- •Error Notifications
- •Trying Out Core Location
- •Updating Location Manager
- •Determining Distance Traveled
- •Wherever You Go, There You Are
- •Accelerometer Physics
- •Don’t Forget Rotation
- •Core Motion and the Motion Manager
- •Event-Based Motion
- •Proactive Motion Access
- •Accelerometer Results
- •Detecting Shakes
- •Baked-In Shaking
- •Shake and Break
- •Accelerometer As Directional Controller
- •Rolling Marbles
- •Writing the Ball View
- •Calculating Ball Movement
- •Rolling On
- •Using the Image Picker and UIImagePickerController
- •Implementing the Image Picker Controller Delegate
- •Road Testing the Camera and Library
- •Designing the Interface
- •Implementing the Camera View Controller
- •It’s a Snap!
- •Localization Architecture
- •Strings Files
- •What’s in a Strings File?
- •The Localized String Macro
- •Real-World iOS: Localizing Your Application
- •Setting Up LocalizeMe
- •Trying Out LocalizeMe
- •Localizing the Nib
- •Localizing an Image
- •Generating and Localizing a Strings File
- •Localizing the App Display Name
- •Auf Wiedersehen
- •Apple’s Documentation
- •Mailing Lists
- •Discussion Forums
- •Web Sites
- •Blogs
- •Conferences
- •Follow the Authors
- •Farewell
- •Index
324 |
CHAPTER 9: Navigation Controllers and Table Views |
Now let’s move on to the fifth subcontroller, which demonstrates another use of edit mode. This time, we’ll allow the user to delete our precious rows. Gasp!
Fifth Subcontroller: Deletable Rows
Letting users delete rows isn’t really significantly harder than letting them move rows. Let’s take a look at that process.
Instead of creating an array from a hard-coded list of objects, we’re going to load a property list file this time, just to save some typing. You can grab the file called computers.plist out of the 09 Nav folder in the projects archive that accompanies this book and add it to the Nav folder of your Xcode project.
Select the Nav folder in the project navigator, and then press N or select File New New File…. Select Cocoa Touch, select Objective-C class, and click Next. Name your new class BIDDeleteMeController, and enter BIDSecondLevelViewController for Subclass of.
Creating the Deletable Rows View
The changes we’re going to make to BIDDeleteMeController.h should look familiar, as they’re nearly identical to the ones we made in the movable rows view controller we just built. Go ahead and make these changes now:
#import "BIDSecondLevelViewController.h"
@interface BIDDeleteMeController : BIDSecondLevelViewController
@property (strong, nonatomic) NSMutableArray *list; - (IBAction)toggleEdit:(id)sender;
@end
No surprises here, right? We declare a mutable array to hold our data and an action method to toggle edit mode.
In the previous controller, we used edit mode to let the users reorder rows. In this version, edit mode will be used to let them delete rows. You can actually combine both in the same table if you like. We separated them so the concepts would be a bit easier to follow, but the delete and reorder operations do play nicely together.
A row that can be reordered will display the reorder icon anytime that the table is in edit mode. When you tap the red, circular icon on the left side of the row (see Figure 9–7), the Delete button will pop up, obscuring the reorder icon, but only temporarily.
Switch over to BIDDeleteMeController.m, and add the following code:
#import "BIDDeleteMeController.h"
@implementation BIDDeleteMeController
@synthesize list;
- (IBAction)toggleEdit:(id)sender {
www.it-ebooks.info
CHAPTER 9: Navigation Controllers and Table Views |
325 |
[self.tableView setEditing:!self.tableView.editing animated:YES];
if (self.tableView.editing) [self.navigationItem.rightBarButtonItem setTitle:@"Done"];
else
[self.navigationItem.rightBarButtonItem setTitle:@"Delete"];
}
- (void)viewDidLoad { [super viewDidLoad]; if (list == nil) {
NSString *path = [[NSBundle mainBundle] pathForResource:@"computers" ofType:@"plist"];
NSMutableArray *array = [[NSMutableArray alloc] initWithContentsOfFile:path];
self.list = array;
}
UIBarButtonItem *editButton = [[UIBarButtonItem alloc] initWithTitle:@"Delete" style:UIBarButtonItemStyleBordered target:self action:@selector(toggleEdit:)];
self.navigationItem.rightBarButtonItem = editButton;
}
#pragma mark -
#pragma mark Table Data Source Methods
- (NSInteger)tableView:(UITableView *)tableView numberOfRowsInSection:(NSInteger)section {
return [list count];
}
- (UITableViewCell *)tableView:(UITableView *)tableView cellForRowAtIndexPath:(NSIndexPath *)indexPath {
static NSString *DeleteMeCellIdentifier = @"DeleteMeCellIdentifier";
UITableViewCell *cell = [tableView dequeueReusableCellWithIdentifier:
DeleteMeCellIdentifier];
if (cell == nil) {
cell = [[UITableViewCell alloc] initWithStyle:UITableViewCellStyleDefault reuseIdentifier:DeleteMeCellIdentifier];
}
NSInteger row = [indexPath row];
cell.textLabel.text = [self.list objectAtIndex:row]; return cell;
}
#pragma mark -
#pragma mark Table View Data Source Methods - (void)tableView:(UITableView *)tableView
commitEditingStyle:(UITableViewCellEditingStyle)editingStyle forRowAtIndexPath:(NSIndexPath *)indexPath {
www.it-ebooks.info
326 |
CHAPTER 9: Navigation Controllers and Table Views |
NSUInteger row = [indexPath row]; [self.list removeObjectAtIndex:row];
[tableView deleteRowsAtIndexPaths:[NSArray arrayWithObject:indexPath] withRowAnimation:UITableViewRowAnimationAutomatic];
}
@end
Here, the new action method, toggleEdit:, is pretty much the same as our previous version. It sets edit mode to on if it’s currently off and vice versa, and then sets the button’s title as appropriate. The viewDidLoad method is also similar to the one from the previous view controller and, again, we do not have a viewDidUnload method because we have no outlets and we want to preserve changes made to our mutable array in edit mode. The only difference is that we’re loading our array from a property list rather than feeding it a hard-coded list of strings. The property list we’re using is a flat array of strings containing a variety of computer model names that might be a bit familiar. We also assign the name Delete to the edit button, to make the button’s effect obvious to the user.
The two data source methods contain nothing new, but the last method in the class is something you’ve never seen before, so let’s take a closer look at it.
- (void)tableView:(UITableView *)tableView commitEditingStyle:(UITableViewCellEditingStyle)editingStyle forRowAtIndexPath:(NSIndexPath *)indexPath {
This method is called by the table view when the user has made an edit, which means a deletion or an insertion. The first argument is the table view on which a row was edited. The second parameter, editingStyle, is a constant that tells us what kind of edit just happened. Currently, three editing styles are defined:
UITableViewCellEditingStyleNone: We used this style in the previous controller to indicate that a row can’t be edited. The option
UITableViewCellEditingStyleNone will never be passed into this method, because it is used to indicate that editing is not allowed for this row.
UITableViewCellEditingStyleDelete: This is the default option. We ignore this parameter, because the default editing style for rows is the delete style, so we know that every time this method is called, it will be requesting a delete. You can use this parameter to allow both inserts and deletes within a single table.
UITableViewCellEditingStyleInsert: This is generally used when you need to let the user insert rows at a specific spot in a list. In a list whose order is maintained by the system, such as an alphabetical list of names, the user will usually tap a toolbar or navigation bar button to ask the system to create a new object in a detail view. Once the user is finished specifying the new object, the system will place in the appropriate row.
www.it-ebooks.info
CHAPTER 9: Navigation Controllers and Table Views |
327 |
The last parameter, indexPath, tells us which row is being edited. For a delete, this index path represents the row to be deleted. For an insert, it represents the index where the new row should be inserted.
NOTE: We won’t be covering the use of inserts, but the insert functionality works in fundamentally the same way as the delete functionality we are about to implement. The only difference is that instead of deleting the specified row from your data model, you need to create a new object and insert it at the specified spot.
In our method, we first retrieve the row that is being edited from indexPath.
NSUInteger row = [indexPath row];
Then we remove the object from the mutable array we created earlier.
[self.list removeObjectAtIndex:row];
Finally, we tell the table to delete the row, specifying the constant UITableViewRowAnimationAutomatic, which sets the animation so that the row disappears as either the rows below or the rows above appear to slide over it. The table view will decide the direction of the sliding animation on its own, depending on which row is being deleted.
[tableView deleteRowsAtIndexPaths:[NSArray arrayWithObject:indexPath] withRowAnimation:UITableViewRowAnimationAutomatic];
}
NOTE: Several types of animation are available for table views. You can look up UITableViewRowAnimation in Xcode’s document browser to see what other animations are available.
And that’s all she wrote, folks. That’s the whole enchilada for this class.
Adding a Delete Me Controller Instance
Now, let’s add an instance of the new controller to our root view controller and try it out. In BIDFirstLevelController.m, we first need to import our new controller class’s header file, so add the following line of code directly before the @implementation declaration:
#import "BIDDeleteMeController.h"
Next, add the following code to the viewDidLoad method:
- (void)viewDidLoad { [super viewDidLoad];
self.title = @"First Level";
NSMutableArray *array = [[NSMutableArray alloc] init];
// Disclosure Button
BIDDisclosureButtonController *disclosureButtonController =
www.it-ebooks.info
328 |
CHAPTER 9: Navigation Controllers and Table Views |
[[BIDDisclosureButtonController alloc] initWithStyle:UITableViewStylePlain];
disclosureButtonController.title = @"Disclosure Buttons"; disclosureButtonController.rowImage = [UIImage imageNamed:
@"disclosureButtonControllerIcon.png"]; [array addObject:disclosureButtonController];
// Checklist
BIDCheckListController *checkListController = [[BIDCheckListController alloc] initWithStyle:UITableViewStylePlain];
checkListController.title = @"Check One"; checkListController.rowImage = [UIImage imageNamed:
@"checkmarkControllerIcon.png"]; [array addObject:checkListController];
// Table Row Controls
RowControlsController *rowControlsController = [[RowControlsController alloc] initWithStyle:UITableViewStylePlain];
rowControlsController.title = @"Row Controls"; rowControlsController.rowImage = [UIImage imageNamed:
@"rowControlsIcon.png"];
[array addObject:rowControlsController];
// Move Me
BIDMoveMeController *moveMeController = [[BIDMoveMeController alloc] initWithStyle:UITableViewStylePlain];
moveMeController.title = @"Move Me";
moveMeController.rowImage = [UIImage imageNamed:@"moveMeIcon.png"]; [array addObject:moveMeController];
// Delete Me
BIDDeleteMeController *deleteMeController = [[BIDDeleteMeController alloc] initWithStyle:UITableViewStylePlain];
deleteMeController.title = @"Delete Me";
deleteMeController.rowImage = [UIImage imageNamed:@"deleteMeIcon.png"]; [array addObject:deleteMeController];
self.controllers = array;
}
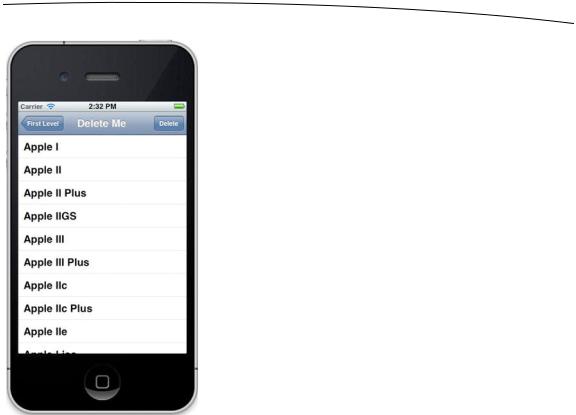
Save everything, compile, and let her rip. When the simulator comes up, the root level will now have—can you guess?—five rows. If you select the new Delete Me row, you’ll be presented with a list of computer models (see Figure 9–19). How many of these have you owned?
www.it-ebooks.info
CHAPTER 9: Navigation Controllers and Table Views |
329 |
Figure 9–19. The Delete Me view when it first launches. Recognize any of these computers?
Notice that we again have a button on the right side of the navigation bar, this time labeled Delete. If you tap that, the table enters edit mode, which looks like Figure 9–20.
www.it-ebooks.info