


196 |
CHAPTER 7: Tab Bars and Pickers |
viewDidLoad: is also very similar to the version we wrote for the previous picker. The only difference is that we are loading two arrays with data rather than just one array. Again, we’re just creating arrays from a hard-coded list of strings—something you generally won’t do in your own applications.
When we get down to the data source methods, that’s where things start to change a bit. In the first method, we specify that our picker should have two components rather than just one:
- (NSInteger)numberOfComponentsInPickerView:(UIPickerView *)pickerView { return 2;
}
This time, when we are asked for the number of rows, we need to check which component the picker is asking about and return the correct row count for the corresponding array.
- (NSInteger)pickerView:(UIPickerView *)pickerView numberOfRowsInComponent:(NSInteger)component {
if (component == kBreadComponent) return [self.breadTypes count];
return [self.fillingTypes count];
}
Then, in our delegate method, we do the same thing. We check the component and use the correct array for the requested component to fetch and return the correct value.
- (NSString *)pickerView:(UIPickerView *)pickerView titleForRow:(NSInteger)row
forComponent:(NSInteger)component { if (component == kBreadComponent)
return [self.breadTypes objectAtIndex:row]; return [self.fillingTypes objectAtIndex:row];
}
That wasn’t so hard, was it? Compile and run your application, and make sure the Double content pane looks like Figure 7–4.
Notice that each wheel is completely independent of the other wheel. Turning one has no effect on the other. That’s appropriate in this case. But there will be times when one component is dependent on another. A good example of this is in the date picker. When you change the month, the dial that shows the number of days in the month may need to change, because not all months have the same number of days. Implementing this isn’t really hard once you know how, but it’s not the easiest thing to figure out on your own, so let’s do that next.
Implementing Dependent Components
We’re picking up steam now. For this next section, we’re not going to hold your hand quite as much when it comes to material we’ve already covered. Instead, we’ll focus on the new stuff. Our new picker will display a list of US states in the left component and a
www.it-ebooks.info

CHAPTER 7: Tab Bars and Pickers |
197 |
list of ZIP codes in the right component that correspond to the state currently selected in the left.
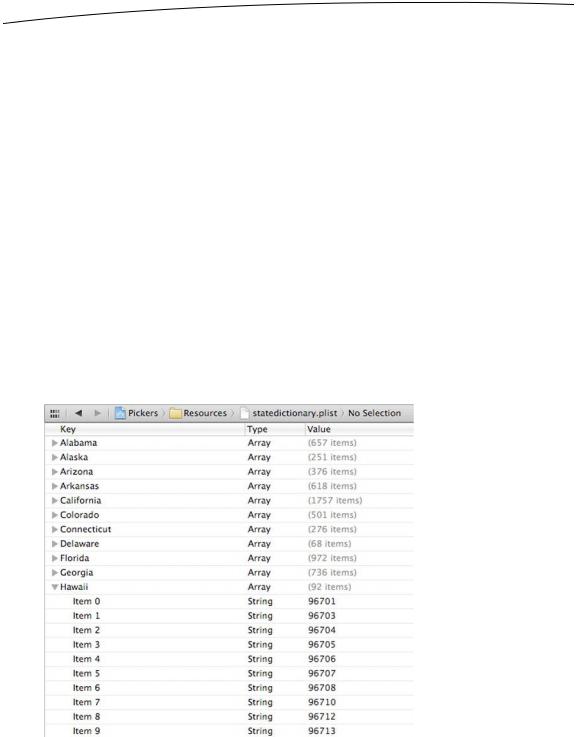
We’ll need a separate list of ZIP code values for each item in the left-hand component. We’ll declare two arrays, one for each component, as we did last time. We’ll also need an NSDictionary. In the dictionary, we’re going to store an NSArray for each state (see Figure 7–20). Later, we’ll implement a delegate method that will notify us when the picker’s selection changes. If the value on the left changes, we will grab the correct array out of the dictionary and assign it to the array being used for the right-hand component. Don’t worry if you didn’t catch all that; we’ll talk about it more as we get into the code.
Figure 7–20. Our application’s data. For each state, there will be one entry in a dictionary with the name of the state as the key. Stored under that key will be an NSArray instance containing all the ZIP codes from that state.
Add the following code to your BIDDependentComponentPickerViewController.h file:
#import <UIKit/UIKit.h> |
|
|
#define |
kStateComponent |
0 |
#define |
kZipComponent |
1 |
@interface BIDDependentComponentPickerViewController : UIViewController
<UIPickerViewDelegate, UIPickerViewDataSource>
@property (strong, nonatomic) IBOutlet UIPickerView *picker; @property (strong, nonatomic) NSDictionary *stateZips; @property (strong, nonatomic) NSArray *states;
@property (strong, nonatomic) NSArray *zips;
- (IBAction) buttonPressed;
@end
Now it’s time to build the content view. That process will be almost identical to the previous two component views we built. If you get lost, flip back to the “Building the View” section for the single-component picker, and follow those step-by-step
www.it-ebooks.info
198 |
CHAPTER 7: Tab Bars and Pickers |
instructions. Here’s a hint: start off by opening
BIDDependentComponentPickerViewController.xib, and then repeat the same basic steps you’ve done for all the other content views in this chapter. When you’re finished, save the nib.
OK, take a deep breath. Let’s implement this controller class. This implementation may seem a little gnarly at first. By making one component dependent on the other, we have added a whole new level of complexity to our controller class. Although the picker displays only two lists at a time, our controller class must know about and manage 51 lists. The technique we’re going to use here actually simplifies that process. The data source methods look almost identical to the one we implemented for the DoublePicker view. All of the additional complexity is handled elsewhere, between viewDidLoad and a new delegate method called pickerView:didSelectRow:inComponent:.
Before we write the code, we need some data to display. Up to now, we’ve created arrays in code by specifying a list of strings. Because we didn’t want you to need to type in several thousand values, and because we figured we should show you the correct way to do this, we’re going to load the data from a property list. As we’ve mentioned, both NSArray and NSDictionary objects can be created from property lists. We’ve included a property list called statedictionary.plist in the project archive, under the 07 Pickers folder.
Copy that file into the Pickers folder in your Xcode project. If you single-click the plist file in the project window, you can see and even edit the data that it contains (see Figure 7–21).
Figure 7–21. The statedictionary.plist file, showing our list of states. Within Hawaii, you can see the start of a list of ZIP codes.
www.it-ebooks.info

CHAPTER 7: Tab Bars and Pickers |
199 |
Now, let’s write some code. Add the following to
BIDDependentComponentPickerViewController.m, and then we’ll break it down into more digestible chunks:
#import "BIDDependentComponentPickerViewController.h"
@implementation BIDDependentComponentPickerViewController
@synthesize picker; @synthesize stateZips; @synthesize states; @synthesize zips;
- (IBAction) buttonPressed {
NSInteger stateRow = [picker selectedRowInComponent:kStateComponent]; NSInteger zipRow = [picker selectedRowInComponent:kZipComponent];
NSString *state = [self.states objectAtIndex:stateRow];
NSString *zip = [self.zips objectAtIndex:zipRow];
NSString *title = [[NSString alloc] initWithFormat: @"You selected zip code %@.", zip];
NSString *message = [[NSString alloc] initWithFormat: @"%@ is in %@", zip, state];
UIAlertView *alert = [[UIAlertView alloc] initWithTitle:title message:message
delegate:nil
cancelButtonTitle:@"OK"
otherButtonTitles:nil];
[alert show];
}
.
.
.
Then, add the following code to the existing viewDidLoad method:
- (void)viewDidLoad { [super viewDidLoad];
// Do any additional setup after loading the view from its nib.
NSBundle *bundle = [NSBundle mainBundle];
NSURL *plistURL = [bundle URLForResource:@"statedictionary" withExtension:@"plist"];
NSDictionary *dictionary = [NSDictionary dictionaryWithContentsOfURL:plistURL];
self.stateZips = dictionary;
NSArray *components = [self.stateZips allKeys];
NSArray *sorted = [components sortedArrayUsingSelector: @selector(compare:)];
self.states = sorted;
www.it-ebooks.info

200 |
CHAPTER 7: Tab Bars and Pickers |
NSString *selectedState = [self.states objectAtIndex:0]; NSArray *array = [stateZips objectForKey:selectedState]; self.zips = array;
}
Next, add the following lines of code to the existing viewDidUnload method:
- (void)viewDidUnload { [super viewDidUnload];
//Release any retained subviews of the main view.
//e.g. self.myOutlet = nil;
self.picker = nil; self.stateZips = nil; self.states = nil; self.zips = nil;
}
And, finally, add the delegate and data source methods at the bottom of the file:
.
.
.
#pragma mark -
#pragma mark Picker Data Source Methods
- (NSInteger)numberOfComponentsInPickerView:(UIPickerView *)pickerView { return 2;
}
- (NSInteger)pickerView:(UIPickerView *)pickerView numberOfRowsInComponent:(NSInteger)component {
if (component == kStateComponent) return [self.states count];
return [self.zips count];
}
#pragma mark Picker Delegate Methods
- (NSString *)pickerView:(UIPickerView *)pickerView titleForRow:(NSInteger)row
forComponent:(NSInteger)component { if (component == kStateComponent)
return [self.states objectAtIndex:row]; return [self.zips objectAtIndex:row];
}
- (void)pickerView:(UIPickerView *)pickerView didSelectRow:(NSInteger)row inComponent:(NSInteger)component {
if (component == kStateComponent) {
NSString *selectedState = [self.states objectAtIndex:row]; NSArray *array = [stateZips objectForKey:selectedState]; self.zips = array;
[picker selectRow:0 inComponent:kZipComponent animated:YES]; [picker reloadComponent:kZipComponent];
}
}
@end
www.it-ebooks.info

CHAPTER 7: Tab Bars and Pickers |
201 |
There’s no need to talk about the buttonPressed method, since it’s fundamentally the same as the previous one. We should talk about the viewDidLoad method, though. There’s some stuff going on there that you need to understand, so pull up a chair, and let’s chat.
The first thing we do in this new viewDidLoad method is grab a reference to our application’s main bundle.
NSBundle *bundle = [NSBundle mainBundle];
What is a bundle, you ask? Well, a bundle is just a special type of folder whose contents follow a specific structure. Applications and frameworks are both bundles, and this call returns a bundle object that represents our application.
One of the primary uses of NSBundle is to get to resources that you added to the Resources folder of your project. Those files will be copied into your application’s bundle when you build your application. We’ve added resources like images to our projects, but up to now, we’ve used those only in Interface Builder. If we want to get to those resources in our code, we usually need to use NSBundle. We use the main bundle to retrieve the URL of the resource in which we’re interested.
NSURL *plistURL = [bundle URLForResource:@"statedictionary" withExtension:@"plist"];
This will return a URL containing the location of the statedictionary.plist file. We can then use that URL to create an NSDictionary object. Once we do that, the entire contents of that property list will be loaded into the newly created NSDictionary object, which we then assign to stateZips.
NSDictionary *dictionary = [NSDictionary dictionaryWithContentsOfURL:plistURL];
self.stateZips = dictionary;
The dictionary we just loaded uses the names of the states as the keys and contains an NSArray with all the ZIP codes for that state as the values. To populate the array for the left-hand component, we get the list of all keys from our dictionary and assign those to the states array. Before we assign it, though, we sort it alphabetically.
NSArray *components = [self.stateZips allKeys];
NSArray *sorted = [components sortedArrayUsingSelector: @selector(compare:)];
self.states = sorted;
Unless we specifically set the selection to another value, pickers start with the first row (row 0) selected. In order to get the zips array that corresponds to the first row in the states array, we grab the object from the states array that’s at index 0. That will return the name of the state that will be selected at launch time. We then use that state name to grab the array of ZIP codes for that state, which we assign to the zips array that will be used to feed data to the right-hand component.
NSString *selectedState = [self.states objectAtIndex:0]; NSArray *array = [stateZips objectForKey:selectedState]; self.zips = array;
www.it-ebooks.info
202 |
CHAPTER 7: Tab Bars and Pickers |
The two data source methods are practically identical to the previous version. We return the number of rows in the appropriate array. The same is true for the first delegate method we implemented. The second delegate method is the new one, and it’s where the magic happens.
- (void)pickerView:(UIPickerView *)pickerView didSelectRow:(NSInteger)row
inComponent:(NSInteger)component { if (component == kStateComponent) {
NSString *selectedState = [self.states objectAtIndex:row]; NSArray *array = [stateZips objectForKey:selectedState]; self.zips = array;
[picker selectRow:0 inComponent:kZipComponent animated:YES]; [picker reloadComponent:kZipComponent];
}
}
In this method, which is called any time the picker’s selection changes, we look at the component and see whether the left-hand component changed. If it did, we grab the array that corresponds to the new selection and assign it to the zips array. Then we set the right-hand component back to the first row and tell it to reload itself. By swapping the zips array whenever the state changes, the rest of the code remains pretty much the same as it was in the DoublePicker example.
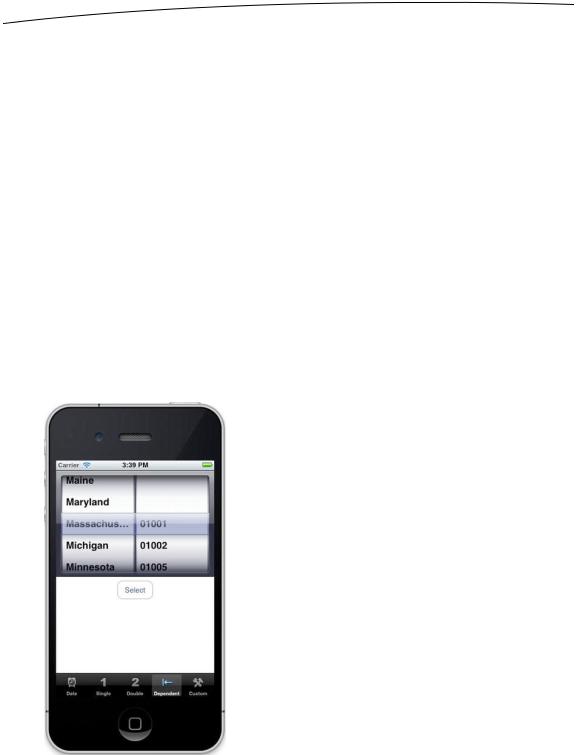
We’re not quite finished yet. Compile and run your application, and check out the Dependent tab (see Figure 7–22). Do you see anything there you don’t like?
Figure 7–22. Do we really want the two components to be of equal size? Notice the clipping of a long state name.
www.it-ebooks.info