- •Contents at a Glance
- •About the Authors
- •About the Technical Reviewer
- •Acknowledgments
- •Preface
- •What This Book Is
- •What You Need
- •Developer Options
- •What You Need to Know
- •What’s Different About Coding for iOS?
- •Only One Active Application
- •Only One Window
- •Limited Access
- •Limited Response Time
- •Limited Screen Size
- •Limited System Resources
- •No Garbage Collection, but…
- •Some New Stuff
- •A Different Approach
- •What’s in This Book
- •What’s New in This Update?
- •Are You Ready?
- •Setting Up Your Project in Xcode
- •The Xcode Workspace Window
- •The Toolbar
- •The Navigator View
- •The Jump Bar
- •The Utility Pane
- •Interface Builder
- •New Compiler and Debugger
- •A Closer Look at Our Project
- •Introducing Xcode’s Interface Builder
- •What’s in the Nib File?
- •The Library
- •Adding a Label to the View
- •Changing Attributes
- •Some iPhone Polish—Finishing Touches
- •Bring It on Home
- •The Model-View-Controller Paradigm
- •Creating Our Project
- •Looking at the View Controller
- •Understanding Outlets and Actions
- •Outlets
- •Actions
- •Cleaning Up the View Controller
- •Designing the User Interface
- •Adding the Buttons and Action Method
- •Adding the Label and Outlet
- •Writing the Action Method
- •Trying It Out
- •Looking at the Application Delegate
- •Bring It on Home
- •A Screen Full of Controls
- •Active, Static, and Passive Controls
- •Creating the Application
- •Implementing the Image View and Text Fields
- •Adding the Image View
- •Resizing the Image View
- •Setting View Attributes
- •The Mode Attribute
- •Interaction Checkboxes
- •The Alpha Value
- •Background
- •Drawing Checkboxes
- •Stretching
- •Adding the Text Fields
- •Text Field Inspector Settings
- •Setting the Attributes for the Second Text Field
- •Creating and Connecting Outlets
- •Closing the Keyboard
- •Closing the Keyboard When Done Is Tapped
- •Touching the Background to Close the Keyboard
- •Adding the Slider and Label
- •Creating and Connecting the Actions and Outlets
- •Implementing the Action Method
- •Adding Two Labeled Switches
- •Connecting and Creating Outlets and Actions
- •Implementing the Switch Actions
- •Adding the Button
- •Connecting and Creating the Button Outlets and Actions
- •Implementing the Segmented Control Action
- •Implementing the Action Sheet and Alert
- •Conforming to the Action Sheet Delegate Method
- •Showing the Action Sheet
- •Spiffing Up the Button
- •Using the viewDidLoad Method
- •Control States
- •Stretchable Images
- •Crossing the Finish Line
- •The Mechanics of Autorotation
- •Points, Pixels, and the Retina Display
- •Autorotation Approaches
- •Handling Rotation Using Autosize Attributes
- •Configuring Supported Orientations
- •Specifying Rotation Support
- •Designing an Interface with Autosize Attributes
- •Using the Size Inspector’s Autosize Attributes
- •Setting the Buttons’ Autosize Attributes
- •Restructuring a View When Rotated
- •Creating and Connecting Outlets
- •Moving the Buttons on Rotation
- •Swapping Views
- •Designing the Two Views
- •Implementing the Swap
- •Changing Outlet Collections
- •Rotating Out of Here
- •Common Types of Multiview Apps
- •The Architecture of a Multiview Application
- •The Root Controller
- •Anatomy of a Content View
- •Building View Switcher
- •Creating Our View Controller and Nib Files
- •Modifying the App Delegate
- •Modifying BIDSwitchViewController.h
- •Adding a View Controller
- •Building a View with a Toolbar
- •Writing the Root View Controller
- •Implementing the Content Views
- •Animating the Transition
- •Switching Off
- •The Pickers Application
- •Delegates and Data Sources
- •Setting Up the Tab Bar Framework
- •Creating the Files
- •Adding the Root View Controller
- •Creating TabBarController.xib
- •The Initial Test Run
- •Implementing the Date Picker
- •Implementing the Single-Component Picker
- •Declaring Outlets and Actions
- •Building the View
- •Implementing the Controller As a Data Source and Delegate
- •Implementing a Multicomponent Picker
- •Declaring Outlets and Actions
- •Building the View
- •Implementing the Controller
- •Implementing Dependent Components
- •Creating a Simple Game with a Custom Picker
- •Writing the Controller Header File
- •Building the View
- •Adding Image Resources
- •Implementing the Controller
- •The spin Method
- •The viewDidLoad Method
- •Final Details
- •Linking in the Audio Toolbox Framework
- •Final Spin
- •Table View Basics
- •Table Views and Table View Cells
- •Grouped and Plain Tables
- •Implementing a Simple Table
- •Designing the View
- •Writing the Controller
- •Adding an Image
- •Using Table View Cell Styles
- •Setting the Indent Level
- •Handling Row Selection
- •Changing the Font Size and Row Height
- •Customizing Table View Cells
- •Adding Subviews to the Table View Cell
- •Creating a UITableViewCell Subclass
- •Adding New Cells
- •Implementing the Controller’s Code
- •Loading a UITableViewCell from a Nib
- •Designing the Table View Cell in Interface Builder
- •Using the New Table View Cell
- •Grouped and Indexed Sections
- •Building the View
- •Importing the Data
- •Implementing the Controller
- •Adding an Index
- •Implementing a Search Bar
- •Rethinking the Design
- •A Deep Mutable Copy
- •Updating the Controller Header File
- •Modifying the View
- •Modifying the Controller Implementation
- •Copying Data from allNames
- •Implementing the Search
- •Changes to viewDidLoad
- •Changes to Data Source Methods
- •Adding a Table View Delegate Method
- •Adding Search Bar Delegate Methods
- •Adding a Magnifying Glass to the Index
- •Adding the Special Value to the Keys Array
- •Suppressing the Section Header
- •Telling the Table View What to Do
- •Putting It All on the Table
- •Navigation Controller Basics
- •Stacky Goodness
- •A Stack of Controllers
- •Nav, a Hierarchical Application in Six Parts
- •Meet the Subcontrollers
- •The Disclosure Button View
- •The Checklist View
- •The Rows Control View
- •The Movable Rows View
- •The Deletable Rows View
- •The Editable Detail View
- •The Nav Application’s Skeleton
- •Creating the Top-Level View Controller
- •Setting Up the Navigation Controller
- •Adding the Images to the Project
- •First Subcontroller: The Disclosure Button View
- •Creating the Detail View
- •Modifying the Disclosure Button Controller
- •Adding a Disclosure Button Controller Instance
- •Second Subcontroller: The Checklist
- •Creating the Checklist View
- •Adding a Checklist Controller Instance
- •Third Subcontroller: Controls on Table Rows
- •Creating the Row Controls View
- •Adding a Rows Control Controller Instance
- •Fourth Subcontroller: Movable Rows
- •Creating the Movable Row View
- •Adding a Move Me Controller Instance
- •Fifth Subcontroller: Deletable Rows
- •Creating the Deletable Rows View
- •Adding a Delete Me Controller Instance
- •Sixth Subcontroller: An Editable Detail Pane
- •Creating the Data Model Object
- •Creating the Detail View List Controller
- •Creating the Detail View Controller
- •Adding an Editable Detail View Controller Instance
- •But There’s One More Thing. . .
- •Breaking the Tape
- •Creating a Simple Storyboard
- •Dynamic Prototype Cells
- •Dynamic Table Content, Storyboard-Style
- •Editing Prototype Cells
- •Good Old Table View Data Source
- •Will It Load?
- •Static Cells
- •Going Static
- •So Long, Good Old Table View Data Source
- •You Say Segue, I Say Segue
- •Creating Segue Navigator
- •Filling the Blank Slate
- •First Transition
- •A Slightly More Useful Task List
- •Viewing Task Details
- •Make More Segues, Please
- •Passing a Task from the List
- •Handling Task Details
- •Passing Back Details
- •Making the List Receive the Details
- •If Only We Could End with a Smooth Transition
- •Split Views and Popovers
- •Creating a SplitView Project
- •The Storyboard Defines the Structure
- •The Code Defines the Functionality
- •The App Delegate
- •The Master View Controller
- •The Detail View Controller
- •Here Come the Presidents
- •Creating Your Own Popover
- •iPad Wrap-Up
- •Getting to Know Your Settings Bundle
- •The AppSettings Application
- •Creating the Project
- •Working with the Settings Bundle
- •Adding a Settings Bundle to Our Project
- •Setting Up the Property List
- •Adding a Text Field Setting
- •Adding an Application Icon
- •Adding a Secure Text Field Setting
- •Adding a Multivalue Field
- •Adding a Toggle Switch Setting
- •Adding the Slider Setting
- •Adding Icons to the Settings Bundle
- •Adding a Child Settings View
- •Reading Settings in Our Application
- •Retrieving User Settings
- •Creating the Main View
- •Updating the Main View Controller
- •Registering Default Values
- •Changing Defaults from Our Application
- •Keeping It Real
- •Beam Me Up, Scotty
- •Your Application’s Sandbox
- •Getting the Documents Directory
- •Getting the tmp Directory
- •File-Saving Strategies
- •Single-File Persistence
- •Multiple-File Persistence
- •Using Property Lists
- •Property List Serialization
- •The First Version of the Persistence Application
- •Creating the Persistence Project
- •Designing the Persistence Application View
- •Editing the Persistence Classes
- •Archiving Model Objects
- •Conforming to NSCoding
- •Implementing NSCopying
- •Archiving and Unarchiving Data Objects
- •The Archiving Application
- •Implementing the BIDFourLines Class
- •Implementing the BIDViewController Class
- •Using iOS’s Embedded SQLite3
- •Creating or Opening the Database
- •Using Bind Variables
- •The SQLite3 Application
- •Linking to the SQLite3 Library
- •Modifying the Persistence View Controller
- •Using Core Data
- •Entities and Managed Objects
- •Key-Value Coding
- •Putting It All in Context
- •Creating New Managed Objects
- •Retrieving Managed Objects
- •The Core Data Application
- •Designing the Data Model
- •Creating the Persistence View and Controller
- •Persistence Rewarded
- •Managing Document Storage with UIDocument
- •Building TinyPix
- •Creating BIDTinyPixDocument
- •Code Master
- •Initial Storyboarding
- •Creating BIDTinyPixView
- •Storyboard Detailing
- •Adding iCloud Support
- •Creating a Provisioning Profile
- •Enabling iCloud Entitlements
- •How to Query
- •Save Where?
- •Storing Preferences on iCloud
- •What We Didn’t Cover
- •Grand Central Dispatch
- •Introducing SlowWorker
- •Threading Basics
- •Units of Work
- •GCD: Low-Level Queueing
- •Becoming a Blockhead
- •Improving SlowWorker
- •Don’t Forget That Main Thread
- •Giving Some Feedback
- •Concurrent Blocks
- •Background Processing
- •Application Life Cycle
- •State-Change Notifications
- •Creating State Lab
- •Exploring Execution States
- •Making Use of Execution State Changes
- •Handling the Inactive State
- •Handling the Background State
- •Removing Resources When Entering the Background
- •Saving State When Entering the Background
- •A Brief Journey to Yesteryear
- •Back to the Background
- •Requesting More Backgrounding Time
- •Grand Central Dispatch, Over and Out
- •Two Views of a Graphical World
- •The Quartz 2D Approach to Drawing
- •Quartz 2D’s Graphics Contexts
- •The Coordinate System
- •Specifying Colors
- •A Bit of Color Theory for Your iOS Device’s Display
- •Other Color Models
- •Color Convenience Methods
- •Drawing Images in Context
- •Drawing Shapes: Polygons, Lines, and Curves
- •The QuartzFun Application
- •Setting Up the QuartzFun Application
- •Creating a Random Color
- •Defining Application Constants
- •Implementing the QuartzFunView Skeleton
- •Creating and Connecting Outlets and Actions
- •Implementing the Action Methods
- •Adding Quartz 2D Drawing Code
- •Drawing the Line
- •Drawing the Rectangle and Ellipse
- •Drawing the Image
- •Optimizing the QuartzFun Application
- •The GLFun Application
- •Setting Up the GLFun Application
- •Creating BIDGLFunView
- •Updating BIDViewController
- •Updating the Nib
- •Finishing GLFun
- •Drawing to a Close
- •Multitouch Terminology
- •The Responder Chain
- •Responding to Events
- •Forwarding an Event: Keeping the Responder Chain Alive
- •The Multitouch Architecture
- •The Four Touch Notification Methods
- •The TouchExplorer Application
- •The Swipes Application
- •Automatic Gesture Recognition
- •Implementing Multiple Swipes
- •Detecting Multiple Taps
- •Detecting Pinches
- •Defining Custom Gestures
- •The CheckPlease Application
- •The CheckPlease Touch Methods
- •Garçon? Check, Please!
- •The Location Manager
- •Setting the Desired Accuracy
- •Setting the Distance Filter
- •Starting the Location Manager
- •Using the Location Manager Wisely
- •The Location Manager Delegate
- •Getting Location Updates
- •Getting Latitude and Longitude Using CLLocation
- •Error Notifications
- •Trying Out Core Location
- •Updating Location Manager
- •Determining Distance Traveled
- •Wherever You Go, There You Are
- •Accelerometer Physics
- •Don’t Forget Rotation
- •Core Motion and the Motion Manager
- •Event-Based Motion
- •Proactive Motion Access
- •Accelerometer Results
- •Detecting Shakes
- •Baked-In Shaking
- •Shake and Break
- •Accelerometer As Directional Controller
- •Rolling Marbles
- •Writing the Ball View
- •Calculating Ball Movement
- •Rolling On
- •Using the Image Picker and UIImagePickerController
- •Implementing the Image Picker Controller Delegate
- •Road Testing the Camera and Library
- •Designing the Interface
- •Implementing the Camera View Controller
- •It’s a Snap!
- •Localization Architecture
- •Strings Files
- •What’s in a Strings File?
- •The Localized String Macro
- •Real-World iOS: Localizing Your Application
- •Setting Up LocalizeMe
- •Trying Out LocalizeMe
- •Localizing the Nib
- •Localizing an Image
- •Generating and Localizing a Strings File
- •Localizing the App Display Name
- •Auf Wiedersehen
- •Apple’s Documentation
- •Mailing Lists
- •Discussion Forums
- •Web Sites
- •Blogs
- •Conferences
- •Follow the Authors
- •Farewell
- •Index
CHAPTER 8: Introduction to Table Views |
221 |
Sections have two primary purposes. In a grouped table, each section represents one group. In an indexed table, each section corresponds to one index entry. For example, if you wanted to display a list indexed alphabetically with an index entry for every letter, you would have 26 sections, each containing all the values that begin with a particular letter.
CAUTION: Even though it is technically possible to create a grouped table with an index, you should not do so. The iPhone Human Interface Guidelines specifically state that grouped tables
should not provide indexes.
Implementing a Simple Table
Let’s look at the simplest possible example of a table view to get a feel for how it works. In this example, we’re just going to display a list of text values.
Create a new project in Xcode. For this chapter, we’re going back to the Single View Application template, so select that one. Call your project Simple Table, enter BID as the
Class Prefix, and set the Device Family to iPhone. Be sure the Use Storyboard and
Include Unit Tests checkboxes are unchecked.
Designing the View
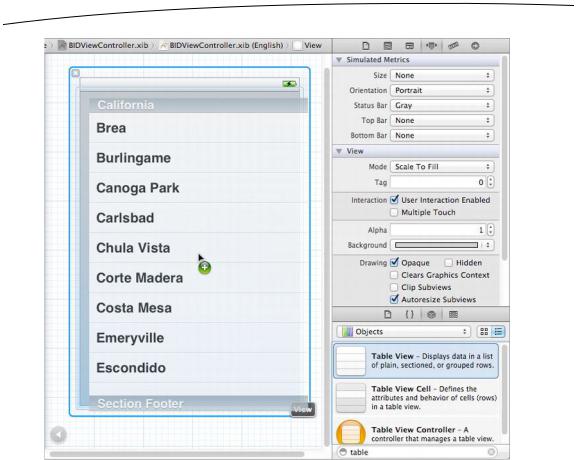
In the project navigator, expand the Simple Table project and the Simple Table folder. This is such a simple application that we’re not going to need any outlets or actions. Go ahead and select BIDViewController.xib to edit the GUI. If the View window isn’t visible in the layout area, single-click its icon in the dock to open it. Then look in the object library for a Table View (see Figure 8–4), and drag that over to the View window.
The table view should automatically size itself to the height and width of the view. This is exactly what we want. Table views are designed to fill the entire width of the screen and as much of the height as isn’t taken up by your application’s navigation bars, toolbars, and tab bars.
After dropping the table view onto the View window and fitting it just below the status bar, it should still be selected. If it’s not, single-click the table view to select it. Then press 6 to bring up the connections inspector. You’ll notice that the first two available connections for the table view are the same as the first two for the picker view: dataSource and delegate. Drag from the circle next to each of those connections over to the File’s Owner icon. By doing this, we are making our controller class both the data source and delegate for this table.
After setting the connections, save your nib file and get ready to dig into some
UITableView code.
www.it-ebooks.info
222 |
CHAPTER 8: Introduction to Table Views |
Figure 8–4. Dragging a table view from the library onto our main view. Notice that the table view automatically resizes to the full size of the view.
Writing the Controller
The next stop is our controller class’s header file. Single-click BIDViewController.h, and add the following code:
#import <UIKit/UIKit.h>
@interface BIDViewController : UIViewController
<UITableViewDelegate, UITableViewDataSource>
@property (strong, nonatomic) NSArray *listData;
@end
All we’re doing here is conforming our class to the two protocols that are needed for it to act as the delegate and data source for the table view, and then declaring an array that will hold the data to be displayed.
Save your changes. Next, switch over to BIDViewController.m, and add the following code at the beginning of the file:
www.it-ebooks.info
CHAPTER 8: Introduction to Table Views |
223 |
#import "BIDViewController.h"
@implementation BIDViewController
@synthesize listData;
.
.
.
- (void)viewDidLoad {
[super viewDidLoad];
// Do any additional setup after loading the view, typically from a nib.
NSArray *array = [[NSArray alloc] initWithObjects:@"Sleepy", @"Sneezy", @"Bashful", @"Happy", @"Doc", @"Grumpy", @"Dopey", @"Thorin", @"Dorin", @"Nori", @"Ori", @"Balin", @"Dwalin", @"Fili", @"Kili", @"Oin", @"Gloin", @"Bifur", @"Bofur", @"Bombur", nil];
self.listData = array;
}
.
.
.
Now, add the following line of code to the existing viewDidUnload method:
- (void)viewDidUnload { [super viewDidUnload];
//Release any retained subviews of the main view.
//e.g. self.myOutlet = nil;
self.listData = nil;
}
Finally, add the following code at the end of the file:
.
.
.
#pragma mark -
#pragma mark Table View Data Source Methods
- (NSInteger)tableView:(UITableView *)tableView numberOfRowsInSection:(NSInteger)section { return [self.listData count];
}
- (UITableViewCell *)tableView:(UITableView *)tableView cellForRowAtIndexPath:(NSIndexPath *)indexPath {
static NSString *SimpleTableIdentifier = @"SimpleTableIdentifier";
UITableViewCell *cell = [tableView dequeueReusableCellWithIdentifier: SimpleTableIdentifier];
if (cell == nil) {
cell = [[UITableViewCell alloc] initWithStyle:UITableViewCellStyleDefault reuseIdentifier:SimpleTableIdentifier];
}
NSUInteger row = [indexPath row]; cell.textLabel.text = [listData objectAtIndex:row];
www.it-ebooks.info
224 |
CHAPTER 8: Introduction to Table Views |
return cell;
}
@end
We added three methods to the controller. You should be comfortable with the first one, viewDidLoad, since we’ve done similar things in the past. We’re simply creating an array of data to pass to the table. In a real application, this array would likely come from another source, such as a text file, property list, or URL.
If you scroll down to the end, you can see we added two data source methods. The first one, tableView:numberOfRowsInSection:, is used by the table to ask how many rows are in a particular section. As you might expect, the default number of sections is one, and this method will be called to get the number of rows in the one section that makes up the list. We just return the number of items in our array.
The next method probably requires a little explanation, so let’s look at it more closely.
- (UITableViewCell *)tableView:(UITableView *)tableView cellForRowAtIndexPath:(NSIndexPath *)indexPath {
This method is called by the table view when it needs to draw one of its rows. Notice that the second argument to this method is an NSIndexPath instance. This is the mechanism that table views use to wrap the section and row into a single object. To get the row or the section out of an NSIndexPath, you just call either its row method or its section method, both of which return an int.
The first parameter, tableView, is a reference to the table doing the asking. This allows us to create classes that act as a data source for multiple tables.
Next, we declare a static string instance.
static NSString *SimpleTableIdentifier = @"SimpleTableIdentifier";
This string will be used as a key to represent the type of our table cell. Our table will use only a single type of cell.
A table view can display only a few rows at a time on the iPhone’s small screen, but the table itself can conceivably hold considerably more. Remember that each row in the table is represented by an instance of UITableViewCell, a subclass of UIView, which means each row can contain subviews. With a large table, this could represent a huge amount of overhead if the table were to try to keep one table view cell instance for every row in the table, regardless of whether that row was currently being displayed. Fortunately, tables don’t work that way.
Instead, as table view cells scroll off the screen, they are placed into a queue of cells available to be reused. If the system runs low on memory, the table view will get rid of the cells in the queue. But as long as the system has some memory available for those cells, it will hold on to them in case you want to use them again.
Every time a table view cell rolls off the screen, there’s a pretty good chance that another one just rolled onto the screen on the other side. If that new row can just reuse one of the cells that has already rolled off the screen, the system can avoid the overhead
www.it-ebooks.info
CHAPTER 8: Introduction to Table Views |
225 |
associated with constantly creating and releasing those views. To take advantage of this mechanism, we’ll ask the table view to give us a previously used cell of the specified type. Note that we’re making use of the NSString identifier we declared earlier. In effect, we’re asking for a reusable cell of type SimpleTableIdentifier.
UITableViewCell *cell = [tableView dequeueReusableCellWithIdentifier:
SimpleTableIdentifier];
Now, it’s completely possible that the table view won’t have any spare cells (when it’s being initially populated, for example), so we check cell after the call to see whether it’s nil. If it is, we manually create a new table view cell using that identifier string. At some point, we’ll inevitably reuse one of the cells we create here, so we need to make sure that we create it using SimpleTableIdentifier.
if (cell == nil) {
cell = [[UITableViewCell alloc] initWithStyle:UITableViewCellStyleDefault reuseIdentifier:SimpleTableIdentifier];
}
Curious about UITableViewCellStyleDefault? Hold that thought. We’ll get to it when we look at the table view cell styles.
We now have a table view cell that we can return for the table view to use. So, all we need to do is place whatever information we want displayed in this cell. Displaying text in a row of a table is a very common task, so the table view cell provides a UILabel property called textLabel that we can set in order to display strings. That just requires getting the correct string from our listData array and using it to set the cell’s textLabel.
To get the correct value, however, we need to know which row the table view is asking for. We get that information from the indexPath variable, like so:
NSUInteger row = [indexPath row];
We use the row number of the table to get the corresponding string from the array, assign it to the cell’s textLabel.text property, and then return the cell.
cell.textLabel.text = [listData objectAtIndex:row]; return cell;
}
That wasn’t so bad, was it? Compile and run your application, and you should see the array values displayed in a table view (see Figure 8–5).
www.it-ebooks.info