- •Contents at a Glance
- •About the Authors
- •About the Technical Reviewer
- •Acknowledgments
- •Preface
- •What This Book Is
- •What You Need
- •Developer Options
- •What You Need to Know
- •What’s Different About Coding for iOS?
- •Only One Active Application
- •Only One Window
- •Limited Access
- •Limited Response Time
- •Limited Screen Size
- •Limited System Resources
- •No Garbage Collection, but…
- •Some New Stuff
- •A Different Approach
- •What’s in This Book
- •What’s New in This Update?
- •Are You Ready?
- •Setting Up Your Project in Xcode
- •The Xcode Workspace Window
- •The Toolbar
- •The Navigator View
- •The Jump Bar
- •The Utility Pane
- •Interface Builder
- •New Compiler and Debugger
- •A Closer Look at Our Project
- •Introducing Xcode’s Interface Builder
- •What’s in the Nib File?
- •The Library
- •Adding a Label to the View
- •Changing Attributes
- •Some iPhone Polish—Finishing Touches
- •Bring It on Home
- •The Model-View-Controller Paradigm
- •Creating Our Project
- •Looking at the View Controller
- •Understanding Outlets and Actions
- •Outlets
- •Actions
- •Cleaning Up the View Controller
- •Designing the User Interface
- •Adding the Buttons and Action Method
- •Adding the Label and Outlet
- •Writing the Action Method
- •Trying It Out
- •Looking at the Application Delegate
- •Bring It on Home
- •A Screen Full of Controls
- •Active, Static, and Passive Controls
- •Creating the Application
- •Implementing the Image View and Text Fields
- •Adding the Image View
- •Resizing the Image View
- •Setting View Attributes
- •The Mode Attribute
- •Interaction Checkboxes
- •The Alpha Value
- •Background
- •Drawing Checkboxes
- •Stretching
- •Adding the Text Fields
- •Text Field Inspector Settings
- •Setting the Attributes for the Second Text Field
- •Creating and Connecting Outlets
- •Closing the Keyboard
- •Closing the Keyboard When Done Is Tapped
- •Touching the Background to Close the Keyboard
- •Adding the Slider and Label
- •Creating and Connecting the Actions and Outlets
- •Implementing the Action Method
- •Adding Two Labeled Switches
- •Connecting and Creating Outlets and Actions
- •Implementing the Switch Actions
- •Adding the Button
- •Connecting and Creating the Button Outlets and Actions
- •Implementing the Segmented Control Action
- •Implementing the Action Sheet and Alert
- •Conforming to the Action Sheet Delegate Method
- •Showing the Action Sheet
- •Spiffing Up the Button
- •Using the viewDidLoad Method
- •Control States
- •Stretchable Images
- •Crossing the Finish Line
- •The Mechanics of Autorotation
- •Points, Pixels, and the Retina Display
- •Autorotation Approaches
- •Handling Rotation Using Autosize Attributes
- •Configuring Supported Orientations
- •Specifying Rotation Support
- •Designing an Interface with Autosize Attributes
- •Using the Size Inspector’s Autosize Attributes
- •Setting the Buttons’ Autosize Attributes
- •Restructuring a View When Rotated
- •Creating and Connecting Outlets
- •Moving the Buttons on Rotation
- •Swapping Views
- •Designing the Two Views
- •Implementing the Swap
- •Changing Outlet Collections
- •Rotating Out of Here
- •Common Types of Multiview Apps
- •The Architecture of a Multiview Application
- •The Root Controller
- •Anatomy of a Content View
- •Building View Switcher
- •Creating Our View Controller and Nib Files
- •Modifying the App Delegate
- •Modifying BIDSwitchViewController.h
- •Adding a View Controller
- •Building a View with a Toolbar
- •Writing the Root View Controller
- •Implementing the Content Views
- •Animating the Transition
- •Switching Off
- •The Pickers Application
- •Delegates and Data Sources
- •Setting Up the Tab Bar Framework
- •Creating the Files
- •Adding the Root View Controller
- •Creating TabBarController.xib
- •The Initial Test Run
- •Implementing the Date Picker
- •Implementing the Single-Component Picker
- •Declaring Outlets and Actions
- •Building the View
- •Implementing the Controller As a Data Source and Delegate
- •Implementing a Multicomponent Picker
- •Declaring Outlets and Actions
- •Building the View
- •Implementing the Controller
- •Implementing Dependent Components
- •Creating a Simple Game with a Custom Picker
- •Writing the Controller Header File
- •Building the View
- •Adding Image Resources
- •Implementing the Controller
- •The spin Method
- •The viewDidLoad Method
- •Final Details
- •Linking in the Audio Toolbox Framework
- •Final Spin
- •Table View Basics
- •Table Views and Table View Cells
- •Grouped and Plain Tables
- •Implementing a Simple Table
- •Designing the View
- •Writing the Controller
- •Adding an Image
- •Using Table View Cell Styles
- •Setting the Indent Level
- •Handling Row Selection
- •Changing the Font Size and Row Height
- •Customizing Table View Cells
- •Adding Subviews to the Table View Cell
- •Creating a UITableViewCell Subclass
- •Adding New Cells
- •Implementing the Controller’s Code
- •Loading a UITableViewCell from a Nib
- •Designing the Table View Cell in Interface Builder
- •Using the New Table View Cell
- •Grouped and Indexed Sections
- •Building the View
- •Importing the Data
- •Implementing the Controller
- •Adding an Index
- •Implementing a Search Bar
- •Rethinking the Design
- •A Deep Mutable Copy
- •Updating the Controller Header File
- •Modifying the View
- •Modifying the Controller Implementation
- •Copying Data from allNames
- •Implementing the Search
- •Changes to viewDidLoad
- •Changes to Data Source Methods
- •Adding a Table View Delegate Method
- •Adding Search Bar Delegate Methods
- •Adding a Magnifying Glass to the Index
- •Adding the Special Value to the Keys Array
- •Suppressing the Section Header
- •Telling the Table View What to Do
- •Putting It All on the Table
- •Navigation Controller Basics
- •Stacky Goodness
- •A Stack of Controllers
- •Nav, a Hierarchical Application in Six Parts
- •Meet the Subcontrollers
- •The Disclosure Button View
- •The Checklist View
- •The Rows Control View
- •The Movable Rows View
- •The Deletable Rows View
- •The Editable Detail View
- •The Nav Application’s Skeleton
- •Creating the Top-Level View Controller
- •Setting Up the Navigation Controller
- •Adding the Images to the Project
- •First Subcontroller: The Disclosure Button View
- •Creating the Detail View
- •Modifying the Disclosure Button Controller
- •Adding a Disclosure Button Controller Instance
- •Second Subcontroller: The Checklist
- •Creating the Checklist View
- •Adding a Checklist Controller Instance
- •Third Subcontroller: Controls on Table Rows
- •Creating the Row Controls View
- •Adding a Rows Control Controller Instance
- •Fourth Subcontroller: Movable Rows
- •Creating the Movable Row View
- •Adding a Move Me Controller Instance
- •Fifth Subcontroller: Deletable Rows
- •Creating the Deletable Rows View
- •Adding a Delete Me Controller Instance
- •Sixth Subcontroller: An Editable Detail Pane
- •Creating the Data Model Object
- •Creating the Detail View List Controller
- •Creating the Detail View Controller
- •Adding an Editable Detail View Controller Instance
- •But There’s One More Thing. . .
- •Breaking the Tape
- •Creating a Simple Storyboard
- •Dynamic Prototype Cells
- •Dynamic Table Content, Storyboard-Style
- •Editing Prototype Cells
- •Good Old Table View Data Source
- •Will It Load?
- •Static Cells
- •Going Static
- •So Long, Good Old Table View Data Source
- •You Say Segue, I Say Segue
- •Creating Segue Navigator
- •Filling the Blank Slate
- •First Transition
- •A Slightly More Useful Task List
- •Viewing Task Details
- •Make More Segues, Please
- •Passing a Task from the List
- •Handling Task Details
- •Passing Back Details
- •Making the List Receive the Details
- •If Only We Could End with a Smooth Transition
- •Split Views and Popovers
- •Creating a SplitView Project
- •The Storyboard Defines the Structure
- •The Code Defines the Functionality
- •The App Delegate
- •The Master View Controller
- •The Detail View Controller
- •Here Come the Presidents
- •Creating Your Own Popover
- •iPad Wrap-Up
- •Getting to Know Your Settings Bundle
- •The AppSettings Application
- •Creating the Project
- •Working with the Settings Bundle
- •Adding a Settings Bundle to Our Project
- •Setting Up the Property List
- •Adding a Text Field Setting
- •Adding an Application Icon
- •Adding a Secure Text Field Setting
- •Adding a Multivalue Field
- •Adding a Toggle Switch Setting
- •Adding the Slider Setting
- •Adding Icons to the Settings Bundle
- •Adding a Child Settings View
- •Reading Settings in Our Application
- •Retrieving User Settings
- •Creating the Main View
- •Updating the Main View Controller
- •Registering Default Values
- •Changing Defaults from Our Application
- •Keeping It Real
- •Beam Me Up, Scotty
- •Your Application’s Sandbox
- •Getting the Documents Directory
- •Getting the tmp Directory
- •File-Saving Strategies
- •Single-File Persistence
- •Multiple-File Persistence
- •Using Property Lists
- •Property List Serialization
- •The First Version of the Persistence Application
- •Creating the Persistence Project
- •Designing the Persistence Application View
- •Editing the Persistence Classes
- •Archiving Model Objects
- •Conforming to NSCoding
- •Implementing NSCopying
- •Archiving and Unarchiving Data Objects
- •The Archiving Application
- •Implementing the BIDFourLines Class
- •Implementing the BIDViewController Class
- •Using iOS’s Embedded SQLite3
- •Creating or Opening the Database
- •Using Bind Variables
- •The SQLite3 Application
- •Linking to the SQLite3 Library
- •Modifying the Persistence View Controller
- •Using Core Data
- •Entities and Managed Objects
- •Key-Value Coding
- •Putting It All in Context
- •Creating New Managed Objects
- •Retrieving Managed Objects
- •The Core Data Application
- •Designing the Data Model
- •Creating the Persistence View and Controller
- •Persistence Rewarded
- •Managing Document Storage with UIDocument
- •Building TinyPix
- •Creating BIDTinyPixDocument
- •Code Master
- •Initial Storyboarding
- •Creating BIDTinyPixView
- •Storyboard Detailing
- •Adding iCloud Support
- •Creating a Provisioning Profile
- •Enabling iCloud Entitlements
- •How to Query
- •Save Where?
- •Storing Preferences on iCloud
- •What We Didn’t Cover
- •Grand Central Dispatch
- •Introducing SlowWorker
- •Threading Basics
- •Units of Work
- •GCD: Low-Level Queueing
- •Becoming a Blockhead
- •Improving SlowWorker
- •Don’t Forget That Main Thread
- •Giving Some Feedback
- •Concurrent Blocks
- •Background Processing
- •Application Life Cycle
- •State-Change Notifications
- •Creating State Lab
- •Exploring Execution States
- •Making Use of Execution State Changes
- •Handling the Inactive State
- •Handling the Background State
- •Removing Resources When Entering the Background
- •Saving State When Entering the Background
- •A Brief Journey to Yesteryear
- •Back to the Background
- •Requesting More Backgrounding Time
- •Grand Central Dispatch, Over and Out
- •Two Views of a Graphical World
- •The Quartz 2D Approach to Drawing
- •Quartz 2D’s Graphics Contexts
- •The Coordinate System
- •Specifying Colors
- •A Bit of Color Theory for Your iOS Device’s Display
- •Other Color Models
- •Color Convenience Methods
- •Drawing Images in Context
- •Drawing Shapes: Polygons, Lines, and Curves
- •The QuartzFun Application
- •Setting Up the QuartzFun Application
- •Creating a Random Color
- •Defining Application Constants
- •Implementing the QuartzFunView Skeleton
- •Creating and Connecting Outlets and Actions
- •Implementing the Action Methods
- •Adding Quartz 2D Drawing Code
- •Drawing the Line
- •Drawing the Rectangle and Ellipse
- •Drawing the Image
- •Optimizing the QuartzFun Application
- •The GLFun Application
- •Setting Up the GLFun Application
- •Creating BIDGLFunView
- •Updating BIDViewController
- •Updating the Nib
- •Finishing GLFun
- •Drawing to a Close
- •Multitouch Terminology
- •The Responder Chain
- •Responding to Events
- •Forwarding an Event: Keeping the Responder Chain Alive
- •The Multitouch Architecture
- •The Four Touch Notification Methods
- •The TouchExplorer Application
- •The Swipes Application
- •Automatic Gesture Recognition
- •Implementing Multiple Swipes
- •Detecting Multiple Taps
- •Detecting Pinches
- •Defining Custom Gestures
- •The CheckPlease Application
- •The CheckPlease Touch Methods
- •Garçon? Check, Please!
- •The Location Manager
- •Setting the Desired Accuracy
- •Setting the Distance Filter
- •Starting the Location Manager
- •Using the Location Manager Wisely
- •The Location Manager Delegate
- •Getting Location Updates
- •Getting Latitude and Longitude Using CLLocation
- •Error Notifications
- •Trying Out Core Location
- •Updating Location Manager
- •Determining Distance Traveled
- •Wherever You Go, There You Are
- •Accelerometer Physics
- •Don’t Forget Rotation
- •Core Motion and the Motion Manager
- •Event-Based Motion
- •Proactive Motion Access
- •Accelerometer Results
- •Detecting Shakes
- •Baked-In Shaking
- •Shake and Break
- •Accelerometer As Directional Controller
- •Rolling Marbles
- •Writing the Ball View
- •Calculating Ball Movement
- •Rolling On
- •Using the Image Picker and UIImagePickerController
- •Implementing the Image Picker Controller Delegate
- •Road Testing the Camera and Library
- •Designing the Interface
- •Implementing the Camera View Controller
- •It’s a Snap!
- •Localization Architecture
- •Strings Files
- •What’s in a Strings File?
- •The Localized String Macro
- •Real-World iOS: Localizing Your Application
- •Setting Up LocalizeMe
- •Trying Out LocalizeMe
- •Localizing the Nib
- •Localizing an Image
- •Generating and Localizing a Strings File
- •Localizing the App Display Name
- •Auf Wiedersehen
- •Apple’s Documentation
- •Mailing Lists
- •Discussion Forums
- •Web Sites
- •Blogs
- •Conferences
- •Follow the Authors
- •Farewell
- •Index
CHAPTER 8: Introduction to Table Views |
269 |
returned by this method is an NSRange struct with two members: location and length. If the search term was not found, the location will be set to NSNotFound, so we just check for that. If the NSRange that is returned contains NSNotFound, we add the name to the array of objects to be removed later.
if ([name rangeOfString:searchTerm options:NSCaseInsensitiveSearch].location == NSNotFound)
[toRemove addObject:name];
}
After we’ve looped through all the names for a given letter, we check to see whether the array of names to be removed is the same length as the array of names. If it is, we know this section is now empty, and we add it to the array of keys to be removed later.
if ([array count] == [toRemove count]) [sectionsToRemove addObject:key];
Next, we actually remove the nonmatching names from this section’s arrays.
[array removeObjectsInArray:toRemove];
}
Finally, we remove the empty sections, release the array used to keep track of the empty sections, and tell the table to reload its data.
[self.keys removeObjectsInArray:sectionsToRemove]; [sectionsToRemove release];
[table reloadData];
}
Changes to viewDidLoad
Down in viewDidLoad, we made a few changes. First, we now load the property list into the allNames dictionary instead of the names dictionary and delete the code that loads the keys array, because that is now done in the resetSearch method. We then call the resetSearch method, which populates the names mutable dictionary and the keys array for us. After that, we call reloadData on our tableView. In the normal flow of the program, reloadData will be called before the user ever sees the table, so most of the time it’s not necessary to call it in viewDidLoad:. However, in order for the line after it, setContentOffset:animated:, to work, we need to make sure that the table is all set up, which we do by calling reloadData on the table.
[table reloadData];
[table setContentOffset:CGPointMake(0.0, 44.0) animated:NO];
So, what does setContentOffset:animated: do? Well, it does exactly what it sounds like. It offsets the contents of the table—in our case, by 44 pixels, the height of the search bar. This causes the search bar to be scrolled off the top when the table first comes up. In effect, we are “hiding” the search bar up there at the top, to be discovered by users the first time they scroll all the way up. This is similar to the way that Mail, Contacts, and other standard iOS applications support searching. Users don’t see the search bar at first, but can bring it into view with a simple downward swipe.
www.it-ebooks.info
270 |
CHAPTER 8: Introduction to Table Views |
Hiding the search bar bears a certain risk in that the user might not discover the search functionality at first, or perhaps not at all! However, this is a risk shared among a wide variety of iOS apps, and this usage of the search bar is now so common that there’s no real reason to show anything more explicit. We’ll talk more about this in the “Adding a Magnifying Glass to the Index” section, coming up soon.
Changes to Data Source Methods
If you skip down to the data source methods, you’ll see we made a few minor changes there. Because the names dictionary and keys array are still being used to feed the data source, these methods are basically the same as they were before.
We did need to account for the fact that table views always have a minimum of one section, and yet the search could potentially exclude all names from all sections. So, we added a little code to check for the situation where all sections were removed. In those cases, we feed the table view a single section with no rows and a blank name. This avoids any problems and doesn’t give any incorrect feedback to the user.
Adding a Table View Delegate Method
Below the data source methods, we’ve added a single delegate method. If the user clicks a row while using the search bar, we want the keyboard to go away. We accomplish this by implementing tableView:willSelectRowAtIndexPath: and telling the search bar to resign first responder status, which will cause the keyboard to retract. Next, we return indexPath unchanged.
- (NSIndexPath *)tableView:(UITableView *)tableView willSelectRowAtIndexPath:(NSIndexPath *)indexPath { [search resignFirstResponder];
return indexPath;
}
We could also have done this in tableView:didSelectRowAtIndexPath:, but because we’re doing it here, the keyboard retracts a bit sooner.
Adding Search Bar Delegate Methods
The search bar has a number of methods that it calls on its delegate. When the user taps return or the search key on the keyboard, searchBarSearchButtonClicked: will be called. Our version of this method grabs the search term from the search bar and calls our search method, which will remove the nonmatching names from names and the empty sections from keys.
- (void)searchBarSearchButtonClicked:(UISearchBar *)searchBar { NSString *searchTerm = [searchBar text];
[self handleSearchForTerm:searchTerm];
}
The searchBarSearchButtonClicked: method should be implemented any time you use a search bar.
www.it-ebooks.info
CHAPTER 8: Introduction to Table Views |
271 |
We also implement another search bar delegate method, which requires a bit of caution. This next method implements a live search. Every time the search term changes, regardless of whether the user has selected the search button or tapped return, we redo the search. This behavior is very user-friendly, as the users can see the results change while typing. If users pare the list down far enough on the third character, they can stop typing and select the row they want.
You can easily hamstring the performance of your application by implementing live search, especially if you’re displaying images or have a complex data model. In this case, with 2,000 strings and no images or accessory icons, things actually work pretty well, even on a first-generation iPhone or iPod touch.
CAUTION: Do not assume that snappy performance in the simulator translates to snappy performance on your device. If you’re going to implement a live search like this, you need to test
extensively on actual hardware to make sure your application stays responsive. When in doubt, don’t use the live search feature. Your users will likely be perfectly happy tapping the search
button.
To handle a live search, implement the search bar delegate method searchBar:textDidChange: like so:
- (void)searchBar:(UISearchBar *)searchBar textDidChange:(NSString *)searchTerm { if ([searchTerm length] == 0) {
[self resetSearch]; [table reloadData]; return;
}
[self handleSearchForTerm:searchTerm];
}
Notice that we check for an empty string. If the string is empty, we know all names are going to match it, so we simply reset the search and reload the data, without bothering to enumerate over all the names.
Last, we implement a method that allows us to be notified when the user clicks the Cancel button on the search bar.
- (void)searchBarCancelButtonClicked:(UISearchBar *)searchBar { search.text = @"";
[self resetSearch]; [table reloadData];
[searchBar resignFirstResponder];
}
When the user clicks Cancel, we set the search term to an empty string, reset the search, and reload the data so that all names are showing. We also tell the search bar to yield first responder status, so that the keyboard drops away and the user can resume working with the table view.
www.it-ebooks.info
272 CHAPTER 8: Introduction to Table Views
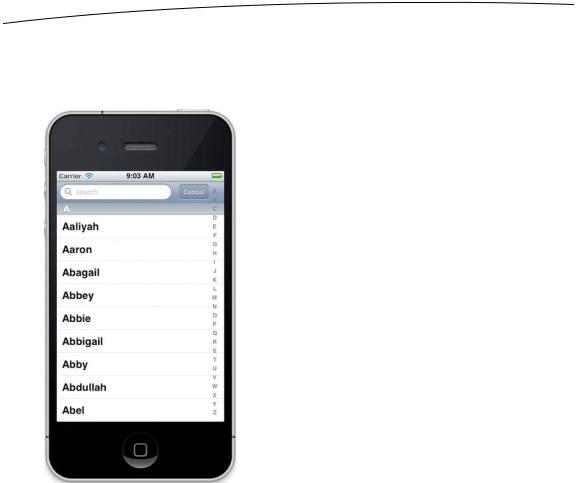
If you haven’t done so already, fire up our app and try out the search functionality. Remember that the search bar is scrolled just off the top of the screen, so drag down to bring it into view. Click in the search field and start typing. The name list should trim to match the text you type (Figure 8–32). It works, right?
Figure 8–32. Our Sections app in all its glory. As promised, the index no longer steps on the Cancel button. Nice!
For our next bit of tinkering, how about making that index disappear when you tap on the search field? This is not mandatory—it’s strictly a design decision—but worth knowing how to do.
First, let’s add a property variable to keep track of whether the user is currently using the search bar. Add the following to BIDViewController.h:
@interface ViewController : UIViewController <UITableViewDataSource, UITableViewDelegate, UISearchBarDelegate>
@property (strong, nonatomic) IBOutlet UITableView *table; @property (strong, nonatomic) IBOutlet UISearchBar *search; @property (strong, nonatomic) NSDictionary *allNames; @property (strong, nonatomic) NSMutableDictionary *names; @property (strong, nonatomic) NSMutableArray *keys;
@property (assign, nonatomic) BOOL isSearching;
-(void)resetSearch;
-(void)handleSearchForTerm:(NSString *)searchTerm; @end
www.it-ebooks.info
CHAPTER 8: Introduction to Table Views |
273 |
Save the file, and let’s shift our attention to BIDViewController.m. First, add a method synthesizer for the new property:
@implementation ViewController @synthesize names;
@synthesize keys; @synthesize table; @synthesize search; @synthesize allNames;
@synthesize isSearching;
Next, we need to modify the sectionIndexTitlesForTableView: method to return nil if the user is searching:
- (NSArray *)sectionIndexTitlesForTableView:(UITableView *)tableView { if (isSearching)
return nil; return keys;
}
We need to implement a new delegate method to set isSearching to YES when searching begins. Add the following method to the search bar delegate methods section of BIDViewController.m:
- (void)searchBarTextDidBeginEditing:(UISearchBar *)searchBar { isSearching = YES;
[table reloadData];
}
This method is called when the search bar is tapped. In it, we set isSearching to YES, and then tell the table to reload itself, which causes the index to disappear. We also need to remember to set isSearching to NO when the user is finished searching. There are two ways a user can finish searching: by pressing the Cancel button or by tapping a row in the table. Therefore, we need to add code to the searchBarCancelButtonClicked: method:
- (void)searchBarCancelButtonClicked:(UISearchBar *)searchBar { isSearching = NO;
search.text = @""; [self resetSearch]; [table reloadData];
[searchBar resignFirstResponder];
}
We also need to make that change to the tableView:willSelectRowAtIndexPath: method:
-(NSIndexPath *)tableView:(UITableView *)tableView willSelectRowAtIndexPath:(NSIndexPath *)indexPath {
[search resignFirstResponder];
isSearching = NO; search.text = @""; [tableView reloadData]; return indexPath;
}
www.it-ebooks.info