- •Contents at a Glance
- •About the Authors
- •About the Technical Reviewer
- •Acknowledgments
- •Preface
- •What This Book Is
- •What You Need
- •Developer Options
- •What You Need to Know
- •What’s Different About Coding for iOS?
- •Only One Active Application
- •Only One Window
- •Limited Access
- •Limited Response Time
- •Limited Screen Size
- •Limited System Resources
- •No Garbage Collection, but…
- •Some New Stuff
- •A Different Approach
- •What’s in This Book
- •What’s New in This Update?
- •Are You Ready?
- •Setting Up Your Project in Xcode
- •The Xcode Workspace Window
- •The Toolbar
- •The Navigator View
- •The Jump Bar
- •The Utility Pane
- •Interface Builder
- •New Compiler and Debugger
- •A Closer Look at Our Project
- •Introducing Xcode’s Interface Builder
- •What’s in the Nib File?
- •The Library
- •Adding a Label to the View
- •Changing Attributes
- •Some iPhone Polish—Finishing Touches
- •Bring It on Home
- •The Model-View-Controller Paradigm
- •Creating Our Project
- •Looking at the View Controller
- •Understanding Outlets and Actions
- •Outlets
- •Actions
- •Cleaning Up the View Controller
- •Designing the User Interface
- •Adding the Buttons and Action Method
- •Adding the Label and Outlet
- •Writing the Action Method
- •Trying It Out
- •Looking at the Application Delegate
- •Bring It on Home
- •A Screen Full of Controls
- •Active, Static, and Passive Controls
- •Creating the Application
- •Implementing the Image View and Text Fields
- •Adding the Image View
- •Resizing the Image View
- •Setting View Attributes
- •The Mode Attribute
- •Interaction Checkboxes
- •The Alpha Value
- •Background
- •Drawing Checkboxes
- •Stretching
- •Adding the Text Fields
- •Text Field Inspector Settings
- •Setting the Attributes for the Second Text Field
- •Creating and Connecting Outlets
- •Closing the Keyboard
- •Closing the Keyboard When Done Is Tapped
- •Touching the Background to Close the Keyboard
- •Adding the Slider and Label
- •Creating and Connecting the Actions and Outlets
- •Implementing the Action Method
- •Adding Two Labeled Switches
- •Connecting and Creating Outlets and Actions
- •Implementing the Switch Actions
- •Adding the Button
- •Connecting and Creating the Button Outlets and Actions
- •Implementing the Segmented Control Action
- •Implementing the Action Sheet and Alert
- •Conforming to the Action Sheet Delegate Method
- •Showing the Action Sheet
- •Spiffing Up the Button
- •Using the viewDidLoad Method
- •Control States
- •Stretchable Images
- •Crossing the Finish Line
- •The Mechanics of Autorotation
- •Points, Pixels, and the Retina Display
- •Autorotation Approaches
- •Handling Rotation Using Autosize Attributes
- •Configuring Supported Orientations
- •Specifying Rotation Support
- •Designing an Interface with Autosize Attributes
- •Using the Size Inspector’s Autosize Attributes
- •Setting the Buttons’ Autosize Attributes
- •Restructuring a View When Rotated
- •Creating and Connecting Outlets
- •Moving the Buttons on Rotation
- •Swapping Views
- •Designing the Two Views
- •Implementing the Swap
- •Changing Outlet Collections
- •Rotating Out of Here
- •Common Types of Multiview Apps
- •The Architecture of a Multiview Application
- •The Root Controller
- •Anatomy of a Content View
- •Building View Switcher
- •Creating Our View Controller and Nib Files
- •Modifying the App Delegate
- •Modifying BIDSwitchViewController.h
- •Adding a View Controller
- •Building a View with a Toolbar
- •Writing the Root View Controller
- •Implementing the Content Views
- •Animating the Transition
- •Switching Off
- •The Pickers Application
- •Delegates and Data Sources
- •Setting Up the Tab Bar Framework
- •Creating the Files
- •Adding the Root View Controller
- •Creating TabBarController.xib
- •The Initial Test Run
- •Implementing the Date Picker
- •Implementing the Single-Component Picker
- •Declaring Outlets and Actions
- •Building the View
- •Implementing the Controller As a Data Source and Delegate
- •Implementing a Multicomponent Picker
- •Declaring Outlets and Actions
- •Building the View
- •Implementing the Controller
- •Implementing Dependent Components
- •Creating a Simple Game with a Custom Picker
- •Writing the Controller Header File
- •Building the View
- •Adding Image Resources
- •Implementing the Controller
- •The spin Method
- •The viewDidLoad Method
- •Final Details
- •Linking in the Audio Toolbox Framework
- •Final Spin
- •Table View Basics
- •Table Views and Table View Cells
- •Grouped and Plain Tables
- •Implementing a Simple Table
- •Designing the View
- •Writing the Controller
- •Adding an Image
- •Using Table View Cell Styles
- •Setting the Indent Level
- •Handling Row Selection
- •Changing the Font Size and Row Height
- •Customizing Table View Cells
- •Adding Subviews to the Table View Cell
- •Creating a UITableViewCell Subclass
- •Adding New Cells
- •Implementing the Controller’s Code
- •Loading a UITableViewCell from a Nib
- •Designing the Table View Cell in Interface Builder
- •Using the New Table View Cell
- •Grouped and Indexed Sections
- •Building the View
- •Importing the Data
- •Implementing the Controller
- •Adding an Index
- •Implementing a Search Bar
- •Rethinking the Design
- •A Deep Mutable Copy
- •Updating the Controller Header File
- •Modifying the View
- •Modifying the Controller Implementation
- •Copying Data from allNames
- •Implementing the Search
- •Changes to viewDidLoad
- •Changes to Data Source Methods
- •Adding a Table View Delegate Method
- •Adding Search Bar Delegate Methods
- •Adding a Magnifying Glass to the Index
- •Adding the Special Value to the Keys Array
- •Suppressing the Section Header
- •Telling the Table View What to Do
- •Putting It All on the Table
- •Navigation Controller Basics
- •Stacky Goodness
- •A Stack of Controllers
- •Nav, a Hierarchical Application in Six Parts
- •Meet the Subcontrollers
- •The Disclosure Button View
- •The Checklist View
- •The Rows Control View
- •The Movable Rows View
- •The Deletable Rows View
- •The Editable Detail View
- •The Nav Application’s Skeleton
- •Creating the Top-Level View Controller
- •Setting Up the Navigation Controller
- •Adding the Images to the Project
- •First Subcontroller: The Disclosure Button View
- •Creating the Detail View
- •Modifying the Disclosure Button Controller
- •Adding a Disclosure Button Controller Instance
- •Second Subcontroller: The Checklist
- •Creating the Checklist View
- •Adding a Checklist Controller Instance
- •Third Subcontroller: Controls on Table Rows
- •Creating the Row Controls View
- •Adding a Rows Control Controller Instance
- •Fourth Subcontroller: Movable Rows
- •Creating the Movable Row View
- •Adding a Move Me Controller Instance
- •Fifth Subcontroller: Deletable Rows
- •Creating the Deletable Rows View
- •Adding a Delete Me Controller Instance
- •Sixth Subcontroller: An Editable Detail Pane
- •Creating the Data Model Object
- •Creating the Detail View List Controller
- •Creating the Detail View Controller
- •Adding an Editable Detail View Controller Instance
- •But There’s One More Thing. . .
- •Breaking the Tape
- •Creating a Simple Storyboard
- •Dynamic Prototype Cells
- •Dynamic Table Content, Storyboard-Style
- •Editing Prototype Cells
- •Good Old Table View Data Source
- •Will It Load?
- •Static Cells
- •Going Static
- •So Long, Good Old Table View Data Source
- •You Say Segue, I Say Segue
- •Creating Segue Navigator
- •Filling the Blank Slate
- •First Transition
- •A Slightly More Useful Task List
- •Viewing Task Details
- •Make More Segues, Please
- •Passing a Task from the List
- •Handling Task Details
- •Passing Back Details
- •Making the List Receive the Details
- •If Only We Could End with a Smooth Transition
- •Split Views and Popovers
- •Creating a SplitView Project
- •The Storyboard Defines the Structure
- •The Code Defines the Functionality
- •The App Delegate
- •The Master View Controller
- •The Detail View Controller
- •Here Come the Presidents
- •Creating Your Own Popover
- •iPad Wrap-Up
- •Getting to Know Your Settings Bundle
- •The AppSettings Application
- •Creating the Project
- •Working with the Settings Bundle
- •Adding a Settings Bundle to Our Project
- •Setting Up the Property List
- •Adding a Text Field Setting
- •Adding an Application Icon
- •Adding a Secure Text Field Setting
- •Adding a Multivalue Field
- •Adding a Toggle Switch Setting
- •Adding the Slider Setting
- •Adding Icons to the Settings Bundle
- •Adding a Child Settings View
- •Reading Settings in Our Application
- •Retrieving User Settings
- •Creating the Main View
- •Updating the Main View Controller
- •Registering Default Values
- •Changing Defaults from Our Application
- •Keeping It Real
- •Beam Me Up, Scotty
- •Your Application’s Sandbox
- •Getting the Documents Directory
- •Getting the tmp Directory
- •File-Saving Strategies
- •Single-File Persistence
- •Multiple-File Persistence
- •Using Property Lists
- •Property List Serialization
- •The First Version of the Persistence Application
- •Creating the Persistence Project
- •Designing the Persistence Application View
- •Editing the Persistence Classes
- •Archiving Model Objects
- •Conforming to NSCoding
- •Implementing NSCopying
- •Archiving and Unarchiving Data Objects
- •The Archiving Application
- •Implementing the BIDFourLines Class
- •Implementing the BIDViewController Class
- •Using iOS’s Embedded SQLite3
- •Creating or Opening the Database
- •Using Bind Variables
- •The SQLite3 Application
- •Linking to the SQLite3 Library
- •Modifying the Persistence View Controller
- •Using Core Data
- •Entities and Managed Objects
- •Key-Value Coding
- •Putting It All in Context
- •Creating New Managed Objects
- •Retrieving Managed Objects
- •The Core Data Application
- •Designing the Data Model
- •Creating the Persistence View and Controller
- •Persistence Rewarded
- •Managing Document Storage with UIDocument
- •Building TinyPix
- •Creating BIDTinyPixDocument
- •Code Master
- •Initial Storyboarding
- •Creating BIDTinyPixView
- •Storyboard Detailing
- •Adding iCloud Support
- •Creating a Provisioning Profile
- •Enabling iCloud Entitlements
- •How to Query
- •Save Where?
- •Storing Preferences on iCloud
- •What We Didn’t Cover
- •Grand Central Dispatch
- •Introducing SlowWorker
- •Threading Basics
- •Units of Work
- •GCD: Low-Level Queueing
- •Becoming a Blockhead
- •Improving SlowWorker
- •Don’t Forget That Main Thread
- •Giving Some Feedback
- •Concurrent Blocks
- •Background Processing
- •Application Life Cycle
- •State-Change Notifications
- •Creating State Lab
- •Exploring Execution States
- •Making Use of Execution State Changes
- •Handling the Inactive State
- •Handling the Background State
- •Removing Resources When Entering the Background
- •Saving State When Entering the Background
- •A Brief Journey to Yesteryear
- •Back to the Background
- •Requesting More Backgrounding Time
- •Grand Central Dispatch, Over and Out
- •Two Views of a Graphical World
- •The Quartz 2D Approach to Drawing
- •Quartz 2D’s Graphics Contexts
- •The Coordinate System
- •Specifying Colors
- •A Bit of Color Theory for Your iOS Device’s Display
- •Other Color Models
- •Color Convenience Methods
- •Drawing Images in Context
- •Drawing Shapes: Polygons, Lines, and Curves
- •The QuartzFun Application
- •Setting Up the QuartzFun Application
- •Creating a Random Color
- •Defining Application Constants
- •Implementing the QuartzFunView Skeleton
- •Creating and Connecting Outlets and Actions
- •Implementing the Action Methods
- •Adding Quartz 2D Drawing Code
- •Drawing the Line
- •Drawing the Rectangle and Ellipse
- •Drawing the Image
- •Optimizing the QuartzFun Application
- •The GLFun Application
- •Setting Up the GLFun Application
- •Creating BIDGLFunView
- •Updating BIDViewController
- •Updating the Nib
- •Finishing GLFun
- •Drawing to a Close
- •Multitouch Terminology
- •The Responder Chain
- •Responding to Events
- •Forwarding an Event: Keeping the Responder Chain Alive
- •The Multitouch Architecture
- •The Four Touch Notification Methods
- •The TouchExplorer Application
- •The Swipes Application
- •Automatic Gesture Recognition
- •Implementing Multiple Swipes
- •Detecting Multiple Taps
- •Detecting Pinches
- •Defining Custom Gestures
- •The CheckPlease Application
- •The CheckPlease Touch Methods
- •Garçon? Check, Please!
- •The Location Manager
- •Setting the Desired Accuracy
- •Setting the Distance Filter
- •Starting the Location Manager
- •Using the Location Manager Wisely
- •The Location Manager Delegate
- •Getting Location Updates
- •Getting Latitude and Longitude Using CLLocation
- •Error Notifications
- •Trying Out Core Location
- •Updating Location Manager
- •Determining Distance Traveled
- •Wherever You Go, There You Are
- •Accelerometer Physics
- •Don’t Forget Rotation
- •Core Motion and the Motion Manager
- •Event-Based Motion
- •Proactive Motion Access
- •Accelerometer Results
- •Detecting Shakes
- •Baked-In Shaking
- •Shake and Break
- •Accelerometer As Directional Controller
- •Rolling Marbles
- •Writing the Ball View
- •Calculating Ball Movement
- •Rolling On
- •Using the Image Picker and UIImagePickerController
- •Implementing the Image Picker Controller Delegate
- •Road Testing the Camera and Library
- •Designing the Interface
- •Implementing the Camera View Controller
- •It’s a Snap!
- •Localization Architecture
- •Strings Files
- •What’s in a Strings File?
- •The Localized String Macro
- •Real-World iOS: Localizing Your Application
- •Setting Up LocalizeMe
- •Trying Out LocalizeMe
- •Localizing the Nib
- •Localizing an Image
- •Generating and Localizing a Strings File
- •Localizing the App Display Name
- •Auf Wiedersehen
- •Apple’s Documentation
- •Mailing Lists
- •Discussion Forums
- •Web Sites
- •Blogs
- •Conferences
- •Follow the Authors
- •Farewell
- •Index
150 |
CHAPTER 6: Multiview Applications |
CAUTION: If you don’t see the switchViews: action as shown in Figure 6–14, check the spelling of your class file names. If you don’t get the name exactly right, things won’t match up.
Watch your spelling!
Save your nib file and move to the next step.
Building a View with a Toolbar
We now need to build a view to add to BIDSwitchViewController. As a reminder, this new view controller will be our root view controller—the controller that is in play when our application is launched. BIDSwitchViewController’s content view will consist of a toolbar that occupies the bottom of the screen. Its job is to switch between the blue view and the yellow view, so it will need a way for the user to change the views. For that, we’re going to use a toolbar with a button. Let’s build the toolbar view now.
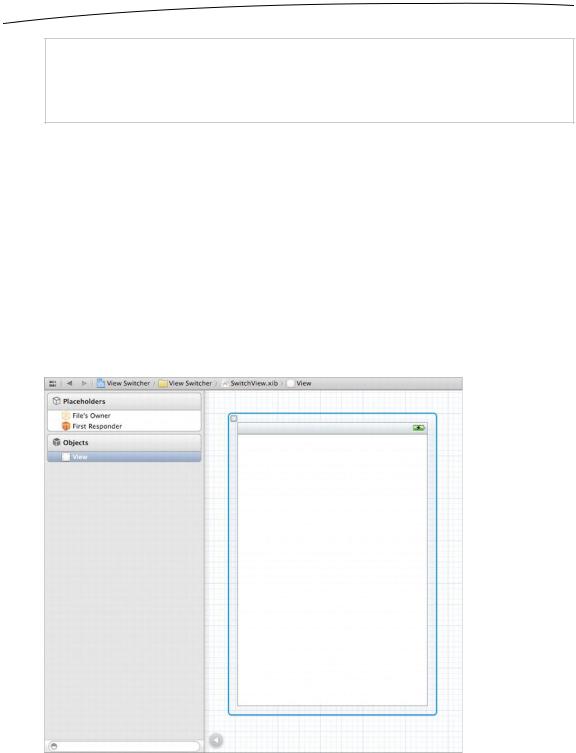
Still in SwitchView.xib, in the nib’s dock, click the View icon to make the view appear in the editing window (if it wasn’t already there). This will also select the view. The view is an instance of UIView, and as you can see in Figure 6–15, it’s currently empty and quite dull. This is where we’ll start building our GUI.
Figure 6–15. The default view contained within our nib file, just waiting to be filled with interesting stuff!
www.it-ebooks.info
CHAPTER 6: Multiview Applications |
151 |
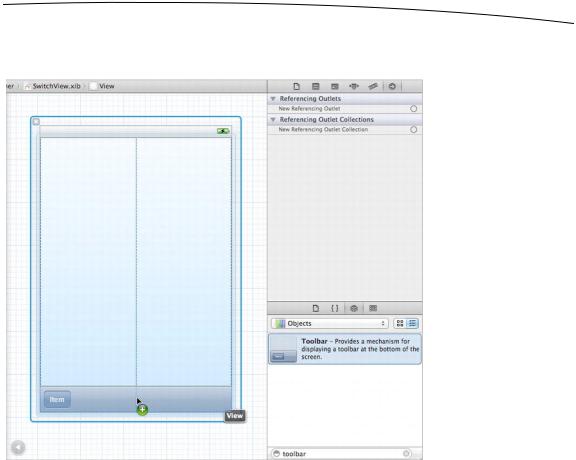
Now, let’s add a toolbar to the bottom of the view. Grab a Toolbar from the library, drag it onto your view, and place it at the bottom, so that it looks like Figure 6–16.
Figure 6–16. We dragged a toolbar onto our view. Notice that the toolbar features a single button, labeled Item.
The toolbar features a single button. We’ll use that button to let the user switch between the different content views. Double-click the button, and change its title to Switch Views. Press the return key to commit your change.
Now, we can link the toolbar button to our action method. Before doing that, though, we should warn you: toolbar buttons aren’t like other iOS controls. They support only a single target action, and they trigger that action only at one well-defined moment—the equivalent of a touch up inside event on other iOS controls.
Selecting a toolbar button in Interface Builder can be tricky. Click the view so we are all starting in the same place. Now, single-click the toolbar button. Notice that this selects the toolbar, not the button. Click the button a second time. This should select the button itself. You can confirm you have the button selected by switching to the object attributes inspector ( 4) and making sure the top group name is Bar Button Item.
Once you have the Switch Views button selected, control-drag from it over to the File’s Owner icon, and select the switchViews: action. If the switchViews: action doesn’t pop up, and instead you see an outlet called delegate, you’ve most likely control-dragged
www.it-ebooks.info
152 |
CHAPTER 6: Multiview Applications |
from the toolbar rather than the button. To fix it, just make sure you have the button rather than the toolbar selected, and then redo your control-drag.
TIP: Remember that you can always view the nib’s dock in list mode and use the disclosure
triangles to drill down through the hierarchy to get to any element in the view hierarchy.
We have one more thing to do in this nib, which is to connect BIDSwitchViewController’s view outlet to the view in the nib. The view outlet is inherited from the parent class, UIViewController, and gives the controller access to the view it controls. When we changed the underlying class of the file’s owner, the existing outlet connections were broken. So, we need to reestablish the connection from the controller to its view. Control-drag from the File’s Owner icon to the View icon, and select the view outlet to do that.
That’s all we need to do here, so save your nib file. Next, let’s get started implementing
BIDSwitchViewController.
Writing the Root View Controller
It’s time to write our root view controller. Its job is to switch between the blue view and the yellow view whenever the user clicks the Switch Views button.
In BIDSwitchViewController.m, first remove the comments around the viewDidLoad method. We’ll be replacing that method in a moment. You can delete the remaining commented-out methods provided by the template if you want to shorten the code.
Start by adding this code to the top of the file:
#import "BIDSwitchViewController.h"
#import "BIDYellowViewController.h" #import "BIDBlueViewController.h"
@implementation BIDSwitchViewController
@synthesize yellowViewController; @synthesize blueViewController;
.
.
.
Next, replace viewDidLoad with this version:
- (void)viewDidLoad
{
self.blueViewController = [[BIDBlueViewController alloc] initWithNibName:@"BlueView" bundle:nil];
[self.view insertSubview:self.blueViewController.view atIndex:0];
[super viewDidLoad];
}
www.it-ebooks.info
CHAPTER 6: Multiview Applications |
153 |
Now, add in the switchViews: method:
- (IBAction)switchViews:(id)sender {
if (self.yellowViewController.view.superview == nil) { if (self.yellowViewController == nil) {
self.yellowViewController =
[[BIDYellowViewController alloc] initWithNibName:@"YellowView" bundle:nil];
}
[blueViewController.view removeFromSuperview];
[self.view insertSubview:self.yellowViewController.view atIndex:0]; } else {
if (self.blueViewController == nil) { self.blueViewController =
[[BIDBlueViewController alloc] initWithNibName:@"BlueView" bundle:nil];
}
[yellowViewController.view removeFromSuperview];
[self.view insertSubview:self.blueViewController.view atIndex:0];
}
}
.
.
.
Also, add the following code to the existing didReceiveMemoryWarning method:
-(void)didReceiveMemoryWarning {
//Releases the view if it doesn't have a superview [super didReceiveMemoryWarning];
//Release any cached data, images, etc, that aren't in use if (self.blueViewController.view.superview == nil) {
self.blueViewController = nil;
}else {
self.yellowViewController = nil;
}
}
The first method we modified, viewDidLoad, overrides a UIViewController method that is called when the nib is loaded. How could we tell? Hold down the option key and singleclick the method name viewDidLoad. A documentation popup window will appear (see Figure 6–17). Alternatively, you can select View Utilities Show Quick Help Inspector to view similar information in the Quick Help panel. viewDidLoad is defined in our superclass, UIViewController, and is intended to be overridden by classes that need to be notified when the view has finished loading.
www.it-ebooks.info
154 |
CHAPTER 6: Multiview Applications |
Figure 6–17. This documentation window appears when you option-click the viewDidLoad method name.
This version of viewDidLoad creates an instance of BIDBlueViewController. We use the initWithNibName:bundle: method to load the BIDBlueViewController instance from the nib file BlueView.xib. Note that the file name provided to initWithNibName:bundle: does not include the .xib extension. Once the BIDBlueViewController is created, we assign this new instance to our blueViewController property.
self.blueViewController = [[BIDBlueViewController alloc] initWithNibName:@"BlueView" bundle:nil];
Next, we insert the blue view as a subview of the root view. We insert it at index 0, which tells iOS to put this view behind everything else. Sending the view to the back ensures that the toolbar we created in Interface Builder a moment ago will always be visible on the screen, since we’re inserting the content views behind it.
[self.view insertSubview:self.blueViewController.view atIndex:0];
Now, why didn’t we load the yellow view here also? We’re going to need to load it at some point, so why not do it now? Good question. The answer is that the user may never tap the Switch Views button. The user might just use the view that’s visible when the application launches, and then quit. In that case, why use resources to load the yellow view and its controller?
Instead, we’ll load the yellow view the first time we actually need it. This is called lazy loading, and it’s a standard way of keeping memory overhead down. The actual loading of the yellow view happens in the switchViews: method, so let’s take a look at that.
switchViews: first checks which view is being swapped in by seeing whether yellowViewController’s view’s superview is nil. This will return true if one of two things is true:
If yellowViewController exists but its view is not being shown to the user, that view will not have a superview because it’s not presently in the view hierarchy, and the expression will evaluate to true.
If yellowViewController doesn’t exist because it hasn’t been created yet or was flushed from memory, it will also return true.
www.it-ebooks.info
CHAPTER 6: Multiview Applications |
155 |
We then check to see whether yellowViewController is nil.
if (self.yellowViewController.view.superview == nil) {
If it is nil, that means there is no instance of yellowViewController, and we need to create one. This could happen because it’s the first time the button has been pressed or because the system ran low on memory and it was flushed. In this case, we need to create an instance of BIDYellowViewController as we did for the
BIDBlueViewController in the viewDidLoad method:
if (self.yellowViewController |
== nil) { |
self.yellowViewController |
= |
[[BIDYellowViewController |
alloc] initWithNibName:@"YellowView" |
} |
bundle:nil]; |
|
At this point, we know that we have a yellowViewController instance, because either we already had one or we just created it. We then remove blueViewController’s view from the view hierarchy and add the yellowViewController’s view:
[blueViewController.view removeFromSuperview];
[self.view insertSubview:self.yellowViewController.view atIndex:0];
If self.yellowViewController.view.superview is not nil, then we need to do the same thing, but for blueViewController. Although we create an instance of BIDBlueViewController in viewDidLoad, it is still possible that the instance has been flushed because memory got low. Now, in this application, the chances of memory running out are slim, but we’re still going to be good memory citizens and make sure we have an instance before proceeding:
} else |
{ |
|
if |
(self.blueViewController |
== nil) { |
|
self.blueViewController |
= |
|
[[BIDBlueViewController |
alloc] initWithNibName:@"BlueView" |
|
|
bundle:nil]; |
}
[yellowViewController.view removeFromSuperview];
[self.view insertSubview:self.blueViewController.view atIndex:0];
}
In addition to not using resources for the yellow view and controller if the Switch Views button is never tapped, lazy loading also gives us the ability to release whichever view is not being shown to free up its memory. iOS will call the UIViewController method didReceiveMemoryWarning, which is inherited by every view controller, when memory drops below a system-determined level.
Since we know that either view will be reloaded the next time it is shown to the user, we can safely release either controller. We do this by adding a few lines to the existing didReceiveMemoryWarning method:
- (void)didReceiveMemoryWarning {
[super didReceiveMemoryWarning]; // Releases the view if it
//doesn't have a superview
//Release anything that's not essential, such as cached data if (self.blueViewController.view.superview == nil)
self.blueViewController = nil;
www.it-ebooks.info