

142 |
CHAPTER 6: Multiview Applications |
This root controller is often an instance of UINavigationController or UITabBarController, although it can also be a custom subclass of UIViewController.
In a multiview application, the job of the root controller is to take two or more other views and present them to the user as appropriate, based on the user’s input. A tab bar controller, for example, will swap in different views and view controllers based on which tab bar item was last tapped. A navigation controller will do the same thing as the user drills down and backs up through hierarchical data.
NOTE: The root controller is the primary view controller for the application and, as such, is the view that specifies whether it is OK to automatically rotate to a new orientation. However, the
root controller can pass responsibility for tasks like that to the currently active controller.
In multiview applications, most of the screen will be taken up by a content view, and each content view will have its own controller with its own outlets and actions. In a tab bar application, for example, taps on the tab bar will go to the tab bar controller, but taps anywhere else on the screen will go to the controller that corresponds to the content view currently being displayed.
Anatomy of a Content View
In a multiview application, each view controller controls a content view, and these content views are where the bulk of your application’s user interface is built. Each content view generally consists of up to three pieces: the view controller, the nib, and a subclass of UIView. Unless you are doing something really unusual, your content view will always have an associated view controller, will usually have a nib, and will sometimes subclass UIView. Although you can create your interface in code rather than using a nib file, few people choose that route because it is more time-consuming and the code is difficult to maintain. In this chapter, we’ll be creating only a nib and a controller class for each content view.
In the View Switcher project, our root controller controls a content view that consists of a toolbar that occupies the bottom of the screen. The root controller then loads a blue view controller, placing the blue content view as a subview to the root controller view. When the root controller’s Switch Views button (the button is in the toolbar) is pressed, the root controller swaps out the blue view controller and swaps in a yellow view controller, instantiating that controller if it needs to do so. Confused? Don’t worry, because this will become clearer as we walk through the code.
Building View Switcher
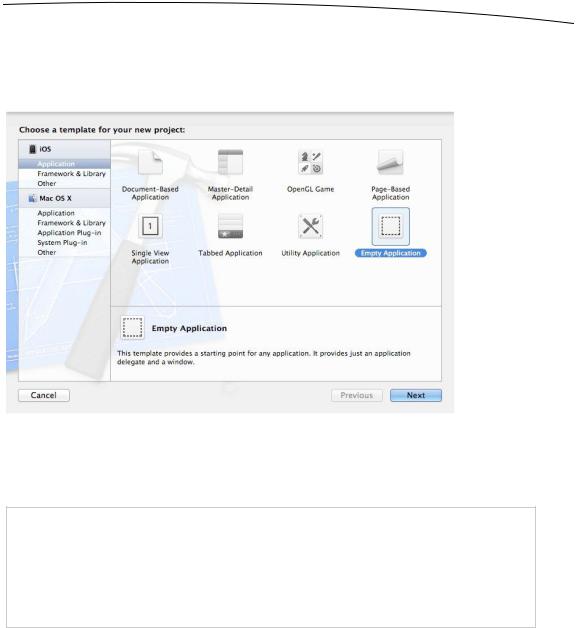
Enough theory! Let’s go ahead and build our project. Select File New New Project… or press N. When the template selection sheet opens, select Empty Application (see Figure 6–9), and then click Next. On the next page of the assistant, enter View Switcher as the Product Name, leave BID as the Class Prefix, and set the Device Family popup
www.it-ebooks.info
CHAPTER 6: Multiview Applications |
143 |
button to iPhone. Also make sure the checkboxes labeled Use Core Data and Include Unit Tests are unchecked, and Use Automatic Reference Counting is checked. Click
Next to continue. On the next screen, navigate to wherever you’re saving your projects on disk, and click the Create button to create a new project directory.
Figure 6–9. Creating a new project using the Empty Application project template
The template we just selected is actually even simpler than the Single View Application template we’ve been using up to now. This template will give us a window, an application delegate, and nothing else—no views, no controllers, no nothing.
NOTE: The window is the most basic container in iOS. Each app has exactly one window that belongs to it, though it is possible to see more than one window on the screen at a time. For example, if your app is running and a Short Message Service (SMS) message comes in, you’ll
see the SMS message displayed in its window. Your app can’t access that overlaid window
because it belongs to the SMS app.
You won’t use the Empty Application template very often when you’re creating applications, but by starting from nothing for our example, you’ll really get a feel for the way multiview applications are put together.
If they’re not expanded already, take a second to expand the View Switcher folder in the project navigator, as well as the Supporting Files folder it contains. Inside the View Switcher folder, you’ll find the two files that implement the application delegate. Within the Supporting Files folder, you’ll find the View Switcher-Info.plist file, the
InfoPlist.strings file (which contains the localized versions of your Info.plist file), the
www.it-ebooks.info
144 |
CHAPTER 6: Multiview Applications |
standard main.m, and the precompiled header file (View Switcher-Prefix.pch). Everything else we need for our application, we must create.
Creating Our View Controller and Nib Files
One of the more daunting aspects of building a multiview application from scratch is that we need to create several interconnected objects. We’re going to create all the files that will make up our application before we do anything in Interface Builder and before we write any code. By creating all the files first, we’ll be able to use Xcode’s Code Sense feature to write our code faster. If a class hasn’t been declared, Code Sense has no way to know about it, so we would need to type its name in full every time, which takes longer and is more error-prone.
Fortunately, in addition to project templates, Xcode also provides file templates for many standard file types, which helps simplify the process of creating the basic skeleton of our application.
Single-click the View Switcher folder in the project navigator, and then press N or select File New New File…. Take a look at the window that opens (see Figure 6–10).
Figure 6–10. The template we’ll use to create a new view controller subclass
If you select Cocoa Touch from the left pane, you will be given templates for a number of common Cocoa Touch classes. Select UIViewController subclass and click Next. On the next page of the assistant, you’ll see a text field where you can enter the name of the new class. Type in BIDSwitchViewController, and then direct your attention to the three other controls that let you configure the subclass:
www.it-ebooks.info
CHAPTER 6: Multiview Applications |
145 |
The first is a combo box labeled Subclass of, with possible values of
UIViewController and UITableViewController. If we wanted to create a table-based layout, for example, we might change this to
UITableViewController. For our purposes, UIViewController will do what we need.
The second is a checkbox labeled Targeted for iPad. If it’s checked by default, you should uncheck it now (since we’re not making an iPad GUI).
The third is another checkbox, labeled With XIB for user interface. If that box is checked, uncheck it as well. If you left that checkbox checked, Xcode would create a nib file that corresponds to this controller class. We will start using that option in the next chapter, but for now, we want you to see how the different parts of the puzzle fit together by creating each individually.
Click Next. A window appears that lets you choose a particular directory in which to save the files and pick a group and target for your files. By default, this window will show the directory most relevant to the folder you selected in the project navigator. For the sake of consistency, you’ll want to save the new class into the View Switcher folder, which Xcode set up when you created this project; it should already contain the BIDAppDelegate class. That’s where Xcode puts all of the Objective-C classes that are created as part of the project, and it’s as good a place as any for you to put your own classes.
About halfway down the window, you’ll find the Group popup list. You’ll want to add the new files to the View Switcher group. Finally, make sure the View Switcher target is selected in the Targets list before clicking the Save button.
Xcode should add two files to your View Switcher folder: BIDSwitchViewController.h and BIDSwitchViewController.m. BIDSwitchViewController will be your root controller—the controller that swaps the other views in and out. Now, we need to create the controllers for the two content views that will be swapped in and out. Repeat the same steps two more times to create BIDBlueViewController.m, BIDYellowViewController.m, and their .h counterparts, adding them to the same spot in the project hierarchy.
CAUTION: Make sure you check your spelling, as a typo here will create classes that don’t match
the source code later in the chapter.
Our next step is to create a nib file for each of the two content views we just created. Single-click the View Switcher folder in the project navigator, and then press N or select File New New File… again. This time, select User Interface under the iOS heading in the left pane (see Figure 6–11). Next, select the icon for the View template, which will create a nib with a content view. Then click Next. On the next screen, select iPhone from the Device Family popup, and then click the Next button.
www.it-ebooks.info