- •Contents at a Glance
- •About the Authors
- •About the Technical Reviewer
- •Acknowledgments
- •Preface
- •What This Book Is
- •What You Need
- •Developer Options
- •What You Need to Know
- •What’s Different About Coding for iOS?
- •Only One Active Application
- •Only One Window
- •Limited Access
- •Limited Response Time
- •Limited Screen Size
- •Limited System Resources
- •No Garbage Collection, but…
- •Some New Stuff
- •A Different Approach
- •What’s in This Book
- •What’s New in This Update?
- •Are You Ready?
- •Setting Up Your Project in Xcode
- •The Xcode Workspace Window
- •The Toolbar
- •The Navigator View
- •The Jump Bar
- •The Utility Pane
- •Interface Builder
- •New Compiler and Debugger
- •A Closer Look at Our Project
- •Introducing Xcode’s Interface Builder
- •What’s in the Nib File?
- •The Library
- •Adding a Label to the View
- •Changing Attributes
- •Some iPhone Polish—Finishing Touches
- •Bring It on Home
- •The Model-View-Controller Paradigm
- •Creating Our Project
- •Looking at the View Controller
- •Understanding Outlets and Actions
- •Outlets
- •Actions
- •Cleaning Up the View Controller
- •Designing the User Interface
- •Adding the Buttons and Action Method
- •Adding the Label and Outlet
- •Writing the Action Method
- •Trying It Out
- •Looking at the Application Delegate
- •Bring It on Home
- •A Screen Full of Controls
- •Active, Static, and Passive Controls
- •Creating the Application
- •Implementing the Image View and Text Fields
- •Adding the Image View
- •Resizing the Image View
- •Setting View Attributes
- •The Mode Attribute
- •Interaction Checkboxes
- •The Alpha Value
- •Background
- •Drawing Checkboxes
- •Stretching
- •Adding the Text Fields
- •Text Field Inspector Settings
- •Setting the Attributes for the Second Text Field
- •Creating and Connecting Outlets
- •Closing the Keyboard
- •Closing the Keyboard When Done Is Tapped
- •Touching the Background to Close the Keyboard
- •Adding the Slider and Label
- •Creating and Connecting the Actions and Outlets
- •Implementing the Action Method
- •Adding Two Labeled Switches
- •Connecting and Creating Outlets and Actions
- •Implementing the Switch Actions
- •Adding the Button
- •Connecting and Creating the Button Outlets and Actions
- •Implementing the Segmented Control Action
- •Implementing the Action Sheet and Alert
- •Conforming to the Action Sheet Delegate Method
- •Showing the Action Sheet
- •Spiffing Up the Button
- •Using the viewDidLoad Method
- •Control States
- •Stretchable Images
- •Crossing the Finish Line
- •The Mechanics of Autorotation
- •Points, Pixels, and the Retina Display
- •Autorotation Approaches
- •Handling Rotation Using Autosize Attributes
- •Configuring Supported Orientations
- •Specifying Rotation Support
- •Designing an Interface with Autosize Attributes
- •Using the Size Inspector’s Autosize Attributes
- •Setting the Buttons’ Autosize Attributes
- •Restructuring a View When Rotated
- •Creating and Connecting Outlets
- •Moving the Buttons on Rotation
- •Swapping Views
- •Designing the Two Views
- •Implementing the Swap
- •Changing Outlet Collections
- •Rotating Out of Here
- •Common Types of Multiview Apps
- •The Architecture of a Multiview Application
- •The Root Controller
- •Anatomy of a Content View
- •Building View Switcher
- •Creating Our View Controller and Nib Files
- •Modifying the App Delegate
- •Modifying BIDSwitchViewController.h
- •Adding a View Controller
- •Building a View with a Toolbar
- •Writing the Root View Controller
- •Implementing the Content Views
- •Animating the Transition
- •Switching Off
- •The Pickers Application
- •Delegates and Data Sources
- •Setting Up the Tab Bar Framework
- •Creating the Files
- •Adding the Root View Controller
- •Creating TabBarController.xib
- •The Initial Test Run
- •Implementing the Date Picker
- •Implementing the Single-Component Picker
- •Declaring Outlets and Actions
- •Building the View
- •Implementing the Controller As a Data Source and Delegate
- •Implementing a Multicomponent Picker
- •Declaring Outlets and Actions
- •Building the View
- •Implementing the Controller
- •Implementing Dependent Components
- •Creating a Simple Game with a Custom Picker
- •Writing the Controller Header File
- •Building the View
- •Adding Image Resources
- •Implementing the Controller
- •The spin Method
- •The viewDidLoad Method
- •Final Details
- •Linking in the Audio Toolbox Framework
- •Final Spin
- •Table View Basics
- •Table Views and Table View Cells
- •Grouped and Plain Tables
- •Implementing a Simple Table
- •Designing the View
- •Writing the Controller
- •Adding an Image
- •Using Table View Cell Styles
- •Setting the Indent Level
- •Handling Row Selection
- •Changing the Font Size and Row Height
- •Customizing Table View Cells
- •Adding Subviews to the Table View Cell
- •Creating a UITableViewCell Subclass
- •Adding New Cells
- •Implementing the Controller’s Code
- •Loading a UITableViewCell from a Nib
- •Designing the Table View Cell in Interface Builder
- •Using the New Table View Cell
- •Grouped and Indexed Sections
- •Building the View
- •Importing the Data
- •Implementing the Controller
- •Adding an Index
- •Implementing a Search Bar
- •Rethinking the Design
- •A Deep Mutable Copy
- •Updating the Controller Header File
- •Modifying the View
- •Modifying the Controller Implementation
- •Copying Data from allNames
- •Implementing the Search
- •Changes to viewDidLoad
- •Changes to Data Source Methods
- •Adding a Table View Delegate Method
- •Adding Search Bar Delegate Methods
- •Adding a Magnifying Glass to the Index
- •Adding the Special Value to the Keys Array
- •Suppressing the Section Header
- •Telling the Table View What to Do
- •Putting It All on the Table
- •Navigation Controller Basics
- •Stacky Goodness
- •A Stack of Controllers
- •Nav, a Hierarchical Application in Six Parts
- •Meet the Subcontrollers
- •The Disclosure Button View
- •The Checklist View
- •The Rows Control View
- •The Movable Rows View
- •The Deletable Rows View
- •The Editable Detail View
- •The Nav Application’s Skeleton
- •Creating the Top-Level View Controller
- •Setting Up the Navigation Controller
- •Adding the Images to the Project
- •First Subcontroller: The Disclosure Button View
- •Creating the Detail View
- •Modifying the Disclosure Button Controller
- •Adding a Disclosure Button Controller Instance
- •Second Subcontroller: The Checklist
- •Creating the Checklist View
- •Adding a Checklist Controller Instance
- •Third Subcontroller: Controls on Table Rows
- •Creating the Row Controls View
- •Adding a Rows Control Controller Instance
- •Fourth Subcontroller: Movable Rows
- •Creating the Movable Row View
- •Adding a Move Me Controller Instance
- •Fifth Subcontroller: Deletable Rows
- •Creating the Deletable Rows View
- •Adding a Delete Me Controller Instance
- •Sixth Subcontroller: An Editable Detail Pane
- •Creating the Data Model Object
- •Creating the Detail View List Controller
- •Creating the Detail View Controller
- •Adding an Editable Detail View Controller Instance
- •But There’s One More Thing. . .
- •Breaking the Tape
- •Creating a Simple Storyboard
- •Dynamic Prototype Cells
- •Dynamic Table Content, Storyboard-Style
- •Editing Prototype Cells
- •Good Old Table View Data Source
- •Will It Load?
- •Static Cells
- •Going Static
- •So Long, Good Old Table View Data Source
- •You Say Segue, I Say Segue
- •Creating Segue Navigator
- •Filling the Blank Slate
- •First Transition
- •A Slightly More Useful Task List
- •Viewing Task Details
- •Make More Segues, Please
- •Passing a Task from the List
- •Handling Task Details
- •Passing Back Details
- •Making the List Receive the Details
- •If Only We Could End with a Smooth Transition
- •Split Views and Popovers
- •Creating a SplitView Project
- •The Storyboard Defines the Structure
- •The Code Defines the Functionality
- •The App Delegate
- •The Master View Controller
- •The Detail View Controller
- •Here Come the Presidents
- •Creating Your Own Popover
- •iPad Wrap-Up
- •Getting to Know Your Settings Bundle
- •The AppSettings Application
- •Creating the Project
- •Working with the Settings Bundle
- •Adding a Settings Bundle to Our Project
- •Setting Up the Property List
- •Adding a Text Field Setting
- •Adding an Application Icon
- •Adding a Secure Text Field Setting
- •Adding a Multivalue Field
- •Adding a Toggle Switch Setting
- •Adding the Slider Setting
- •Adding Icons to the Settings Bundle
- •Adding a Child Settings View
- •Reading Settings in Our Application
- •Retrieving User Settings
- •Creating the Main View
- •Updating the Main View Controller
- •Registering Default Values
- •Changing Defaults from Our Application
- •Keeping It Real
- •Beam Me Up, Scotty
- •Your Application’s Sandbox
- •Getting the Documents Directory
- •Getting the tmp Directory
- •File-Saving Strategies
- •Single-File Persistence
- •Multiple-File Persistence
- •Using Property Lists
- •Property List Serialization
- •The First Version of the Persistence Application
- •Creating the Persistence Project
- •Designing the Persistence Application View
- •Editing the Persistence Classes
- •Archiving Model Objects
- •Conforming to NSCoding
- •Implementing NSCopying
- •Archiving and Unarchiving Data Objects
- •The Archiving Application
- •Implementing the BIDFourLines Class
- •Implementing the BIDViewController Class
- •Using iOS’s Embedded SQLite3
- •Creating or Opening the Database
- •Using Bind Variables
- •The SQLite3 Application
- •Linking to the SQLite3 Library
- •Modifying the Persistence View Controller
- •Using Core Data
- •Entities and Managed Objects
- •Key-Value Coding
- •Putting It All in Context
- •Creating New Managed Objects
- •Retrieving Managed Objects
- •The Core Data Application
- •Designing the Data Model
- •Creating the Persistence View and Controller
- •Persistence Rewarded
- •Managing Document Storage with UIDocument
- •Building TinyPix
- •Creating BIDTinyPixDocument
- •Code Master
- •Initial Storyboarding
- •Creating BIDTinyPixView
- •Storyboard Detailing
- •Adding iCloud Support
- •Creating a Provisioning Profile
- •Enabling iCloud Entitlements
- •How to Query
- •Save Where?
- •Storing Preferences on iCloud
- •What We Didn’t Cover
- •Grand Central Dispatch
- •Introducing SlowWorker
- •Threading Basics
- •Units of Work
- •GCD: Low-Level Queueing
- •Becoming a Blockhead
- •Improving SlowWorker
- •Don’t Forget That Main Thread
- •Giving Some Feedback
- •Concurrent Blocks
- •Background Processing
- •Application Life Cycle
- •State-Change Notifications
- •Creating State Lab
- •Exploring Execution States
- •Making Use of Execution State Changes
- •Handling the Inactive State
- •Handling the Background State
- •Removing Resources When Entering the Background
- •Saving State When Entering the Background
- •A Brief Journey to Yesteryear
- •Back to the Background
- •Requesting More Backgrounding Time
- •Grand Central Dispatch, Over and Out
- •Two Views of a Graphical World
- •The Quartz 2D Approach to Drawing
- •Quartz 2D’s Graphics Contexts
- •The Coordinate System
- •Specifying Colors
- •A Bit of Color Theory for Your iOS Device’s Display
- •Other Color Models
- •Color Convenience Methods
- •Drawing Images in Context
- •Drawing Shapes: Polygons, Lines, and Curves
- •The QuartzFun Application
- •Setting Up the QuartzFun Application
- •Creating a Random Color
- •Defining Application Constants
- •Implementing the QuartzFunView Skeleton
- •Creating and Connecting Outlets and Actions
- •Implementing the Action Methods
- •Adding Quartz 2D Drawing Code
- •Drawing the Line
- •Drawing the Rectangle and Ellipse
- •Drawing the Image
- •Optimizing the QuartzFun Application
- •The GLFun Application
- •Setting Up the GLFun Application
- •Creating BIDGLFunView
- •Updating BIDViewController
- •Updating the Nib
- •Finishing GLFun
- •Drawing to a Close
- •Multitouch Terminology
- •The Responder Chain
- •Responding to Events
- •Forwarding an Event: Keeping the Responder Chain Alive
- •The Multitouch Architecture
- •The Four Touch Notification Methods
- •The TouchExplorer Application
- •The Swipes Application
- •Automatic Gesture Recognition
- •Implementing Multiple Swipes
- •Detecting Multiple Taps
- •Detecting Pinches
- •Defining Custom Gestures
- •The CheckPlease Application
- •The CheckPlease Touch Methods
- •Garçon? Check, Please!
- •The Location Manager
- •Setting the Desired Accuracy
- •Setting the Distance Filter
- •Starting the Location Manager
- •Using the Location Manager Wisely
- •The Location Manager Delegate
- •Getting Location Updates
- •Getting Latitude and Longitude Using CLLocation
- •Error Notifications
- •Trying Out Core Location
- •Updating Location Manager
- •Determining Distance Traveled
- •Wherever You Go, There You Are
- •Accelerometer Physics
- •Don’t Forget Rotation
- •Core Motion and the Motion Manager
- •Event-Based Motion
- •Proactive Motion Access
- •Accelerometer Results
- •Detecting Shakes
- •Baked-In Shaking
- •Shake and Break
- •Accelerometer As Directional Controller
- •Rolling Marbles
- •Writing the Ball View
- •Calculating Ball Movement
- •Rolling On
- •Using the Image Picker and UIImagePickerController
- •Implementing the Image Picker Controller Delegate
- •Road Testing the Camera and Library
- •Designing the Interface
- •Implementing the Camera View Controller
- •It’s a Snap!
- •Localization Architecture
- •Strings Files
- •What’s in a Strings File?
- •The Localized String Macro
- •Real-World iOS: Localizing Your Application
- •Setting Up LocalizeMe
- •Trying Out LocalizeMe
- •Localizing the Nib
- •Localizing an Image
- •Generating and Localizing a Strings File
- •Localizing the App Display Name
- •Auf Wiedersehen
- •Apple’s Documentation
- •Mailing Lists
- •Discussion Forums
- •Web Sites
- •Blogs
- •Conferences
- •Follow the Authors
- •Farewell
- •Index
126 |
CHAPTER 5: Autorotation and Autosizing |
buttonUR.frame = CGRectMake(20, 155, 125, 125); buttonL.frame = CGRectMake(177, 20, 125, 125); buttonR.frame = CGRectMake(177, 155, 125, 125); buttonLL.frame = CGRectMake(328, 20, 125, 125); buttonLR.frame = CGRectMake(328, 155, 125, 125);
}
}
The size and position of all views, including controls such as buttons, are specified in a property called frame, which is a struct of type CGRect. CGRectMake is a function provided by Apple that lets you easily create a CGRect by specifying the x and y positions along with the width and height.
Save this code. Now build and run the application to see it in action. Try rotating, and watch how the buttons end up in their new positions.
Swapping Views
Moving controls to different locations, as we did in the previous section, can be a very tedious process, especially with a complex interface. Wouldn’t it be nice if we could just design the landscape and portrait views separately, and then swap them out when the phone is rotated?
Well, we can. But it’s a moderately complicated option, which you’ll likely use only in the case of very complex interfaces.
While controls on both views can trigger the same actions, we need to be able to keep track of the fact that multiple outlets will be pointing to objects performing the same function. For example, if we had a button called foo, we would actually have two copies of that button—one in the landscape layout and one in the portrait layout—and any change we make to one needs to be made to the other. So, if we wanted to disable or hide that button, we would need to disable or hide both of the foo buttons.
We could handle this by using multiple outlets, perhaps fooPortrait and fooLandscape, one pointing to each button. In fact, in previous editions of the book, that’s exactly what we did. Life is better now. There’s a relatively new feature of iOS called an outlet collection that we can use to make our code a little simpler and easier to manage. An outlet collection is exactly like an outlet in every way except for one. Whereas an outlet can point to only a single element, an outlet collection is actually an array and can point to any number of objects. This will allow us to have a single property that points to both versions of the same button.
To demonstrate how this works, we’ll build an app with separate views for portrait and landscape orientation. Although the interface we’ll build is not complex enough to justify the technique we’re using, keeping the interface simple will help clarify the process.
Create a new project in Xcode using the Single View Application template again (we’ll start working with other templates in the next chapter). Call this project Swap. The application will start up in portrait mode, with two buttons, one on top of the other (see Figure 5–13).
www.it-ebooks.info
CHAPTER 5: Autorotation and Autosizing |
127 |
Figure 5–13. The Swap application at launch. This is the portrait view and its two buttons.
Rotating the phone swaps in a completely different view, specifically designed for landscape orientation. The landscape view will also feature two buttons with the exact same labels (see Figure 5–14), so the users won’t know they’re looking at two different views.
Figure 5–14. Similar but not the same. This is the landscape view, with two different buttons.
www.it-ebooks.info
128 |
CHAPTER 5: Autorotation and Autosizing |
When a button is tapped, it will show an alert identifying which button was tapped. We won’t pull the button’s name from sender the way we did in Chapter 3, however. We’ll use the outlet collection to determine which button was tapped.
Designing the Two Views
We’ll need two views in our nib. We can use the existing view that Xcode created for us as one of them, but we’ll need to add a second view. The easiest way to get that second view is to duplicate the existing view, and then make the necessary changes.
Select BIDViewController.xib to edit the file in Interface Builder. In the nib editor dock, there should be three icons. The bottom one represents the view that Xcode created for us. Hold down the option key on your keyboard, and then click and drag that icon downward. When you see the green plus on your icon, that’s your indication that you’ve moved far enough for a copy. Release the mouse button to duplicate the view.
Single-click the newly added view and bring up the attributes inspector by pressing z4. Under the heading Simulated Metrics, look for a popup menu called Orientation. Change it from Portrait to Landscape.
We’ll need access to both of these views in our code so that we can swap between them, so we need a pair of outlets. Make sure the assistant editor is turned on and displaying BIDViewController.h. Control-drag from the portrait view over to BIDViewController.h, and when prompted, create an outlet called portrait. Make sure you specify Strong in the Storage popup menu. Do the same thing from the landscape view, creating an outlet called landscape.
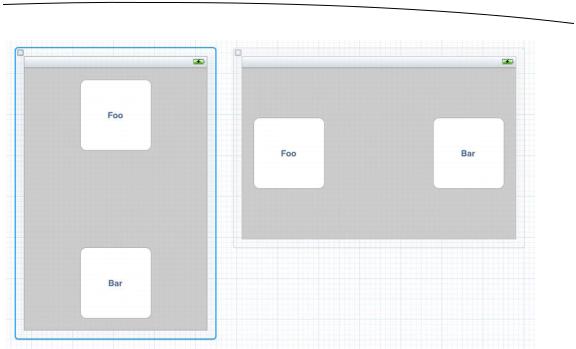
The next step is to drag in our buttons. Go to the object library and drag out a pair of Rounded Rect Buttons onto each of our views. Use Figure 5–15 as a guide. Click each button and use the size inspector (View Utilities Size) to change the Width and Height attributes to 125. Center each button and drag it to the blue guideline near one edge of the view. Double-click each button and change its label to either Foo or Bar. Again, Figure 5–15 will set you straight.
www.it-ebooks.info
CHAPTER 5: Autorotation and Autosizing |
129 |
Figure 5–15. We dragged two buttons onto each of our two views, labeling one Foo and one Bar in each view.
Now, let’s create and connect the button outlets. Again, make sure the assistant is turned on and displaying BIDViewController.h. Control-drag from the Foo button on the landscape view to the header file on the right. When prompted, change the Connection popup menu from Outlet to Outlet Collection, and give it a name of foos. Next, drag from the Foo button on the portrait view and connect it to the existing foos outlet connection. To reiterate, you first control-dragged from the Foo button on the landscape view to create the outlet collection, and then control-dragged from the other view’s Foo button to connect it to that same outlet collection.
Repeat those steps with the Bar buttons. Control-drag from one of them to create a new outlet collection named bars, and then control-drag from the other Bar button to connect it to the same collection.
Lastly, we need to create an action method and connect all four buttons to it. Controldrag from the Foo button on the landscape view to BIDViewController.h, and when prompted, change the connection type from Outlet to Action. Give the action a name of buttonTapped:. Then connect the other three buttons to that action and save the nib.
www.it-ebooks.info