

330 |
CHAPTER 9: Navigation Controllers and Table Views |
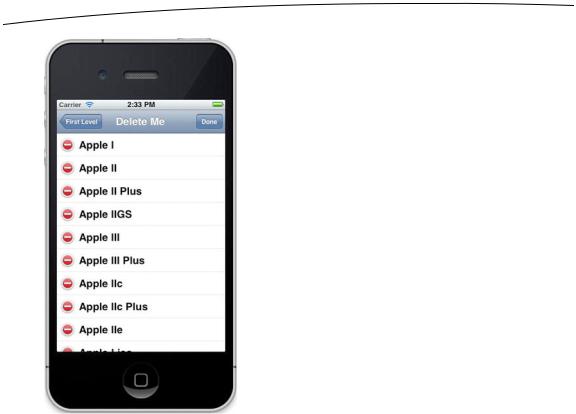
Figure 9–20. The Delete Me view in edit mode
Next to each editable row is a little icon that looks a little like a Do Not Enter street sign. If you tap the icon, it rotates sideways, and a button labeled Delete appears (see Figure 9–7). Tapping that button will cause its row to be deleted, both from the underlying model as well as from the table, using the animation style we specified.
When you implement edit mode to allow deletions, you get additional functionality for free. Swipe your finger horizontally across a row. Look at that! The Delete button comes up for just that row, just as in the Mail application.
We’re coming around the bend, now, and the finish line is in sight, albeit still a little ways in the distance. If you’re still with us, give yourself a pat on the back, or have someone do it for you. This is a long, tough chapter.
Sixth Subcontroller: An Editable Detail Pane
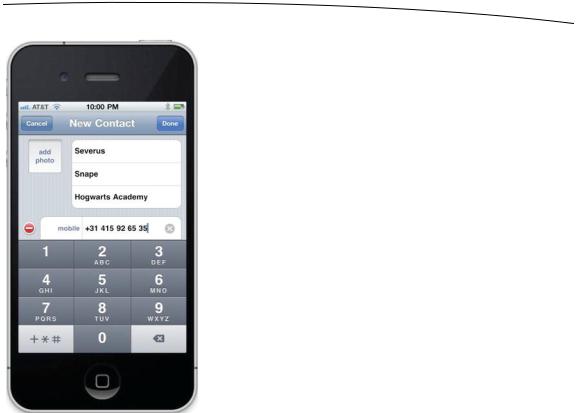
The next concept we’re going to explore is how to implement a reusable editable detail view. You may notice as you look through the various applications that come on your iPhone that many of them, including the Contacts application, implement their detail views as a grouped table (see Figure 9–21).
www.it-ebooks.info
CHAPTER 9: Navigation Controllers and Table Views |
331 |
Figure 9–21. An example of a grouped table view being used to present an editable table view
Let’s look at how to do this now. Before we begin, we need some data to show, and we need more than just a list of strings. In the previous two chapters, when we needed more complex data, such as with the multiline table in Chapter 8 or the ZIP codes picker in Chapter 7, we used an NSArray to hold a bunch of NSDictionary instances filled with our data. That works fine and is very flexible, but it’s a little hard to work with. For this table’s data, let’s create a custom Objective-C data object to hold the individual instances that will be displayed in the list.
Creating the Data Model Object
The property list we’ll be using in this section of the application contains data about the US presidents: each president’s name, his party, the year he took office, and the year he left office. Let’s create the class to hold that data.
Once again, single-click the Nav folder in Xcode to select it, and then press N to bring up the new file assistant. Select Cocoa Touch from the left pane, Objective-C class from the right pane, and click Next. Then name the new class BIDPresident, and select
NSObject for Subclass of.
Click BIDPresident.h, and make the following changes:
#import <Foundation/Foundation.h>
www.it-ebooks.info

332 |
CHAPTER 9: Navigation Controllers and Table Views |
#define kPresidentNumberKey |
@"President" |
|
#define kPresidentNameKey |
@"Name" |
|
#define kPresidentFromKey |
@"FromYear" |
|
#define |
kPresidentToKey |
@"ToYear" |
#define |
kPresidentPartyKey |
@"Party" |
@interface BIDPresident : NSObject
@interface BIDPresident : NSObject <NSCoding>
@property int number;
@property (nonatomic, copy) NSString *name; @property (nonatomic, copy) NSString *fromYear; @property (nonatomic, copy) NSString *toYear; @property (nonatomic, copy) NSString *party;
@end
The five constants will be used to identify the fields when they are read from the file system. Conforming this class to the NSCoding protocol is what allows this object to be written to and created from files. The rest of the new stuff we’ve added to this header file is there to implement the properties needed to hold our data. Switch over to BIDPresident.m, and make these changes:
#import "BIDPresident.h"
@implementation BIDPresident
@synthesize number; @synthesize name; @synthesize fromYear; @synthesize toYear; @synthesize party;
#pragma mark - #pragma mark NSCoding
- (void)encodeWithCoder:(NSCoder *)coder {
[coder encodeInt:self.number forKey:kPresidentNumberKey]; [coder encodeObject:self.name forKey:kPresidentNameKey]; [coder encodeObject:self.fromYear forKey:kPresidentFromKey]; [coder encodeObject:self.toYear forKey:kPresidentToKey]; [coder encodeObject:self.party forKey:kPresidentPartyKey];
}
- (id)initWithCoder:(NSCoder *)coder { if (self = [super init]) {
number = [coder decodeIntForKey:kPresidentNumberKey]; name = [coder decodeObjectForKey:kPresidentNameKey]; fromYear = [coder decodeObjectForKey:kPresidentFromKey]; toYear = [coder decodeObjectForKey:kPresidentToKey]; party = [coder decodeObjectForKey:kPresidentPartyKey];
}
return self;
}
@end
www.it-ebooks.info

CHAPTER 9: Navigation Controllers and Table Views |
333 |
Don’t worry too much about the encodeWithCoder: and initWithCoder: methods. We’ll be covering those in more detail in Chapter 13. All you need to know for now is that these two methods are part of the NSCoding protocol, which can be used to save objects to disk and load them back in. The encodeWithCoder: method encodes our object to be saved. initWithCoder: is used to create new objects from the saved file. These methods will allow us to create BIDPresident objects from a property list archive file. Everything else in this class should be fairly self-explanatory.
We’ve provided you with a property list file that contains data for all the US presidents and can be used to create new instances of the BIDPresident object we just wrote. We will be using this in the next section, so you don’t need to type in a whole bunch of data. Grab the Presidents.plist file from the 09 Nav folder in the project archive, and add it to the Nav folder of your project.
Now, we’re ready to write our two controller classes.
Creating the Detail View List Controller
For this part of the application, we’re going to need two new controllers: one that will show the list to be edited, and another to view and edit the details of the item selected in that list. Since both of these view controllers will be based on tables, we won’t need to create any nib files, but we will need two separate controller classes. Let’s create the files for both classes now and then implement them.
Select the Nav folder in the project navigator, and then press N or select File New New File…. Select Cocoa Touch, select Objective-C class, and click Next. Name the new class BIDPresidentsViewController, and enter BIDSecondLevelViewController for
Subclass of. Be sure to check your spelling.
Repeat the same process a second time using the name BIDPresidentDetailController, but that time use UITableViewController in the Subclass of field.
NOTE: In case you were wondering, BIDPresidentDetailController is singular (as opposed to BIDPresidentsDetailController) because it deals with the details of a single president. Yes, we actually had a fistfight about that little detail, but one intense paintball session later, we are friends again.
Let’s create the view controller that shows the list of presidents first. Single-click
BIDPresidentsViewController.h, and make the following changes:
#import "BIDSecondLevelViewController.h"
@interface BIDPresidentsViewController : BIDSecondLevelViewController
@property (strong, nonatomic) NSMutableArray *list;
@end
Then switch over to BIDPresidentsViewController.m and make the following changes:
www.it-ebooks.info

334CHAPTER 9: Navigation Controllers and Table Views
#import "BIDPresidentsViewController.h"
#import "BIDPresidentDetailController.h" #import "BIDPresident.h"
@implementation BIDPresidentsViewController
@synthesize list;
- (void)viewDidLoad { [super viewDidLoad];
NSString *path = [[NSBundle mainBundle] pathForResource:@"Presidents" ofType:@"plist"];
NSData *data; NSKeyedUnarchiver *unarchiver;
data = [[NSData alloc] initWithContentsOfFile:path];
unarchiver = [[NSKeyedUnarchiver alloc] initForReadingWithData:data]; NSMutableArray *array = [unarchiver decodeObjectForKey:@"Presidents"]; self.list = array;
[unarchiver finishDecoding];
}
- (void)viewWillAppear:(BOOL)animated { [super viewWillAppear:animated]; [self.tableView reloadData];
}
#pragma mark -
#pragma mark Table Data Source Methods
- (NSInteger)tableView:(UITableView *)tableView numberOfRowsInSection:(NSInteger)section {
return [list count];
}
- (UITableViewCell *)tableView:(UITableView *)tableView cellForRowAtIndexPath:(NSIndexPath *)indexPath {
static NSString *PresidentListCellIdentifier = @"PresidentListCellIdentifier";
UITableViewCell *cell = [tableView dequeueReusableCellWithIdentifier:PresidentListCellIdentifier];
if (cell == nil) {
cell = [[UITableViewCell alloc] initWithStyle:UITableViewCellStyleSubtitle reuseIdentifier:PresidentListCellIdentifier];
}
NSUInteger row = [indexPath row];
BIDPresident *thePres = [self.list objectAtIndex:row]; cell.textLabel.text = thePres.name;
cell.detailTextLabel.text = [NSString stringWithFormat:@"%@ - %@", thePres.fromYear, thePres.toYear];
return cell;
}
www.it-ebooks.info

CHAPTER 9: Navigation Controllers and Table Views |
335 |
#pragma mark -
#pragma mark Table Delegate Methods
- (void)tableView:(UITableView *)tableView didSelectRowAtIndexPath:(NSIndexPath *)indexPath {
NSUInteger row = [indexPath row];
BIDPresident *prez = [self.list objectAtIndex:row];
BIDPresidentDetailController *childController = [[BIDPresidentDetailController alloc] initWithStyle:UITableViewStyleGrouped];
childController.title = prez.name; childController.president = prez;
[self.navigationController pushViewController:childController animated:YES];
}
@end
Most of the code you just entered is stuff you’ve seen before. One new thing is in the viewDidLoad method, where we used an NSKeyedUnarchiver method to create an array full of instances of the BIDPresident class from our property list file. It’s not important that you understand exactly what’s going on there, as long as you know that we’re loading an array full of Presidents.
First, we get the path for the property file.
NSString *path = [[NSBundle mainBundle] pathForResource:@"Presidents" ofType:@"plist"];
Next, we declare a data object that will temporarily hold the encoded archive and an NSKeyedUnarchiver, which we’ll use to actually restore the objects from the archive.
NSData *data;
NSKeyedUnarchiver *unarchiver;
We load the property list into data, and then use data to initialize unarchiver.
data = [[NSData alloc] initWithContentsOfFile:path];
unarchiver = [[NSKeyedUnarchiver alloc] initForReadingWithData:data];
Now, we decode an array from the archive. The key @"Presidents" is the same value that was used to create this archive.
NSMutableArray *array = [unarchiver decodeObjectForKey:@"Presidents"];
We then assign this decoded array to our list property, and finalize the decoding process.
self.list = array; [unarchiver finishDecoding];
We also need to tell our tableView to reload its data in the viewWillAppear: method. If the user changes something in the detail view, we need to make sure that the parent view shows that new data. Rather than testing for a change, we force the parent view to reload its data and redraw each time it appears.
www.it-ebooks.info