

310 |
CHAPTER 9: Navigation Controllers and Table Views |
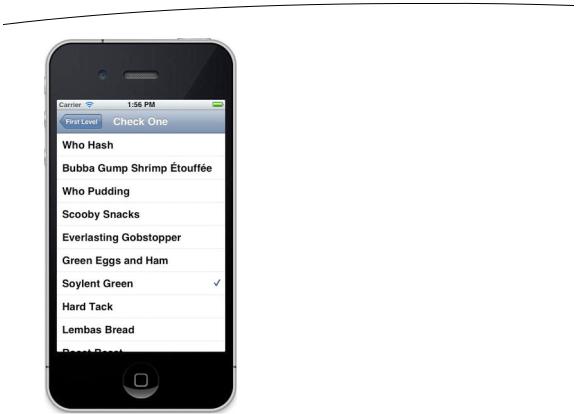
Figure 9–15. The checklist view. Note that only a single item can be checked at a time. Soylent Green, anyone?
Third Subcontroller: Controls on Table Rows
In the previous chapter, we showed you how to add subviews to a table view cell to customize its appearance. However, we didn’t put any active controls into the content view; it had only labels. Now let’s see how to add controls to a table view cell.
In our example, we’ll add a button to each row, but the same technique will work with most controls. We’ll add the control to the accessory view, which is the area on the right side of each row where you found the accessory icons covered earlier in the chapter.
To add another row to our BIDFirstLevelController’s table, we need another secondlevel controller. You know the drill: select the Nav folder in the project navigator, and then press N or select File New New File. . .. Select Cocoa Touch, select Objective- C class, and click Next. Name the class BIDRowControlsController, and enter BIDSecondLevelViewController for Subclass of. Save the file in the Nav folder, with Nav selected for both Target and Group, as usual. Just as with the previous subcontroller, this controller can be completely implemented with a single table view; no nib file is necessary.
www.it-ebooks.info
CHAPTER 9: Navigation Controllers and Table Views |
311 |
Creating the Row Controls View
Single-click BIDRowControlsController.h, and make the following changes:
#import "BIDSecondLevelViewController.h"
@interface BIDRowControlsController : BIDSecondLevelViewController
@property (strong, nonatomic) NSArray *list; - (IBAction)buttonTapped:(id)sender;
@end
Not much there, huh? We change the parent class and create an array to hold our table data. Then we define a property for that array and declare an action method that will be called when the row buttons are pressed.
NOTE: Strictly speaking, we don’t need to declare the buttonTapped: method an action method by specifying IBAction, since we won’t be triggering it from controls in a nib file. Since it is an action method and will be called by a control, however, it’s still a good idea to use the IBAction keyword, since it signals our intent to future readers of this code.
Switch over to BIDRowControlsController.m, and make the following changes:
#import "BIDRowControlsController.h"
@implementation BIDRowControlsController
@synthesize list;
- (IBAction)buttonTapped:(id)sender {
UIButton *senderButton = (UIButton *)sender; UITableViewCell *buttonCell =
(UITableViewCell *)[senderButton superview]; NSUInteger buttonRow = [[self.tableView
indexPathForCell:buttonCell] row];
NSString *buttonTitle = [list objectAtIndex:buttonRow]; UIAlertView *alert = [[UIAlertView alloc]
initWithTitle:@"You tapped the button" message:[NSString stringWithFormat:
@"You tapped the button for %@", buttonTitle] delegate:nil
cancelButtonTitle:@"OK"
otherButtonTitles:nil];
[alert show];
}
- (void)viewDidLoad { [super viewDidLoad];
NSArray *array = [[NSArray alloc] initWithObjects:@"R2-D2", @"C3PO", @"Tik-Tok", @"Robby", @"Rosie", @"Uniblab", @"Bender", @"Marvin", @"Lt. Commander Data",
@"Evil Brother Lore", @"Optimus Prime", @"Tobor", @"HAL",
www.it-ebooks.info

312 CHAPTER 9: Navigation Controllers and Table Views
@"Orgasmatron", nil]; self.list = array;
}
- (void)viewDidUnload { [super viewDidUnload]; self.list = nil;
}
#pragma mark -
#pragma mark Table Data Source Methods
- (NSInteger)tableView:(UITableView *)tableView numberOfRowsInSection:(NSInteger)section {
return [list count];
}
- (UITableViewCell *)tableView:(UITableView *)tableView cellForRowAtIndexPath:(NSIndexPath *)indexPath {
static NSString *ControlRowIdentifier = @"ControlRowIdentifier";
UITableViewCell *cell = [tableView dequeueReusableCellWithIdentifier:ControlRowIdentifier];
if (cell == nil) {
cell = [[UITableViewCell alloc] initWithStyle:UITableViewCellStyleDefault reuseIdentifier:ControlRowIdentifier];
UIImage *buttonUpImage = [UIImage imageNamed:@"button_up.png"]; UIImage *buttonDownImage = [UIImage imageNamed:@"button_down.png"]; UIButton *button = [UIButton buttonWithType:UIButtonTypeCustom]; button.frame = CGRectMake(0.0, 0.0, buttonUpImage.size.width,
buttonUpImage.size.height);
[button setBackgroundImage:buttonUpImage forState:UIControlStateNormal];
[button setBackgroundImage:buttonDownImage forState:UIControlStateHighlighted];
[button setTitle:@"Tap" forState:UIControlStateNormal]; [button addTarget:self action:@selector(buttonTapped:)
forControlEvents:UIControlEventTouchUpInside]; cell.accessoryView = button;
}
NSUInteger row = [indexPath row];
NSString *rowTitle = [list objectAtIndex:row]; cell.textLabel.text = rowTitle;
return cell;
}
#pragma mark -
#pragma mark Table Delegate Methods
- (void)tableView:(UITableView *)tableView didSelectRowAtIndexPath:(NSIndexPath *)indexPath {
NSUInteger row = [indexPath row];
NSString *rowTitle = [list objectAtIndex:row]; UIAlertView *alert = [[UIAlertView alloc]
www.it-ebooks.info

CHAPTER 9: Navigation Controllers and Table Views |
313 |
initWithTitle:@"You tapped the row." message:[NSString
stringWithFormat:@"You tapped %@.", rowTitle] delegate:nil
cancelButtonTitle:@"OK"
otherButtonTitles:nil];
[alert show];
[tableView deselectRowAtIndexPath:indexPath animated:YES];
}
@end
Let’s begin with our new action method. The first thing we do is declare a new UIButton variable and set it to sender. This is just so we don’t need to cast sender multiple times throughout our method.
UIButton *senderButton = (UIButton *)sender;
Next, we get the button’s superview, which is the table view cell for the row it’s in, and we use that to determine the row that was pressed and to retrieve the title for that row.
UITableViewCell *buttonCell =
(UITableViewCell *)[senderButton superview]; NSUInteger buttonRow = [[self.tableView
indexPathForCell:buttonCell] row];
NSString *buttonTitle = [list objectAtIndex:buttonRow];
Then we show an alert, saying that the user pressed the button.
UIAlertView *alert = [[UIAlertView alloc] initWithTitle:@"You tapped the button" message:[NSString stringWithFormat:
@"You tapped the button for %@", buttonTitle] delegate:nil
cancelButtonTitle:@"OK"
otherButtonTitles:nil];
[alert show];
Everything from there to tableView:cellForRowAtIndexPath: should be familiar to you, so skip down to that method, which is where we set up the table view cell with the button. The method starts as usual. We declare an identifier and then use it to request a reusable cell.
static NSString *ControlRowIdentifier = @"ControlRowIdentifier"; UITableViewCell *cell = [tableView
dequeueReusableCellWithIdentifier:ControlRowIdentifier];
If there are no reusable cells, we create one.
if (cell == nil) {
cell = [[UITableViewCell alloc] initWithStyle:UITableViewCellStyleDefault reuseIdentifier:ControlRowIdentifier];
To create the button, we load in two of the images that were in the Images folder you imported earlier. One will represent the button in the normal state; the other will
www.it-ebooks.info

314 |
CHAPTER 9: Navigation Controllers and Table Views |
represent the button in its highlighted state—in other words, when the button is being tapped.
UIImage *buttonUpImage = [UIImage imageNamed:@"button_up.png"];
UIImage *buttonDownImage = [UIImage imageNamed:@"button_down.png"];
Next, we create a button. Because the buttonType property of UIButton is declared read-only, we need to create the button using the factory method buttonWithType:. If we created it using alloc and init, we wouldn’t be able to change the button’s type to UIButtonTypeCustom, which we need to do in order to use the custom button images.
UIButton *button = [UIButton buttonWithType:UIButtonTypeCustom];
Next, we set the button’s size to match the images, assign the images for the two states, and give the button a title.
button.frame = CGRectMake(0.0, 0.0, buttonUpImage.size.width, buttonUpImage.size.height);
[button setBackgroundImage:buttonUpImage forState:UIControlStateNormal];
[button setBackgroundImage:buttonDownImage forState:UIControlStateHighlighted];
[button setTitle:@"Tap" forState:UIControlStateNormal];
Finally, we tell the button to call our action method on the touch up inside event and assign it to the cell’s accessory view.
[button addTarget:self action:@selector(buttonTapped:) forControlEvents:UIControlEventTouchUpInside];
cell.accessoryView = button;
Everything else in the tableView:cellForRowAtIndexPath: method is just as we’ve done it in the past.
The last method we implemented is tableView:didSelectRowAtIndexPath:, which is the delegate method that is called after the user selects a row. All we do here is find out which row was selected and grab the appropriate title from our array.
NSUInteger row = [indexPath row];
NSString *rowTitle = [list objectAtIndex:row];
Then we create another alert to inform the user that a row was tapped, but not the button.
UIAlertView *alert = [[UIAlertView alloc] initWithTitle:@"You tapped the row." message:[NSString
stringWithFormat:@"You tapped %@.", rowTitle] delegate:nil
cancelButtonTitle:@"OK"
otherButtonTitles:nil];
[alert show];
[tableView deselectRowAtIndexPath:indexPath animated:YES];
www.it-ebooks.info