

186 |
CHAPTER 7: Tab Bars and Pickers |
In viewDidLoad, we create a new NSDate object. An NSDate object created this way will hold the current date and time. We then set datePicker to that date, which ensures that every time this view is loaded from the nib, the picker will reset to the current date and time.
Go ahead and build and run to make sure your date picker checks out. If everything went OK, your application should look like Figure 7–2 when it runs. If you choose the Select button, an alert sheet will pop up, telling you the date and time currently selected in the date picker.
NOTE: The date picker does not allow you to specify seconds or a time zone. The alert displays the time with seconds and in Greenwich Mean Time (GMT). We could have added some code to simplify the string displayed in the alert, but isn’t this chapter long enough already? If you’re interested in customizing the formatting of the date, take a look at the NSDateFormatter class.
Implementing the Single-Component Picker
Our next picker lets the user select from a list of values. In this example, we’re going to create an NSArray to hold the values we want to display in the picker.
Pickers don’t hold any data themselves. Instead, they call methods on their data source and delegate to get the data they need to display. The picker doesn’t really care where the underlying data lives. It asks for the data when it needs it, and the data source and delegate (which are often, in practice, the same object) work together to supply that data. As a result, the data could be coming from a static list, as we’ll do in this section. It also could be loaded from a file or a URL, or even made up or calculated on the fly.
Declaring Outlets and Actions
As always, we need to make sure our outlets and actions are in place in our controller’s header file before we start working on the GUI. In the project navigator, single-click
BIDSingleComponentPickerViewController.h. This controller class will act as both the data source and the delegate for its picker, so we need to make sure it conforms to the protocols for those two roles. In addition, we need to declare an outlet and an action. Add the following code:
#import <UIKit/UIKit.h>
@interface BIDSingleComponentPickerViewController : UIViewController
<UIPickerViewDelegate, UIPickerViewDataSource>
@property (strong, nonatomic) IBOutlet UIPickerView *singlePicker; @property (strong, nonatomic) NSArray *pickerData;
- (IBAction)buttonPressed;
@end
www.it-ebooks.info
CHAPTER 7: Tab Bars and Pickers |
187 |
We start by conforming our controller class to two protocols, UIPickerViewDelegate and UIPickerViewDataSource. After that, we declare an outlet for the picker and a pointer to an NSArray, which will be used to hold the list of items that will be displayed in the picker. Finally, we declare the action method for the button, just as we did for the date picker.
Building the View
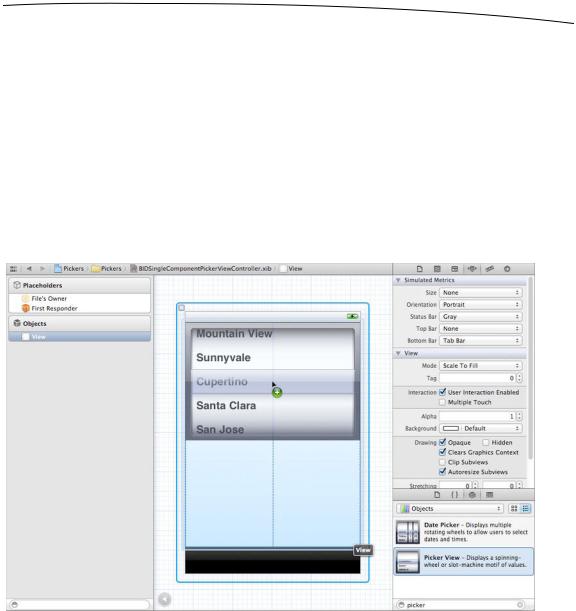
Now select BIDSingleComponentPickerViewController.xib to edit the content view for the second tab in our tab bar. Click the View icon and press 4 to bring up the attributes inspector. Set the Bottom Bar to Tab Bar in the Simulated Metrics section. Next, bring over a Picker View from the library (see Figure 7–19), and add it to your nib’s View window, placing it snugly into the top of the view, as you did with the date picker view.
Figure 7–19. Dragging a Picker View from the library onto our second view
After placing the picker, control-drag from File’s Owner to the picker, and select the singlePicker outlet.
Next, with the picker selected, press 6 to bring up the connections inspector. If you look at the connections available for the picker view, you’ll see that the first two items are dataSource and delegate. If you don’t see those outlets, make sure you have the picker selected, rather than the UIView that contains it! Drag from the circle next to dataSource to the File’s Owner icon. Then drag from the circle next to delegate to the File’s Owner icon.
www.it-ebooks.info

188 |
CHAPTER 7: Tab Bars and Pickers |
Now this picker knows that the instance of the BIDSingleComponentPickerViewController class in the nib is its data source and delegate, and will ask it to supply the data to be displayed. In other words, when the picker needs information about the data it is going to display, it asks the BIDSingleComponentPickerViewController instance that controls this view for that information.
Drag a Round Rect Button to the view, double-click it, and give it a title of Select. Press return to commit the change. In the connections inspector, drag from the circle next to Touch Up Inside to the File’s Owner icon, selecting the buttonPressed action. Now you’ve finished building the GUI for the second tab. Save the nib file, and let’s get back to some coding.
Implementing the Controller As a Data Source and Delegate
To make our controller work properly as the picker’s data source and delegate, we’ll start with some code you should feel comfortable with, and then add a few methods that you’ve never seen before.
Single-click BIDSingleComponentPickerViewController.m, and add the following code at the beginning of the file:
#import "BIDSingleComponentPickerViewController.h"
@implementation BIDSingleComponentPickerViewController
@synthesize singlePicker; @synthesize pickerData;
- (IBAction)buttonPressed {
NSInteger row = [singlePicker selectedRowInComponent:0]; NSString *selected = [pickerData objectAtIndex:row]; NSString *title = [[NSString alloc] initWithFormat:
@"You selected %@!", selected]; UIAlertView *alert = [[UIAlertView alloc] initWithTitle:title
message:@"Thank you for choosing." delegate:nil
cancelButtonTitle:@"You're Welcome" otherButtonTitles:nil];
[alert show];
}
.
.
.
- (void)viewDidLoad { [super viewDidLoad];
// Do any additional setup after loading the view from its nib.
NSArray *array = [[NSArray alloc] initWithObjects:@"Luke", @"Leia", @"Han", @"Chewbacca", @"Artoo", @"Threepio", @"Lando", nil];
self.pickerData = array;
}
.
.
.
www.it-ebooks.info
CHAPTER 7: Tab Bars and Pickers |
189 |
These two methods should be familiar to you by now. The buttonPressed method is nearly identical to the one we used with the date picker.
Unlike the date picker, a regular picker can’t tell us what data it holds, because it doesn’t maintain the data. It hands off that job to the delegate and data source. Instead, we need to ask the picker which row is selected, and then grab the corresponding data from our pickerData array. Here is how we ask it for the selected row:
NSInteger row = [singlePicker selectedRowInComponent:0];
Notice that we needed to specify which component we want to know about. We have only one component in this picker, so we simply pass in 0, which is the index of the first component.
NOTE: Did you notice that there is no asterisk between NSInteger and row in our request for the selected row? Throughout most of the iOS SDK, the prefix NS often indicates an Objective-C class from the Foundation framework, but this is one of the exceptions to that general rule.
NSInteger is always defined as an integer datatype, either an int or a long. We use NSInteger rather than int or long, because with NSInteger, the compiler automatically chooses whichever size is best for the platform for which we are compiling. It will create a 32-bit int when compiling for a 32-bit processor and a longer 64-bit long when compiling for a 64-bit architecture. Currently, there is no 64-bit iOS device, but who knows? Someday in the future, there likely will be. You might also write classes for your iOS applications that you’ll later want to recycle and use in Cocoa applications for Mac OS X, which does run on both 32and 64-bit machines.
In viewDidLoad, we create an array with several objects so that we have data to feed the picker. Usually, your data will come from other sources, like a property list in your project’s Resources folder. By embedding a list of items in our code the way we’ve done here, we are making it much harder on ourselves if we need to update this list or if we want to have our application translated into other languages. But this approach is the quickest and easiest way to get data into an array for demonstration purposes. Even though you won’t usually create your arrays like this, you will almost always configure some form of access to your application’s model objects here in the viewDidLoad method, so that you’re not constantly going to disk or to the network every time the picker asks you for data.
www.it-ebooks.info
190 |
CHAPTER 7: Tab Bars and Pickers |
TIP: If you’re not supposed to create arrays from lists of objects in your code as we just did in viewDidLoad, how should you do it? Embed the lists in property list files, and add those files to the Resources folder of your project. Property list files can be changed without recompiling your source code, which means there is little risk of introducing new bugs when you do so. You can also provide different versions of the list for different languages, as you’ll see in Chapter 20. Property lists can be created using the Property List Editor application (/Developer/Applications/Utilities/Property List Editor.app) or directly in Xcode, which offers a template for creating a property list in the Resource section of the new file assistant, and supports the editing of property lists in the editor pane. Both NSArray and NSDictionary offer a method called initWithContentsOfFile: to allow you to initialize instances from a property list file, as we’ll do later in this chapter when we implement the Dependent tab.
Next, insert the following new lines of code into the existing viewDidUnload method:
- (void)viewDidUnload { [super viewDidUnload];
//Release any retained subviews of the main view.
//e.g. self.myOutlet = nil;
self.singlePicker = nil; self.pickerData = nil;
}
Notice that we set both singlePicker and pickerData to nil. In most cases, you’ll set only outlets to nil and not other properties. However, setting pickerData to nil is appropriate here because the pickerData array will be re-created each time the view is reloaded, and we want to free up that memory when the view is unloaded. Anything that is created in the viewDidLoad method can be flushed in viewDidUnload because viewDidLoad will fire again when the view is reloaded.
Finally, insert the following new code at the end of the file:
.
.
.
#pragma mark -
#pragma mark Picker Data Source Methods
- (NSInteger)numberOfComponentsInPickerView:(UIPickerView *)pickerView { return 1;
}
- (NSInteger)pickerView:(UIPickerView *)pickerView numberOfRowsInComponent:(NSInteger)component {
return [pickerData count];
}
#pragma mark Picker Delegate Methods
- (NSString *)pickerView:(UIPickerView *)pickerView titleForRow:(NSInteger)row
www.it-ebooks.info
CHAPTER 7: Tab Bars and Pickers |
191 |
forComponent:(NSInteger)component { return [pickerData objectAtIndex:row];
}
@end
At the bottom of the file, we get into the new methods required to implement the picker. The first two methods are from the UIPickerViewDataSource protocol, and they are both required for all pickers (except date pickers). Here’s the first one:
- (NSInteger)numberOfComponentsInPickerView:(UIPickerView *)pickerView { return 1;
}
Pickers can have more than one spinning wheel, or component, and this is how the picker asks how many components it should display. We want to display only one list this time, so we return a value of 1. Notice that a UIPickerView is passed in as a parameter. This parameter points to the picker view that is asking us the question, which makes it possible to have multiple pickers being controlled by the same data source. In our case, we know that we have only one picker, so we can safely ignore this argument because we already know which picker is calling us.
The second data source method is used by the picker to ask how many rows of data there are for a given component:
- (NSInteger)pickerView:(UIPickerView *)pickerView numberOfRowsInComponent:(NSInteger)component {
return [pickerData count];
}
#PRAGMA WHAT?
Did you notice the following lines of code from BIDSingleComponentPickerViewController.m?
#pragma mark -
#pragma mark Picker Data Source Methods
Any line of code that begins with #pragma is technically a compiler directive. More specifically, a #pragma marks a pragmatic, or compiler-specific, directive that won’t necessarily work with other compilers or in other environments. If the compiler doesn’t recognize the directive, it ignores it, though it may generate a warning. In this case, the #pragma directives are actually directives to the IDE, not the compiler, and they tell Xcode’s editor to put a break in the popup menu of methods and functions at the top of the editor pane. The first one puts the break in the menu. The second creates a text entry containing whatever the rest of the line holds, which you can use as a sort of descriptive header for groups of methods in your source code.
Some of your classes, especially some of your controller classes, are likely to get rather long, and the methods and functions popup menu makes navigating around your code much easier. Putting in #pragma directives and logically organizing your code will make that popup more efficient to use.
Once again, we are told which picker view is asking and which component that picker is asking about. Since we know that we have only one picker and one component, we
www.it-ebooks.info