

- •Preface
- •About This Book
- •Acknowledgments
- •Contents at a Glance
- •Contents
- •Relaxing at the Beach
- •Dressing the Scene
- •Animating Motion
- •Rendering the Final Animation
- •Summary
- •The Interface Elements
- •Using the Menus
- •Using the Toolbars
- •Using the Viewports
- •Using the Command Panel
- •Using the Lower Interface Bar Controls
- •Interacting with the Interface
- •Getting Help
- •Summary
- •Understanding 3D Space
- •Using the Viewport Navigation Controls
- •Configuring the Viewports
- •Working with Viewport Backgrounds
- •Summary
- •Working with Max Scene Files
- •Setting File Preferences
- •Importing and Exporting
- •Referencing External Objects
- •Using the File Utilities
- •Accessing File Information
- •Summary
- •Customizing Modify and Utility Panel Buttons
- •Working with Custom Interfaces
- •Configuring Paths
- •Selecting System Units
- •Setting Preferences
- •Summary
- •Creating Primitive Objects
- •Exploring the Primitive Object Types
- •Summary
- •Selecting Objects
- •Setting Object Properties
- •Hiding and Freezing Objects
- •Using Layers
- •Summary
- •Cloning Objects
- •Understanding Cloning Options
- •Mirroring Objects
- •Cloning over Time
- •Spacing Cloned Objects
- •Creating Arrays of Objects
- •Summary
- •Working with Groups
- •Building Assemblies
- •Building Links between Objects
- •Displaying Links and Hierarchies
- •Working with Linked Objects
- •Summary
- •Using the Schematic View Window
- •Working with Hierarchies
- •Setting Schematic View Preferences
- •Using List Views
- •Summary
- •Working with the Transformation Tools
- •Using Pivot Points
- •Using the Align Commands
- •Using Grids
- •Using Snap Options
- •Summary
- •Exploring the Modifier Stack
- •Exploring Modifier Types
- •Summary
- •Exploring the Modeling Types
- •Working with Subobjects
- •Modeling Helpers
- •Summary
- •Drawing in 2D
- •Editing Splines
- •Using Spline Modifiers
- •Summary
- •Creating Editable Mesh and Poly Objects
- •Editing Mesh Objects
- •Editing Poly Objects
- •Using Mesh Editing Modifiers
- •Summary
- •Introducing Patch Grids
- •Editing Patches
- •Using Modifiers on Patch Objects
- •Summary
- •Creating NURBS Curves and Surfaces
- •Editing NURBS
- •Working with NURBS
- •Summary
- •Morphing Objects
- •Creating Conform Objects
- •Creating a ShapeMerge Object
- •Creating a Terrain Object
- •Using the Mesher Object
- •Working with BlobMesh Objects
- •Creating a Scatter Object
- •Creating Connect Objects
- •Modeling with Boolean Objects
- •Creating a Loft Object
- •Summary
- •Understanding the Various Particle Systems
- •Creating a Particle System
- •Using the Spray and Snow Particle Systems
- •Using the Super Spray Particle System
- •Using the Blizzard Particle System
- •Using the PArray Particle System
- •Using the PCloud Particle System
- •Using Particle System Maps
- •Controlling Particles with Particle Flow
- •Summary
- •Understanding Material Properties
- •Working with the Material Editor
- •Using the Material/Map Browser
- •Using the Material/Map Navigator
- •Summary
- •Using the Standard Material
- •Using Shading Types
- •Accessing Other Parameters
- •Using External Tools
- •Summary
- •Using Compound Materials
- •Using Raytrace Materials
- •Using the Matte/Shadow Material
- •Using the DirectX 9 Shader
- •Applying Multiple Materials
- •Material Modifiers
- •Summary
- •Understanding Maps
- •Understanding Material Map Types
- •Using the Maps Rollout
- •Using the Map Path Utility
- •Using Map Instances
- •Summary
- •Mapping Modifiers
- •Using the Unwrap UVW modifier
- •Summary
- •Working with Cameras
- •Setting Camera Parameters
- •Summary
- •Using the Camera Tracker Utility
- •Summary
- •Using Multi-Pass Cameras
- •Creating Multi-Pass Camera Effects
- •Summary
- •Understanding the Basics of Lighting
- •Getting to Know the Light Types
- •Creating and Positioning Light Objects
- •Viewing a Scene from a Light
- •Altering Light Parameters
- •Working with Photometric Lights
- •Using the Sunlight and Daylight Systems
- •Using Volume Lights
- •Summary
- •Selecting Advanced Lighting
- •Using Local Advanced Lighting Settings
- •Tutorial: Excluding objects from light tracing
- •Summary
- •Understanding Radiosity
- •Using Local and Global Advanced Lighting Settings
- •Working with Advanced Lighting Materials
- •Using Lighting Analysis
- •Summary
- •Using the Time Controls
- •Working with Keys
- •Using the Track Bar
- •Viewing and Editing Key Values
- •Using the Motion Panel
- •Using Ghosting
- •Animating Objects
- •Working with Previews
- •Wiring Parameters
- •Animation Modifiers
- •Summary
- •Understanding Controller Types
- •Assigning Controllers
- •Setting Default Controllers
- •Examining the Various Controllers
- •Summary
- •Working with Expressions in Spinners
- •Understanding the Expression Controller Interface
- •Understanding Expression Elements
- •Using Expression Controllers
- •Summary
- •Learning the Track View Interface
- •Working with Keys
- •Editing Time
- •Editing Curves
- •Filtering Tracks
- •Working with Controllers
- •Synchronizing to a Sound Track
- •Summary
- •Understanding Your Character
- •Building Bodies
- •Summary
- •Building a Bones System
- •Using the Bone Tools
- •Using the Skin Modifier
- •Summary
- •Creating Characters
- •Working with Characters
- •Using Character Animation Techniques
- •Summary
- •Forward versus Inverse Kinematics
- •Creating an Inverse Kinematics System
- •Using the Various Inverse Kinematics Methods
- •Summary
- •Creating and Binding Space Warps
- •Understanding Space Warp Types
- •Combining Particle Systems with Space Warps
- •Summary
- •Understanding Dynamics
- •Using Dynamic Objects
- •Defining Dynamic Material Properties
- •Using Dynamic Space Warps
- •Using the Dynamics Utility
- •Using the Flex Modifier
- •Summary
- •Using reactor
- •Using reactor Collections
- •Creating reactor Objects
- •Calculating and Previewing a Simulation
- •Constraining Objects
- •reactor Troubleshooting
- •Summary
- •Understanding the Max Renderers
- •Previewing with ActiveShade
- •Render Parameters
- •Rendering Preferences
- •Creating VUE Files
- •Using the Rendered Frame Window
- •Using the RAM Player
- •Reviewing the Render Types
- •Using Command-Line Rendering
- •Creating Panoramic Images
- •Getting Printer Help
- •Creating an Environment
- •Summary
- •Creating Atmospheric Effects
- •Using the Fire Effect
- •Using the Fog Effect
- •Summary
- •Using Render Elements
- •Adding Render Effects
- •Creating Lens Effects
- •Using Other Render Effects
- •Summary
- •Using Raytrace Materials
- •Using a Raytrace Map
- •Enabling mental ray
- •Summary
- •Understanding Network Rendering
- •Network Requirements
- •Setting up a Network Rendering System
- •Starting the Network Rendering System
- •Configuring the Network Manager and Servers
- •Logging Errors
- •Using the Monitor
- •Setting up Batch Rendering
- •Summary
- •Compositing with Photoshop
- •Video Editing with Premiere
- •Video Compositing with After Effects
- •Introducing Combustion
- •Using Other Compositing Solutions
- •Summary
- •Completing Post-Production with the Video Post Interface
- •Working with Sequences
- •Adding and Editing Events
- •Working with Ranges
- •Working with Lens Effects Filters
- •Summary
- •What Is MAXScript?
- •MAXScript Tools
- •Setting MAXScript Preferences
- •Types of Scripts
- •Writing Your Own MAXScripts
- •Learning the Visual MAXScript Editor Interface
- •Laying Out a Rollout
- •Summary
- •Working with Plug-Ins
- •Locating Plug-Ins
- •Summary
- •Low-Res Modeling
- •Using Channels
- •Using Vertex Colors
- •Rendering to a Texture
- •Summary
- •Max and Architecture
- •Using AEC Objects
- •Using Architectural materials
- •Summary
- •Tutorial: Creating Icy Geometry with BlobMesh
- •Tutorial: Using Caustic Photons to Create a Disco Ball
- •Summary
- •mental ray Rendering System
- •Particle Flow
- •reactor 2.0
- •Schematic View
- •BlobMesh
- •Spline and Patch Features
- •Import and Export
- •Shell Modifier
- •Vertex Paint and Channel Info
- •Architectural Primitives and Materials
- •Minor Improvements
- •Choosing an Operating System
- •Hardware Requirements
- •Installing 3ds max 6
- •Authorizing the Software
- •Setting the Display Driver
- •Updating Max
- •Moving Max to Another Computer
- •Using Keyboard Shortcuts
- •Using the Hotkey Map
- •Main Interface Shortcuts
- •Dialog Box Shortcuts
- •Miscellaneous Shortcuts
- •System Requirements
- •Using the CDs with Windows
- •What’s on the CDs
- •Troubleshooting
- •Index
Chapter 33 Working with the Track View 833
Reversing, inserting, and scaling time
The Reverse Time button flips the keys within the selected time block.
The Insert Time button lets you insert a section of time anywhere within the current track. To insert time, click and drag to specify the amount of time to insert; all keys beyond the current insertion point slide to accommodate the inserted time.
The Scale Time button scales the selected time block. This feature causes all keys to be pushed closer together or farther apart.
Setting ranges
The Position Ranges button on the Ranges toolbar enables you to move ranges without moving keys. In this mode, you can move and scale a range bar independently of its keys, ignoring any keys that are out of range. For example, this button, when enabled, lets you remove the first several frames of an animation without moving the keys. The Recouple Ranges button can be used to line up the keys with the range again. The left end of the range aligns with the first key, and the right end aligns with the last key.
Editing Curves
When an object is moving through the scene, estimating the exact point where its position changes direction can sometimes be difficult. Function curves provide this information by presenting a controller’s value as a function of time. Each key is a vertex in the curve.
Function curves are visible only in the Curve Editor and the Track Bar layout.
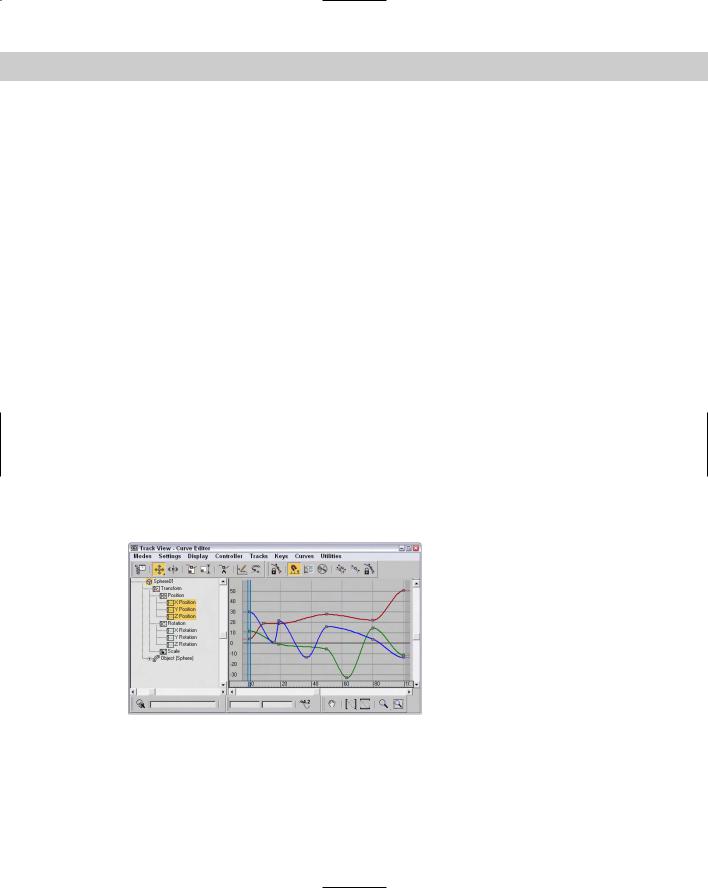
Function curves mode lets you edit and work with these curves for complete control over the animation parameters. Figure 33-9 shows the Position curves for a sphere that moves about the scene.
Figure 33-9: Function curves display keys as square markers along the curve.

834 Part VII Animation
Inserting new keys and moving keys
Function curves with only two keys have slow in and out tangents, making the animation start slow, speed up, and then slow down. You can add more curvature to the line with the addition of another key. To add another key, click the Add Keys button, and then click the curve where you want to place the key.
If the curve contains multiple curves, such as a curve for the Position or RGB color values, then a point is added to each curve. The Move Keys button enables you to move individual keys by dragging them. It also includes flyouts for constraining the key movement to a horizontal or vertical direction.
Click the Scale Keys button to move the selected keys toward or away from the current time. The keys move only horizontally. Click the Scale Values button to move the selected keys toward or away from the zero value. The keys move only vertically.
Tutorial: Animating a monorail
As an example of working with function curves, you animate a monorail that moves around its track, changing speeds, and stopping for passengers.
To animate the monorail using function curves, follow these steps:
1.Open the Monorail.max file from the Chap 33 directory on the CD-ROM. This file contains a simple monorail set up made from primitives.
2.Click the Play button and watch the train move around the track. As a default, the Path Constraint’s Percent track has a Linear controller that causes the train to move at a constant speed. To refine the animation, you need to change it.
3.Open the Track View–Curve Editor, and locate the train group’s Percent track (you can find this track under the Objects Train Transform Path Constraint Percent menu command). Click the Assign Controller button to open the Assign Float Controller dialog box. Select the Bézier Float controller, and click OK.
4.Click the Play button. The train starts slowly (represented by the flattish part of the curve), accelerates (the steeper part of the curve), and slows down again (another flattish part).
Tip |
When “reading” function curves, remember that a steep curve produces fast animation, shal- |
|
low curves produce slow animation, horizontal produces no movement or value change, and |
|
a straight curve produces a constant animation. |
5.We need the train to stop for passengers at the station, so click the Add Keys button (or right-click and choose Add Keys) and add a key somewhere around frame 115 when the train is near the dock.
6.Select the newly created key, and choose the Move Keys Horizontal button from the Move Keys flyout. Hold down the Shift key, and drag right to copy the key to frame 135.
The curve is flat, so the train stops at the station.
7.To adjust the actual position where the train stops, choose the Move Keys Vertical button from the Move Keys flyout, select both keys, and move them up or down until the train’s position at the station is correct.
Chapter 33 Working with the Track View 835
Because the default in and out tangent types cause the curve to flatten out at the keys, the train slows as it reaches the station, and starts out slow and picks up speed as it leaves the station. Anyone who has ever ridden on a train knows that stopping and starting are not always smooth operations. Next, you add a few more keys and make the train shudder to a stop, and lurch as it starts out again.
8.Click the Add Keys button (or right-click and choose Add Keys), and add keys somewhere around frames 105, 109, 113, 142, and 150. Use Zoom Region to zoom in on the keys where the train pulls into the station to stop.
9.Change the Move Keys Vertical button back to Move Keys by selecting it from the flyout, and move the keys slightly up or down to send the train backward and forward along the path.
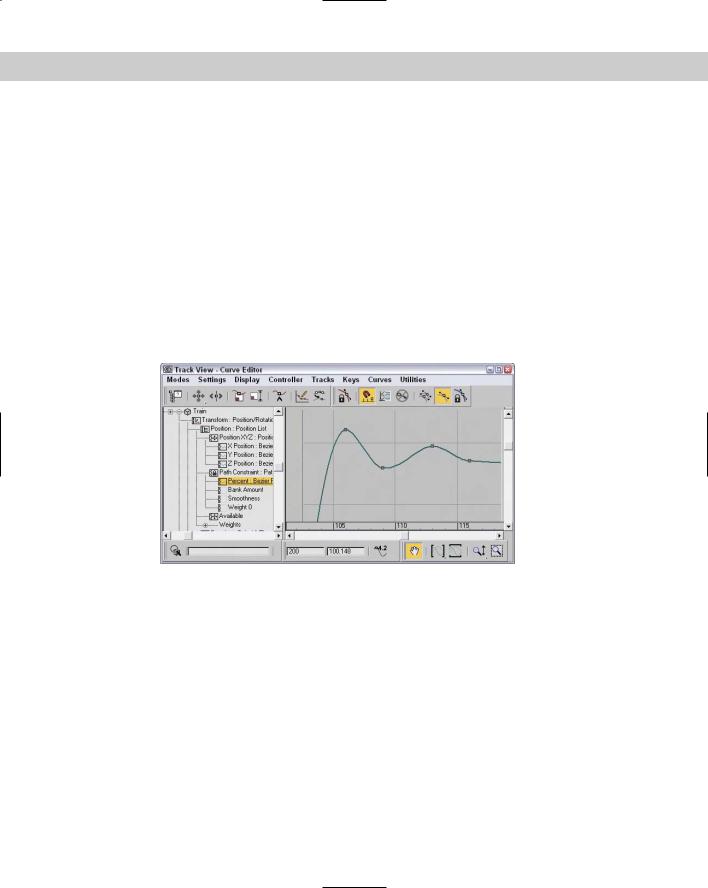
10.As you can see, a little movement goes a long way, so the keys need only to be offset a very small amount. Use the Zoom Values button from the Zoom flyout and the Pan button to help in making the small changes to the animation. Figure 33-10 shows the zoomed in view of this section of the curve.
Figure 33-10: Using Zoom Values to see the stopping position keys
11.Repeat for the keys where the train leaves the station.
The train also needs to slow down to look at one of the famous buildings in “Primitive Town,” the Tubular “building” on the far side of the track.
12.Add a couple more keys somewhere around frames 18 and 50. Lower the second of the new keys until the curve is shallower, but not horizontal. Again, adjust the train’s position on the track (Percent along the path) by raising or lowering the two new keys.
13.Adjust the Out tangent handle of the very first key, and the In tangent handle of the very last key to produce a smooth looping animation.
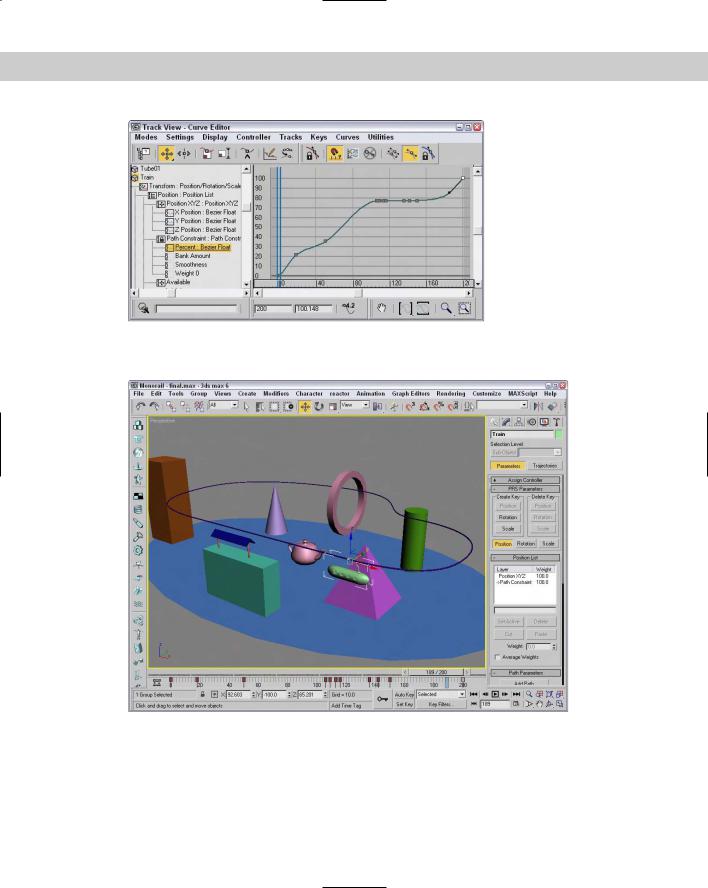
Figure 33-11 shows the final curve after you’ve completed the editing, and Figure 33-12 shows the monorail along its path.
836 Part VII Animation
Figure 33-11: The finished Percent curve for the train’s position along the path
Figure 33-12: The monorail and “Primitive Town”
Chapter 33 Working with the Track View 837
Drawing curves
If you know what the curve you want is supposed to look like, you can actually draw the curve in the Key pane with the Draw Curves button enabled. This mode adds a key for every change in the curve. You may want to use the Reduce Keys optimization after drawing a curve.
Tip |
If you make a mistake, you can just draw over the top of the existing curve to make corrections. |
Figure 33-13 shows a curve that was created with the Draw Curves feature.
Figure 33-13: Drawing curves results in numerous keys.
Reducing keys
The Reduce Keys button enables you to optimize the number of keys used in an animation. Certain IK methods and the Dynamics utility calculate keys for every frame in the scene, which can increase your file size greatly. By optimizing with the Reduce Keys button, you can reduce the file size and complexity of your animations.
Clicking the Reduce Keys button opens the Reduce Keys dialog box. The threshold value determines how close to the actual position the solution must be to eliminate the key. Figure 33-14 shows the same curve created with the Draw Curves feature after it has been optimized with a Threshold value of 0.5 using the Reduce Keys button.
Figure 33-14: The Reduce Keys button optimizes the curve by reducing keys.
838 Part VII Animation
Working with tangents
Function curves for the Bézier controller have tangents associated with every key. To view and edit these tangents, click the Show All Tangents button. These tangents are lines that extend from the key point with a handle on each end. By moving these handles, you can alter the curvature of the curve around the key.
You can select the type of tangent from the Key Tangents toolbar. These can be different for the In and Out portion of the curve. You can also select them using the Key dialog box.
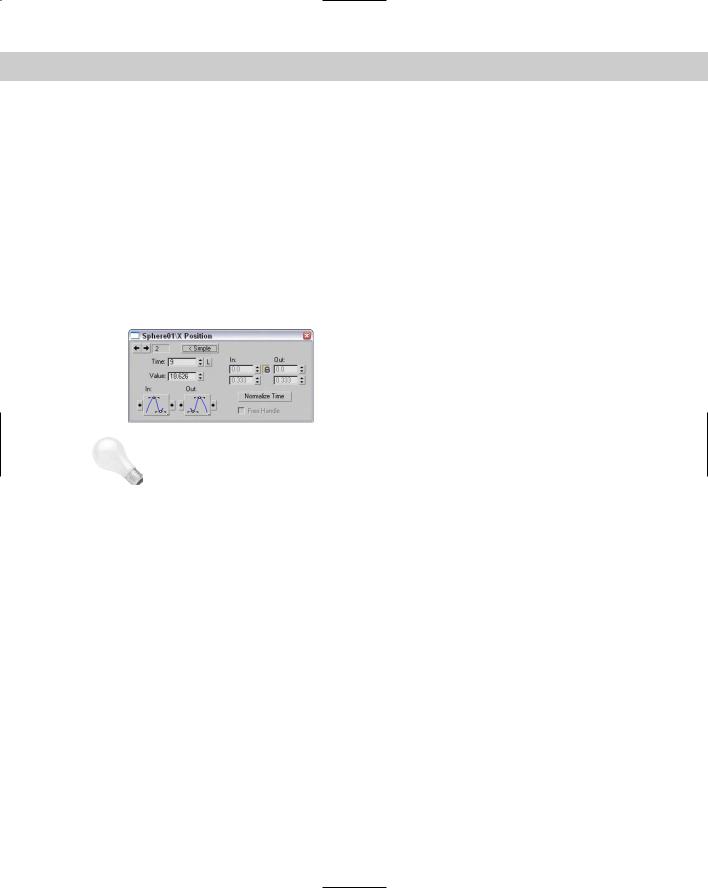
You open the Key dialog box, shown in Figure 33-15, by selecting a key and clicking the Properties button or by right-clicking the key. It lets you specify two different types of tangent points: Continuous and Discontinuous. Continuous tangents are points with two handles that are on the same line. The curvature for continuous tangents is always smooth. Discontinuous tangents have any angle between the two handle lines. These tangents form a sharp point.
Figure 33-15: The Key dialog box lets you change the key’s Time, Value, or In and Out tangent curves.
Tip |
Holding down the Shift key while dragging a handle lets you drag the handle independently |
|
of the other handle. |
The Lock Tangents button lets you change the handles of several keys at the same time. If this button is disabled, adjusting a tangent handle affects only the key of that handle.
Tutorial: Animating a flowing river
The default auto-tangent types create a function curve that has ease-in and ease-out built into the curve. This causes the animation to start slowly, speed up, and then slow to a stop. While this may be a good starting point for many animations, it won’t work for those that should have a constant speed. This example shows how to create a river with a material animated to a constant speed.
1.Open River.max file from the Chap 33 directory on the CD-ROM.
This file contains a river surface made from a loft. The V Offset for the River Water material’s diffuse channel has been animated to simulate flowing water (yes, this river has a checkered past. . .).
2.Click the Play button.
The river flow starts out slow, speeds up, and then slows to a stop.
3.Open the Track View–Curve Editor, and locate and select the V Offset track for the river’s material (you can find this track under the Objects Checkered River River Water Maps Diffuse Color : Map #2 (Checker) Coordinates V Offset menu command).
Chapter 33 Working with the Track View 839
4.You have two easy options for creating an animation with a constant speed. The first changes the entire controller type; the second changes the individual key’s tangent types.
Option 1: Right-click over the V Offset track, and choose Assign Controller or choose Assign from Controller on the menu bar to open the Assign Float Controller dialog box. Select Linear Float, and click OK.
or
Option 2: Select both keys by clicking on one key, holding down the Ctrl button, and clicking on the other, or by dragging an outline around both keys. Click the Set Tangents to Linear button.
Whichever method you use, the line between the two keys is now straight.
5.Click the Play button.
The river now flows at a constant speed.
6.To increase the speed of the flow, select Move Keys Vertical from the Move Keys button flyout, and select and move the end key higher in the graph.
The river flows faster.
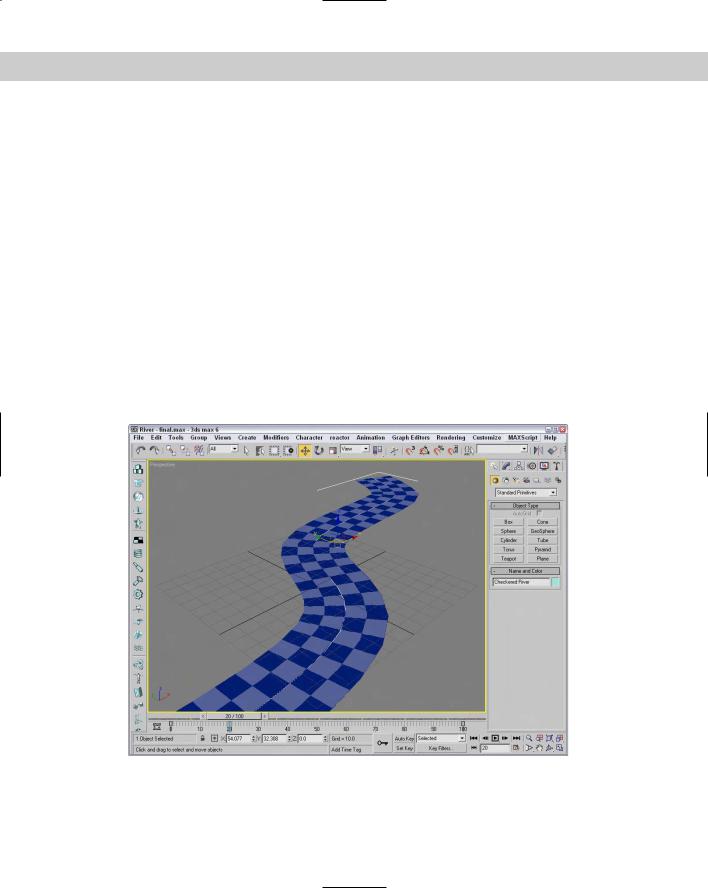
Figure 33-16 shows the river as it flows along.
Figure 33-16: The Checkered River flows evenly.
840 Part VII Animation
Applying out-of-range, ease, and multiplier curves
Out-of-range curves define what the curve should do when it is beyond the range of specified keys. For example, you could tell the curve to loop or repeat its previous range of keys. To apply these curves, select a track and click the Parameter Curve Out-of-Range Types button on the Curves toolbar (or select the Out-of-Range menu command from the Controller menu). This opens a dialog box, shown in Figure 33-17, where you can select from the available curve types.
Figure 33-17: The Param Curve Out-of-Range Types dialog box lets you select the type of out- of-range curve to use.
Note |
You can also apply an out-of-range curve to a select range of frames using the Create Out-of- |
|
Range Keys utility. This utility is available via the Track View Utilities button. |
By clicking the buttons below the types, you can specify a curve for the beginning and end. This Out-of-Range dialog box includes six options:
Constant: Holds the value constant for all out-of-range frames
Cycle: Repeats the track values as soon as the range ends
Loop: Repeats the range values, like the Cycle option, except that the beginning and end points are interpolated to provide a smooth transition
Ping Pong: Repeats the range values in reverse order after the range end is reached
Linear: Projects the range values in a linear manner when out of range
Relative Repeat: Repeats the range values offset by the distance between the start and end values
You can apply ease curves (choose Curves Apply Ease Curve, or press Ctrl+E) to smooth the timing of a function curve. You can apply multiplier curves (Curves Apply Multiplier Curve, Ctrl+M) to alter the scaling of a function curve. You can use ease and multiplier curves to automatically smooth or scale an animation’s motion. Each of these buttons adds a new track and function curve to the selected controller track.
Note |
Not all controllers can have an ease or multiplier curve applied. |
You can delete these tracks and curves using the Delete Ease/Multiplier Curve button. You can also enable or disable these curves with the Enable Ease/Multiplier Curve Toggle button.
Chapter 33 Working with the Track View 841
After you apply an ease or multiplier curve, you can assign the type of curve to use with the Ease Curve Out-of-Range Types button. This button opens the Ease Curve Out-of-Range Types dialog box, which includes the same curve types as the Out-of-Range curves, except for the addition of an Identity curve type.
Note |
In the Ease Curve Out-of-Range Types dialog box is an Identity option that isn’t present in the |
|
Parameter Curve Out-of-Range Types dialog box. The Identity option begins or ends the |
|
curve with a linear slope that produces a gradual, constant rate increase. |
When editing ranges, you can make the range of a selected track smaller than the range of the whole animation. These tracks then go out of range at some point during the animation. The Ease/Multiplier Curve Out-of-Range Types buttons are used to tell the track how to handle its out-of-range time.
Tutorial: Animating a wind-up teapot
As an example of working with multiplier curves, we create a wind-up teapot that vibrates its way across a surface.
To animate the vibrations in the Track View, follow these steps:
1.Open the Wind-up teapot.max file from the Chap 33 directory on the CD-ROM. This file contains a teapot with legs.
2.Click the Play button.
The teapot’s key winds up to about frame 40, and then runs down again as the teapot moves around a bit. To add the random movement and rotation to make the vibrations, you use Noise controllers and Multiplier curves to limit the noise.
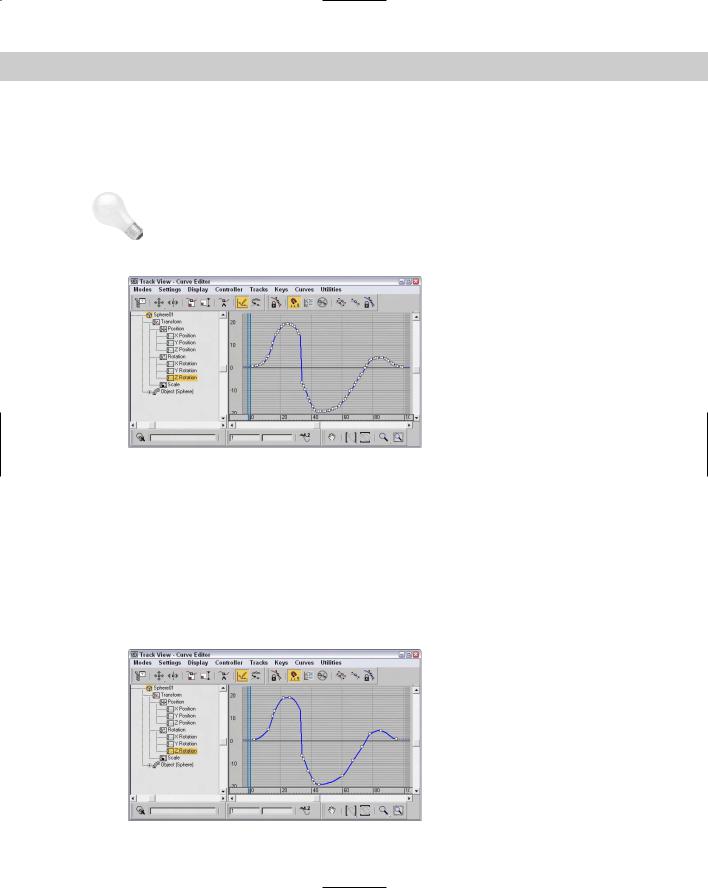
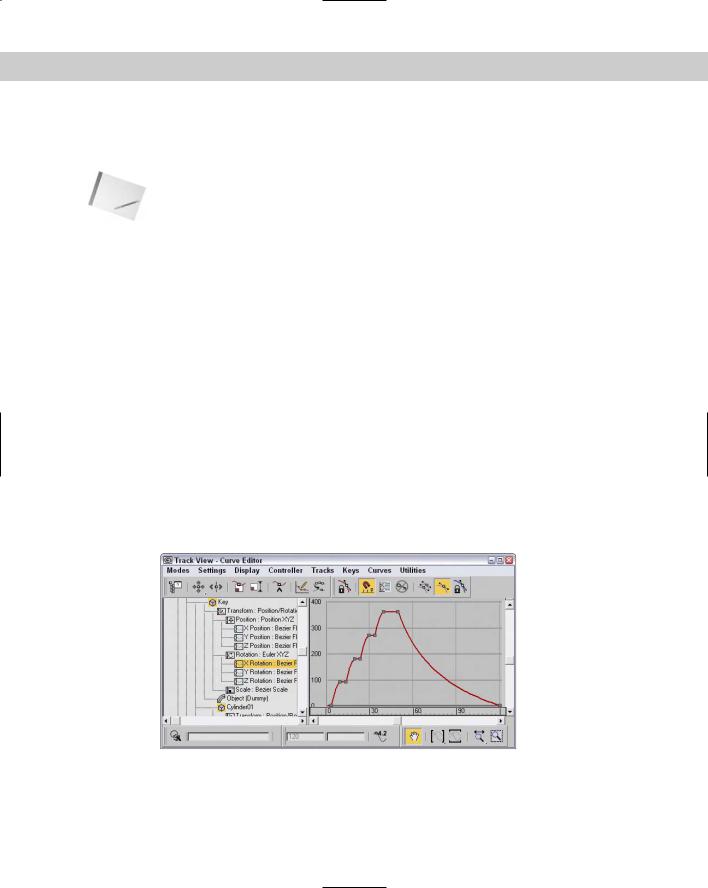
3.Open the Track View–Curve Editor, and navigate down to the Wind-up Key’s X Rotation track. Take a moment to observe the shape of the curve, shown in Figure 33-18.
Figure 33-18: The rotation of the Wind-up Key object
842 Part VII Animation
The key is “wound up” in short spurts and then runs down, slowing until it stops. The vibration, then, should start midway and then taper off as the key runs down.
4.Click the teapot in the viewport to have the curves for its transforms selected and centered in the Track View.
When adding the Noise controller, you should assign a List controller first to retain the ability to transform the object independently of the Noise.
Note |
Assigning controllers through the Animation menu automatically creates a List controller first. |
5.Select the Position track, and click the C key to access the Assign Controller dialog box. Choose Position List. Under the Position track are now the X, Y, and Z Position tracks and an Available track. Select the Available track, access the Assign Controller dialog box again, and choose Noise Position. The default controller should remain the Position XYZ controller, so close the List Controller dialog box. Click Play.
The teapot vibrates the entire animation. You add a multiplier curve to correct the situation.
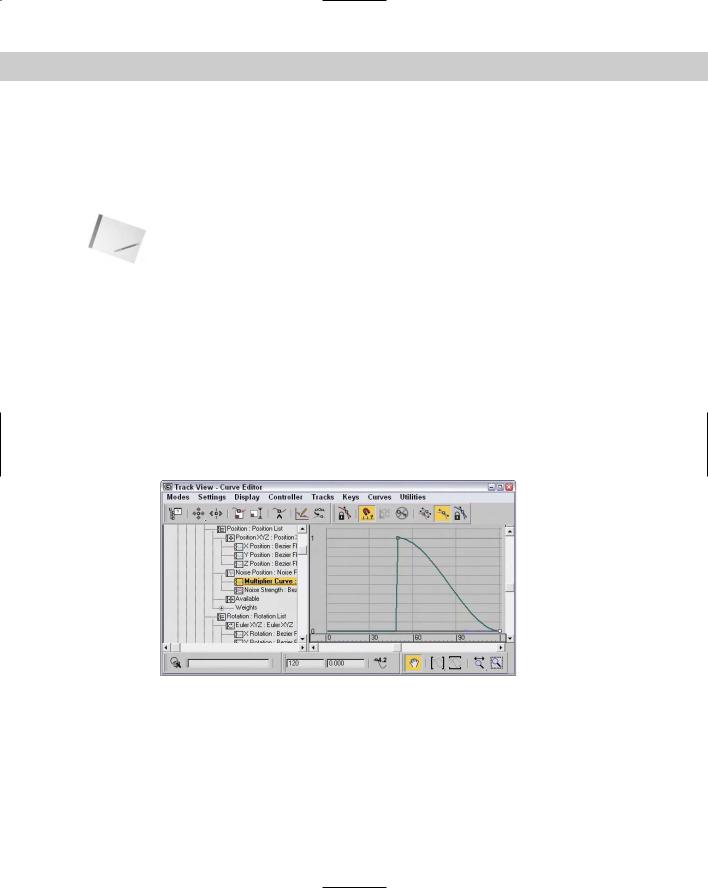
6.Select the Noise Position track, and choose Curves Apply-Multiplier Curve. Select the Multiplier curve track. Assign the first key a value of 0. Change its Out tangent to Stepped so it holds its value until the next key. Click the Add Keys button, and add a key at frame 50 with a value of 1. Move the last key to frame 120, and set a value of 0. The Multiplier curve should now look like the curve in Figure 33-19. Select the Noise Position track.
Figure 33-19: The Multiplier curve keeps the Noise track in check.
The noise curve now conforms to the multiplier track.
7.With the Noise Position track still selected, right-click and choose Properties. In the Noise Position dialog box, set the X and Y Strength to 30, set the Z strength to 20, and check the >0 check box to keep the teapot from going through the floor. Close the dialog box, and click Play.
The animation is much better. Next, you add some noise to the Rotation track.

Chapter 33 Working with the Track View 843
8.Select the Rotation track, right-click, and choose Assign controller, or click the C key to bring up the Assign Controller dialog box. Select Rotation List, and click OK. Select the Available track, access the Assign Controller dialog box again, and choose Noise Rotation.
Click Play. Again, the noise is out of control.
9.This time, select the Noise Strength track and add a multiplier curve.
You already have a perfectly good multiplier curve, so you can instance it into the new track.
10.Select the position multiplier track, right-click, and choose Copy. Now select the rotation Noise Strength multiplier, right-click, and choose Paste. Choose Instance, and close the dialog box.
11.Click the Play button, and watch the Teapot wind up and then vibrate itself along until it winds down.
Figure 33-20 shows the teapot as it dances about, compliments of a controlled noise controller.
Figure 33-20: The wind-up teapot moves about the scene.