


Chapter 3 Working with Files and XRefs |
93 |
If you ever get involved in a modeling duel, then you’ll probably be using the File Replace menu command at some time. A modeling duel is when two modelers work on the same rough model of named objects and the animator (or boss) gets to choose which object to use. With the File Replace menu command, you can replace a named object with an object of the same name in a different scene. The objects are selected using the same dialog box shown in Figure 3-4, but only the objects with identical names in both scene files display. If no objects with the same name appear in both scene files, a warning box is displayed.
Cross- |
The File menu also includes a Merge Animation menu command, which is covered in |
Reference |
Chapter 30, “Animation Basics.” |
|
Archiving files
By archiving a Max scene along with its reference bitmaps, you can ensure that the file includes all the necessary files. This is especially useful if you need to send the project to your cousin to show off or to your boss and you don’t want to miss any ancillary files. Choose File Archive to save all scene files as a compressed archive. The default archive format is .zip (but you can change it in the File panel of the Preference Settings dialog box to use whatever archive format you want). The Archive System lets you specify which archive program Max uses to archive your files. Maxzip is the default, but you can change it to whichever program you want to use.
Saving an archive as a .zip file compiles all external files, such as bitmaps, into a single compressed file. The File Type drop-down list of the File Archive dialog box also includes an option to create a List of Files. When you select this file type, a text file is created that lists all relevant files and their paths.
Getting out
As you can probably guess, you use the File Exit command to exit the program, but only after it gives you a chance to save your work. Clicking on the window icon with an X on it in the upper right has the same effect (but I’m sure you knew that).
Setting File Preferences
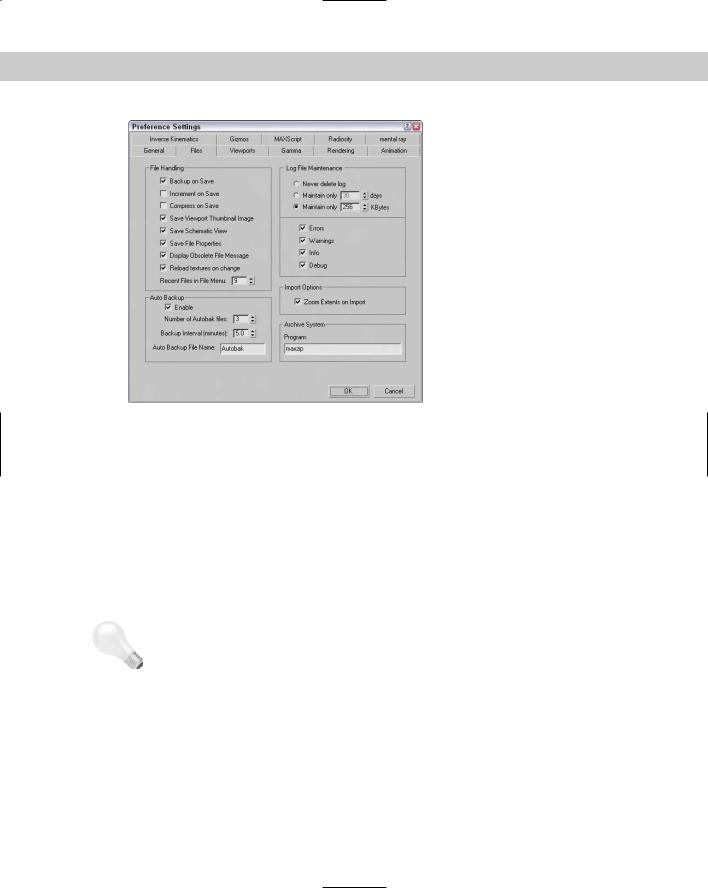
The Files panel of the Preference Settings dialog box holds the controls for backing up, archiving, and logging Max files. You can open this dialog box using the Customize Preferences menu command. Figure 3-5 shows this panel.
Handling files
The Files panel includes several options that define how to handle files. The first option is to Backup on Save. When you save a file using the File Save (Ctrl+S) menu command, the existing file is overwritten. The Backup on Save option causes the current scene file to be saved as a backup (with the name MaxBack.bak in the 3dsmax\autobak directory) before saving the new file. If the changes you made were a mistake, you can recover the file before the last changes by renaming the MaxBack.bak file to MaxBack.max and reopening it in Max.
94 |
Part I Learning the Max Interface |
Figure 3-5: The Files panel includes an Auto Backup feature.
Another option to prevent overwriting your changes is the Increment on Save option. This option adds an incremented number to the end of the existing filename every time it is saved. This retains multiple copies of the file and is an easy version-control method for your scene files. This way, you can always go back to an earlier file when the client changes his mind. With this option enabled, the MaxBack.bak file isn’t used.
The Compress on Save option compresses the file automatically when it is saved. Compressed files require less file space but take longer to load. If you’re running low on hard drive space, then you’ll want to enable this option.
The Save Viewport Thumbnail Image option saves a 64×64-pixel thumbnail of the active viewport along with the file. This thumbnail is displayed in the Open dialog box and can also be seen from Windows Explorer, as shown in Figure 3-6. Saving a thumbnail with a scene adds about 9K to the file size.
Tip The Save Viewport Thumbnail Image option is another good option to keep enabled. Thumbnails help you to find scene files later, and nothing is more frustrating than seeing a scene’s filename without a thumbnail.
In addition to a thumbnail, Max also offers an option to save the Schematic View with the file. Although Max can generate a new Schematic View from an existing file, saving the Schematic View with the file is quicker if you work with this view often. Saving File Properties with the file is also helpful, but be warned that saving this extra info with the file increases its file size slightly. Still, doing so is worth the effort because you can easily locate and understand the scene file later on.

Chapter 3 Working with Files and XRefs |
95 |
|
Figure 3-6: Max files with thumbnails show up in Windows Explorer. |
|
When a Max file created in a previous version of Max is opened, a warning dialog box appears |
|
that says, “Obsolete data format found — Please resave file.” To eliminate this warning, dis- |
|
able the Display Obsolete File Message option. The warning dialog box also includes an |
|
option to Don’t Display Again that enables this option when selected. |
|
When textures are updated, the Reload Textures on Change option forces the textures to be |
|
reloaded when they are altered. This slows your system while Max waits for the textures to |
|
reload, but offers the latest look immediately. |
|
The Recent Files in File Menu option determines the number of recently opened files that |
|
appear in the File Open Recent menu. The maximum value is 9. |
Tip |
I like to set the Recent Files in File Menu option at its highest value because I find that this is |
|
the easiest way to open up the latest scenes. |
Backing up files
The Auto Backup feature in Max can save you from the nightmare of losing all your work due to a system crash. With Auto Backup enabled, you can select the number of Autobak Files to keep around and how often the files are backed up. The backup files are saved to the directory specified by the Configure Paths dialog box. The default is to save these backups to the 3dsmax\autoback directory. You can also select a name for the backup files.

96 |
Part I Learning the Max Interface |
Note Even if you have this feature enabled, you should still save your file often.
|
This is how it works: If you’ve set the number of backup files to 2, the interval to 5 minutes, |
|
and the backup name to MyBackup, then after five minutes, the current file is saved as |
|
MyBackup1.max. After another five minutes, another file named MyBackup2.max is saved, |
|
and then after another five minutes, the MyBackup1.max file is overwritten with the latest |
|
changes. |
|
If you lose your work due to a power failure or by having your toddler accidentally pull out |
|
the plug, you can recover your work by locating the autobak file with the latest date and |
|
reloading it into Max. This file won’t include all the latest changes, only updates up to the last |
|
backup save. |
Tip |
I highly recommend that you keep the Auto Backup option enabled. This feature has saved |
|
my bacon more than once. |
Tutorial: Setting Auto Backup
Now that I have stressed that setting up Auto Backup is an important step to do, let’s run through exactly how to set it up.
To set up the Auto Backup feature, follow these steps:
1.Open the Preferences Settings dialog box by choosing Customize Preferences, and click the Files panel.
2.Turn on Auto Backup by selecting the Enable option in the Auto Backup section.
3.Set the number of Autobak files to 3.
Note |
To maintain version control of your Max scenes, use the Increment on Save feature instead of |
|
increasing the Number of Autobak Files. |
4.Set the Backup Interval to the amount of time to wait between backups.
The Backup Interval should be set to the maximum amount of work that you are willing to redo. (I keep my settings at 5 minutes.) You can also give the Auto Backup file a name.
5.Auto Backup saves the files in the directory specified by the Auto Backup path. To view where this path is located, choose Customize Configure Paths.
Maintaining log files
You can also use the Files panel to control log files. Log files keep track of any errors and warnings, general command info, and any debugging information. You can set log files to never be deleted, expire after so many days, or keep a specified file size with the latest information. If your system is having trouble, checking the error log gives you some idea as to what the problem is. Logs are essential if you plan on developing any custom scripts or plugins. You can select that the log contain all Errors, Warnings, Info, and Debug statements.