

Chapter QS Quick Start: Animating a Monster Truck at the Beach |
13 |
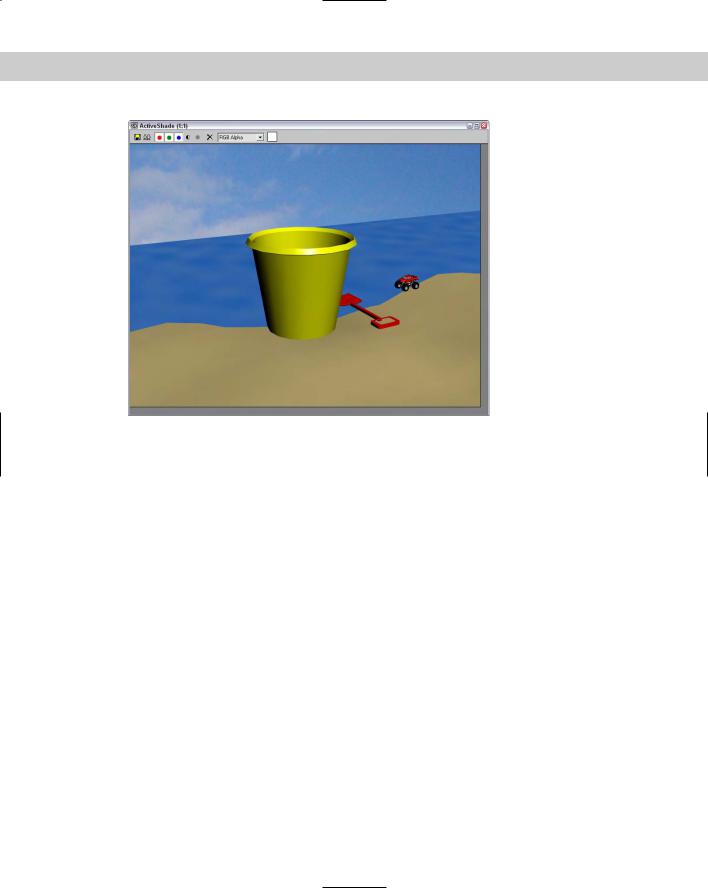
Figure QS-8: The background image adds to the beach scene.
Animating Motion
After loading and positioning all the models and dressing them with materials, you can add motion to the scene by animating the objects. Animations can consist of moving objects, like the truck, as well as secondary motion, like rotating the tires as the truck moves. Animation is not limited to models; in this section we animate the camera too.
Special effects can also be part of the animating process. In this project we use a particle system, which consists of many small particles that combine to look like a cloud of dust.
Tutorial: Animating the monster truck motion
By now, I’m sure that the monster truck is feeling very ready to throw some dirt around. To animate the truck, we want to move it forward and rotate the wheels. The animation method we’re using is keyframes. This works by setting a beginning position and an ending position and letting Max compute all the in-between positions.
To animate the monster truck moving, follow these steps:
1.First, we move the truck to its starting position at the end of the sand away from the toy shovel and pail, but first we need to pan and zoom the Top viewport. Click and drag the Top viewport with the middle scroll wheel button to pan the viewport to the left. Then roll the middle scroll wheel to zoom out of the Top viewport so you can see the truck and most of the sand behind it. Then click the Select and Move tool (W), and drag the truck to the lower-right corner of the “Sand” plane object.

14 |
Part I Learning the Max Interface |
2.With the truck selected, press the Z key to zoom in on it in all viewports. Then with the Select and Move tool (W), drag the truck up in the Front viewport until its wheels are above the “Sand” plane.
3.Right-click the Top viewport to make it the active viewport, and with the middle scroll wheel, zoom out of the view so you can see the shovel object again.
4.Before we animate the monster truck, we need to ungroup it so we can animate the wheels independent of the group. Select Group Ungroup to ungroup the truck.
5.Click the Auto Key button (or press the N key), and drag the Time Slide to frame 100. Auto Key mode records all transforms as keys. Click the Select and Move (W) tool, and drag the truck from its position to the left in the Top viewport until it is just right of the shovel.
6.Click the Auto Key button again to turn off Auto Key mode, and click the Play button (/) to see the truck move in the Top viewport. Click the Pause button to stop the animation, and drag the Time Slider back to frame 0.
This tutorial is saved as Moving truck.max. Animating the movement of the truck is only half the battle. We still need to animate the wheels rotating.
Tutorial: Animating the rotating wheels
The next animation task is to animate the rotating wheels. Because there are four wheels, you can select the wheel and rim objects, position their pivot point to the center of the selected objects, and create the animation.
To animate the wheels rotating, follow these steps:
1.With the truck selected, press the Z key to zoom in on the truck in all viewports.
2.Select the wheel and the rim of one of the tires by dragging over the wheel in the Top viewport. This also selects the “Sand” plane underneath, so hold down the Ctrl key and click the “Sand” plane to deselect it.
3.Before you can rotate the wheel, you need to set the location about which it rotates, which should be the center of the wheel. Open the Hierarchy panel in the command panel, and with the Pivot button selected, click the Affect Pivot Only button. The Pivot is the point about which the rotations take place. Then click the Center to Object button. This places the Pivot at the center of the wheel. Then click the Affect Pivot Only button again to exit Pivot mode.
4.With the entire wheel and rim selected, click the Select and Rotate (E) tool on the main toolbar. Then press the Auto Key button (or press the N key), and drag the Time Slider over to frame 100. Then press the Z key to zoom in on the wheel in all viewports. Select Tools Transform Type-In (or press the F12 key), and enter a value of –7200 in the Offset:Screen field for the Y axis. Close the Transform Type-In floater, and disable Auto Key mode.
5.With the middle mouse button held down, drag in the Top viewport until another one of the tires is visible. Repeat Steps 2 through 4 for this wheel and then drag the viewport again and repeat until all four tires are animated.
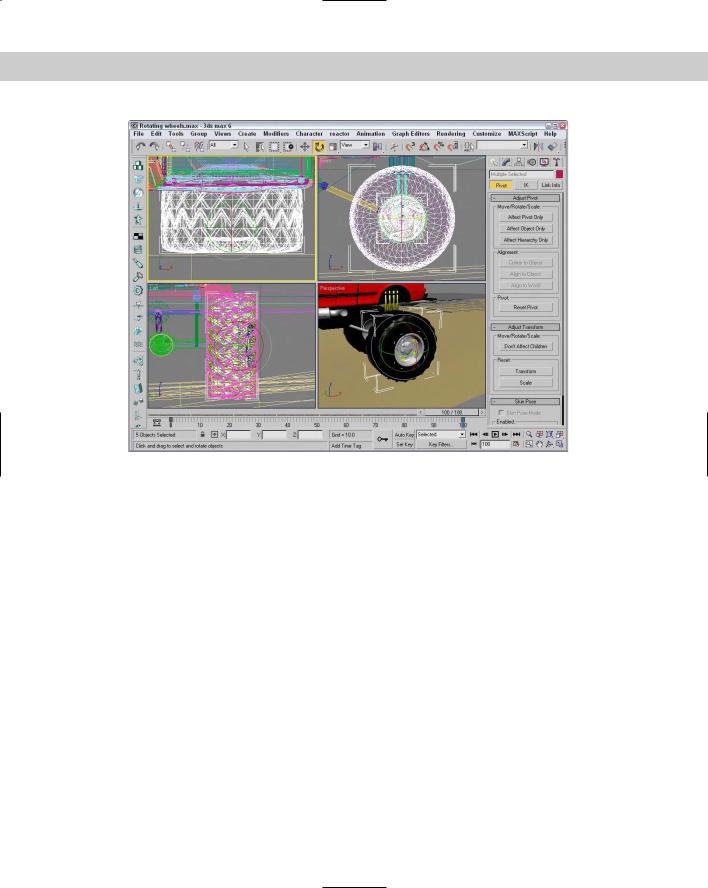
Figure QS-9 shows a tire selected and animated. This tutorial is saved as Rotating wheels.max.
Chapter QS Quick Start: Animating a Monster Truck at the Beach |
15 |
Figure QS-9: Subtle animation pieces like rotating tires are essential for a realistic scene.
Tutorial: Positioning and animating a camera
With the monster truck animated, you’re now ready to add a camera to the scene and animate its motion. Initially, we want it to focus on the monster truck and then slowly dolly away from its focus to reveal the entire scene.
To add a camera to the scene and animate its motion, follow these steps:
1.Zoom out and pan with the middle scroll wheel in the Top viewport until you can see most of the “Sand” pane, and then drag the Time Slider back to frame 0. Then select Create Cameras Target Camera, and click and drag in the Top viewport near the truck to create a camera.
2.In the Left viewport, zoom out, right-click the Target Camera, and choose the Select Camera Target option from the pop-up quadmenu. Click the Select and Move (W) tool, and drag the camera target up toward the center hub between the tires beneath the monster truck. Then click the Select and Link button on the main toolbar, and drag from the Camera Target to the center hub object to link the two together.
This causes the camera to point at this object wherever the truck moves.
3.Select the Perspective viewport, and right-click the Perspective title in the viewport in the upper-left corner. In the pop-up menu that appears, select Views Camera01.
This changes the Perspective viewport to a view from the camera object.
16 |
Part I Learning the Max Interface |
4.Drag the camera object in the Top and Left viewports until the Camera01 viewport shows a good close-up of the monster truck. Then click the Auto Key button (N) to enable this mode, and drag the Time Slider to frame 50. Using the Select and Move button (W), position the camera in the Top and Left viewports to show another close-up of the monster truck.
5.With the Auto Key button still enabled, drag the Time Slider to frame 75 and move the camera up and away from the truck in the Top and Left viewports. Then drag the Time Slider to frame 100, and drag the camera even further so the toy shovel and pail are visible. Click the Auto Key button again to disable it.
6.Right-click the Camera01 viewport to make it the active viewport, and click the Play Animation button (/) to see the resulting animation.
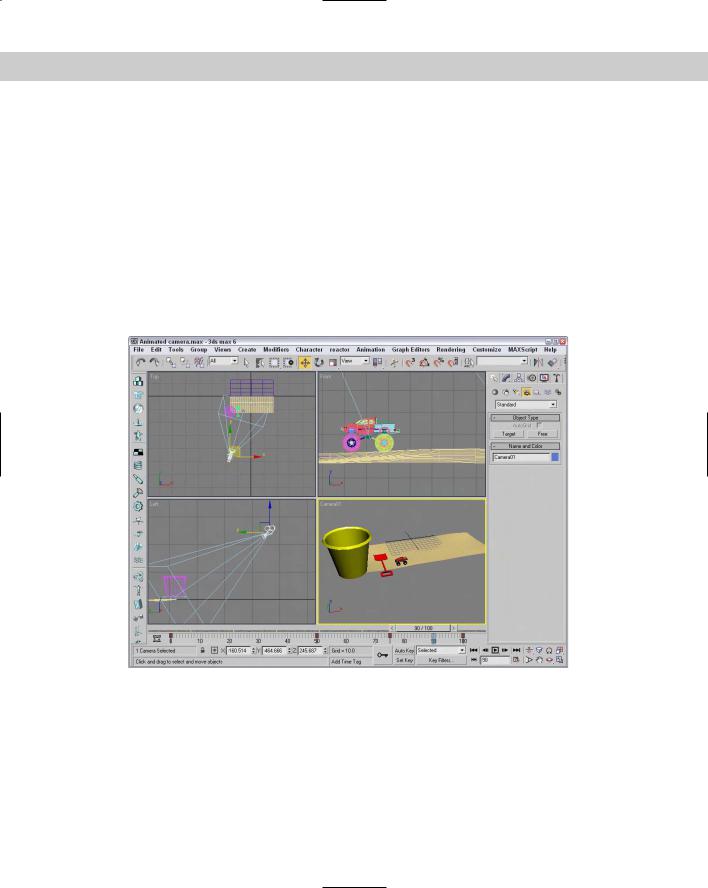
This tutorial is saved as Animated camera.max. Figure QS-10 shows the final position of the camera.
Figure QS-10: Linking the camera target to an object ensures that the object is always visible.

Chapter QS Quick Start: Animating a Monster Truck at the Beach |
17 |
Tutorial: Adding special effects
Special effects are the little extras that you add to an animation that make the scene a little more believable, and one of the best ways to add effects in Max is using particle systems. For this animation, we use a particle system to kick up some dust from the tires as the truck moves along.
To add some dust to the truck motion using particle systems, follow these steps:
1.Drag the Time Slider back to frame 0, select a rear wheel, and press the Z key to zoom in on it.
2.Select Create Particles Super Spray, and drag in the Top viewport to create a Super Spray icon. Click the Select and Rotate (E) tool, and rotate the icon in the Top and Front viewports until the icon’s arrow points up and outward from the bottom of the wheel.
3.With the Super Spray icon selected, open the Modify panel and, in the Basic Parameters rollout, set the Off Axis Spread value to 30 and the Off Plane Spread value to 45. In the Particle Generation rollout, select the Use Rate option with 1000 particles, and set the Speed to 2.0 with a Variation to 80% and the Emit Stop value to 95. Set the Life value to 20 with a Variation of 75, and a Size value of 0.5 with a Variation of 20%. In the Particle Type rollout, select the Facing option.
4.Press the M key to open the Material Editor, drag the “Sand” material to an open sample slot, and name the material Sand particles. Set the Opacity value to 15, and click the mapping shortcut for the Diffuse color. In the Material/Map Browser, double-click the Smoke map and set its colors to light brown and white. Then drag the “Sand particles” material to the Super Spray icon.
5.In the Top viewport, hold down the Shift key and drag the Super Spray icon upward to clone another particle system for the other rear wheel. In the Clone Options dialog box that opens, click OK.
6.Click the Select and Link tool on the main toolbar, and drag from each Super Spray icon to the rear bumper object in the Front viewport.
This links the particle systems so they travel with the truck.
Having a monster truck kick up a little dust adds to the render time, but the effect is worth it and makes the monster truck in the earlier scenes look like a real machine. Figure QS-11 shows a rendered frame of the particles being emitted behind the truck. This tutorial is saved as Dust particles.max.