

Chapter 3 Working with Files and XRefs 113
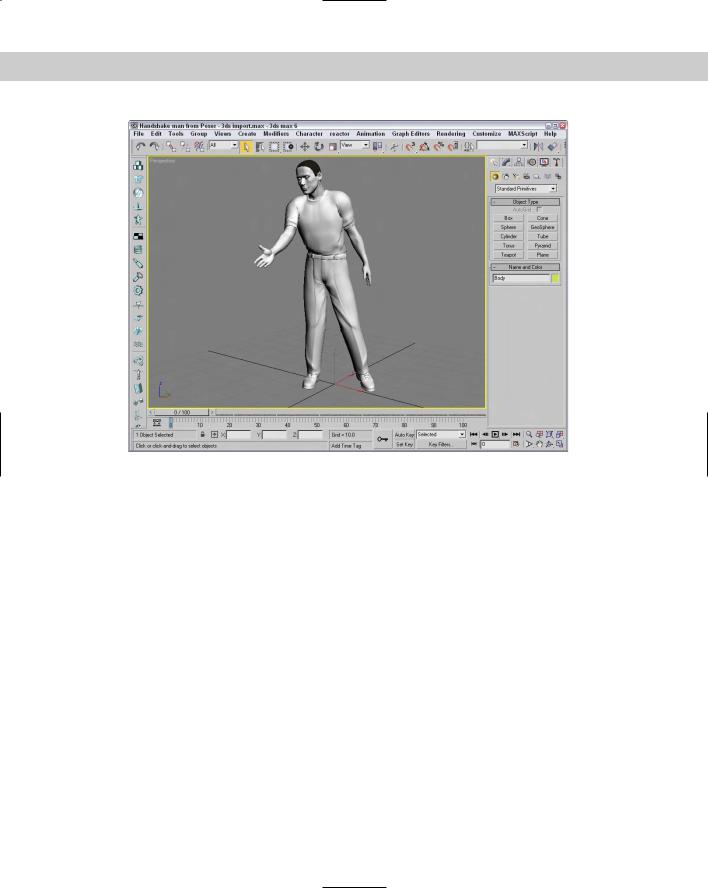
Figure 3-22: A Poser model imported into Max using the 3DS format
Referencing External Objects
No man is an island, and if Discreet has its way, no Max user will be an island either. XRefs (which stands for eXternal Reference) make it easy for creative teams to collaborate on a project without having to wait for one or another group member to finish his or her respective production task. External references are objects and scenes contained in separate Max files and made available for reference during a Max session. This arrangement enables several artists on a team to work on separate sections of a project without interfering with one another or altering each other’s work.
Max includes two different types of XRefs: XRef Scenes and XRef Objects.
Using XRef Scenes
An externally referenced scene is one that appears in the current Max session, but that is not accessible for editing or changing. The scene can be positioned and transformed when linked to a parent object and can be set to update automatically as changes are made to the source file.
114 Part I Learning the Max Interface
As an example of how XRef Scenes facilitate a project, let’s say that a design team is in the midst of creating an environment for a project while the animator is animating a character model. The animator can access the in-production environment as an XRef Scene in order to help him move the character correctly about the environment. The design team members are happy because the animator didn’t modify any of their lights, terrain models, maps, and props. The animator is happy because he won’t have to wait for the design team members to finish all their tweaking before he can get started. The end result is one large, happy production team (if they can meet their deadlines).
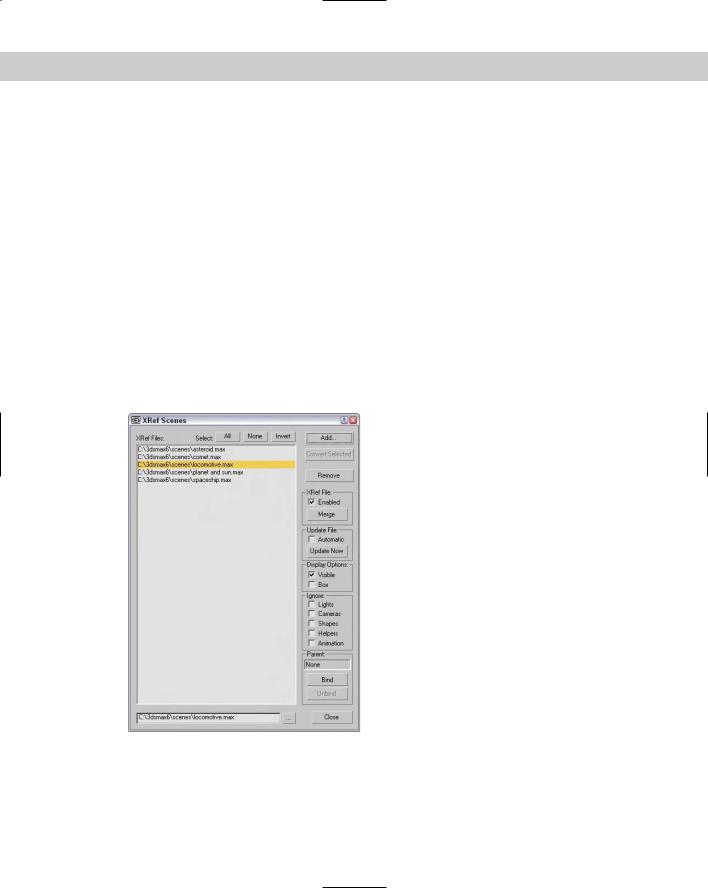
Choose File XRef Scenes to open the XRef Scenes dialog box (shown in Figure 3-23), which you use to load XRef Scenes into a file.
XRef Scene options
In the XRef Scenes dialog box are several options for controlling the appearance of the scene objects, how often the scene is updated, and to which object the scene is bound. This dialog box is modeless, and you can open and change the options in this dialog box at any time.
The pane on the left lists all XRef Scenes in the current scene. To the right are the settings, which can be different for each XRef Scene in the list. To view or apply a setting, you first need to select the scene from the list. You can remove any scene by selecting it from the list and clicking the Remove button.
Figure 3-23: The XRef Scenes dialog box lets you specify which scenes to load as external references.

Chapter 3 Working with Files and XRefs 115
Caution |
If an XRef Scene in the list is displayed in red, then the scene could not be loaded. If the |
|
path or name is incorrect, you can change it in the Path field at the bottom of the list. |
The Convert Selected button converts any selected objects in the current scene to XRef objects by saving them as a separate file. This button opens a dialog box to let you name and save the new file. If no objects are selected in the current scene, then this option is disabled.
Use the Enabled option to enable or disable all XRef Scenes. Disabled scenes are displayed in gray. The Merge button lets you insert the current XRef Scene into the current scene. This button removes the scene from the list and acts the same way as the File Merge command.
Updating an external scene
Automatic is a key option that can set any XRef Scene to be automatically updated. Enable this option by selecting a scene from the list and checking the Automatic option box; thereafter, the scene is updated anytime the source file is updated. This option can slow the system if the external scene is updated frequently, but the benefit is that you can work with the latest update.
The Update Now button is for manually updating the XRef Scene. Click this button to update the external scene to the latest saved version.
External scene appearance
Other options let you decide how the scene is displayed in the viewports. You can choose to make the external scene invisible or to display it as a box. Making an external scene invisible only removes it from the viewports, but the scene is still included in the rendered output. To remove a scene from the rendered output, deselect the Enabled option.
The Ignore section lists objects such as lights, cameras, shapes, helpers, and animation; selecting them causes them to be ignored and to have no effect in the scene. If an external scene’s animation is ignored, then the scene appears as it does in frame 0.
Positioning an external scene
Positioning an external scene is accomplished by binding the scene to an object in the current scene (a dummy object, for example). The XRef Scenes dialog box is modeless, so you can select the object to bind to without closing the dialog box. After a binding object is selected, the external scene transforms to the binding object’s pivot point. The name of the parent object is also displayed in the XRef Scene dialog box.
Transforming the object to which the scene is bound can control how the external scene is repositioned. To unbind an object, click the Unbind button in the XRef Scenes dialog box. Unbound scenes are positioned at the World origin for the current scene.
Working with XRef Scenes
You can’t edit XRef Scenes in the current scene. Their objects are not visible in the Select by Name dialog box or in the Track and Schematic Views. You also cannot access the Modifier Stack of external scenes’ objects. However, you can make use of external scene objects in other ways. For example, you can change a viewport to show the view from any camera or light in the external scene. External scene objects are included in the Summary Info dialog box.

116 Part I Learning the Max Interface
Tip |
Another way to use XRef Scenes is to create a scene with lights and/or cameras positioned |
|
at regular intervals around the scene. You can then use the XRef Scenes dialog box to turn |
|
these lights on and off or to select from a number of different views without creating new |
|
cameras. |
|
You can also nest XRef Scenes within each other, so you can have one XRef Scene for the dis- |
|
tant mountains that includes another XRef for a castle. |
Note |
If a Max file is loaded with XRef files that cannot be located, a warning dialog box appears, |
|
enabling you to browse to the file’s new location. If you click OK or Cancel, the scene still |
|
loads, but the external scenes are missing. |
Tip
Tip
Tutorial: Adding an XRef Scene
As an example of a project that would benefit from XRefs, I’ve created a maze environment. I open a new Max file and animate a diamond moving through this maze that is opened as an XRef Scene.
To set up an XRef Scene, follow these steps:
1.Create a new Max file by choosing File New.
2.Choose File XRef Scenes to open the XRef Scenes dialog box.
3.Click the Add button, locate the Maze.max file from the Chap 03 directory on the CD-ROM, and click Open to add it to the XRef Scene dialog box list.
You can add several XRef Scenes by clicking the Add button again. You can also add a scene to the XRef Scene dialog box by dragging a .max file from Windows Explorer or from the Asset Manager window.
4.Select Create Helpers Dummy, and drag in the Perspective viewport to create a new Dummy object.
5.In the XRef Scenes dialog box, click the Bind button and select the dummy object. This enables you to reposition the XRef Scene as needed.
6.Select the Automatic update option, and then click the Close button to exit the XRef Scene dialog box.
7.Now animate objects moving through the maze.
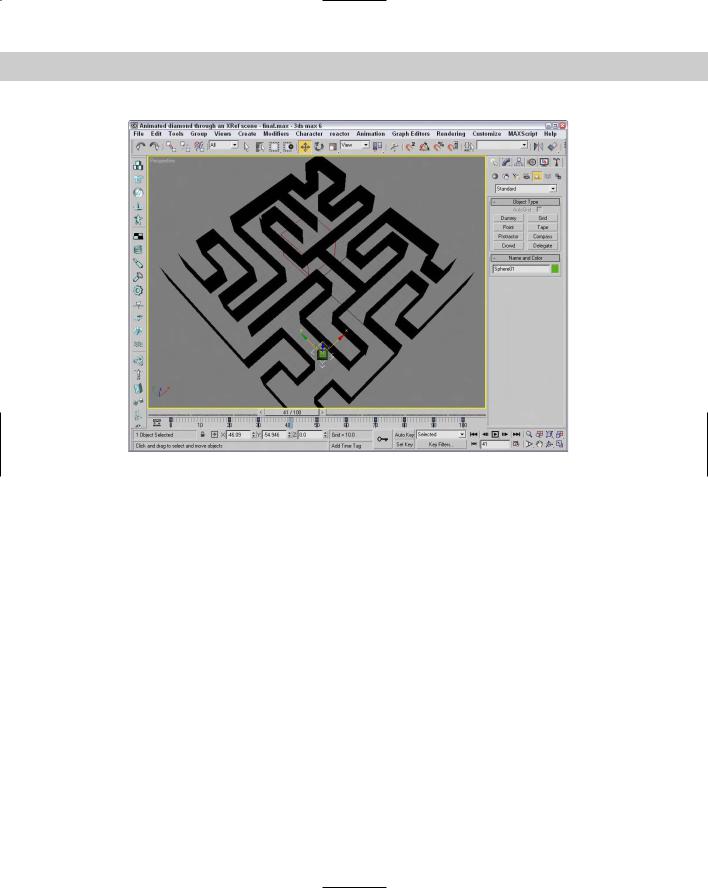
Figure 3-24 shows the Maze.max scene included in the current Max file as an XRef.
With the diamond animated, you can replace it at a later time with a detailed model of a mouse using the File Replace command.
Chapter 3 Working with Files and XRefs 117
Figure 3-24: The maze.max file loaded into the current file as an XRef Scene
Using XRef Objects
XRef Objects are slightly different from XRef Scenes. They are objects that appear in a scene and can be transformed and animated, but the original object’s structure and Modifier Stack cannot be changed.
An innovative way to use this feature would be to create a library of objects that you could load on the fly as needed. For example, if you had a furniture library, you could load several different styles until you got just the look you wanted.
You can also use XRef Objects to load low-resolution proxies of complex models in order to lighten the system load during a Max session. This method increases the viewport refresh rate.
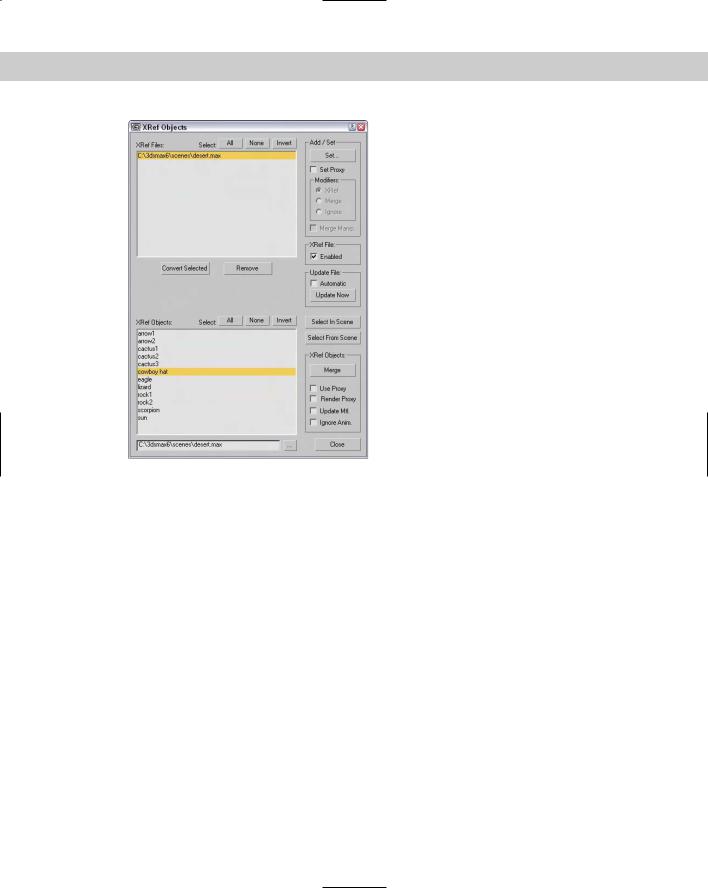
Many of the options in the XRef Objects dialog box, shown in Figure 3-25, are the same as in the XRef Scenes dialog box.
118 Part I Learning the Max Interface
Figure 3-25: The XRef Objects dialog box lets you choose which files to look in for external objects.
The left side of the XRef Objects dialog box is divided into two sections. The top section displays the externally referenced files, and the lower section displays the objects selected from that file. A file needs to be selected in order for you to see its objects.
You have several options for controlling how the XRef Objects are displayed:
Use Proxy: Lets you choose between displaying the proxy and displaying the actual object.
Render Proxy: Forces the proxy object to be rendered instead of the actual referenced object. If this option is not selected, then the referenced object is rendered regardless of the object displayed in the viewports.
Update Materials: Enables the object’s materials to update as the source gets updated.
Ignore Animation: Turns off any Modifier Stack animations associated with the object.
The Convert Selected button works the same as in the XRef Scenes dialog box. It enables you to save the selected objects in the current scene to a separate file just like the File Save Selected command.
In the XRef Objects dialog box, you can choose to automatically update the external referenced objects or use the Update Now button. You can also Enable and Disable all objects in a file.

Chapter 3 Working with Files and XRefs 119
The Select In Scene and Select From Scene buttons are useful for seeing which objects in the scene are related to which items in the XRef Objects dialog box list.
Using proxies
The Add as Proxy button opens a low-resolution proxy object in place of a more complex object. This feature saves memory by not requiring the more complex object to be kept in memory. You can also select to render the proxy, update its materials, or ignore its animation.
If an object in the lower section of the XRefs Objects dialog box is selected, then the Add button changes to a Set button. The Set button lets you choose a file and object to use as a proxy. The proxy is displayed in place of the actual referenced object.
Tip The real benefit of using proxies is to replace complex referenced objects with simpler objects that update quickly. When creating a complex object, remember to also create a lowresolution version to use as a proxy.
Tutorial: Using an XRef proxy
To set up an XRef proxy, follow these steps:
1.Open the Post box with XRef tree.max file from the Chap 03 directory on the CD-ROM. This file includes the post box model produced by Zygote Media.
2.Open the XRef Objects dialog box by choosing File XRef Objects.
3.Click the Add button, and locate the Park bench under a tree.max file from the Chap 03 directory on the CD-ROM.
This file includes the old tree and park bench models made by Zygote Media. The XRef Merge dialog box, shown in Figure 3-26, automatically opens and displays a list of all the objects in the file just added.
Figure 3-26: The XRef Merge dialog box lets you choose specific objects from a scene.
120 Part I Learning the Max Interface
4.Select the Tree object to add to the current scene, and click OK. (Hold down the Ctrl key to select several objects.) Use the Filter and Sort options to locate specific objects.
Note |
If an object you’ve selected has the same name as an object that is currently in the scene, the |
|
Duplicate Name dialog box appears to let you rename the object, merge it anyway, skip the |
|
new object, or delete the old version. |
5.Select the Tree object in the lower pane, and click the Set button with the Set Proxy option selected.
The Open File dialog box appears.
6.Select the Tree Lo-Res.max file from the Chap 03 directory on the CD-ROM. The Merge dialog box opens.
7.Select the Cylinder01 object, and click OK.
Caution |
If the proxy object has a different offset than the original object, a warning dialog box |
|
appears instructing you to use the Reset XForm utility to reset the transform of the objects. |
8.With the Tree object selected in the lower pane, select the Use Proxy option to see the proxy object, and deselect it to see the actual object.
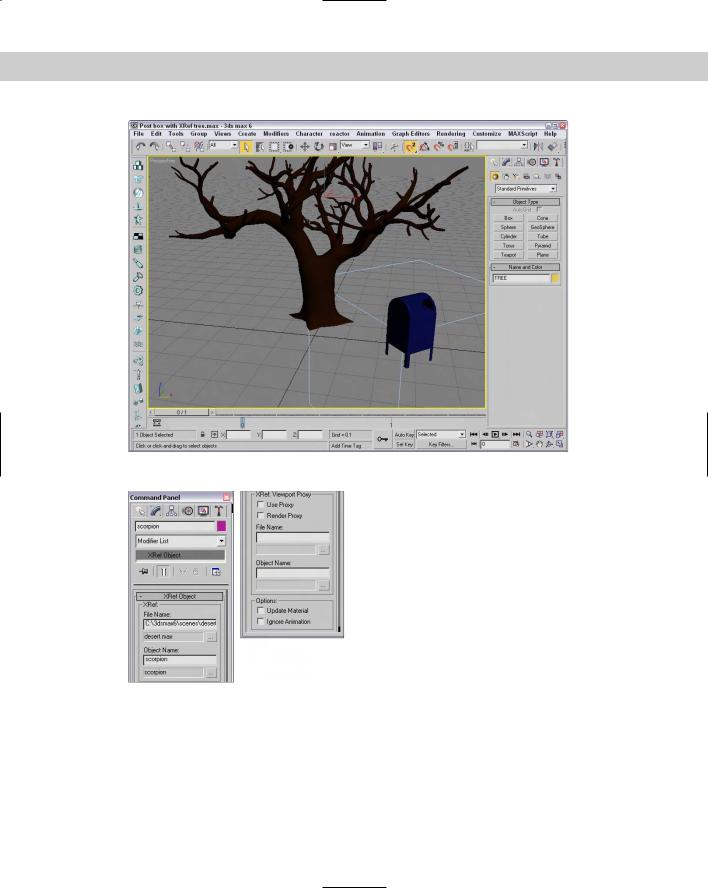
XRef Objects that you add to a scene instantly appear in the current scene as you add them. Figure 3-27 shows the Post Box with the actual tree object. The XRef Objects dialog box lets you switch to the proxy object at any time.
XRef Objects in the Modifier Stack
XRef Objects appear and act like any other object in the scene. About the only difference you’ll see will be if you open the Modifier Stack. The Stack displays “XRef Object” as its only entry.
When you select the XRef Object item in the Modifier Stack, a rollout, shown in Figure 3-28, appears. The rollout includes many of the same controls displayed in the XRef Objects dialog box discussed earlier. These controls include the XRef File Name, Object Name, Proxy File Name, and Proxy Object Name.
Configuring XRef paths
The Configure Paths dialog box includes an XRefs tab for setting the paths for XRef Scenes and Objects, shown in Figure 3-29. Choose Customize Configure Paths to open the XRefs panel.
Chapter 3 Working with Files and XRefs 121
Figure 3-27: The tree object is an XRef from another scene. Its proxy is a simple cylinder.
Figure 3-28: The XRef Object rollout in the Modify panel lets you choose which objects from which files to include as external references.