

64 |
Part I Learning the Max Interface |
Using the Viewport Navigation Controls
The standard viewports show you several different views of your current project, but the default views aren’t necessarily the ones you want. To alter these default views, you need to use the Viewport Navigation Control buttons. These eight buttons are located at the bottomright corner of the window. With these buttons, you can Zoom, Pan, and Rotate the active view. In Table 2-1, the keyboard shortcut for each button is listed in parentheses next to its name.
Tip |
The active viewport is always marked with a yellow border. |
Table 2-1: Viewport Navigation Controls
Toolbar Button |
Name |
Description |
Zoom (Alt+Z or [ or ])
Moves closer to or farther from the objects in the active viewport by dragging the mouse or zooming by steps with the bracket keys.
Zoom All |
Zooms into or out of all the viewports |
|
simultaneously by dragging the mouse. |
Zoom Extents (Ctrl+Alt+Z), |
Zooms in on all objects or just the selected |
Zoom Extents Selected |
object until it fills the active viewport. |
Zoom Extents All (Ctrl+Shift+Z), |
Zooms in on all objects or just the selected |
Zoom Extents All Selected (Z) |
object until it fills all the viewports. |
Field of View, Region Zoom |
The Field of View button (only available in |
(Ctrl+W) |
the Perspective view) controls the width |
|
of the view. The Region Zoom button |
|
zooms in to the region selected by |
|
dragging the mouse. |
Pan (Ctrl+P or I) |
Moves the view to the left, to the right, up, |
|
or down by dragging the mouse or by |
|
moving the mouse while holding down |
|
the I key. |
Arc Rotate (Ctrl+R), Arc Rotate |
Rotates the view around the global axis, |
Selected, Arc Rotate SubObject |
selected object, or subobject by dragging |
|
the mouse. |
Min/Max Toggle (Alt+W) |
Makes the active viewport fill the screen |
|
replacing the four separate viewports. |
|
Clicking this button a second time shows all |
|
four viewports again. |
|
|

Chapter 2 Seeing It All — Working with the Viewports |
65 |
Caution |
When one of the Viewport Navigation buttons is selected, it is highlighted yellow. You cannot |
|
select, create, or transform objects while one of these buttons is highlighted. Right-clicking in |
|
the active viewpoint reverts to select object mode. |
Zooming a view
You can zoom in to and out of the scene in several ways. Clicking the Zoom (Alt+Z) button enters zoom mode where you can zoom in to and out of a viewport by dragging the mouse. This works in whichever viewport you drag in. To the right of the Zoom button is the Zoom All button, which does the same thing as the Zoom button, only to all four viewports at once. The Zoom Extents (Ctrl+Alt+Z) button zooms the active viewport so that all objects (or the selected objects with the Zoom Extents Selected button) are visible in the viewport. A Zoom Extents All (Ctrl+Shift+Z) button is available for zooming in all viewports to all objects’ extents; the most popular Zoom Extents All Selected (Z) is for zooming in to the extents of the selected objects in all viewports.
You can use the brackets keys to zoom in ([) and out (]) by steps. Each key press zooms in (or out) another step. The Region Zoom (Ctrl+W) button lets you drag over the region that you want to zoom in on. If you select a non-orthogonal view, such as the Perspective view, the Region Zoom button has a flyout called the Field of View. Using this button, you can control how wide or narrow the view is. This is like using a wide angle or telephoto lens on your camera. This feature is different from zoom in that the perspective is distorted as the Field of View is increased.
Cross- |
Field of View is covered in more detail in Chapter 24, “Working with Cameras.” |
Reference |
|
Panning a view
The Viewport Navigation Controls also offer two ways to pan in a viewport. In Pan mode (Ctrl+P), dragging in a viewport pans the view. Note that this doesn’t move the objects, only the view. The second way to pan is to hold down the I key while moving the mouse. This is known as an interactive pan.
Rotating a view
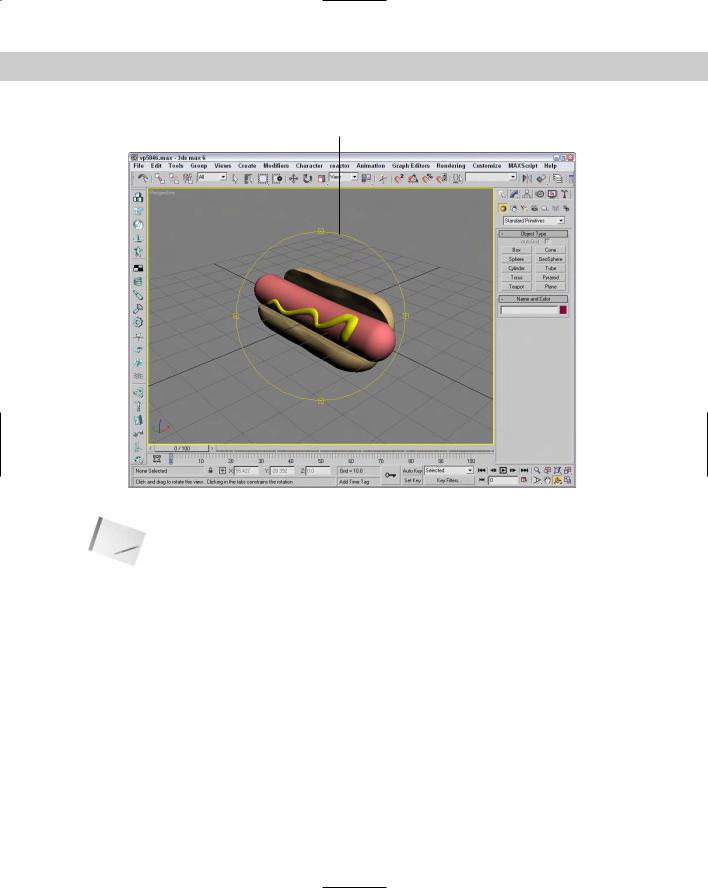
Rotating the view can be the most revealing of all the view changes. When the Arc Rotate (Ctrl+R) button is selected, a rotation guide appears in the active viewport, as shown in Figure 2-3. This rotation guide is a circle with a square located at each quadrant. Clicking and dragging the left or right squares rotates the view side to side; the same action with the top and bottom squares rotates the view up and down. Clicking within the circle and dragging rotates within a single plane, and clicking and dragging outside of the circle rotates the view about the circle’s center either clockwise or counterclockwise. If you get confused, look at the cursor, which changes depending on the type of rotation.
66 |
Part I Learning the Max Interface |
Rotation guide
Figure 2-3: The rotation guide appears whenever the Arc Rotate button is selected.
Note |
If you rotate an orthogonal view, it automatically becomes a User view. |
Controlling viewports with a scroll wheel
Now that I’ve explained the Viewport Navigation Control buttons and listed their keyboard shortcuts, I explain the easiest way to control the viewports — and clicking on the buttons isn’t it. Often, the quickest way to control the viewports is with the mouse. To really get the benefit of the mouse, you need to use a mouse with a scroll wheel.
Rolling the scroll wheel in the active viewport zooms in to and out of the viewport by steps just like the bracket keys ([ and ]). You can zoom precisely by holding down the Ctrl and Alt keys while dragging the scroll wheel. Clicking and dragging the scroll wheel button pans the active viewport. Clicking and dragging with the Alt button held down rotates the active viewport. If the scroll wheel isn’t working, check the Viewports panel in the Preference Settings dialog box. You can select to use the scroll wheel control to pan and zoom in the viewports or to define and use Strokes.
Chapter 2 Seeing It All — Working with the Viewports |
67 |
Cross- |
Strokes are covered in Chapter 4, “Customizing the Max Interface and Setting Preferences.” |
Reference |
|
Controlling camera and spotlight views
You can set any viewport to be a camera view (C) or a spotlight view ($) if a camera or a spotlight exists in the scene. When either of these views is active, the Viewport Navigation Control buttons change. In camera view, controls for dolly, roll, truck, pan, orbit, and field of view become active. A light view includes controls for falloff and hotspots.
Cross- |
Chapter 24, “Working with Cameras,” and Chapter 27, “Basic Lighting Techniques,” cover |
Reference |
these changes in more detail. |
|
Viewing grids
Grids are helpful in establishing your bearings in 3D space. For the active viewport, the G key turns the grids on and off. The Views menu also includes several options for working with grids.
Cross- |
Chapter 10, “Transforming Objects — Translate, Rotate, and Scale,” covers grids in more detail. |
Reference |
|
Disabling and refreshing viewports
If your scene gets too complicated, you can experience some slow-down waiting for each viewport to be updated with changes, but fear not because several options will come to your rescue. The first option to try is to disable a viewport.
You can disable a viewport by right-clicking on the viewport’s name and selecting the Disable View menu command from the pop-up menu, or you can press the keyboard shortcut, D. When a disabled viewport is active, it is updated as normal; when it is inactive, the viewport is not updated at all until it becomes active again. Disabled viewports are identified by the word “Disabled,” which appears next to the viewport’s name in the upper-left corner.
Another trick to increase the viewport update speed is to disable the View Update During Spinner Drag menu option. Changing parameter spinners can cause a slow-down by requiring every viewport to update as the spinner changes. If the spinner is changing rapidly, it can really slow even a powerful system. Disabling this option causes the viewport to wait for the spinner to stop changing before updating.
Sometimes when changes are made, the viewports aren’t completely refreshed. This typically happens when dialog boxes from other programs are moved in front of the viewports. If this happens, you can force Max to refresh all the viewports with the Views Redraw All Views (keyboard shortcut, `) menu command.

68 |
Part I Learning the Max Interface |
Undoing and saving changes made with the Viewport Navigation Controls
If you get lost in your view, you can undo and redo viewport changes with Views Undo View Change (Shift+Z) and Views Redo View Change (Shift+Y). These commands are different from the Edit Undo and Edit Redo commands, which can undo or redo geometry changes.
You can save changes made to a viewport by using the Views Save Active Viewport menu command. This command saves the Viewport Navigation settings for recall. To restore these settings, use Views Restore Active Viewport.
Note The Save and Restore Active Viewport commands do not save any viewport configuration settings, just the navigated view. Saving an active view uses a buffer, so it remembers only one view for each viewport.
Maximizing the active viewport
Sooner or later, the viewports will feel too small. When this happens, you have several ways to increase the size of your viewports. The first trick to try is to change the viewport sizes by clicking and dragging any of the viewport borders. Dragging on the intersection of the viewports resizes all the viewports. Figure 2-4 shows the viewports after being dynamically resized.
Tip You can return to the original layout by right-clicking on any of the viewport borders and selecting Reset Layout from the pop-up menu.
Figure 2-4: You can dynamically resize viewports by dragging their borders.

Chapter 2 Seeing It All — Working with the Viewports |
69 |
The second trick to try is to use the Min/Max Toggle (Alt+W) to expand the active viewport to fill the space reserved for all four viewports, as shown previously in Figure 2-3. Clicking the Min/Max Toggle (or pressing Alt+W) a second time returns to the defined layout.
Maximizing the viewport helps temporarily, but you can take another step before convincing your boss that you need a larger monitor. You can enter Expert Mode by choosing Views Expert Mode (Ctrl+X). It maximizes the viewport space by removing the toolbars, the Command Panel, and most of the Lower Interface Bar.
With most of the interface elements gone, you’ll need to rely on the menus, keyboard shortcuts, and the quadmenus to execute commands. To re-enable the default interface, click the Cancel Expert Mode button in the lower right of the Max window (or press Ctrl+X again).
Figure 2-5 shows the interface in Expert Mode.
Figure 2-5: Expert Mode maximizes the viewports by eliminating most of the interface elements.
Tutorial: Navigating the active viewport
Over time, working with the Viewport Navigation controls will become second nature to you, but you need to practice to get to that point. In this tutorial, you get a chance to take the viewports for a spin — literally.
70 |
Part I Learning the Max Interface |
To practice navigating a viewport, follow these steps:
1.Open Bruce the dog.max file from the Chap 02 directory on the CD-ROM.
This file includes a model of a dog (affectionately named Bruce) created by Viewpoint. It provides a reference as we navigate the viewport. The active viewport is the Perspective viewport.
2.Click the Min/Max Toggle button (or press Alt+W) to make the Perspective viewport fill the space of all four viewports.
3.Click the Pan button (or press Ctrl+P), and drag the window until Bruce’s head is centered in the viewport. Then click the Zoom button (or press Alt+Z), and drag in the Perspective viewport until Bruce’s head fills the viewport, as shown in Figure 2-6.
Figure 2-6: The Perspective viewport zoomed in on the dog’s head using the Zoom and Pan controls
4.Choose Views Save Active Perspective View to save the current view of the dog’s head.
5.Click the Zoom Extents button (or press Ctrl+Alt+Z) to size the entire dog body in the current viewport.
6.Click the Arc Rotate button (or press Ctrl+R), and drag from the left square on the rotation guide to the right. This rotates Bruce to make his front side more visible, as shown in Figure 2-7. Good boy, Bruce.