


128 Part I Learning the Max Interface
The View File dialog box includes several controls for viewing files. The Devices and Setup buttons let you set up and view a file using external devices such as Video Recorders. The Info button lets you view detailed information about the selected file. The View button opens the file for viewing while leaving the View File dialog box open. The Open button closes the dialog box. At the bottom of the View File dialog box, the statistics and path of the current file are displayed.
Note The View File dialog box can open many types of files, including Microsoft videos (AVI), Bitmap images (BMP), Kodak Cineon (CIN), Combustion (CWS), Autodesk Flic images (FLC, FLI, CEL), Graphics Image Format (GIF), Radiance HDRI Image Files (HDR), Image File List (IFL), JPEG images (JPG), Portable Network Graphics (PNG), Adobe Photoshop images (PSD), QuickTime movies (MOV), SGI images (RGB), RLA images, RPF images, Targa images (TGA, VST), Tagged image file format images (TIF), Abekas Digital Disk (YUV), and DirectDraw Surface (DDS) images.
You use the Gamma area on the View File dialog box to specify whether an image uses its own gamma settings or the system’s default setting, or whether an override value should be used.
Summary
Working with files lets you save your work, share it with others, and collaborate across teams. This chapter covered these basics, including these topics:
Creating, saving, opening, merging, and archiving files
Understanding the various import and export types
Importing models from other programs, such as Illustrator and Poser
Using externally referenced scenes and objects to work on the same project at the same time as your fellow team members without interfering with their work (or they with yours)
Configuring XRef paths to help Max track your XRef Scenes and Objects
Working with the file utilities, such as the Asset Browser
Using the Summary Info and File Properties dialog box to keep track of scene files
By now, you should be becoming more comfortable with the user interface, but if you’re not, the next chapter covers how to customize the user interface.
|
|
|

Customizing the
Max Interface and
Setting Preferences
When you get into a new car, one of the first things you do is to rearrange the seat and mirrors. You do this to make yourself
comfortable. The same principle can apply to software packages — arranging or customizing an interface makes it more comfortable to work with.
Early versions of Max allowed only minimal changes to the interface, but later versions enable significant customization. The Max interface can be customized to show only the icons and tools that you want to see. Max also has a rather bulky set of preferences that you can use to set almost every aspect of the program. This chapter covers various ways to make the Max interface more comfortable for you (now if we could only get cars that could save a custom setup).
Using the Customize User
Interface Window
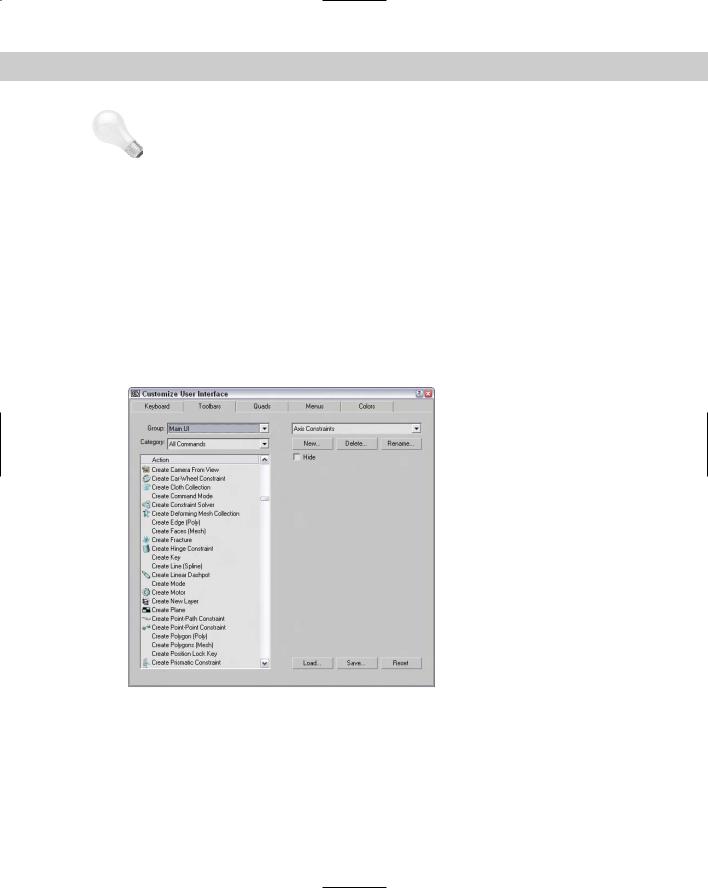
The key to customizing the interface is the Customize Customize User Interface menu command. This command opens the Customize User Interface dialog box. This dialog box includes five panels including Keyboard, Toolbars, Quads, Menus, and Colors. You can also access this dialog box by right-clicking any toolbar away from the buttons and selecting Customize from the pop-up menu.
Customizing keyboard shortcuts
If used properly, keyboard shortcuts can increase your efficiency dramatically. Figure 4-1 shows the Keyboard panel of the Customize User Interface dialog box. In this panel, you can assign shortcuts to any command and define sets of shortcuts. You can assign keyboard shortcuts for any of the interfaces listed in the Group drop-down list. When an interface is selected from the Group drop-down list, all its commands are listed below along with their current keyboard shortcut. You can disable the keyboard shortcuts for any of these interfaces using the Active option located next to the drop-down list.
C 4H A P T E R
In This Chapter
Using the Customize User Interface dialog box
Creating custom keyboard shortcuts, toolbars, quadmenus, menus, and colors
Customizing the Command Panel buttons
Loading and saving custom interfaces
Configuring paths
Setting system units
Setting preferences
130 Part I Learning the Max Interface
Figure 4-1: The Keyboard panel enables you to create keyboard shortcuts for any command.
Groups that have a large number of commands are split into categories. You can use the Category drop-down list to filter only select types of commands. This helps you to quickly locate a specific type of command such as controllers, modifiers, or Space Warps. Entering a keyboard shortcut into the Hotkey field shows in the Assigned to field whether that key is currently assigned to a command. You can Assign the hotkey to the selected command or Remove the hotkey from its current assignment.
You can use the Write Keyboard Chart button to output all the keyboard commands to a text file. Using this feature, you can print and post a chart of keyboard shortcuts next to your computer monitor. You can also Load, Save, and Reset selected keyboard shortcut sets. Keyboard shortcut sets are saved as .kbd files in the UI directory where Max is installed.
Cross- |
You can find a reference of the available default keyboard shortcuts in Appendix C, “Max |
Reference |
Keyboard Shortcuts.” |
|
Tutorial: Assigning keyboard shortcuts
Do you use both hands to control the mouse? If not, then you have one hand that is idle most of the time. If you can train this hand to control features using the keyboard, then you can be much more efficient.
To assign a new keyboard shortcut to create a Sphere object, follow these steps:
1.Open the Customize User Interface dialog box by choosing Customize Customize User Interface.
2.Open the Keyboard panel and select Main UI in the Group drop-down list. Scroll through the list, and select the Sphere Object command.
Chapter 4 Customizing the Max Interface and Setting Preferences |
131 |
Tip |
With a list of objects available, you can quickly jump close to a desired item by typing the first |
|
letter of the item. For example, pressing the S key jumps to the first item that begins with an S. |
3.Place the cursor in the Hotkey field, and press Alt+Shift+Ctrl+S keys together. This enters the hotkey into the field. In the default interface, this key isn’t assigned to any command. Click the Assign button to assign the hotkey to the command.
4.Click the Save button to save the keyboard shortcut set as myShortcuts.kbd. You can load the resulting set from the Chap 04 directory on the CD-ROM.
5.The final step is to try out the shortcut. Close the Customize User Interface dialog box, press the new keyboard shortcut, Alt+Shift+Ctrl+S, and drag in a viewport to create a sphere.
Customizing toolbars
You can use the Customize User Interface dialog box’s Toolbar panel to create custom toolbars. Figure 4-2 shows this panel.
Figure 4-2: The Customize User Interface dialog box enables you to create new toolbars.
The Toolbars panel of the Customize User Interface dialog box includes the same Group and Category drop-down lists and command list as the Keyboard panel. Clicking the New button opens a simple dialog box where you can name the new toolbar. The Delete button lets you delete toolbars. You can delete only toolbars that you’ve created. The Rename button lets you rename the current toolbar. The Hide option makes the selected toolbar hidden.
132 Part I Learning the Max Interface
Use the Load and Save buttons to load and save your newly created interface, including the new toolbar, to a custom interface file. Saved toolbars have the .cui extension.
After you create a new toolbar, you can drag the commands in the Action list to either a new blank toolbar created with the New button or to an existing toolbar. By holding down the Alt key, you can drag a button from another toolbar and move it to your new toolbar. Holding down the Ctrl key and dragging a button retains a copy of the button on the first toolbar.
If you drag a command that has an icon associated with it, the icon appears on the new toolbar. If the command doesn’t have an icon, then the text for the commands appears on the new toolbar.
Tutorial: Creating a custom toolbar
If you’ve been using Max for a while, you probably have several favorite commands that you use extensively. You can create a custom toolbar of all your favorite commands. To show you how to do this, we create a custom toolbar for the compound objects.
To create a custom toolbar for creating compound objects, follow these steps:
1.Open the Customize User Interface dialog box by choosing Customize Custom User Interface.
2.Open the Toolbars panel and click the New button. In the New Toolbar dialog box that appears, name the toolbar Compound Objects. After you click OK, a new blank toolbar appears.
3.Select the Main UI group and the Objects Compound category from the drop-down lists on the left. Then drag each command in the Action list to the new blank toolbar.
4.Click the Save button to save the changes to the customized interface file. I named my file Compound Objects toolbar.cui.
Note |
Don’t be alarmed if the toolbar icons show up gray. Gray icons are simply disabled. When the |
|
tool is enabled, they are shown in color. |
Figure 4-3 shows the new toolbar. With the new toolbar created, you can float, dock, or add this toolbar to the Tab panel just like the other toolbars. Notice that some of the tools have icons and others have text names.
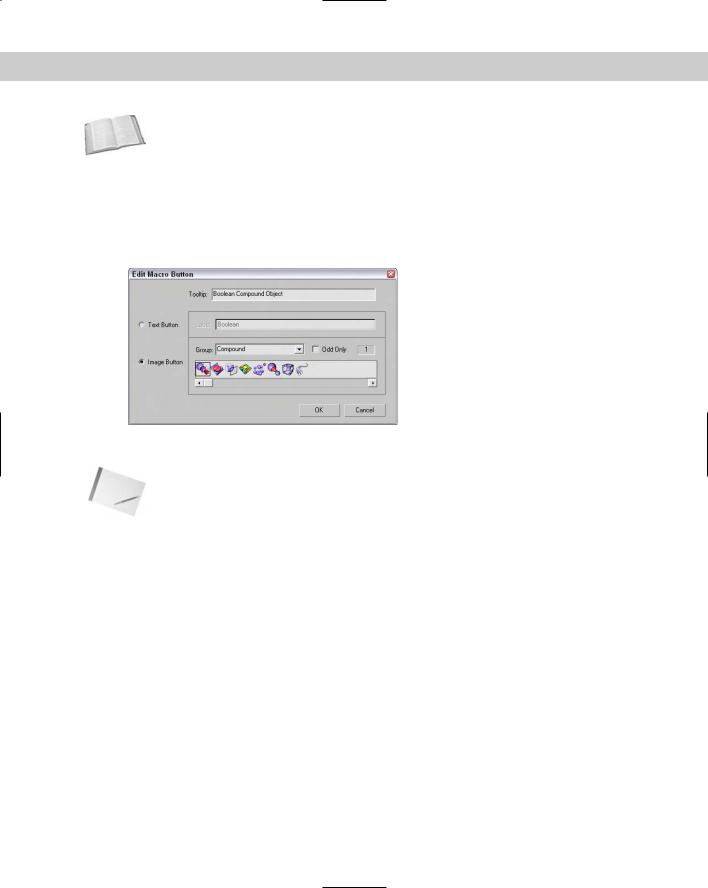
Figure 4-3: A new toolbar of compound objects created using the Customize User Interface dialog box
You can right-click any of the buttons on the new custom toolbar (which is outside the Customize User Interface dialog box) to access a pop-up menu. This menu enables you to change the button’s appearance, delete the button, edit the button’s macro script, or open the Customize User Interface dialog box.
Chapter 4 Customizing the Max Interface and Setting Preferences |
133 |
Cross- |
To learn more about editing macro scripts, see Chapter 48, “Automating with MAXScript.” |
Reference |
|
Changing a button’s appearance
Selecting the Edit Button Appearance command from the pop-up menu opens the Edit Macro Button dialog box, shown in Figure 4-4. This dialog box enables you to quickly change the button’s icon, tooltip, or text label. Each icon group shows both the standard icon and the grayed-out disabled version of the icon. Default buttons can also be changed. The Odd Only check box shows only the standard icons.
Figure 4-4: The Edit Macro Button dialog box provides a quick way to change an icon, tooltip, or text label.
Note If a text label doesn’t fit within the toolbar button, you can increase the button width using the Fixed Width Text Buttons spinner in the General tab of the Preference Settings dialog box.
Tutorial: Adding custom icons
The Max interface uses two different sizes of icons. Large icons are 24×24 pixels, and small icons are 16×15 pixels. Large icons can be 24-bit color, and small ones must be only 16-bit. The easiest way to create some custom toolbars is to copy an existing set of icons into an image-editing program, make the modifications, and save them under a different name. You can find all the icons saved as BMPs and used by Max in the 3dsmax\UI\Icons directory.
To create a new group of icons, follow these steps:
1.Select a group of current icons to edit from the UI directory and open them in Photoshop. I selected the Patches group, which includes all the files that start with the word Patches. This group includes only two icons. To edit icons used for both large and small icon settings and both active and inactive states, open the following four files: Patches_16a.bmp, Patches_16i.bmp, Patches_24a.bmp, and Patches_24i.bmp.
2.In each file, the icons are all included side by side in the same file, so the first two files are 32×15 and the second two are 48×24. Edit the files, being sure to keep each icon within its required dimensions.
134 Part I Learning the Max Interface
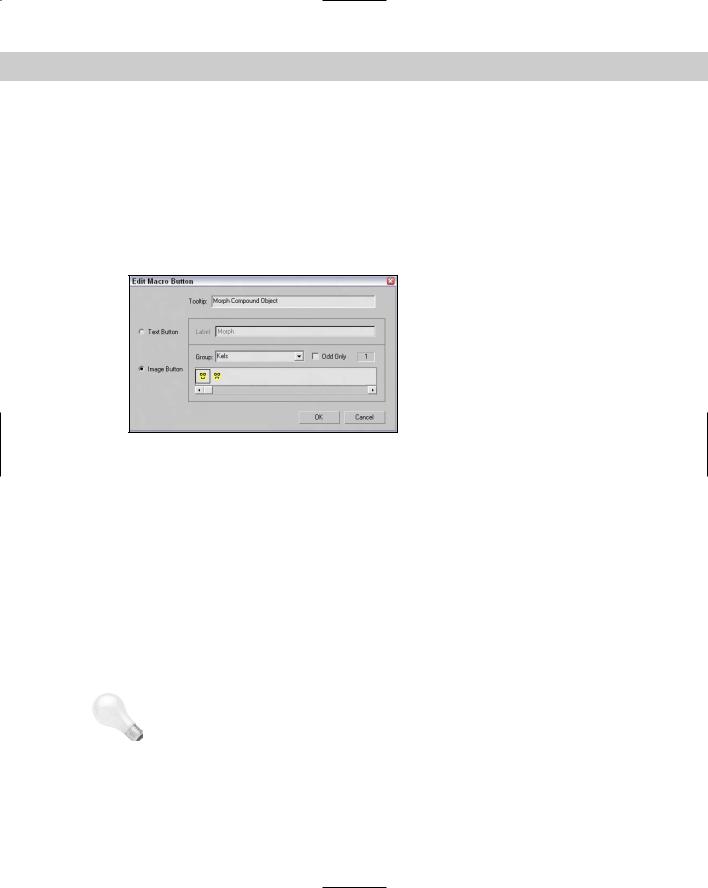
3.When you finish editing or creating the icons, save each file with the name of the icon group in front of the underscore character. My files were saved as Kels_16a.bmp, Kels_16i.bmp, Kels_24a.bmp, and Kels_24i.bmp, so they show up in Kels group in the Edit Macro Button dialog box. Copy these four edited files from the Chap 04 directory on the CD-ROM to the 3dsmax\UI\Icons directory.
4.After the files are saved, you need to restart Max. The icon group is then available within the Customize User Interface dialog box when assigned to a command.
Figure 4-5 shows the Edit Macro Button dialog box with my custom icon group named Kels open.
Figure 4-5: The Edit Macro Button dialog box with a custom icon group selected
|
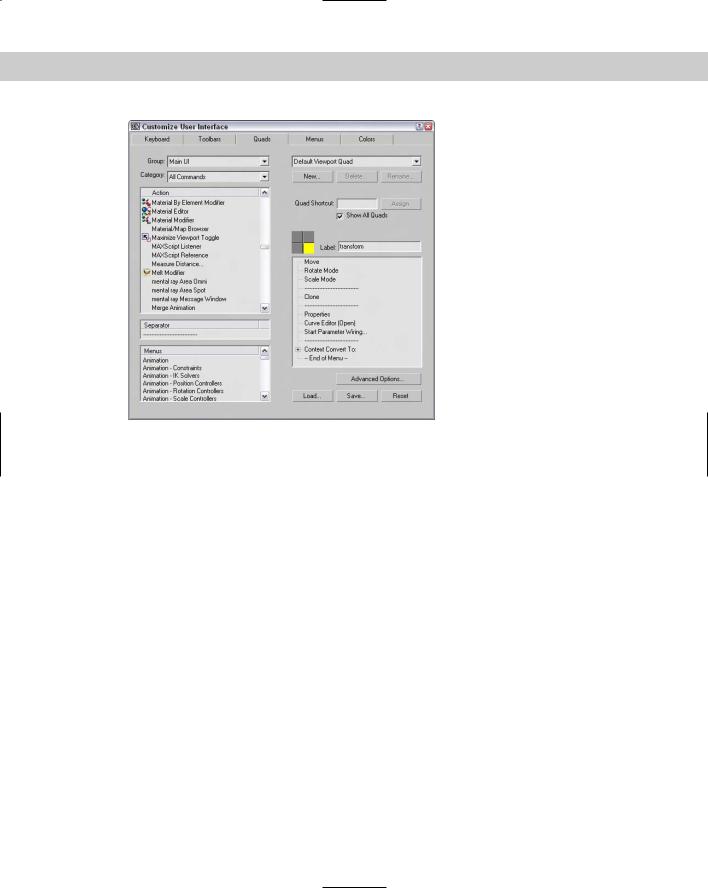
Customizing quadmenus |
|
The third panel in the Customize User Interface dialog box allows you to customize the quad- |
|
menus. You can open quadmenus by right-clicking on the active viewport or in certain inter- |
|
faces. Figure 4-6 shows this panel. |
|
To the left of the panel are the Group and Category drop-down lists and a list of actions that |
|
are the same as the Keyboard and Toolbars panels, but the Quads panel also includes a |
|
Separator and a list of Menu commands. Quadmenus can include separators to divide the |
|
commands into different sections and menus that appear at the top of the standard interface. |
|
The drop-down list at the top right of the Quads panel includes many different Quadmenu |
|
sets. These quadmenus appear in different locations, such as with the ActiveShade window. |
|
Not only can you customize the default viewport quadmenus, but you can also create your |
|
own named custom quadmenus with the New button or Rename an existing quadmenu. The |
|
Quad Shortcut field lets you assign a keyboard shortcut to a custom quadmenu. |
Tip |
Several quadmenus have keyboard shortcuts applied to them. Right-clicking with the Shift |
|
key held down opens the Snap quadmenu. Other shortcuts include Alt+right-click for the |
|
Animation quadmenu, Ctrl+right-click for the Modeling quadmenu, and Ctrl+Alt+right-click |
|
for the Lighting/Rendering quadmenu. |
Chapter 4 Customizing the Max Interface and Setting Preferences |
135 |
Figure 4-6: The Quads panel of the Customize User Interface dialog box lets you modify pop-up quadmenus.
If the Show All Quads option is disabled, it causes only a single quadmenu to be shown at a time when unchecked. Although only one quadmenu is shown at a time, the corner of each menu is shown, and you can switch between the different menus by moving the mouse over the corner of the menu.
The four quadrants of the current quadmenu are shown as four boxes. The currently selected quadmenu is highlighted yellow, and its label and commands are shown in the adjacent fields. Click the gray boxes to select one of the different quadmenus.
To add a command to the selected quadmenu, drag an action, separator, or menu from the panes on the left to the quadmenu commands pane on the right. You can reorder the commands in the quadmenu commands pane by dragging the commands and dropping them in their new location. To delete a command, just select it and press the Delete key or select Delete Menu Item from the right-click pop-up menu.
The right-click pop-up menu also lets you edit the command name or flatten a submenu, which displays all submenu commands on the top level with the other commands.
Custom quadmenus can be loaded and saved as menu files (with the .mnu extension).
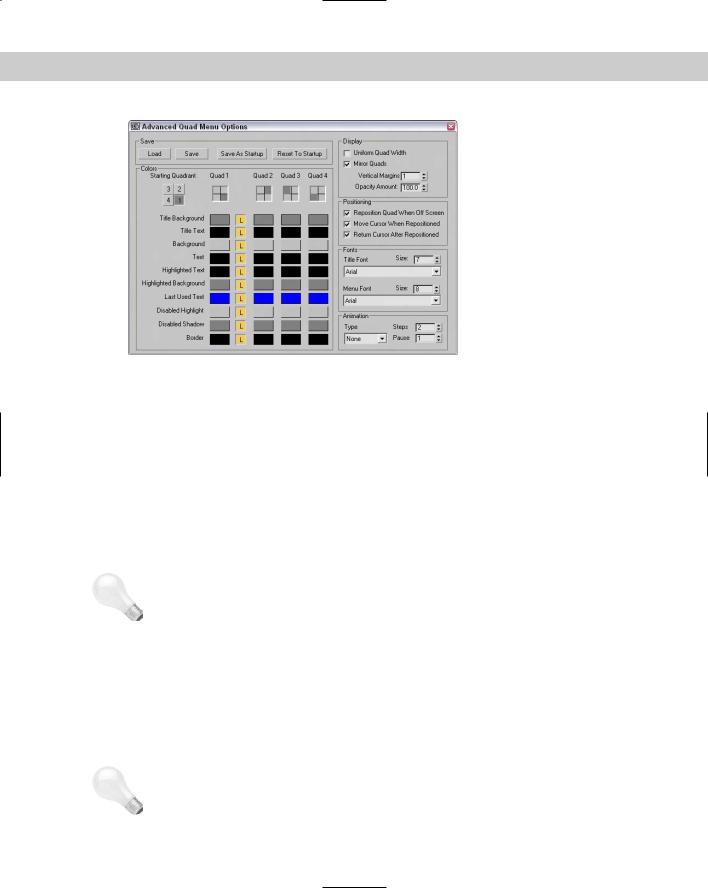
The Quads panel also includes an Advanced Options button. Clicking this button opens the Advanced Quad Menu Options dialog box, shown in Figure 4-7. Using this dialog box, you can set options such as the colors used in the quadmenus.
136 Part I Learning the Max Interface
|
Figure 4-7: The Advanced Quad Menu Options dialog box lets |
|
you change quadmenu fonts and colors. |
|
Changes to the Advanced Quad Menu Options dialog box affect all quadmenus. You can load |
|
and save these settings to files (with the .qop extension). The Starting Quadrant determines |
|
which quadrant is first to appear when the quadmenu is accessed. You can select to change |
|
the colors for each quadmenu independent of the others. The column with the L locks the |
|
colors so they are consistent for all quadmenus if enabled. |
|
The remainder of the Advanced Quad Menu Options dialog box includes settings for control- |
|
ling how the quadmenus are displayed and positioned, as well as the fonts that are used. |
|
The Animation section lets you define the animation style that is used when the quadmenus |
|
appear. The animation types include None, Stretch, and Fade. The Stretch style slowly stretches |
|
the quadmenus until they are full size over the designated number of steps, and the Fade style |
|
slowly makes the quadmenus appear. |
Tip |
I personally don’t like to wait for the quadmenus to appear, so I keep the Animation setting |
|
set to None. |
Customizing menus
The Menus panel of the Customize User Interface dialog box allows you to customize the menus used at the top of the Max window. Figure 4-8 shows this panel.
This panel includes the same Group and Category drop-down lists and the Action, Separator, and Menus panes found in the Quads panel. You can drag and drop these commands on the menu pane to the right. Menus can be saved as files (with the .mnu extension). In the menu pane on the right, you can delete menu items with the Delete key or by right-clicking and selecting Delete Item from the pop-up menu.
Tip |
If you place an ampersand (&) character in front of a custom menu name letter, that letter is |
|
underlined and can be accessed using the Alt key; for example, Alt+F opens the File menu. |

Chapter 4 Customizing the Max Interface and Setting Preferences |
137 |
Figure 4-8: You can use the Menus panel of the Customize
User Interface dialog box to modify menus.
Tutorial: Adding a new menu
Adding a new menu is easy to do with the Customize User Interface dialog box. For this example, you tack another menu for the Collapse utility on the end of the Tools menu.
To add another menu item to the Tools menu, follow these steps:
1.Choose Customize Customize User Interface to open the Customize User Interface dialog box.
2.Click the Menus tab to open the Menus panel.
3.In the top-right drop-down list, select Tools. The current Tools menu opens in the right pane.
4.Locate the Collapse Stack menu item in the Action list, drag it to the right, and drop it right after the Channel Info Editor menu item.
As you drag, a blue line indicates where the menu will be located.
5.Click the Save button to save the menu as a file. You can find the customized menu from this example in the Chap 04 directory on the CD-ROM.
After you save the new menu file, you need to restart Max before you can see the changes. You can reset the default UI by choosing Customize Revert to Startup Layout.