

84 |
Part I Learning the Max Interface |
Once enabled, you can use the divide key (/) on the numeric keypad to turn the virtual viewport on and off. Use the plus (+) and minus (-) numeric keypad keys to zoom in and out, and use the 2, 4, 6, and 8 keys on the numeric keypad to pan within the virtual viewport.
Caution |
The Virtual Viewport feature is available only if you are using the OpenGL driver. If you’ve |
|
specified either the Software Z-Buffer or the Direct X driver, then this option isn’t available. |
Working with Viewport Backgrounds
Remember in grade school when you realized that you could immediately draw really well using tracing paper (where all you needed to do was follow the lines)? Well, it’s not quite tracing paper, but you can load background images into a viewport that can help as you create and position your objects.
Loading viewport background images
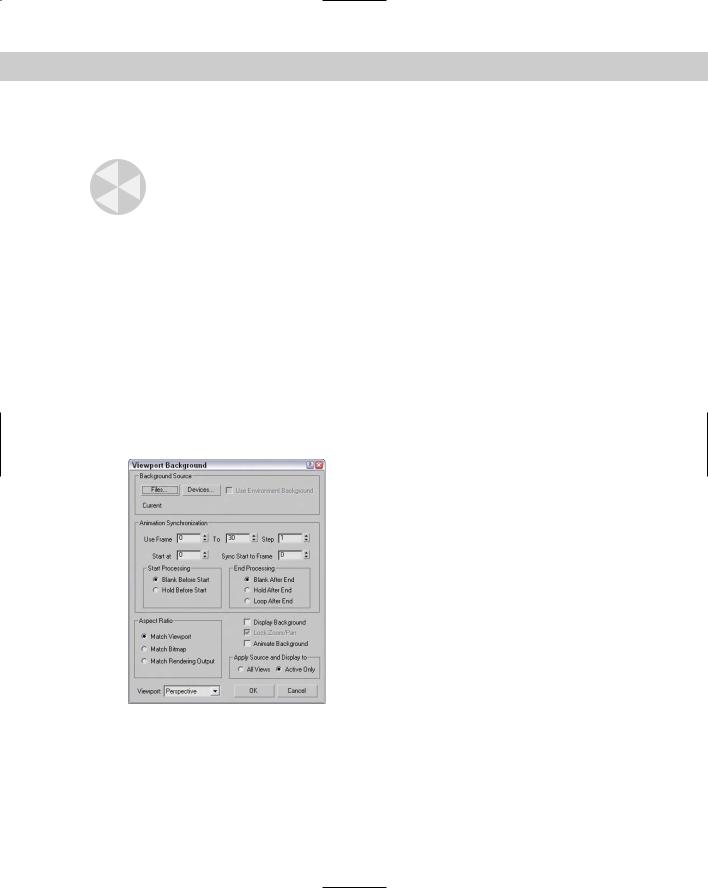
The Views Viewport Background menu command (Alt+B) opens a dialog box, shown in Figure 2-22, where you can select an image or animation to appear behind a viewport. The displayed background image is helpful for aligning objects in a scene, but it is for display purposes only and will not be rendered. To create a background image to be rendered, you need to specify the background in the Environment dialog box, opened using the Rendering Environment (keyboard shortcut, 8) menu command.
Figure 2-22: The Viewport Background dialog box lets you select a background source image or animation.

Chapter 2 Seeing It All — Working with the Viewports |
85 |
|
If the background image changes, you can update the viewport using the Views Update |
|
Background Image menu command (Alt+Shift+Ctrl+B). This is helpful if you have the back- |
|
ground image opened in Photoshop at the same time. You can update the background image, |
|
save it, and then immediately update the image in Max. The Views Reset Background |
|
Transform menu command automatically rescales and recenters the background image to |
|
fit the viewport. You should use this if you’ve changed the viewport size or changed the |
|
background’s size. |
|
Each viewport can have a different background image. To load and configure a viewport back- |
|
ground image, choose Views Viewport Background (or press the Alt+B keyboard shortcut). |
|
This opens the Viewport Background dialog box, shown previously. |
|
The Files button opens the Select Background Image dialog box, where you can select the |
|
image to load. The Devices button lets you obtain a background from a device such as a |
|
Video Recorder. If an environment map is already loaded into the Environment dialog box, |
|
you can simply click the Use Environment Background option. Keep in mind that the back- |
|
ground image will not be rendered unless it is made into an Environment map. |
Cross- |
I cover environment maps in Chapter 41, “Rendering Basics.” |
Reference |
|
|
Loading viewport background animations |
|
The Animation Synchronization section of the Viewport Background dialog box lets you set |
|
which frames of a background animation sequence are displayed. The Use Frame and To val- |
|
ues determine which frames of the loaded animation are used. The Step value trims the num- |
|
ber of frames that are to be used by selecting every Nth frame. For example, a Step value of 4 |
|
would use every fourth frame. |
Tip |
Loading an animation sequence as a viewport background can really help as you begin to |
|
animate complex motions, like a running horse. By stepping through the frames of the ani- |
|
mation, you can line up your model with the background image for realistic animations. |
|
The Start At value is the frame in the current scene where this background animation would |
|
first appear. The Sync Start to Frame value is the frame of the background animation that |
|
should appear first. The Start and End Processing options let you determine what appears |
|
before the Start and End frames. Options include displaying a blank, holding the current |
|
frame, and looping. |
|
If you select an animation as the background, make sure that the Animate Background option |
|
is selected. Also note that the viewport background is not visible if the Display Background |
|
option is not selected. |

86 |
Part I Learning the Max Interface |
The Aspect Ratio section offers options for setting the size of the background image. You can select to Match Viewport, Match Bitmap, or Match Rendering Output.
The Lock Zoom/Pan option is available if either the Match Bitmap option or the Match Rendering Output option is selected. This option locks the background image to the geometry so that when the objects in the scene are zoomed or panned, the background image follows. If the background gets out of line, you can reset its position with the Views Reset Background Transform command.
Caution |
When the Lock Zoom/Pan option is selected, the background image is resized when you |
|
zoom in on an object. Resizing the background image fills the virtual memory, and if you |
|
zoom in too far, the background image could exceed your virtual memory. If this happens, a |
|
dialog box appears that informs you of the problem and gives you the option of not display- |
|
ing the background image. |
You can set the Apply Source and Display to option to display the background in All Views or in the Active Only.
Tutorial: Loading reference images for modeling
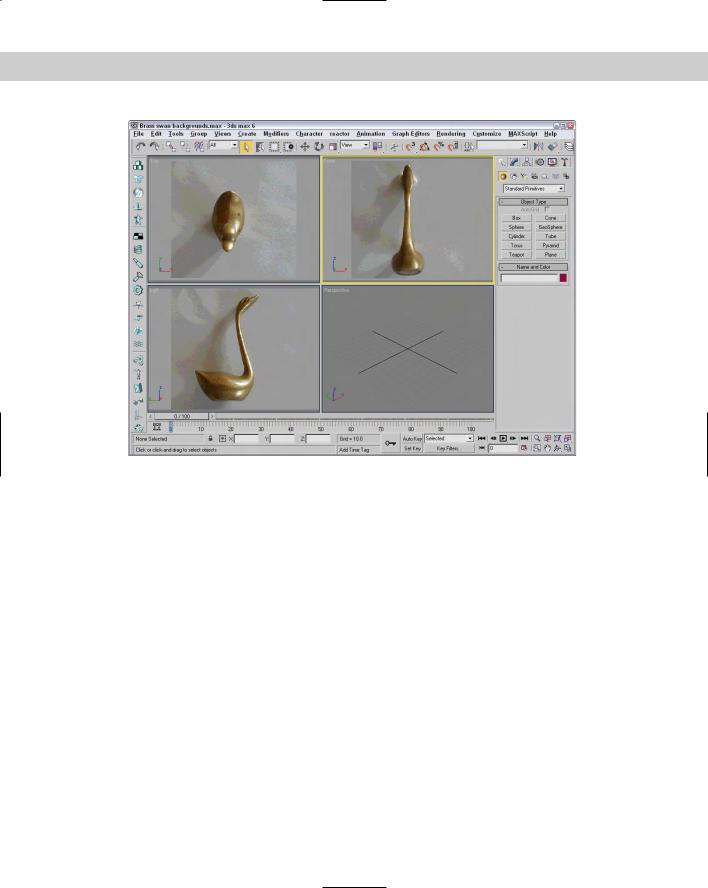
When modeling a physical object, you can get a jump on the project by taking pictures with a digital camera of the front, top, and left views of the object and then load them as background images in the respective viewports. The background images can then be a reference for your work. This is especially helpful with models that need to be precise. You can even work from CAD drawings.
To load the background images of a brass swan, follow these steps:
1.Choose File New (or press Ctrl+N) to open a blank scene file.
2.Right-click on the Front viewport to make it the active viewport, and choose Views Viewport Background (or press Alt+B).
The Viewport Background dialog box opens.
3.Click on the Files button, and in the File dialog box that opens, select the Brass swanfront view.jpg image from the Chap 02 directory on the CD-ROM.
4.Select the Match Bitmap, Display Background, Lock Zoom/Pan, and Active Only options, and click OK to close the dialog box.
The image now appears in the background of the Front viewport.
5.Repeat Steps 2 through 4 for the Top and Left viewports.
Figure 2-23 shows the Max interface with background images loaded in the Front, Top, and Left viewports.
Chapter 2 Seeing It All — Working with the Viewports |
87 |
Figure 2-23: Adding a background image to a viewport can help as you begin to model objects.
Summary
Viewports are the window into the Max world. Remember that if you can’t see it, you can’t work with it, so you need to learn to use the viewports. You can also configure viewports to display just the way you desire.
In this chapter, you
Learned about 3D space and the various viewport types
Covered the various Viewport Navigation Control buttons
Set the Rendering Level and Display options in the Viewport Configuration dialog box
Used the other panels of the Viewport Configuration dialog box to change the layout, safe frames, and regions

88 |
Part I Learning the Max Interface |
Learned how you can use Adaptive Degradation to maintain a constant frame rate for viewport animation sequences
Loaded a viewport background image
In the next chapter, you find out all the details about working with files, including loading, saving, and merging scene files. You also learn about External References (XRefs) and how to use them to manage scene creation in a workgroup. The next chapter also covers import and export options for interfacing with other software packages.
|
|
|