

- •Preface
- •About This Book
- •Acknowledgments
- •Contents at a Glance
- •Contents
- •Relaxing at the Beach
- •Dressing the Scene
- •Animating Motion
- •Rendering the Final Animation
- •Summary
- •The Interface Elements
- •Using the Menus
- •Using the Toolbars
- •Using the Viewports
- •Using the Command Panel
- •Using the Lower Interface Bar Controls
- •Interacting with the Interface
- •Getting Help
- •Summary
- •Understanding 3D Space
- •Using the Viewport Navigation Controls
- •Configuring the Viewports
- •Working with Viewport Backgrounds
- •Summary
- •Working with Max Scene Files
- •Setting File Preferences
- •Importing and Exporting
- •Referencing External Objects
- •Using the File Utilities
- •Accessing File Information
- •Summary
- •Customizing Modify and Utility Panel Buttons
- •Working with Custom Interfaces
- •Configuring Paths
- •Selecting System Units
- •Setting Preferences
- •Summary
- •Creating Primitive Objects
- •Exploring the Primitive Object Types
- •Summary
- •Selecting Objects
- •Setting Object Properties
- •Hiding and Freezing Objects
- •Using Layers
- •Summary
- •Cloning Objects
- •Understanding Cloning Options
- •Mirroring Objects
- •Cloning over Time
- •Spacing Cloned Objects
- •Creating Arrays of Objects
- •Summary
- •Working with Groups
- •Building Assemblies
- •Building Links between Objects
- •Displaying Links and Hierarchies
- •Working with Linked Objects
- •Summary
- •Using the Schematic View Window
- •Working with Hierarchies
- •Setting Schematic View Preferences
- •Using List Views
- •Summary
- •Working with the Transformation Tools
- •Using Pivot Points
- •Using the Align Commands
- •Using Grids
- •Using Snap Options
- •Summary
- •Exploring the Modifier Stack
- •Exploring Modifier Types
- •Summary
- •Exploring the Modeling Types
- •Working with Subobjects
- •Modeling Helpers
- •Summary
- •Drawing in 2D
- •Editing Splines
- •Using Spline Modifiers
- •Summary
- •Creating Editable Mesh and Poly Objects
- •Editing Mesh Objects
- •Editing Poly Objects
- •Using Mesh Editing Modifiers
- •Summary
- •Introducing Patch Grids
- •Editing Patches
- •Using Modifiers on Patch Objects
- •Summary
- •Creating NURBS Curves and Surfaces
- •Editing NURBS
- •Working with NURBS
- •Summary
- •Morphing Objects
- •Creating Conform Objects
- •Creating a ShapeMerge Object
- •Creating a Terrain Object
- •Using the Mesher Object
- •Working with BlobMesh Objects
- •Creating a Scatter Object
- •Creating Connect Objects
- •Modeling with Boolean Objects
- •Creating a Loft Object
- •Summary
- •Understanding the Various Particle Systems
- •Creating a Particle System
- •Using the Spray and Snow Particle Systems
- •Using the Super Spray Particle System
- •Using the Blizzard Particle System
- •Using the PArray Particle System
- •Using the PCloud Particle System
- •Using Particle System Maps
- •Controlling Particles with Particle Flow
- •Summary
- •Understanding Material Properties
- •Working with the Material Editor
- •Using the Material/Map Browser
- •Using the Material/Map Navigator
- •Summary
- •Using the Standard Material
- •Using Shading Types
- •Accessing Other Parameters
- •Using External Tools
- •Summary
- •Using Compound Materials
- •Using Raytrace Materials
- •Using the Matte/Shadow Material
- •Using the DirectX 9 Shader
- •Applying Multiple Materials
- •Material Modifiers
- •Summary
- •Understanding Maps
- •Understanding Material Map Types
- •Using the Maps Rollout
- •Using the Map Path Utility
- •Using Map Instances
- •Summary
- •Mapping Modifiers
- •Using the Unwrap UVW modifier
- •Summary
- •Working with Cameras
- •Setting Camera Parameters
- •Summary
- •Using the Camera Tracker Utility
- •Summary
- •Using Multi-Pass Cameras
- •Creating Multi-Pass Camera Effects
- •Summary
- •Understanding the Basics of Lighting
- •Getting to Know the Light Types
- •Creating and Positioning Light Objects
- •Viewing a Scene from a Light
- •Altering Light Parameters
- •Working with Photometric Lights
- •Using the Sunlight and Daylight Systems
- •Using Volume Lights
- •Summary
- •Selecting Advanced Lighting
- •Using Local Advanced Lighting Settings
- •Tutorial: Excluding objects from light tracing
- •Summary
- •Understanding Radiosity
- •Using Local and Global Advanced Lighting Settings
- •Working with Advanced Lighting Materials
- •Using Lighting Analysis
- •Summary
- •Using the Time Controls
- •Working with Keys
- •Using the Track Bar
- •Viewing and Editing Key Values
- •Using the Motion Panel
- •Using Ghosting
- •Animating Objects
- •Working with Previews
- •Wiring Parameters
- •Animation Modifiers
- •Summary
- •Understanding Controller Types
- •Assigning Controllers
- •Setting Default Controllers
- •Examining the Various Controllers
- •Summary
- •Working with Expressions in Spinners
- •Understanding the Expression Controller Interface
- •Understanding Expression Elements
- •Using Expression Controllers
- •Summary
- •Learning the Track View Interface
- •Working with Keys
- •Editing Time
- •Editing Curves
- •Filtering Tracks
- •Working with Controllers
- •Synchronizing to a Sound Track
- •Summary
- •Understanding Your Character
- •Building Bodies
- •Summary
- •Building a Bones System
- •Using the Bone Tools
- •Using the Skin Modifier
- •Summary
- •Creating Characters
- •Working with Characters
- •Using Character Animation Techniques
- •Summary
- •Forward versus Inverse Kinematics
- •Creating an Inverse Kinematics System
- •Using the Various Inverse Kinematics Methods
- •Summary
- •Creating and Binding Space Warps
- •Understanding Space Warp Types
- •Combining Particle Systems with Space Warps
- •Summary
- •Understanding Dynamics
- •Using Dynamic Objects
- •Defining Dynamic Material Properties
- •Using Dynamic Space Warps
- •Using the Dynamics Utility
- •Using the Flex Modifier
- •Summary
- •Using reactor
- •Using reactor Collections
- •Creating reactor Objects
- •Calculating and Previewing a Simulation
- •Constraining Objects
- •reactor Troubleshooting
- •Summary
- •Understanding the Max Renderers
- •Previewing with ActiveShade
- •Render Parameters
- •Rendering Preferences
- •Creating VUE Files
- •Using the Rendered Frame Window
- •Using the RAM Player
- •Reviewing the Render Types
- •Using Command-Line Rendering
- •Creating Panoramic Images
- •Getting Printer Help
- •Creating an Environment
- •Summary
- •Creating Atmospheric Effects
- •Using the Fire Effect
- •Using the Fog Effect
- •Summary
- •Using Render Elements
- •Adding Render Effects
- •Creating Lens Effects
- •Using Other Render Effects
- •Summary
- •Using Raytrace Materials
- •Using a Raytrace Map
- •Enabling mental ray
- •Summary
- •Understanding Network Rendering
- •Network Requirements
- •Setting up a Network Rendering System
- •Starting the Network Rendering System
- •Configuring the Network Manager and Servers
- •Logging Errors
- •Using the Monitor
- •Setting up Batch Rendering
- •Summary
- •Compositing with Photoshop
- •Video Editing with Premiere
- •Video Compositing with After Effects
- •Introducing Combustion
- •Using Other Compositing Solutions
- •Summary
- •Completing Post-Production with the Video Post Interface
- •Working with Sequences
- •Adding and Editing Events
- •Working with Ranges
- •Working with Lens Effects Filters
- •Summary
- •What Is MAXScript?
- •MAXScript Tools
- •Setting MAXScript Preferences
- •Types of Scripts
- •Writing Your Own MAXScripts
- •Learning the Visual MAXScript Editor Interface
- •Laying Out a Rollout
- •Summary
- •Working with Plug-Ins
- •Locating Plug-Ins
- •Summary
- •Low-Res Modeling
- •Using Channels
- •Using Vertex Colors
- •Rendering to a Texture
- •Summary
- •Max and Architecture
- •Using AEC Objects
- •Using Architectural materials
- •Summary
- •Tutorial: Creating Icy Geometry with BlobMesh
- •Tutorial: Using Caustic Photons to Create a Disco Ball
- •Summary
- •mental ray Rendering System
- •Particle Flow
- •reactor 2.0
- •Schematic View
- •BlobMesh
- •Spline and Patch Features
- •Import and Export
- •Shell Modifier
- •Vertex Paint and Channel Info
- •Architectural Primitives and Materials
- •Minor Improvements
- •Choosing an Operating System
- •Hardware Requirements
- •Installing 3ds max 6
- •Authorizing the Software
- •Setting the Display Driver
- •Updating Max
- •Moving Max to Another Computer
- •Using Keyboard Shortcuts
- •Using the Hotkey Map
- •Main Interface Shortcuts
- •Dialog Box Shortcuts
- •Miscellaneous Shortcuts
- •System Requirements
- •Using the CDs with Windows
- •What’s on the CDs
- •Troubleshooting
- •Index
Chapter 48 Automating with MAXScript 1127
10.Now it’s time to try out your first MAXScript effort. Add a sphere to your scene. Make sure that it’s selected before moving to the next step.
11.In the top pane of the MAXScript Listener window, select all the text (an easy way to do so is by pressing Ctrl+A), and then hold down the Shift key and press the Enter key to tell Max to execute the MAXScript.
In Figure 48-7, you can see the script and the sphere that has been squashed and has changed color.
Figure 48-7: Running the new squash-and-turn-purple script
Setting MAXScript Preferences
The Preference Settings dialog box, opened with the Customize Preference Settings menu command, includes a panel of MaxScript settings, shown in Figure 48-8. Using these settings, you can set which scripts load automatically, the default settings for the Macro Recorder, and even what font is displayed in the Script Editor window.

1128 Part XII MAXScript and Plug-Ins
Figure 48-8: The MAXScript panel includes options for controlling MAXScript.
Max includes two directories in its default installation that can be used to automatically load scripts when Max starts. These directories are scripts and scripts\startup, but you can change these directories using the Configure Paths dialog box. The Load Startup Scripts option causes any scripts in these directories to be loaded automatically when Max starts.
Types of Scripts
All scripts are not created equal, and Max categorizes different scripts based on how they work. For more information, the MAXScript online help provides exhaustive information on their various options.
The main thing to consider when deciding what type of script to create is the user interface. Ask yourself what the most logical user interface would be for the type of tool you’re creating, and this gives you a hint as to which type of script is well suited for the task.
Macro scripts
Macro scripts are scripts created with the Macro Recorder. Any script that is associated with a toolbar button is considered a Macro script. Max organizes Macro scripts by their category, which you can change by editing the script file. To call a Macro script from another script, you can use the macros command. For example,
macros.run “objects” “sphere”
runs the “sphere” script in the “objects” category.

Chapter 48 Automating with MAXScript 1129
Macro scripts are generally scripts that require no other user input; you just click a button, and the script works its magic.
Scripted utilities
A scripted utility is a MAXScript that has its own custom rollout in the Utilities panel, like the SphereArray example. This type of script is particularly useful when your script has parameters that the user needs to enter, such as the radius in the SphereArray script. Scripted utilities are easy to build using the Visual MAXScript Editor.
Scripted right-click menus
When you right-click an object in your scene, Max opens a pop-up menu of options for you to choose from, much like a quadmenu. Scripted right-click menus let you append your own menu items to the right-click menu. If you create a script that modifies some property of an object, making the script available through the right-click menu makes it easily accessible.
Scripted mouse tools
You can use scripted mouse tools to create scripts that handle mouse input in the viewports. These scripts listen for commands from the mouse, such as clicking the mouse buttons and clicking and dragging the cursor. For example, you would use this type of MAXScript if you were making a new primitive object type so that users could create the new objects just like they would a sphere or a box.
Scripted plug-ins
Scripted plug-ins are by far the most complex type of MAXScript available. They mirror the functionality of non-MAXScript plug-ins (which are written in other programming languages such as C++). You can create scripted plug-ins that make new geometry, create new shapes, control lights, act as modifiers, control texture maps and materials, and even produce special rendering effects.
Writing Your Own MAXScripts
This section presents the basics of the MAXScript language and shows you how to use the various parts of MAXScript in your own scripts. You can test any of these scripting commands using the MAXScript Listener window.
Cross- |
Much of the discussion that follows will sound familiar if you’ve already read the chapter on |
Reference |
expressions found in Chapter 32, “Using the Expression Controller.” Expressions use many of |
|
|
|
the same constructs as MAXScript. |
Variables and data types
A variable in MAXScript is sort of like a variable in algebra. It represents some other value, and when you mention a variable in an equation, you’re actually talking about the value that the variable holds. You can think of variables in MAXScript as containers that you can put
1130 Part XII MAXScript and Plug-Ins
stuff into and take it out of later. Unlike variables in algebra, however, variables in MAXScript can “hold” other things besides numbers, as we’ll soon see.
To put a value into a variable, you use the equal sign. For example, if you type
X = 5 * 3
in the MAXScript Listener window, Max evaluates the expression on the right side of the equal sign and stores the result in the variable named X. In this case, Max would multiply 5 and 3, and would store the result (15) in X. You can then see what is in X by just typing X in the Listener window and pressing Enter. Max then displays the value stored in X, or 15.
You can name your variables whatever you want, and naming them something that helps you remember what the variable is for is a good idea. For example, if you want a variable that keeps track of how many objects you’re going to manipulate, the name “objCount” would be better than something like “Z.”
Note |
Variable names can be just about anything you want, but you must start a variable name with |
|
a letter. Also, the variable name can’t have any special characters in it, like spaces, commas, or |
|
quote marks. You can, however, use the underscore character and any normal alphabetic |
|
characters. |
Variables can also hold strings, which are groups of characters. For example,
badDay = “Monday”
stores the word “Monday” in the variable badDay. You can attach two strings together using the plus sign, like this:
grouchy = “My least favorite day is” + badDay
Now the variable grouchy holds the value “My least favorite day is Monday.”
Try this:
wontWork = 5 + “cheese”
Max prints out an error because it’s confused: You’re asking it to add a number to a string. The problem is that 5 and “cheese” are two different data types. Data types are different classes of values that you can store in variables. You can almost always mix values of the same data type, but values of different types usually don’t make sense together.
Note |
To see the data type of a variable, use the classof command. Using the previous example, |
|
you could type classof grouchy, and Max would in turn print out String. |
Another very common data type is Point3, which represents a three-dimensional point. Following are a few examples of using points, with explanatory comments:
Pos = [5,3,2] |
-- Marks a |
point at (5,3,2) |
Pos.x = 7 |
-- Change the x coordinate to 7 |
|
|
-- Now the |
point is at (7,3,2) |
Pos = Pos + (1,2,5) |
-- Take the old value for Pos, |
|
|
-- move it |
by (1,2,5) to (8,5,7) |
|
-- and store the new value in Pos |
|

Chapter 48 Automating with MAXScript 1131
In addition to these basic data types, each object in your scene has its own data type. For example, if you use classof on a sphere object, Max prints out Sphere. Data types for scene objects are actually complex data types or structures, which means that they are groups of other data types in a single unit. The pieces of data inside a larger object are called members or properties. Most scene objects have a member called Name, which is of type String. The Name member tells the specific name of that object. Another common property is Position, a Point3 variable that tells the object’s position.
Max has a special built-in variable that represents whatever object is currently selected. This variable is $ (the dollar sign), which is used in the following tutorial.
Tutorial: Using variables
In this tutorial, you learn more about variables in MAXScript by using them to manipulate an object in your scene.
To use variables to manipulate scene objects, follow these steps:
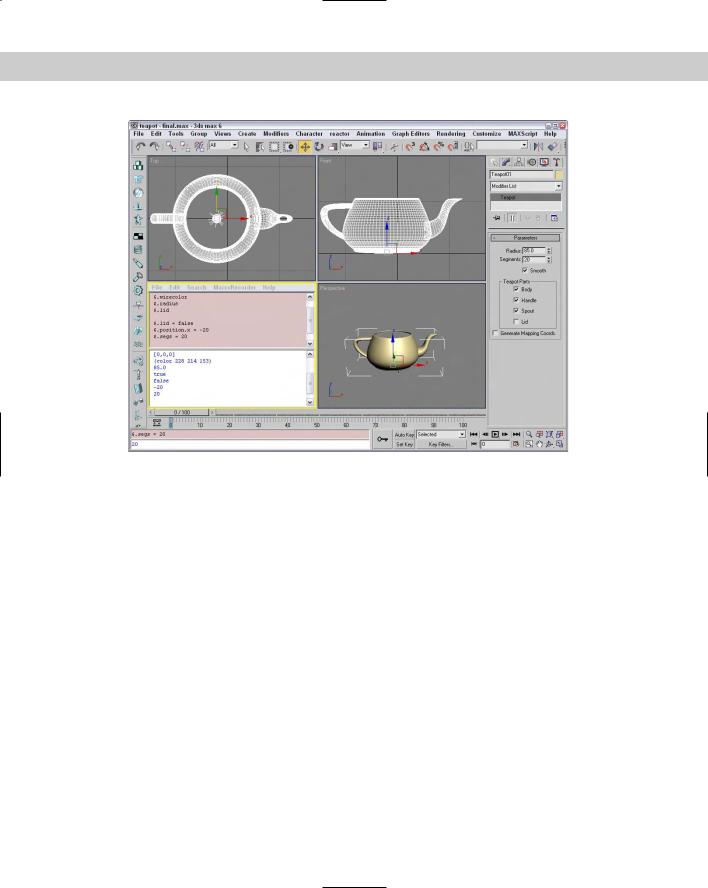
1.Open the Teapot.max file from the Chap 48 directory on the CD-ROM. This file has a simple teapot object.
2.Right-click on the title for the Left viewport, and choose Views Extended MAXScript Listener to open the MAXScript Listener window in the Left viewport.
3.Select the teapot object and type $, and press Enter.
Max displays information about the teapot. (Your numbers will probably be different depending on where you placed your teapot.)
4.Type the following lines one at a time to see the property values stored as part of the teapot object:
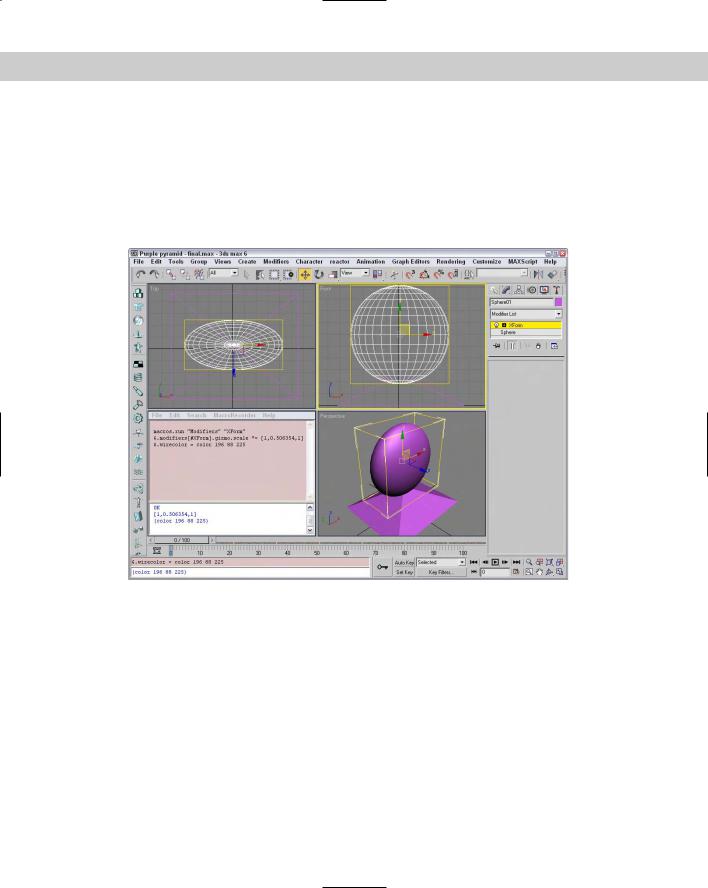
$.position $.wirecolor $.radius $.name $.lid
5.Now type these lines, one at a time, to set the property values of the teapot object:
$.lid = false $.position.x = -20 $.segs = 20
Figure 48-9 shows the commands, their results in the MAXScript Listener window, and the resulting teapot object.
1132 Part XII MAXScript and Plug-Ins
Figure 48-9: The script commands entered in the MAXScript Listener affect the objects in the viewports.
Program flow and comments
In general, when Max begins executing a script it starts with the first line of the script, processes it, and then moves on to the next line. Execution of the script continues until no more lines are in the script file. (Later, we look at some MAXScript keywords that let you change the flow of script execution.)
Max lets you embed comments or notes in your script file to help explain what is happening. To insert a comment, precede it with two hyphens (--). When Max encounters the double hyphen, it skips the comment and everything else on that line and moves to the next line of the script. For example, in this line of MAXScript
$Torus01.pos = [0,0,0] -- Move it back to the origin
Max processes the first part of the line (and moves the object to the origin) and then moves on to the next line after it reaches the comment.
Using comments in your MAXScript files is very important because after your scripts start to become complex, figuring out what is happening can get difficult. Also, when you come back a few months later to improve your script, comments will refresh your memory and help keep you from repeating the same mistakes you made the first time around.
Chapter 48 Automating with MAXScript 1133
Note Because Max ignores anything after the double hyphen, you can use comments to temporarily remove MAXScript lines from your script. If something isn’t working right, you can comment out the lines that you want Max to skip. Later, when you want to add them back in, you don’t have to retype them. You can just remove the comment marks, and your script is back to normal.
Expressions
An expression is what Max uses to make decisions. An expression compares two things and draws a simple conclusion based on that comparison.
Cross- |
These same expressions can be used within the Expression controller. You can find details on |
Reference |
this controller in Chapter 32, “Using the Expression Controller.” |
|
Simple expressions
The expression
1 < 2
is a simple expression that asks the question, “Is 1 less than 2?” Expressions always ask yes/no type questions. When you type an expression in the MAXScript Listener window (or inside of a script), Max evaluates the expression and prints true if the expression is valid (like the preceding example) and false if it isn’t. Try the following expressions in the Listener window, and Max will print the results as shown in Figure 48-10 (you don’t have to type in the comments):
1 |
< |
2 |
|
|
-- 1 |
IS |
less than |
2, so expression is true |
||
1 |
> |
2 |
|
|
-- 1 |
is |
NOT |
greater than 2, so false |
||
2 |
+ |
2 |
== |
4 |
-- ‘==’ |
means “is |
equal to”. 2 + 2 is |
|||
|
|
|
|
|
-- equal to |
4, |
so |
true |
||
2 |
+ |
2 |
== |
5 |
-- 4 |
is |
NOT |
equal |
to 5, so false |
|
3 |
* |
3 |
== |
5 + 4 -- 9 |
IS |
equal to 9, so true |
||||
3 |
* |
3 |
!= |
5 + 4 -- ‘!=’ |
means ‘not equal to’. ‘9 is not |
|||||
|
|
|
|
|
-- equal to |
9’ |
is a false statement, so |
|||
|
|
|
|
|
-- the expression is false |
|||||
a = |
23 |
|
|
-- store 23 |
in |
variable a |
||||
b = |
14 + |
9 |
-- store 23 |
in |
variable b |
|||||
a == b |
|
|
-- 23 IS equal |
to |
23, so true |
|||||

1134 Part XII MAXScript and Plug-Ins
Figure 48-10: Using the MAXScript Listener to evaluate expressions
Play around with simple expressions until you’re familiar with what they mean and have an intuitive feel for whether or not an expression is going to evaluate to true or false.
Complex expressions
Sometimes you need an expression to decide on more than just two pieces of data. MAXScript has the and, or, and not operators to help you do this.
The and operator combines two expressions and asks the question, “Are both expressions true?” If both are true, then the entire expression evaluates to true. But if either is false, or if they are both false, then the entire expression is false. You can use parentheses to group expressions, so an expression with the and operator might look something like this:
(1 < 2) and (1 < 3) -- true because (1 < 2) is true AND -- (1 < 3) is true
The or operator is similar to and, except that an expression with or is true if either of the expressions is true or if both are true. Here are some examples:
(2 > 3) or (2 > 1) -- even though (2 > 3) is false, the
--entire expression is true because
--(2 > 1) is true
(2 > 3) and (2 > 1) -- false because both expressions are -- not true
Try some of these complex expressions to make sure that you understand how they work:
a = 3 b = 2
(a == b) or (a > b) (a == b) and (b == 2)
(a > b) or (a < b) (a != b) and (b == 3)
--true because a IS greater than b
--false because both expressions are
--not true
--true because at least one IS true
--false because b is NOT equal to 3

Chapter 48 Automating with MAXScript 1135
The not operator negates or flips the value of an expression from true to false or vice versa. For example
(1 == 2) |
-- |
false |
because 1 is NOT equal to 2 |
not (1 == 2) |
-- |
true. |
‘not’ flips the false to true |
Conditions
Conditions are one way in which you can control program flow in a script. Normally, Max processes each line, no matter what, and then quits; but with conditions, Max executes certain lines only if an expression is true.
For example, suppose you have a script with the following lines:
a = 4
If (a == 5) then
(
b = 2
)
Max would not execute the line b = 2 because the expression (a == 5) evaluates to false. Conditional statements, or “if” statements, basically say, “If this expression evaluates to true, then do the stuff inside the block of parentheses. If the expression evaluates to false, skip those lines of script.”
Conditional statements follow this form:
If <expr> then <stuff>
where <expr> is an expression to evaluate and <stuff> is some MAXScript to execute if the expression evaluates to true. You can also use the keyword else to specify what happens if the expression evaluates to false, as shown in the following example:
a = 4
if (a == 5) then
(
b = 2
)
else
(
b = 3
)
After this block of MAXScript, the variable b would have the value of 3 because the expression (a == 5) evaluated to false. Consequently, Max executed the MAXScript in the else section of the statement.
Collections and arrays
MAXScript has some very useful features to help you manipulate groups of objects. A group of objects is called a collection. You can think of a collection as a bag that holds a bunch of objects or variables. The things in the bag are in no particular order; they’re just grouped together.

1136 Part XII MAXScript and Plug-Ins
You can use collections to work with groups of a particular type of object. For example, the MAXScript
a = $pokey* a.wirecolor = red
creates a collection that contains every object in your scene whose name starts with “Pokey” and makes every object in that collection turn red.
MAXScript has several built-in collections that you might find useful, such as cameras and lights, containing all the cameras and lights in your scene. So
delete lights
removes all the light objects from your scene (which may or may not be a good idea).
An array is a type of collection in which all the objects are in a fixed order, and you can access each member of the array by an index. For example
a = #() |
-- creates an empty array to use |
a[1] = 5 |
|
a[2] = 10 |
|
a[5] = 12 |
|
a |
|
After the last line, Max prints out the current value for the array:
#(5, 10, undefined, undefined, 12)
Notice that Max makes the array big enough to hold however many elements we want to put in it, and that if we don’t put anything in one of the positions, Max automatically puts in undefined, which simply means that array location has no value at all.
One last useful trick is that Max lets you use the as keyword to convert from a collection to an array:
LightArray = (lights as array)
Max takes the built-in collection of lights, converts it to an array, and names the array
LightArray.
The members of an array or a collection don’t all have to have the same data type, so it’s completely valid to have an array with numbers, strings, and objects, like this:
A = #(5,”Mr. Nutty”,box radius:5)
Note You can use the as MAXScript keyword to convert between data types. For example, (5 as string) converts the number 5 to the string “5,” and (5 as float) converts the whole number 5 to the floating-point number 5.0.
Loops
A loop is a MAXScript construct that lets you override the normal flow of execution. Instead of processing each line in your script once and then quitting, Max can use loops to do something several times.
Chapter 48 Automating with MAXScript 1137
For example,
j = 0
for i = 1 to 5 do
(
j = j + i
)
This MAXScript uses two variables — i and j — but you can use any variables you want in your loops. The script sets the variable j to 0 and then uses the variable i to count from 1 to 5. Max repeats the code between the parentheses five times, and each time the variable i is incremented by 1. Inside the loop, Max adds the current value of i to j. Can you figure out what the value of j is at the end of the script? If you guessed 15, you’re right. To see why, look at the value of each variable as the script is running:
When j i
----------------------------
First line |
0 |
0 |
Start of loop |
0 |
1 |
After first loop |
1 |
1 |
Start of second loop |
1 |
2 |
After second loop |
3 |
2 |
Start of third loop |
3 |
3 |
After third loop |
6 |
3 |
Start of fourth loop |
6 |
4 |
After fourth loop |
10 |
4 |
Start of fifth loop |
10 |
5 |
After fifth loop |
15 |
5 |
A loop is also useful for processing each member of an array or collection. The following MAXScript shows one way to turn every teapot in a scene blue:
teapots = $teapot* |
-- get the collection of teapots |
for singleTeapot in teapots do |
|
( |
|
singleTeapot.wirecolor = blue |
|
) |
|
You can use a for loop to create a bunch of objects for you. Try this MAXScript:
for I = 1 to 10 collect
(
sphere radius:15
)
The collect keyword tells Max to create a collection with the results of the MAXScript in the block of code inside the parentheses. The line
sphere radius:15
tells Max to create a sphere with radius of 15, so the entire script created 10 spheres and added them to your scene. Unfortunately, Max puts them all in the same spot, so let’s move them around a bit so we can see them:

1138 Part XII MAXScript and Plug-Ins
i = -50
For s in spheres do
(
s.position = [i,i,i] i = i + 10
)
Study this script to make sure that you understand what’s going on. We use a for loop to process each sphere in our collection of spheres. For each one, we set its position to [i,i,i], and then we change the value of i so that the next sphere will be at a different location.
Functions
The last feature of basic MAXScript that we look at is the function. Functions are small chunks of MAXScript that act like program building blocks. For example, suppose that you need to compute the average of a collection of numbers many times during a script you’re writing. The MAXScript to do this might be
Total = 0
Count = 0
For n in numbers do
(
total = total + n count = count + 1
)
average = total / (count as float)
Given a collection of numbers called numbers, this MAXScript computes the average. Unfortunately, every time you need to compute the average, you have to type all that MAXScript again. Or you might be smart and just cut and paste it in each time you need it. Still, your script is quickly becoming large and ugly, and you always have to change the script to match the name of your collection you’re averaging.
A function solves your problem. At the beginning of your script, you can define an average function like this:
Function average numbers =
( -- Function to average the numbers in a collection local Total = 0
local Count = 0 For n in numbers do
(
total = total + n count = count + 1
)
total / (count as float)
)
Now any time you need to average any collection of numbers in your script, you could just use this to take all the numbers in the collection called num and store their average in a variable called Ave:
Ave = average num |
-- assuming num is a collection |

Chapter 48 Automating with MAXScript 1139
Not only does this make your script much shorter if you need to average numbers often, but it makes it much more readable, too. It’s very clear to the casual reader that you’re going to average some numbers. Also, if you later realize that you wrote the average function incorrectly, you can just fix it at the top of the script. If you weren’t using functions, you would have to go through your script and find every case where you averaged numbers and then fix the problem. (What a headache!)
Let’s take another look at the function definition. The first line
Function average numbers =
tells Max that you’re creating a new function called average. It also tells Max that to use this function, you have to pass in one piece of data, and that inside the function you refer to that data using a variable called numbers. It doesn’t matter what the name of the actual variable was when the function was called; inside the function, you can simply refer to it as numbers.
Creating functions that use multiple pieces of data is also easy. For example,
Function multEm a b c = (a * b * c)
creates a function that multiplies three numbers together. To use this function to multiply three numbers and store the result in a variable called B, you would simply enter
B = multEm 2 3 4
The next two lines
local Total = 0 local Count = 0
create two variables and set them both to 0. The local keyword tells Max that the variable belongs to this function. No part of the script outside of the function can see this variable, and if there is a variable outside the function with the same name, changing the variable inside this function won’t affect that variable outside the function. That way, you never have to worry about what other variables are in use when someone calls average; even if variables are in use that are named Total or Count, they won’t be affected.
The last line
total / (count as float)
uses the Total and Count values to compute the average. How does that value get sent back to whoever called the function? Max evaluates all the MAXScript inside the function and returns the result. Because the last line is the last thing to be evaluated, Max uses the result of that calculation as the result of the entire function.
Tutorial: Creating a school of fish
Let’s look at an example that puts into practice some of the things you’ve learned in this chapter. In this multipart tutorial, we use MAXScript to create a small school of fish that follows the dummy object around a path.
Part 1: Making the fish follow a path
In this part of the tutorial, we use MAXScript to move one of the fish along a path in the scene. To do this, follow these steps:
1140 Part XII MAXScript and Plug-Ins
1.Open the Fish scene.max file from the Chap 48 directory on the CD-ROM.
This scene consists of two fish and a dummy object that follows a path. What we need to do is use MAXScript to create a small school of fish that follows the dummy object around the path.
2.Press F11 to open the MAXScript Listener window. In the window, choose File New Script to open the MAXScript editor window, and type the following script:
pathObj = $Dummy01 fishObj = $Fish1/FishBody
relPos = [0,-150,-50] -- How close the fish is to the path
animate on
(
for t = 1 to 100 do at time t
(
fishObj.position = pathObj.position + relPos
)
)
4.Select the Camera01 viewport. Choose File Evaluate All or press Ctrl+E to evaluate all the MAXScript in the editor window, right-click the Camera01 viewport to activate it, and click the Play Animation button.
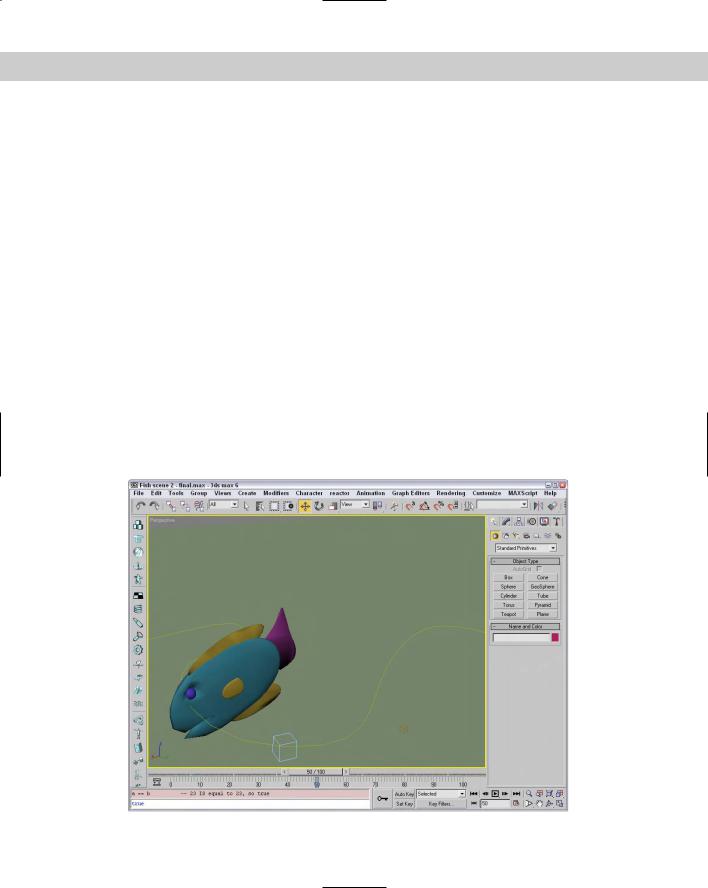
The fish rigidly follows the dummy object’s path. Figure 48-11 shows one frame of this animation.
Figure 48-11: First attempt at making the fish follow a path

Chapter 48 Automating with MAXScript 1141
Now let’s explain the MAXScript entered in the previous tutorial. The first few lines create some variables that the rest of the script uses. pathObj tells the name of the object that the fish will follow, and fishObj is the name of the fish’s body. (Notice that we can reference parts of the group hierarchy by using the object name, a forward slash, and then a child part.) Why bother creating a variable for the fish object? After we get this first fish working, we want to apply the same script to another fish. All we have to do is rename Fish1 as Fish2, re-execute the script, and we’re finished!
The script also creates a variable called relPos, which we use to refer to the relative position of the fish with respect to the dummy object. If we have several fish in the scene, we don’t want them all in the exact same spot, so this is an easy way to position each one.
The next block of MAXScript is new: We’re using the animate on construct. This tells Max to generate key frames for our animation. It’s the same as if we had pressed Max’s Animation button, run our script, and then shut Animation off. So any MAXScript inside the animate on parentheses creates animation key frames. These parentheses define a section of the script we call a block.
Inside the animation block, we have a loop that counts from 1 to 100 (corresponding to each frame of our animation). On the end of the loop line, we have at time t, which tells Max that for each time through the loop, we want all the variables to have whatever values they’ll have at that time. For example, if we want the fish to follow the dummy object, we have to know the position of the object at each point in time instead of just at the beginning; so each time through the loop, Max figures out for us where the dummy object will be.
Inside the loop we set the fish’s object to be that of the dummy object (at that point in time) and then adjust the fish’s position by relPos.
Part 2: Adding body rotation and tail animation
Let’s make that fish look a little more lifelike by animating its tail and having it rotate its body to actually follow the path. Also, we add a little unpredictability to its motion so that when we add other fish, they aren’t exact copies of each other.
To improve the fish’s animation, follow these steps:
1.Type the revised version of the script (the lines that are new are in bold):
pathObj = $Dummy01 fishObj = $Fish1/FishBody
fishTail = $Fish1/FishBody/FishTail
relPos = [0,-150,-50] -- How close the fish is to the path
fishTail.bend.axis = 0 -- |
0 |
is the x-axis |
|
zadd = 4 |
-- |
vertical movement at each step |
|
tailFlapOffset = (random 0 100) |
|||
tailFlapRate = 25 + (random |
0 25) |
||
animate on
(
for t = 0 to 100 do at time t
(
fishObj.position = pathObj.position + relPos fishObj.position.z = relPos.z
relPos.z += zadd
1142 Part XII MAXScript and Plug-Ins
--let’s say that there’s a 10% chance that the fish will
--change directions vertically
if ((random 1 100) > 90) then
(
zadd = -zadd
)
fishTail.bend.angle = 50 * sin (t * tailFlapRate + tailFlapOffset)
oldRt = fishObj.rotation.z_rotation
newRt = (in coordsys pathObj pathObj.rotation.z_rotation)
if ((random 1 100) > 85) then
(
fishObj.rotation.z_rotation += (newRt - oldRt) * (random 0.5 1.5)
)
)
)
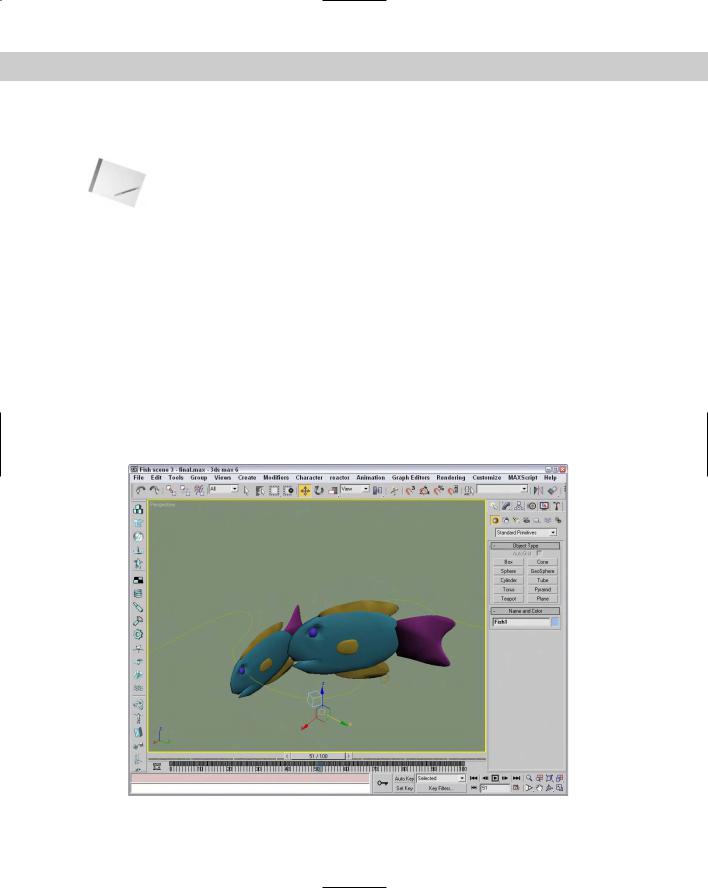
2.Save your script (File Save), and then press Ctrl+E to evaluate the script again. This script is saved in the Chap 48 directory as FishPath2.ms. Make the Camera01 viewport active, and click Play Animation. Figure 48-12 shows another frame of the animation. As you can see, the fish is heading in the right direction this time, and the tail is flapping wildly.
Figure 48-12: A tail-flapping fish that faces the right direction as it follows the path

Chapter 48 Automating with MAXScript 1143
Okay, let’s look at what changed. First, we added a variable to refer to the fish’s tail, so that it is easy to change when we add another fish. Also, we accessed the bend modifier of the tail and set its axis to 0, which corresponds to the X axis. (You can try other values to see that it really does change the axis parameter in the rollout.)
Next we created some more variables. We use zadd to tell Max how much to move the fish in the Z direction at each step (we don’t want our fish to always swim at the same level). tailFlapOffset and tailFlapRate are two variables used to control the tail flapping
(I explain this when we get to the part of the script that uses them).
Inside the for loop, notice that we’ve overridden the fish’s Z position and replaced it with just the relative Z position, so that each fish swims at its own depth and not the dummy object’s depth. Then, at each step, we add zadd to the Z position so that the fish changes depth slowly. We have to be careful or our fish will continue to climb out of the scene or run into the ground, so at each step we also choose a random number between 1 and 100 with the function (random 1 100). If the random number that Max picks is greater than 90, we flip the sign of zadd so that the fish starts moving in the other direction. This is a fancy way of saying, “There’s a 90 percent chance that the fish will continue moving in the same direction and a 10 percent chance that it will switch directions.”
In the next part, we again access the tail’s bend modifier, this time to set the bend angle. To get a nice back-and-forth motion for the tail, we use the sin function. In case you’ve forgotten all that math from when you were in school, a sine wave oscillates from 1 to –1 to 1 over and over again. By multiplying the function by 50, we get values that oscillate between 50 and –50 (pretty good values to use for our bend angle). We use tailFlapOffset to shift the sine wave so that the tail flapping of additional fish is out of synch slightly with this one (remember, we’re trying to get at least a little realism here) and tailFlapRate to make each fish flap its tail at a slightly different speed.
The only thing left for us to do is to make the fish “follow” the path; that is, rotate its body so that it’s facing the direction it’s moving. The simplest way to do this is to use the following MAXScript (split into two lines to make it easier to read):
newRt = (in coordsys pathObj pathObj.rotation.z_rotation) fishObj.rotation.z_rotation = newRt
The in coordsys construct tells Max to give us a value from the point of view of a particular coordinate system. Instead of pathObj, we could have asked for the Z rotation in the world, local, screen, or parent coordinate system, too. In this case, we want to rotate the fish in the same coordinate system as the dummy object. In order to randomize the direction of the fish a little, we’ve made the rotation a little more complex:
oldRt = fishObj.rotation.z_rotation
newRt = (in coordsys pathObj pathObj.rotation.z_rotation)
if ((random 1 100) > 85) then
(
fishObj.rotation.z_rotation += (newRt - oldRt) * (random 0.5 1.5)
)
First, we save the old Z rotation in oldRt, and then we put the new rotation in newRt. Again, we pick a random number to decide whether we’ll do something; in this case we’re saying, “There’s an 85 percent chance we won’t change directions at all.” If our random number does fall in that other 15 percent, however, we adjust the fish’s rotation a little. We take the difference between the new rotation and the old rotation and multiply it by a random number
1144 Part XII MAXScript and Plug-Ins
between 0.5 and 1.5, which means we adjust the rotation by anywhere from 50 percent to 150 percent of the difference between the two rotations. So any fish will basically follow the same path, but with a little variation here and there.
Note Max lets you use shorthand when adjusting the values of variables. Instead of saying a = a + b, you can just say a += b. Both have the same effect.
Part 3: Animating the second fish
This scene actually has two fish in it (the other one has been sitting patiently off to the side), so for the final part of this tutorial, we get both fish involved in the animation. To animate the second fish alongside the first one, follow these steps:
1.At the top of the script, change these three lines (what changed is in bold):
pathObj = $Dummy01 fishObj = $Fish2/FishBody
fishTail = $Fish2/FishBody/FishTail
relPos = [50,75,0] -- How close the fish is to the path
2.Choose File Evaluate All, or press Ctrl+E to run the script again, and then animate it. Figure 48-13 shows both fish swimming merrily.
This script generates key frames for the second fish because we changed the fishObj and fishTail variables to refer to the second fish. We’ve also moved the second fish’s relative position so that the two don’t run into each other.
Figure 48-13: Both fish swimming together