


Chapter 5 Creating and Editing Primitive Objects |
187 |
Summary
Primitives are the most basic shapes and often provide a starting point for more ambitious modeling projects. The two classes of primitives — Standard and Extended — provide a host of possible objects. This chapter covered the following topics:
The basics of creating primitives by both dragging and entering keyboard values
How to name objects and set and change the object color
The various creation methods for all the primitive objects
The various primitives in both the Standard and Extended subcategories
The possible parameters for each of the primitive objects
Now that you know how to create objects, you can focus on selecting them after they’re created, which is what the next chapter covers. You can select objects in numerous ways.
|
|
|


Selecting Objects
and Setting Object
Properties
Now that you’ve learned how to create objects and had some practice, you’ve probably created more than you really need. To
eliminate, move, or change the look of any objects, you first have to know how to select the object. Doing so can be tricky if the viewports are all full of objects lying on top of one another. Luckily, Max offers several selection features that make looking for a needle in a haystack easier.
Max offers many different ways to select objects. You can select by name, color, type, and even material. You can also use selection filters to make only certain types of objects selectable. And after you’ve found all the objects you need, you can make a selection set, which will allow you to quickly select a set of objects by name. Now where is that needle?
All objects have properties that define their physical characteristics, such as shape, radius, and smoothness, but objects also have properties that control where they are located in the scene, how they are displayed and rendered, and what their parent objects are. These properties have a major impact on how you work with objects; understanding them can make objects in a scene easier to work with.
Selecting Objects
Max includes several methods for selecting objects — the easiest being simply clicking on the object in one of the viewports. Selected objects turn white and are enclosed in brackets called selection brackets.
In addition to turning white and displaying selection brackets, several options allow you to mark selected objects. You can find these options in the Viewport Configuration dialog box (which you access with the Customize Viewport Configuration menu command); they include selection brackets (keyboard shortcut, J) and edged faces (F4). Either or both of these options can be enabled, as shown in Figure 6-1. Another way to detect the selected object is that the object’s axes appear at the object’s pivot point.
C 6H A P T E R
In This Chapter
Selecting objects using toolbars and menus
Using named selection sets
Setting object properties
Hiding and freezing objects
Working with layers
190 Part II Working with Objects
Caution |
The Viewport Configuration dialog box also includes an option to Shade Selected Faces (F2), |
|
but this option shades only selected subobject faces. |
|
Figure 6-1: Selected objects can be highlighted with selection |
|
brackets (left), edged faces (middle), or both (right). |
|
With many objects in a scene, clicking directly on a single object, free from the others, can |
|
be difficult, but persistence can pay off. If you continue to click an object that is already |
|
selected, then the object directly behind the object you clicked on is selected. For example, |
|
if you have a row of spheres lined up, you can select the third sphere by clicking three times |
|
on the first object. |
Tip |
In complicated scenes, finding an object is often much easier if it has a relevant name. Be |
|
sure to name your new objects using the Name and Color rollout. |
Selection filters
Before examining the selection commands in the Edit menu, I need to tell you about Selection Filters. With a complex scene that includes geometry, lights, cameras, shapes, and so on, selecting the exact object that you want can be difficult. Selection filters can simplify this task.
A selection filter specifies which types of objects can be selected. The Selection Filter dropdown list is located on the main toolbar. Selecting Shapes, for example, makes only shape objects available for selection. Clicking a geometry object with the Shape Selection Filter enabled does nothing.
The available filters include All, Geometry, Shapes, Lights, Cameras, Helpers, and Space Warps. If you’re using Inverse Kinematics, you can also filter by Bone, IK Chain Object, and Point.
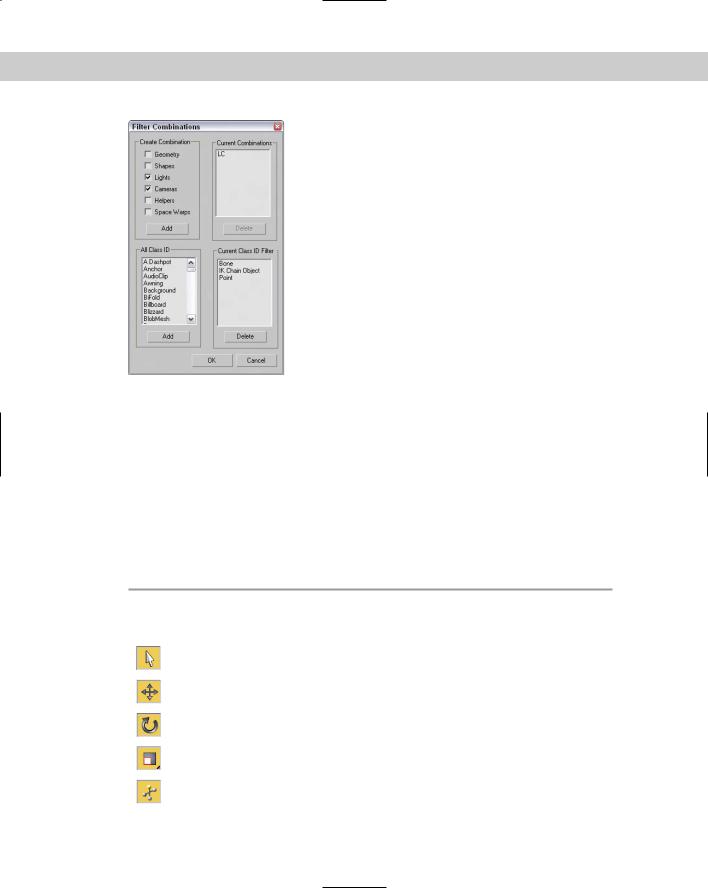
The Combos option opens the Filter Combinations dialog box, shown in Figure 6-2. From this dialog box, you can select combinations of objects to filter. These new filter combinations are added to the drop-down list. For example, to create a filter combination for lights and cameras, open the Filter Combinations dialog box, select Lights and Cameras, and click Add. The combination is listed as LC in the Current Combinations section, and the LC option is added to the drop-down list.
Chapter 6 Selecting Objects and Setting Object Properties |
191 |
Figure 6-2: The Filter Combinations dialog box enables you to create a custom selection filter.
The Filter Combinations dialog box also includes a list of additional objects. Using this list, you can filter very specific object types, such as a Boolean object or a Box primitive. In fact, the Bone, IK Chain Object, and Point filters that appear in the default main toolbar drop-down list all come from this additional list.
Select buttons
On the main toolbar are several buttons used to select objects, shown in Table 6-1. The Select Object button looks like the arrow cursor. The other three buttons select and transform objects. They are Select and Move (W), Select and Rotate (E), and Select and Scale (R). The final selection button is the Select and Manipulate button. With this button, you can select and use special helpers such as sliders.
|
|
Table 6-1: Select Buttons |
|
|
|
|
Button |
Description |
|
|
|
|
|
Select Object (Q) |
|
|
Select and Move (W) |
|
|
Select and Rotate (E) |
|
|
Select and Scale (R) |
|
|
Select and Manipulate |
|
|
|
192 Part II Working with Objects
Cross- |
See Chapter 10, “Transforming Objects — Translate, Rotate, and Scale” for more details on the |
Reference |
Select and Transform buttons. |
|
Selecting with the Edit menu
The Edit menu includes several convenient selection commands. The Edit Select All (Ctrl+A) menu command does just what you would think it does: It selects all objects in the current scene of the type defined by the selection filter. The Edit Select None (Ctrl+D) menu command deselects all objects. You can also simulate this command by clicking in any viewport away from all objects. The Edit Select Invert (Ctrl+I) menu command selects all objects defined by the selection filter that are currently not selected and deselects all currently selected objects.
Choosing Edit Select by Color lets you click a single object in any of the viewports. All objects with the same color as the one you selected are selected. Even if you already have an object of that color selected, you still must select an object of the desired color. Be aware that this is the object color and not the applied material color.
This command, of course, does not work on any objects without an associated color, such as Space Warps.
Select by Name
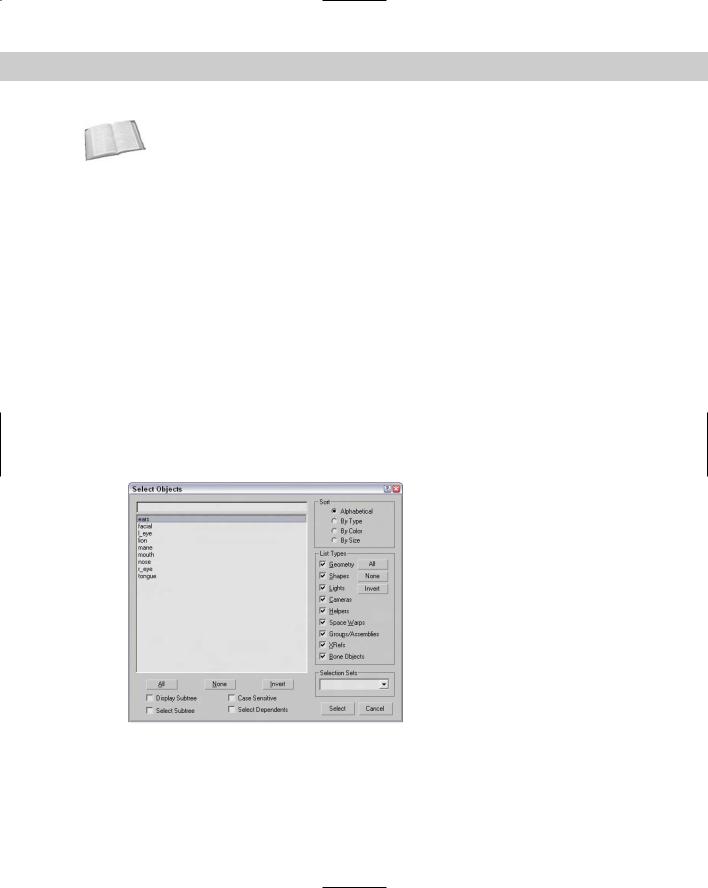
Choosing Edit Select by Name opens the Select Objects dialog box, as shown in Figure 6-3. Clicking the Select by Name button on the main toolbar, positioned to the right of the Select Object button, or pressing the keyboard shortcut, H, can also open this dialog box.
Figure 6-3: The Select Objects dialog box displays all objects in the current scene by name.
Chapter 6 Selecting Objects and Setting Object Properties |
193 |
|
You select objects by clicking their names in the list and then clicking the Select button. To |
|
pick and choose several objects, hold down the Ctrl key while selecting. Holding down the |
|
Shift key selects a range of objects. |
Note |
An identical version of the Select Objects dialog box works in a modeless state and enables |
|
you to interact with the viewports behind the dialog box. This dialog box is called the |
|
Selection Floater, and you can access it by choosing Tools Selection Floater. |
|
You can also type an object name in the field above the name list. All objects that match the |
|
typed characters are selected. The Sort options affect how the list is displayed. Selecting the |
|
Sort by Size option sorts the objects by the number of faces. This is an easy way to find the |
|
most complicated object in the scene. |
Tip |
Within the Select by Name text field, you can use wildcards to locate objects. Acceptable |
|
wildcards include an asterisk (*) for multiple characters in a row and a question mark (?) for |
|
single characters. For example, an entry of hedra* selects all objects beginning with “hedra,” |
|
regardless of the ending. |
|
The Display Subtree option includes all child objects in the list. By enabling the Select Subtree |
|
option, you select all child objects along with their parent objects. The Select Dependents |
|
option automatically selects all instances and references. The Case Sensitive option checks |
|
the case of the letters typed in the name search field. If this option is not selected, then capital |
|
letters are the same as their lowercase counterparts. |
|
The Select Object dialog box isn’t subject to the selection filter because the object types |
|
can be selected in the dialog box. Selection sets are also accessible from the Select Objects |
|
dialog box. |
|
Select by Region |
|
The Edit Region command lets you select from one of two different methods for selecting |
|
objects in the viewport using the mouse. First, make sure that you’re in select mode, and then |
|
click away from any of the objects and drag over the objects to select. The first method for |
|
selecting objects is Window Selection. This method selects all objects that are contained |
|
completely within the dragged outline. The Crossing Selection method selects any objects |
|
that are inside or overlapping the dragged outline. You can also access these two selection |
|
methods via the Window Selection buttons on the main toolbar — Window and Crossing, |
|
shown in Table 6-2. |
Tip |
If you can’t decide whether to use the Crossing or Window selection method, you can select |
|
to use both. The General panel of the Preference Settings dialog box provides an option to |
|
enable Auto Window/Crossing by Direction. When this option is enabled, you can select a |
|
direction and the Crossing selection method is used for all selections that move from that |
|
direction. The Window selection method is used for all selections that move from the oppo- |
|
site direction. For example, if you select Left to Right for the Crossing selection method, then |
|
moving from Left to Right uses the Crossing selection method and selecting from Right to |
|
Left uses the Window selection method. |

194 Part II Working with Objects
|
Table 6-2: Window Selection Buttons |
Button |
Description |
|
Window |
|
Crossing |
You can also change the shape of the selection outline. The Selection Region button on the main toolbar to the left of the Selection Filter drop-down list includes flyout buttons for Rectangular, Circular, Fence, and Lasso Selection Regions, shown in Table 6-3.
|
Table 6-3: Shape-Shifting Selection Region Buttons |
Button |
Description |
|
Rectangular |
|
Circular |
|
Fence |
|
Lasso |
The Rectangular selection method lets you select objects by dragging a rectangular section (from corner to corner) over a viewport. The Circular selection method selects objects within a circle that grows from the center outward. The Fence method lets you draw a polygonshaped selection area by clicking at each corner. Simply double-click to finish the fenced selection. The Lasso method lets you draw by freehand the selection area.
Pressing the Q keyboard shortcut selects the Select Object mode in the main toolbar, but repeated pressing of the Q keyboard shortcut cycles through the selection methods. Figure 6-4 shows each of the selection methods.
Figure 6-4: The drill’s front is selected using the Rectangular, Circular, Fence, and Lasso selection methods.

Chapter 6 Selecting Objects and Setting Object Properties |
195 |
Selecting multiple objects
As you work with objects in Max, you’ll sometimes want to apply a modification or transform to several objects at once. You can select multiple objects in several ways. With the Select by Name dialog box open, you can choose several objects from the list using the standard Ctrl and Shift keys. Holding down the Ctrl key selects or deselects multiple list items, but holding down the Shift key selects all consecutive list items between the first selected and the second selected items.
The Ctrl key also works when selecting objects in the viewport using one of the main toolbar Select buttons. You can tell whether you’re in select mode by looking for a button that’s highlighted yellow. If you hold down the Ctrl key and click an object, then the object is added to the current selection set. If you click an item that is already selected, then it is deselected. If you drag over multiple objects while holding down the Ctrl key, then all items in the dragged selection are added to the current selection set.
The Alt key deselects objects from the current selection set, which is opposite of what the Ctrl key does.
If you drag over several objects while holding down the Shift key, then the selection set is inverted. Each item that was selected is deselected and vice versa.
Object hierarchies are established using the Link button on the main toolbar. You can select an entire hierarchy of objects by double-clicking on its parent object. You can also select multiple objects within the hierarchy. When you double-click an object, any children of that object are also selected. When an object with a hierarchy is selected, the Page Up and Page Down keys select the next object up or down the hierarchy.
Another way to select multiple objects is by dragging within the viewport using the Window and Crossing Selection methods discussed previously in the “Select by Region” section.
Tutorial: Selecting objects
To practice selecting objects, we work with a simple model of the lion toy. When you’re finished, you can throw this model to your dog for a chew toy.
To select objects, follow these steps:
1.Open the Lion toy.max scene. You can find it in the Chap 06 directory on the CD-ROM.
2.Click the Select Object button (or press the Q key), and click the lion’s body in one of the viewports.
In the Command Panel, the name for this object, lion, is displayed in the Name and Color rollout.
3.Click the Select and Move button (or press the W key), click the lion’s body, and drag in the Perspective viewport to the right.
As you can see, the lion’s head and body form an object independent of the other parts of the lion object. Moving it separates it from the rest of the model’s parts.
4.Choose Edit Undo Move (or press Ctrl+Z) to piece the lion back together again.
5.With the Select and Move tool still selected, drag an outline around the entire lion in the Top view to select all the lion parts, and then click and drag the entire lion again.
This time, the entire lion moves as one entity, and the name field displays Multiple Selected.
196 Part II Working with Objects
6.Open the Select Objects dialog box by clicking the Select by Name button on the main toolbar (or by pressing the H key).
All the individual parts that make up this model are listed.
7.Double-click the nose object listed in the dialog box.
The Select Objects dialog box automatically closes, and the nose object becomes selected in the viewports.
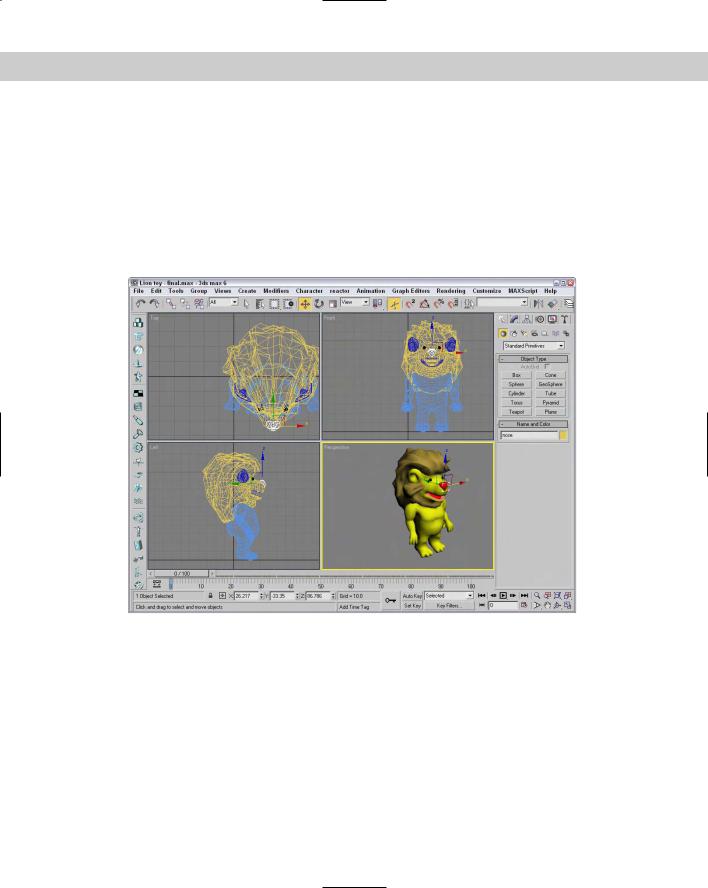
Figure 6-5 shows our lion friend with just its nose object selected. Notice that the name of the selected object in the Name and Color rollout says “nose.”
Figure 6-5: A lion cartoon character with its white selected nose.
Locking selection sets
If you’ve finally selected the exact objects that you want to work with, you can disable any other selections using the Selection Lock Toggle button on the Status Bar (it looks like a lock). When this button is enabled, it is colored yellow, and clicking objects in the viewports won’t have any effect on the current selection. The keyboard shortcut toggle for this command is the spacebar.
Chapter 6 Selecting Objects and Setting Object Properties |
197 |
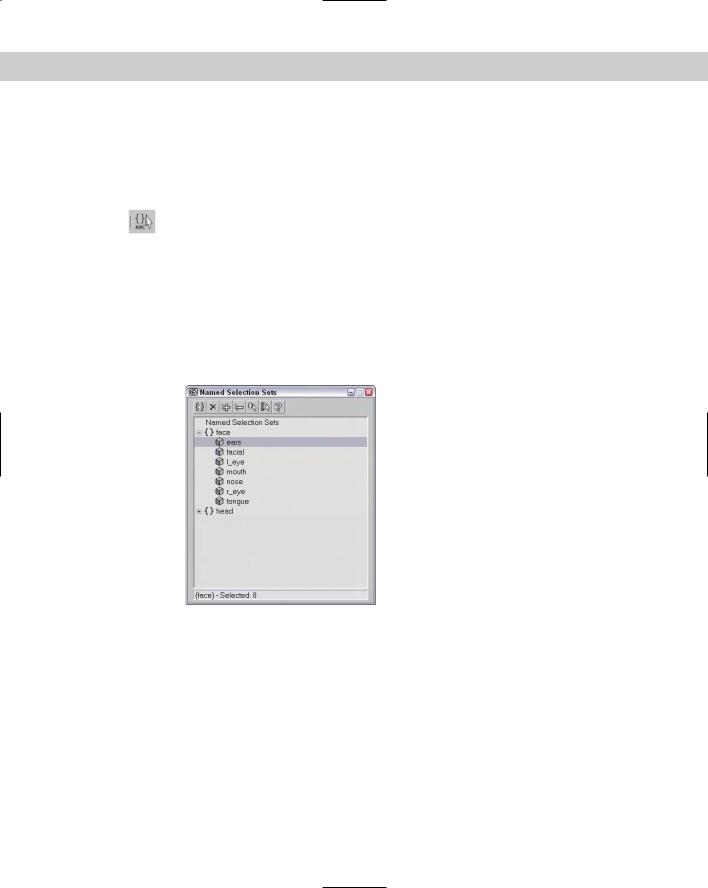
Using named selection sets
With a group of selected objects, you can establish a selection set. Once established as a selection set, you can recall this group of selected objects at any time by selecting its name from the Named Selection Set drop-down list on the main toolbar, or by opening the Named Selection Sets dialog box, shown in Figure 6-6.
You can access this dialog box using the Named Selection Sets button on the main toolbar or by selecting the Edit Named Selection Sets menu command. To establish a
selection set, type a name in the Named Selection Set drop-down list toward the right end of the main toolbar or use the dialog box.
Subtract Selected Objects
Add Selected Objects |
Select Objects in Set |
||||||
Remove |
|
|
Select by Name |
||||
Create New Set |
|
|
|
|
Highlight Selected Objects |
||
|
|
|
|
|
|
|
|
Figure 6-6: The Edit Named Selections dialog box lets you view and manage selection sets.
You can also create named selection sets for subobject selections. Be aware that these subobject selection sets are available only when you’re in subobject edit mode and only for the currently selected object.
Editing named selections
After you’ve created several named selection sets, you can use the Named Selections Sets dialog box to manage the selection sets. The buttons at the top let you create and delete sets, add or remove objects from a set, and select and highlight set objects. You can also move an object between sets by dragging its name to the set name to which you want to add it. Dragging one set name onto another set name combines all the objects from both sets under the second set name. Double-clicking on a set name selects all the objects in the set.
198 Part II Working with Objects
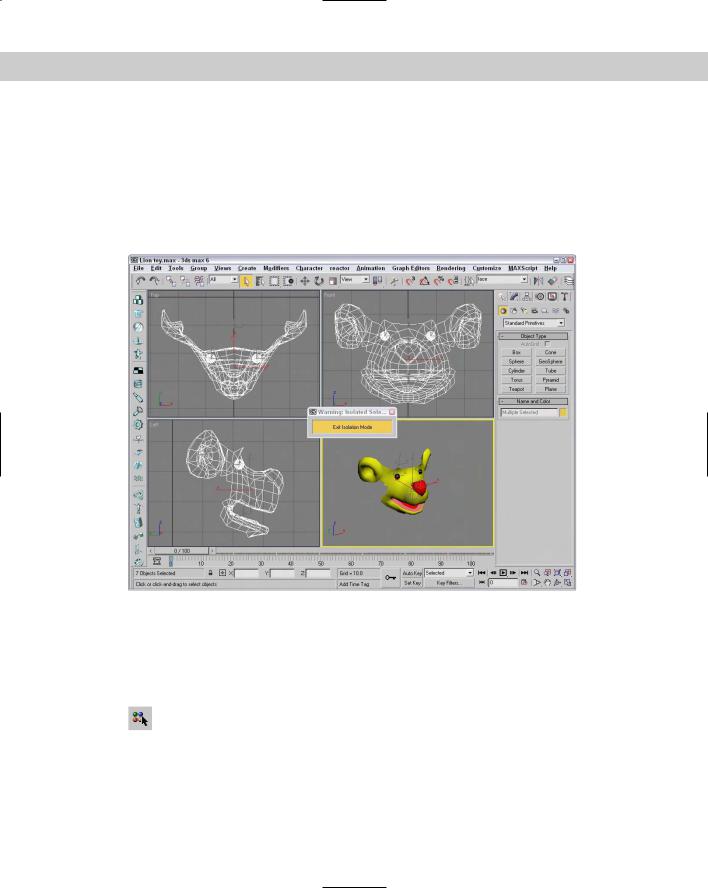
Isolating the current selection
The Tools Isolate Selection (Alt+Q) menu command hides all objects except for the selected object. It also zooms to extents on the object in the active viewport. It also opens a simple dialog box with an Exit Isolation button in it. Clicking this button or selecting the Isolate command again exits isolation mode and displays all the objects again.
Isolate Selection mode is very convenient for working on a certain area. Figure 6-7 shows the Isolate Selection mode for a selection set that includes all elements of the lion toy’s face.
Figure 6-7: Isolated Selection mode lets you focus on the details of the selected object.
Selecting objects in other interfaces
In addition to selecting objects in the viewports, you can use many of the other interfaces and dialog boxes to select objects. For example, the Material Editor includes a button that selects all objects in a scene with the same material applied.
The Select by Material button opens the Select Object dialog box with all objects that use the selected material highlighted.
Another way to select objects is in the Track View, which can be opened using the Graph Editors New Track View menu command. To view all the objects, click the + sign that precedes the Objects track. You can identify the Objects track by a small yellow cube. A hierarchy of all the objects in a scene is displayed. At the bottom left of the Track View window is the Select by Name text field. Typing an object name in this field automatically selects the object’s track in the editor’s window, but not in the viewport. Clicking the yellow cube icon selects the object in the viewport.