- •Preface
- •About This Book
- •Acknowledgments
- •Contents at a Glance
- •Contents
- •Relaxing at the Beach
- •Dressing the Scene
- •Animating Motion
- •Rendering the Final Animation
- •Summary
- •The Interface Elements
- •Using the Menus
- •Using the Toolbars
- •Using the Viewports
- •Using the Command Panel
- •Using the Lower Interface Bar Controls
- •Interacting with the Interface
- •Getting Help
- •Summary
- •Understanding 3D Space
- •Using the Viewport Navigation Controls
- •Configuring the Viewports
- •Working with Viewport Backgrounds
- •Summary
- •Working with Max Scene Files
- •Setting File Preferences
- •Importing and Exporting
- •Referencing External Objects
- •Using the File Utilities
- •Accessing File Information
- •Summary
- •Customizing Modify and Utility Panel Buttons
- •Working with Custom Interfaces
- •Configuring Paths
- •Selecting System Units
- •Setting Preferences
- •Summary
- •Creating Primitive Objects
- •Exploring the Primitive Object Types
- •Summary
- •Selecting Objects
- •Setting Object Properties
- •Hiding and Freezing Objects
- •Using Layers
- •Summary
- •Cloning Objects
- •Understanding Cloning Options
- •Mirroring Objects
- •Cloning over Time
- •Spacing Cloned Objects
- •Creating Arrays of Objects
- •Summary
- •Working with Groups
- •Building Assemblies
- •Building Links between Objects
- •Displaying Links and Hierarchies
- •Working with Linked Objects
- •Summary
- •Using the Schematic View Window
- •Working with Hierarchies
- •Setting Schematic View Preferences
- •Using List Views
- •Summary
- •Working with the Transformation Tools
- •Using Pivot Points
- •Using the Align Commands
- •Using Grids
- •Using Snap Options
- •Summary
- •Exploring the Modifier Stack
- •Exploring Modifier Types
- •Summary
- •Exploring the Modeling Types
- •Working with Subobjects
- •Modeling Helpers
- •Summary
- •Drawing in 2D
- •Editing Splines
- •Using Spline Modifiers
- •Summary
- •Creating Editable Mesh and Poly Objects
- •Editing Mesh Objects
- •Editing Poly Objects
- •Using Mesh Editing Modifiers
- •Summary
- •Introducing Patch Grids
- •Editing Patches
- •Using Modifiers on Patch Objects
- •Summary
- •Creating NURBS Curves and Surfaces
- •Editing NURBS
- •Working with NURBS
- •Summary
- •Morphing Objects
- •Creating Conform Objects
- •Creating a ShapeMerge Object
- •Creating a Terrain Object
- •Using the Mesher Object
- •Working with BlobMesh Objects
- •Creating a Scatter Object
- •Creating Connect Objects
- •Modeling with Boolean Objects
- •Creating a Loft Object
- •Summary
- •Understanding the Various Particle Systems
- •Creating a Particle System
- •Using the Spray and Snow Particle Systems
- •Using the Super Spray Particle System
- •Using the Blizzard Particle System
- •Using the PArray Particle System
- •Using the PCloud Particle System
- •Using Particle System Maps
- •Controlling Particles with Particle Flow
- •Summary
- •Understanding Material Properties
- •Working with the Material Editor
- •Using the Material/Map Browser
- •Using the Material/Map Navigator
- •Summary
- •Using the Standard Material
- •Using Shading Types
- •Accessing Other Parameters
- •Using External Tools
- •Summary
- •Using Compound Materials
- •Using Raytrace Materials
- •Using the Matte/Shadow Material
- •Using the DirectX 9 Shader
- •Applying Multiple Materials
- •Material Modifiers
- •Summary
- •Understanding Maps
- •Understanding Material Map Types
- •Using the Maps Rollout
- •Using the Map Path Utility
- •Using Map Instances
- •Summary
- •Mapping Modifiers
- •Using the Unwrap UVW modifier
- •Summary
- •Working with Cameras
- •Setting Camera Parameters
- •Summary
- •Using the Camera Tracker Utility
- •Summary
- •Using Multi-Pass Cameras
- •Creating Multi-Pass Camera Effects
- •Summary
- •Understanding the Basics of Lighting
- •Getting to Know the Light Types
- •Creating and Positioning Light Objects
- •Viewing a Scene from a Light
- •Altering Light Parameters
- •Working with Photometric Lights
- •Using the Sunlight and Daylight Systems
- •Using Volume Lights
- •Summary
- •Selecting Advanced Lighting
- •Using Local Advanced Lighting Settings
- •Tutorial: Excluding objects from light tracing
- •Summary
- •Understanding Radiosity
- •Using Local and Global Advanced Lighting Settings
- •Working with Advanced Lighting Materials
- •Using Lighting Analysis
- •Summary
- •Using the Time Controls
- •Working with Keys
- •Using the Track Bar
- •Viewing and Editing Key Values
- •Using the Motion Panel
- •Using Ghosting
- •Animating Objects
- •Working with Previews
- •Wiring Parameters
- •Animation Modifiers
- •Summary
- •Understanding Controller Types
- •Assigning Controllers
- •Setting Default Controllers
- •Examining the Various Controllers
- •Summary
- •Working with Expressions in Spinners
- •Understanding the Expression Controller Interface
- •Understanding Expression Elements
- •Using Expression Controllers
- •Summary
- •Learning the Track View Interface
- •Working with Keys
- •Editing Time
- •Editing Curves
- •Filtering Tracks
- •Working with Controllers
- •Synchronizing to a Sound Track
- •Summary
- •Understanding Your Character
- •Building Bodies
- •Summary
- •Building a Bones System
- •Using the Bone Tools
- •Using the Skin Modifier
- •Summary
- •Creating Characters
- •Working with Characters
- •Using Character Animation Techniques
- •Summary
- •Forward versus Inverse Kinematics
- •Creating an Inverse Kinematics System
- •Using the Various Inverse Kinematics Methods
- •Summary
- •Creating and Binding Space Warps
- •Understanding Space Warp Types
- •Combining Particle Systems with Space Warps
- •Summary
- •Understanding Dynamics
- •Using Dynamic Objects
- •Defining Dynamic Material Properties
- •Using Dynamic Space Warps
- •Using the Dynamics Utility
- •Using the Flex Modifier
- •Summary
- •Using reactor
- •Using reactor Collections
- •Creating reactor Objects
- •Calculating and Previewing a Simulation
- •Constraining Objects
- •reactor Troubleshooting
- •Summary
- •Understanding the Max Renderers
- •Previewing with ActiveShade
- •Render Parameters
- •Rendering Preferences
- •Creating VUE Files
- •Using the Rendered Frame Window
- •Using the RAM Player
- •Reviewing the Render Types
- •Using Command-Line Rendering
- •Creating Panoramic Images
- •Getting Printer Help
- •Creating an Environment
- •Summary
- •Creating Atmospheric Effects
- •Using the Fire Effect
- •Using the Fog Effect
- •Summary
- •Using Render Elements
- •Adding Render Effects
- •Creating Lens Effects
- •Using Other Render Effects
- •Summary
- •Using Raytrace Materials
- •Using a Raytrace Map
- •Enabling mental ray
- •Summary
- •Understanding Network Rendering
- •Network Requirements
- •Setting up a Network Rendering System
- •Starting the Network Rendering System
- •Configuring the Network Manager and Servers
- •Logging Errors
- •Using the Monitor
- •Setting up Batch Rendering
- •Summary
- •Compositing with Photoshop
- •Video Editing with Premiere
- •Video Compositing with After Effects
- •Introducing Combustion
- •Using Other Compositing Solutions
- •Summary
- •Completing Post-Production with the Video Post Interface
- •Working with Sequences
- •Adding and Editing Events
- •Working with Ranges
- •Working with Lens Effects Filters
- •Summary
- •What Is MAXScript?
- •MAXScript Tools
- •Setting MAXScript Preferences
- •Types of Scripts
- •Writing Your Own MAXScripts
- •Learning the Visual MAXScript Editor Interface
- •Laying Out a Rollout
- •Summary
- •Working with Plug-Ins
- •Locating Plug-Ins
- •Summary
- •Low-Res Modeling
- •Using Channels
- •Using Vertex Colors
- •Rendering to a Texture
- •Summary
- •Max and Architecture
- •Using AEC Objects
- •Using Architectural materials
- •Summary
- •Tutorial: Creating Icy Geometry with BlobMesh
- •Tutorial: Using Caustic Photons to Create a Disco Ball
- •Summary
- •mental ray Rendering System
- •Particle Flow
- •reactor 2.0
- •Schematic View
- •BlobMesh
- •Spline and Patch Features
- •Import and Export
- •Shell Modifier
- •Vertex Paint and Channel Info
- •Architectural Primitives and Materials
- •Minor Improvements
- •Choosing an Operating System
- •Hardware Requirements
- •Installing 3ds max 6
- •Authorizing the Software
- •Setting the Display Driver
- •Updating Max
- •Moving Max to Another Computer
- •Using Keyboard Shortcuts
- •Using the Hotkey Map
- •Main Interface Shortcuts
- •Dialog Box Shortcuts
- •Miscellaneous Shortcuts
- •System Requirements
- •Using the CDs with Windows
- •What’s on the CDs
- •Troubleshooting
- •Index

990 Part X Rendering
Motion Blur
The Default Scanline Renderer rollout also offers two different types of motion blur: Object Motion Blur and Image Motion Blur. You can enable either of these using the Apply options.
Object Motion Blur is set in the Properties dialog box for each object. The renderer completes this blur by rendering the object over several frames. The movement of the camera doesn’t affect this type of blur. The Duration value determines how long the object is blurred between frames. The Samples value specifies how many Duration units are sampled. The Duration Subdivision value is the number of copies rendered within each Duration segment. All these values can have a maximum setting of 16. The smoothest blurs occur when the Duration and Samples values are equal.
Image Motion Blur is also set in the Properties dialog box for each object. This type of blur is affected by the movement of the camera and is applied after the image has been rendered. You achieve this blur by smearing the image in proportion to the movement of the various objects. The Duration value determines the time length of the blur between frames. The Apply to Environment Map option lets you apply the blurring effect to the background as well as the objects. The Work with Transparency option blurs transparent objects without affecting their transparent regions. Using this option adds time to the rendering process.
Cross-
Reference
You can add two additional blur effects to a scene: the Blur Render Effect, found in the Rendering Effects dialog box (covered in Chapter 43, “Using Render Elements and Render Effects”) and the Scene Motion Blur effect, available through the Video Post dialog box (covered in Chapter 47, “Using the Video Post Interface”).
Other options
The Auto Reflect/Refract Maps section lets you specify a Rendering Iterations value for reflection maps within the scene. The higher the value, the more objects are included in the reflection computations, and the longer the rendering time.
Color Range Limiting offers two methods for correcting overbrightness caused by applying filters. The Clamp method lowers any value above a relative ceiling of 1 to 1 and raises any values below 0 to 0. The Scale method scales all colors between the maximum and minimum values.
The Conserve Memory option optimizes the rendering process to use the least amount of memory possible. If you plan on using Max (or some other program) while it is rendering, you should enable this option.
Rendering Preferences
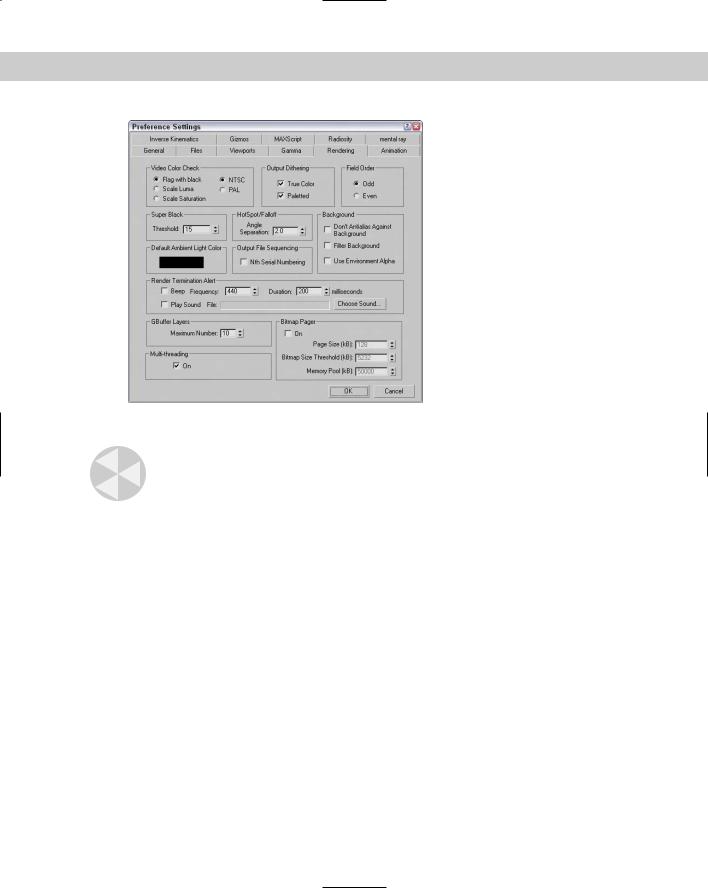
In addition to the settings available in the Render Scene dialog box, the Rendering panel in the Preference Settings dialog box includes many global rendering settings. The Preference Settings dialog box can be opened using the Customize Preferences menu command.
Figure 41-9 shows this panel.
The Video Color Check options specify how unsafe video colors are flagged or corrected. The Flag with black option shows the unsafe colors, and the Scale Luma and Scale Saturation options correct them by scaling either the luminance or the saturation until they are in range. You can also choose to check NTSC or PAL formats.

Chapter 41 Rendering Basics 991
Figure 41-9: The Rendering panel in the Preference
Settings dialog box lets you set global rendering settings.
Caution |
Be aware that the Scale options can discolor some objects. |
Output Dithering options can enable or disable dithering of colors. The options include True Color for 24-bit images and Paletted for 8-bit images.
The Field Order options let you select which field is rendered first. Some video devices use even first, and others use odd first. Check your specific device to see which setting is correct.
The Super Black Threshold setting is the level below which black is displayed as Super Black.
The Angle Separation value sets the angle between the Hotspot and Falloff cones of a light. If the Hotspot angle equals the Falloff angle, then alias artifacts will appear.
The Don’t Anti-alias Against Background option should be enabled if you plan on using a rendered object as part of a composite image. The Filter Background option includes the background image in the anti-aliasing calculations. The Use Environment Alpha option combines the background image’s alpha channel with the scene object’s alpha channel.
The Default Ambient Light Color is the darkest color for rendered shadows in the scene. Selecting a color other than black brightens the shadows.
You can set the Output File Sequencing option to list the frames in order if the Nth Serial Numbering option is enabled. If the Nth Serial Numbering option is disabled, the sequence uses the actual frame numbers.

992 Part X Rendering
In the Render Termination Alert section, you can elect to have a beep triggered when a rendering job is finished. The Frequency value changes the pitch of the sound, and the Duration value changes its length. You can also choose to load and play a different sound. The Choose Sound button opens a File dialog box where you can select the sound file to play.
The GBuffer Layers value is the maximum number of graphics buffers to allow during rendering. This value can range between 1 and 1000. The value you can use depends on the memory of your system.
The Multi-threading option enables the renderer to complete different rendering tasks as separate threads. Threads use the available processor cycles more efficiently by subdividing tasks. This option should be enabled, especially if you’re rendering on a multiprocessor computer.
The Bitmap Pager option breaks rendered images into pages with a specified size. This keeps images from becoming so large that they become difficult to work with. Once enabled, you can specify the Page Size, the Bitmap Size Threshold, and the size in KB of the Memory Pool.
Creating VUE Files
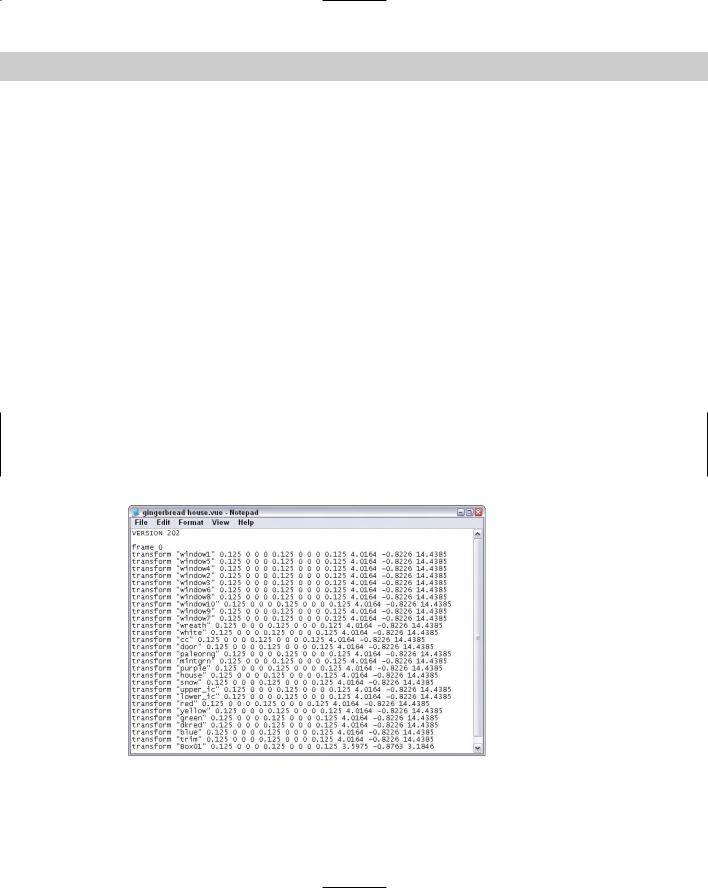
One of the default Current Renderer options available in the Assign Renderer rollout of the Common panel is the VUE File Renderer. This renderer creates VUE files. A VUE file is a textbased script for rendering a scene that you can edit using a text editor.
The contents of a VUE file include keywords followed by a list of parameters. These keywords include objects such as “light” and “camera” and commands such as “transform” and “top.” Parameters can include the part name and values separated by commas. Figure 41-10 shows a sample VUE file.
Figure 41-10: A sample VUE file viewed in a text editor

Chapter 41 Rendering Basics 993
When the VUE File Renderer is selected, the rollout in the Render Scene dialog box includes only a single Files button for giving the VUE file a name.
Caution |
Be sure to use the Files button in the VUE File Renderer rollout and not the Files button in |
|
the Common Parameters rollout. When a VUE file is rendered, the Rendered Frame Window |
|
opens, but no image is created. |
Using the Rendered Frame Window
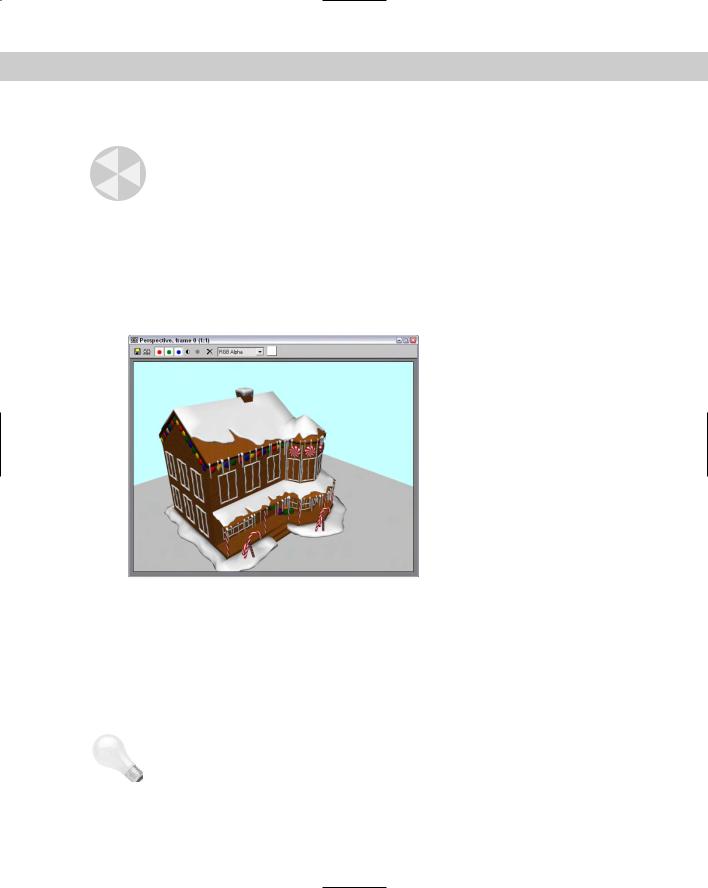
The Rendered Frame Window is a temporary window that holds any rendered images. Often when developing a scene, you want to test-render an image to view the shadows or transparency not visible in the viewports. The Rendered Frame Window, shown in Figure 41-11, enables you to view these test renderings without saving any data to the network or hard drive.
Figure 41-11: The Rendered Frame Window displays rendered images without saving them to a file.
This buffer opens when you select the Rendered Frame Window option and click the Render button in the Render Scene dialog box. You can also view images from a local hard drive or a network drive in the Rendered Frame Window using the File View Image File menu command.
To zoom in on the buffer, hold down the Ctrl key and click the buffer. Right-click while holding down the Ctrl key to zoom out. The Shift key enables you to pan the buffer image. You can also use the mouse wheel (if you have a scrolling mouse) to zoom and pan within the frame buffer.
Tip |
You can zoom and pan the image while it is rendering. |
