

58 |
Part I Learning the Max Interface |
Cross- |
Appendix C, “Max Keyboard Shortcuts,” lists all the default keyboard shortcuts. |
Reference |
|
Using strokes
Strokes are similar to the keyboard shortcuts, except they allow you to draw a pre-defined shape using the middle mouse button as a shortcut to a command. For example, you can set up a stroke to undo the last action using a shape that looks like the letter U. Then you can undo the last action by clicking the middle button and dragging in the shape of the letter U. Strokes are convenient because they use the mouse, and you don’t need to reach for the keyboard.
Cross- |
Setting up and using strokes is covered in more detail in Chapter 4, “Customizing the Max |
Reference |
Interface and Setting Preferences.” |
|
Understanding modeless and persistent dialog boxes
Many dialog boxes in Max are modeless, which means that the dialog box doesn’t need to be closed before you can work with objects in the background viewports. The Material Editor is an example of a modeless dialog box. With the Material Editor open, you can create, select, and transform objects in the background. Other modeless dialog boxes include the Material/ Map Browser, the Render Scene dialog box, the Video Post dialog box, the Transform Type-In dialog box, the Display and Selection Floaters, and the various graph editors.
Another feature of many, but not all, dialog boxes is persistence, which means that values added to a dialog box remain set when the dialog box is reopened. This feature applies only within a given Max session. Choosing the File Reset command button or exiting and restarting Max resets all the dialog boxes.
Getting Help
If you get stuck, Max won’t leave you stranded. You can turn to several places in Max to get help. The Help menu is a valuable resource that provides access to references and tutorials.
Browser-based reference guides
The New Features Guide, User Reference, MAXScript Reference, and Tutorials are Web browser-based help interfaces. An organized list of topics is available in the left navigation pane, as shown in Figure 1-17, and the right includes a pane where the details on the selected topic are displayed. Across the top are five toolbar buttons used to control the interface. The Hide button hides the left navigation pane, the Back and Forward buttons move between visited pages, the Print button prints the information in the right pane, and the Options button displays a pop-up menu of options.
New |
The New Features Guide is new to 3ds max 6. |
Feature |
|

Chapter 1 Finding Your Way — Exploring the Max Interface |
59 |
Above the left navigation pane are five tabs that open separate panels when selected. The Contents panel displays a list of topics; the Index panel lists all topics alphabetically; the Search panel includes a text field where you can search for specific keywords; the Favorites panel keeps a list of bookmarks to topics you add to the list; and the Query panel lets you type in a question and query for answers.
Throughout the textual descriptions, keywords that are linked to other related topics are highlighted in blue and underlined.
Online help
The Web offers many sites that can also help, and Max links to the Online Support, Updates, Resources, and Partners pages on the Discreet site from the Help 3ds max on the Web menu. Selecting either of these menu commands automatically opens a Web browser and loads the Discreet Web pages.
Figure 1-17: The User Reference includes panels for viewing the index of commands and searching the reference.
60 |
Part I Learning the Max Interface |
Summary
You should now be familiar with the interface elements for Max. Understanding the interface is one of the keys to success in using 3ds max. Max includes a variety of different interface elements. Among the menus, toolbars, and keyboard shortcuts, several ways to perform the same command exist. Discover the method that works best for you.
This chapter covered the following topics:
The interface elements
Viewing and using the pull-down menus
Working with toolbars
Using the Command Panel and learning its six panels
Learning the lower interface controls
Interacting with the Max interface
Getting additional help
In this chapter, we’ve skirted about the viewports covering all the other interface elements, but in the next chapter, we’re going to hit the viewports head-on.
|
|
|
Seeing It All — Working with the Viewports
Although Max consists of many different interface elements, such as panels, dialog boxes, and menus, the viewports are the main areas that will catch your attention. The four main viewports make up
the bulk of the interface and are the one place where scene objects are visible. You can think of the viewports as looking at the television screen instead of the remote. Learning to control and use the viewports can make a huge difference in your comfort level with Max.
The viewports are powerful and have numerous settings that you can use to provide thousands of different ways to look at your scene, and beginners can feel frustrated at not being able to control what they see. This chapter includes all the details you need to make the viewports reveal their secrets.
Understanding 3D Space
It seems silly to be talking about 3D space because we live and move in 3D space. If we stop and think about it, 3D space is natural to us. For example, consider a filing cabinet with four drawers. Within each drawer, you can stuff papers in the front, back, or sides, as well as in the drawers above or below. These positions represent three unique directions.
When I ask my wife where our passports are (don’t ask why I’m looking for my passport) and she says, “They’re in the top drawer toward the back on the left side,” I know exactly where they are and can find them immediately (unless, of course, my kids have been in the cabinet). The concept of three dimensions is comfortable and familiar.
Now consider the computer screen, which is inherently 2D. If I have many windows open, including a scanned image of my passport, and I ask my wife where the scanned image is, she would reply, “It’s somewhere behind the large window where you’re writing that book.” And I would look and search before locating it. In 2D space, I understand top and bottom and left and right and have a little notion of above and below.
C 2H A P T E R
In This Chapter
Understanding 3D space
Using the Viewport Navigation Control buttons
Controlling the viewport settings with the Viewport Configuration dialog box
Loading a viewport background image
62 |
Part I Learning the Max Interface |
This conundrum is what 3D computer artists face — how do you represent 3D objects on a 2D device? The answer that 3ds max provides is to present several views, called viewports, of the scene. A viewport is a small window that displays the scene from one perspective. These viewports are the windows into Max’s 3D world. They are probably called viewports instead of windows because the word Windows has a different meaning in the computer world, and it is copyrighted. Each viewport has numerous settings and viewing options.
Axonometric versus Perspective
When it comes to views in the 3D world, two different types exist — Axonometric and Perspective. Axonometric views are common in the CAD world where the viewer is set at an infinite distance from the object such that all parallel lines remain parallel. A Perspective view simulates how our eyes actually work and converges all points to a single location off in the distance.
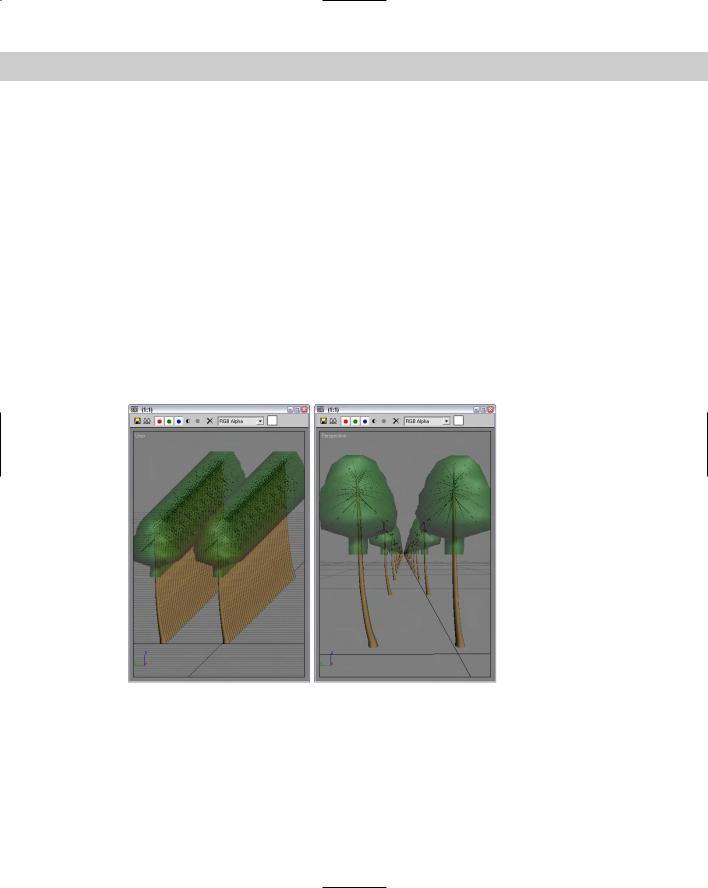
You can see the difference between these two types of views clearly if you look at a long line of objects. For example, if you were to look down a long row of trees lining a road, the trees would eventually merge on the horizon. In Axonometric views, lines stay parallel as they recede off into the distance. Figure 2-1 shows this example with the Axonometric view on the left and the Perspective view on the right.
Figure 2-1: Axonometric and Perspective views
Orthographic and Isometric views
If you dig a little deeper into Axonometric views, you find two different types — Orthographic and Isometric. Orthographic views are displayed from the perspective of looking straight down an axis at an object. This reveals a view in only one plane. Because orthographic
Chapter 2 Seeing It All — Working with the Viewports |
63 |
viewports are constrained to one plane, they show the actual height and width of the object. Isometric views are not constrained to a single axis and can view the scene from any location, but all dimensions are still maintained.
Learning Viewports in Max
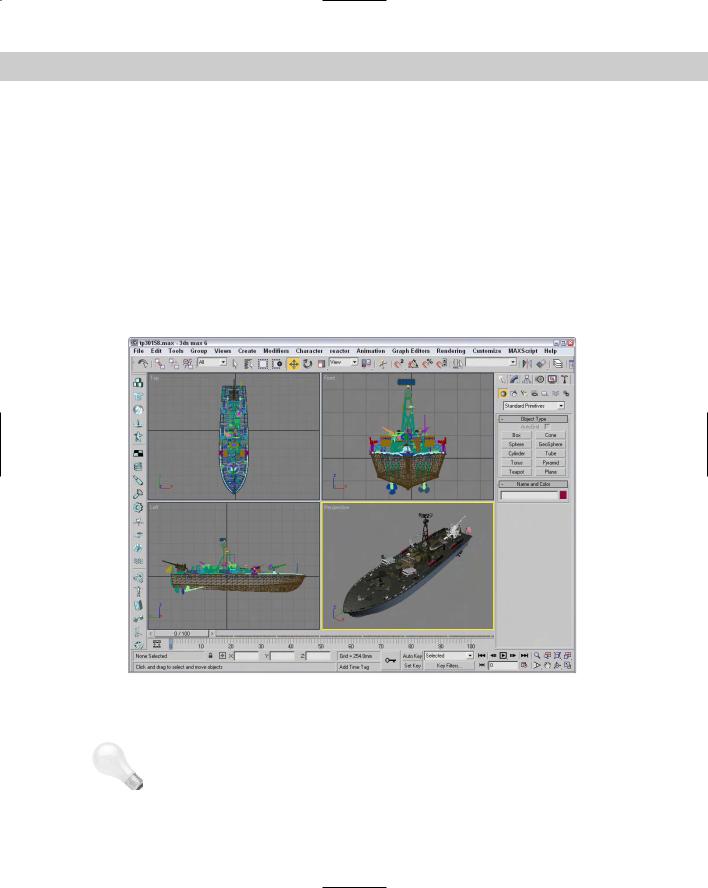
Available orthographic viewports in Max include Front, Back, Top, Bottom, Left, and Right. Max starts up with the Top, Front, and Left orthographic viewports visible. The top-left corner of the viewport displays the viewport name. The fourth default viewport is a Perspective view.
Figure 2-2 shows the viewports with Viewpoint model of a PT-328 U.S. Torpedo boat. You can see the model from a different direction in each viewport. If you want to measure the boat’s length from aft to stern, you could get an accurate measurement using the Top or Left viewports, whereas you can use the Front and Left viewports to measure its precise height. So, using these different viewports, you can accurately work with all object dimensions.
|
Figure 2-2: The Max interface includes four viewports, each with a different view. |
|
Isometric views in Max are called User viewports. You can create a User viewport by rotating |
|
any of the Orthographic views. |
Tip |
Max includes several keyboard shortcuts for quickly changing the view in the active viewport |
|
including T (Top View), B (Bottom View), F (Front View), L (Left View), C (Camera View), |
|
$ (Spotlight View), P (Perspective View), and U (Isometric User View). Pressing the V key |
|
opens a quadmenu that lets you select a new view. |