

- •Preface
- •About This Book
- •Acknowledgments
- •Contents at a Glance
- •Contents
- •Relaxing at the Beach
- •Dressing the Scene
- •Animating Motion
- •Rendering the Final Animation
- •Summary
- •The Interface Elements
- •Using the Menus
- •Using the Toolbars
- •Using the Viewports
- •Using the Command Panel
- •Using the Lower Interface Bar Controls
- •Interacting with the Interface
- •Getting Help
- •Summary
- •Understanding 3D Space
- •Using the Viewport Navigation Controls
- •Configuring the Viewports
- •Working with Viewport Backgrounds
- •Summary
- •Working with Max Scene Files
- •Setting File Preferences
- •Importing and Exporting
- •Referencing External Objects
- •Using the File Utilities
- •Accessing File Information
- •Summary
- •Customizing Modify and Utility Panel Buttons
- •Working with Custom Interfaces
- •Configuring Paths
- •Selecting System Units
- •Setting Preferences
- •Summary
- •Creating Primitive Objects
- •Exploring the Primitive Object Types
- •Summary
- •Selecting Objects
- •Setting Object Properties
- •Hiding and Freezing Objects
- •Using Layers
- •Summary
- •Cloning Objects
- •Understanding Cloning Options
- •Mirroring Objects
- •Cloning over Time
- •Spacing Cloned Objects
- •Creating Arrays of Objects
- •Summary
- •Working with Groups
- •Building Assemblies
- •Building Links between Objects
- •Displaying Links and Hierarchies
- •Working with Linked Objects
- •Summary
- •Using the Schematic View Window
- •Working with Hierarchies
- •Setting Schematic View Preferences
- •Using List Views
- •Summary
- •Working with the Transformation Tools
- •Using Pivot Points
- •Using the Align Commands
- •Using Grids
- •Using Snap Options
- •Summary
- •Exploring the Modifier Stack
- •Exploring Modifier Types
- •Summary
- •Exploring the Modeling Types
- •Working with Subobjects
- •Modeling Helpers
- •Summary
- •Drawing in 2D
- •Editing Splines
- •Using Spline Modifiers
- •Summary
- •Creating Editable Mesh and Poly Objects
- •Editing Mesh Objects
- •Editing Poly Objects
- •Using Mesh Editing Modifiers
- •Summary
- •Introducing Patch Grids
- •Editing Patches
- •Using Modifiers on Patch Objects
- •Summary
- •Creating NURBS Curves and Surfaces
- •Editing NURBS
- •Working with NURBS
- •Summary
- •Morphing Objects
- •Creating Conform Objects
- •Creating a ShapeMerge Object
- •Creating a Terrain Object
- •Using the Mesher Object
- •Working with BlobMesh Objects
- •Creating a Scatter Object
- •Creating Connect Objects
- •Modeling with Boolean Objects
- •Creating a Loft Object
- •Summary
- •Understanding the Various Particle Systems
- •Creating a Particle System
- •Using the Spray and Snow Particle Systems
- •Using the Super Spray Particle System
- •Using the Blizzard Particle System
- •Using the PArray Particle System
- •Using the PCloud Particle System
- •Using Particle System Maps
- •Controlling Particles with Particle Flow
- •Summary
- •Understanding Material Properties
- •Working with the Material Editor
- •Using the Material/Map Browser
- •Using the Material/Map Navigator
- •Summary
- •Using the Standard Material
- •Using Shading Types
- •Accessing Other Parameters
- •Using External Tools
- •Summary
- •Using Compound Materials
- •Using Raytrace Materials
- •Using the Matte/Shadow Material
- •Using the DirectX 9 Shader
- •Applying Multiple Materials
- •Material Modifiers
- •Summary
- •Understanding Maps
- •Understanding Material Map Types
- •Using the Maps Rollout
- •Using the Map Path Utility
- •Using Map Instances
- •Summary
- •Mapping Modifiers
- •Using the Unwrap UVW modifier
- •Summary
- •Working with Cameras
- •Setting Camera Parameters
- •Summary
- •Using the Camera Tracker Utility
- •Summary
- •Using Multi-Pass Cameras
- •Creating Multi-Pass Camera Effects
- •Summary
- •Understanding the Basics of Lighting
- •Getting to Know the Light Types
- •Creating and Positioning Light Objects
- •Viewing a Scene from a Light
- •Altering Light Parameters
- •Working with Photometric Lights
- •Using the Sunlight and Daylight Systems
- •Using Volume Lights
- •Summary
- •Selecting Advanced Lighting
- •Using Local Advanced Lighting Settings
- •Tutorial: Excluding objects from light tracing
- •Summary
- •Understanding Radiosity
- •Using Local and Global Advanced Lighting Settings
- •Working with Advanced Lighting Materials
- •Using Lighting Analysis
- •Summary
- •Using the Time Controls
- •Working with Keys
- •Using the Track Bar
- •Viewing and Editing Key Values
- •Using the Motion Panel
- •Using Ghosting
- •Animating Objects
- •Working with Previews
- •Wiring Parameters
- •Animation Modifiers
- •Summary
- •Understanding Controller Types
- •Assigning Controllers
- •Setting Default Controllers
- •Examining the Various Controllers
- •Summary
- •Working with Expressions in Spinners
- •Understanding the Expression Controller Interface
- •Understanding Expression Elements
- •Using Expression Controllers
- •Summary
- •Learning the Track View Interface
- •Working with Keys
- •Editing Time
- •Editing Curves
- •Filtering Tracks
- •Working with Controllers
- •Synchronizing to a Sound Track
- •Summary
- •Understanding Your Character
- •Building Bodies
- •Summary
- •Building a Bones System
- •Using the Bone Tools
- •Using the Skin Modifier
- •Summary
- •Creating Characters
- •Working with Characters
- •Using Character Animation Techniques
- •Summary
- •Forward versus Inverse Kinematics
- •Creating an Inverse Kinematics System
- •Using the Various Inverse Kinematics Methods
- •Summary
- •Creating and Binding Space Warps
- •Understanding Space Warp Types
- •Combining Particle Systems with Space Warps
- •Summary
- •Understanding Dynamics
- •Using Dynamic Objects
- •Defining Dynamic Material Properties
- •Using Dynamic Space Warps
- •Using the Dynamics Utility
- •Using the Flex Modifier
- •Summary
- •Using reactor
- •Using reactor Collections
- •Creating reactor Objects
- •Calculating and Previewing a Simulation
- •Constraining Objects
- •reactor Troubleshooting
- •Summary
- •Understanding the Max Renderers
- •Previewing with ActiveShade
- •Render Parameters
- •Rendering Preferences
- •Creating VUE Files
- •Using the Rendered Frame Window
- •Using the RAM Player
- •Reviewing the Render Types
- •Using Command-Line Rendering
- •Creating Panoramic Images
- •Getting Printer Help
- •Creating an Environment
- •Summary
- •Creating Atmospheric Effects
- •Using the Fire Effect
- •Using the Fog Effect
- •Summary
- •Using Render Elements
- •Adding Render Effects
- •Creating Lens Effects
- •Using Other Render Effects
- •Summary
- •Using Raytrace Materials
- •Using a Raytrace Map
- •Enabling mental ray
- •Summary
- •Understanding Network Rendering
- •Network Requirements
- •Setting up a Network Rendering System
- •Starting the Network Rendering System
- •Configuring the Network Manager and Servers
- •Logging Errors
- •Using the Monitor
- •Setting up Batch Rendering
- •Summary
- •Compositing with Photoshop
- •Video Editing with Premiere
- •Video Compositing with After Effects
- •Introducing Combustion
- •Using Other Compositing Solutions
- •Summary
- •Completing Post-Production with the Video Post Interface
- •Working with Sequences
- •Adding and Editing Events
- •Working with Ranges
- •Working with Lens Effects Filters
- •Summary
- •What Is MAXScript?
- •MAXScript Tools
- •Setting MAXScript Preferences
- •Types of Scripts
- •Writing Your Own MAXScripts
- •Learning the Visual MAXScript Editor Interface
- •Laying Out a Rollout
- •Summary
- •Working with Plug-Ins
- •Locating Plug-Ins
- •Summary
- •Low-Res Modeling
- •Using Channels
- •Using Vertex Colors
- •Rendering to a Texture
- •Summary
- •Max and Architecture
- •Using AEC Objects
- •Using Architectural materials
- •Summary
- •Tutorial: Creating Icy Geometry with BlobMesh
- •Tutorial: Using Caustic Photons to Create a Disco Ball
- •Summary
- •mental ray Rendering System
- •Particle Flow
- •reactor 2.0
- •Schematic View
- •BlobMesh
- •Spline and Patch Features
- •Import and Export
- •Shell Modifier
- •Vertex Paint and Channel Info
- •Architectural Primitives and Materials
- •Minor Improvements
- •Choosing an Operating System
- •Hardware Requirements
- •Installing 3ds max 6
- •Authorizing the Software
- •Setting the Display Driver
- •Updating Max
- •Moving Max to Another Computer
- •Using Keyboard Shortcuts
- •Using the Hotkey Map
- •Main Interface Shortcuts
- •Dialog Box Shortcuts
- •Miscellaneous Shortcuts
- •System Requirements
- •Using the CDs with Windows
- •What’s on the CDs
- •Troubleshooting
- •Index

Chapter 50 Max and Games 1173
Summary
If you’re working with games, then you’ll want to use these features to help keep your models small and fleet. In this chapter, you
Created low-resolution models with the MultiRes modifier.
Discovered what channels the models have
Used Vertex Colors to paint models
Learned how to bake textures
The next chapter hands control over to a bunch of engineers as we look at using Max for visualization and architecture.
|
|
|


Max and
Visualization
Max enables you to create things that are visual, so it is no surprise that another major area where Max is used is in visual-
ization. Visualization is the concept of creating new and unique ways of looking at things. It is often used in the different branches of science to seeing things that aren’t visible with the naked eye, like molecular structures or far-distant galaxies.
Another place visualization is used is in the field of architecture. Max is used quite often to build and present a new building mapped against the background of the existing site. This type of visualization enables teams of engineers, foremen, and construction workers to see the building before breaking any ground.
Max and Architecture
If you march up the corporate ladder at Discreet, you’ll eventually find your way to a company called Autodesk, which makes a product known as AutoCAD. This product is used by a vast number of engineers and architects to design the layouts for building physical structures.
Along with AutoCAD is VIZ, another very popular package that would be considered a close sibling to Max. AutoCAD VIZ is used to create visualizations of AutoCAD data and, like Max, deals with modeling, rendering, and shading 3D objects. In fact, many of the new features found in Max were originally developed for VIZ.
Autodesk VIZ support
Discreet has insisted that Max play nice with its sibling, and that includes supporting its various formats. The VIZ Render file format (with the .DRF extension) can be loaded seamlessly into Max. In addition, the DWG and DXF file formats use the same import and export features as VIZ.
HDRI File support
Another file format that is common in the architectural world are HDRI files. HDRI stands for High Dynamic Range Image. These images have a higher contrast than typical images, which makes the white sections have a brighter luminance. This makes them ideal to use as a light source when applied as an environment or reflection map.
51C H A P T E R
In This Chapter
Using Max for architecture visualization
Using the AEC Objects
Using the Architecture materials

1176 Part XIII Max in Action
New |
Support for importing and exporting HDRI files in new in 3ds max 6. |
Feature |
|
Max can save rendered images to the HDRI file format. These files have the .hdr HDR file extension. When HDRI files are loaded, a dialog box appears, shown in Figure 51-1, where you can remap a file’s dynamic range. The minimum Black and the maximum White values are marked with a red line. As you drag the Log and Linear values, the areas that are clamped are shown in Magenta or Cyan in the thumbnail.
Figure 51-1: You can remap the dynamic range of HDRI when they are loaded.
Using AEC Objects
Another huge feature that migrated over from VIZ are all the various architectural objects commonly found in buildings. These objects can all be found in the Create AEC Objects menu. The AEC Objects are broken into several categories, including Foliage, Railing, Wall, Doors, Stairs, and Windows.
New |
All the AEC Objects are new in 3ds max 6. |
Feature |
|
Foliage
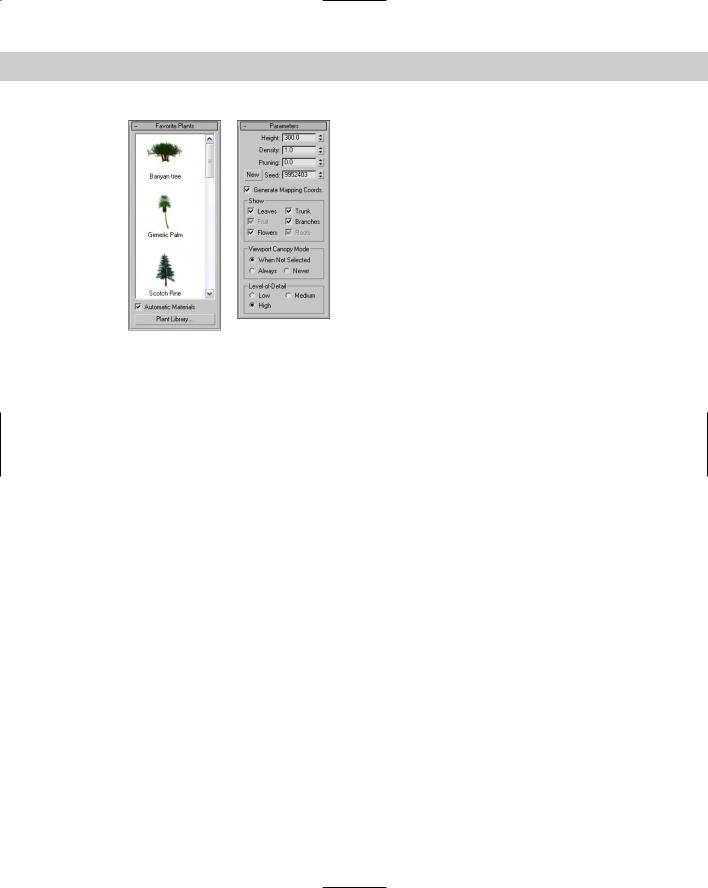
The Foliage category includes several different plants all listed in the Favorite Plants rollout, shown in Figure 51-2. The available plants include a Banyan tree, Generic Palm, Scotch Pine, Yucca, Blue Spruce, American Elm, Weeping Willow, Euphorbia, Society Garlic, Big Yucca, Japanese Flowering Cherry, and Generic Oak.
Chapter 51 Max and Visualization 1177
Figure 51-2: The Favorite Plants rollout shows thumbnails of the various plants.
At the bottom of the Favorite Plants rollout is a button called Plant Library that opens a dialog box where you can see the details of all the plants, including the total number of faces. The winner is the Banyan tree with 100,000 faces. Using the Parameters rollout, you can set the Height, Density, and Pruning values for each of these plants. Also, depending on the tree type, you can select to show the Leaves, Trunk, Fruit, Branches, Flowers, and Roots, and you can set the Level of Detail to Low, Medium, or High.
Railings
The Railings option lets you pick a path that the railing will follow. You can then select the number of Segments to use to create the railing. For the Top Rail, you can select to use a Round or Square Profile and set its Depth, Width, and Height. You can also set parameters for the Lower Rails, Posts (which appear at either end), and Fencing (which are the vertical slats that support the railing).
The Lower Rail, Posts, and Fencing sections feature an icon that can be used to set the Spacing of these elements. The Spacing dialog box that opens looks like the same dialog box that is used for the Spacing Tool, where you can specify a Count, Spacing value, and Offsets.
Walls
Walls are simple, with parameters for Width and Height. You can also set the Justification to Left, Center, or Right. The nice part about creating wall objects is that you can connect several walls together just like the Line tool. For example, creating a single wall in the Top viewport extends a connected wall from the last point where you clicked that is connected to the previous wall. Right-click to exit wall creation mode.
Doors
The Doors category includes three types of doors: Pivot, Sliding, and BiFold. Each of these types has its own parameters that you can set, but for each of these door types, you can set its Height, Width, and Depth dimensions and the amount the door is Open.

1178 Part XIII Max in Action
Be aware when creating doors that Doors have two different Creation Methods — Width/ Depth/Height and Width/Height/Depth. The first is the default and it requires that the first click sets the Width, the second click sets the Depth, and the third click sets the Height. The Parameters rollout includes options to flip the direction in which the door opens. This is very handy if you position your door incorrectly.
Stairs
The Stairs category includes four types of stairs: LType, Spiral, Straight, and UType. For each type, you can select Open (single slats with no vertical backing behind the stairs), Closed (each stair includes a horizontal and vertical portion), or Box (the entire staircase is one solid object). For each type, you also can control the parameters for the Carriage (the center support that holds the stairs together), Stringers (the base boards that run along the sides of the stairs), and Railings.
The Rise section determines the overall height of the staircase. It can be set by an Overall height value, a Riser Height value (the height of each individual stair) or by a Riser Count (the total number of stairs). You also can specify the Thickness and Depth of the stairs.
Windows
The Windows category includes six types of windows: Awning, Casement, Fixed, Pivoted, Projected, and Sliding. As with doors, you can choose from two different Creation Methods. The default Creation Method creates windows with Width, then Depth, and then Height. Parameters include the Window and Frame dimensions, the Thickness of the Glazing, and Rails and Panels. You can also open all windows, except for the Fixed Window type.
Tutorial: Add stairs to a clock tower building
I’ll leave the architectural design to the architects, but for this example, we create a simple staircase and add it to the front of a clock tower building.
To add stairs to a building, follow these steps.
1.Open the Clock tower building.max file from the Chap 51 directory on the CD-ROM. This file includes a building with a clock tower extending from its center, but the main entrance is empty.
2.Select Create AEC Objects Straight Stair. Click and drag in the Top viewport from the upper corner where the stairs meet the entryway to the bottom of the stairs. Then drag downward to set the stairs’ width and click at the opposite side of the entryway. The drag downward again and watch the Left viewport to set the stairs’ height and click. Then right-click in the Top viewport to exit Stairs creation mode.
3.With the stairs selected, click the Select and Move (W) button in the main toolbar and drag the stairs in the Front viewport until they align with the front of one side of the entryway.
4.Open the Modify panel and select the Box option in the Parameters rollout. Then adjust the Overall Rise value so it matches the entryway.
5.Select Tools Mirror and select the Copy option with an Offset of around –140 about the X-Axis. Click OK.
Figure 51-3 shows the clock tower building with stairs.