

Quick Start:
Animating a
Monster Truck
at the Beach
When you first got your hands on 3ds max, you were probably focused on one goal — to create cool 3D images and anima-
tions. I know many of you bought Max to make money, claim a tax write-off, earn a way to Hollywood, or impress your girlfriend or boyfriend, but I’ll just ignore those reasons for now. The goal is to create something cool.
If you’ve perused this book’s Table of Contents or thumbed through its many pages, you’ve seen sections on modeling, NURBS, dynamics, and other topics. But if you’re like me, you don’t want to wade through tons of material before you have something to show off to Mom. (Actually, if you’re like me, then you’ve opened straight to the special effects section, in which case you won’t be reading this.)
The purpose of this Quick Start is to give you a taste of what Max can do. This soaring view of the software from 20,000 feet is intended to show you the big picture before you delve into the details. It exposes you to the most common features and whets your appetite for the more in-depth chapters to follow.
This part of the book is intended for those new to the software. If you’re an experienced user, then your mom is no doubt already impressed with your work, so you can happily advance to whichever chapter appeals to you. (Forgive me for catering to the “newbie,” but we were all beginners once.)
Relaxing at the Beach
No matter where you’re from, warm sunshine appeals to everyone, so this Quick Start (as the chapter titles suggests) takes place at the beach. Now, monster trucks aren’t a regular sight at the beaches that I frequently visit, which brings me to the example concept. The first step in any animation is to have a clear concept in mind and, I hope, a
QSC H A P T E R
In This Chapter
Introducing the
Quick Start project
Creating the background scene
Importing the truck model
Adding scene props
Applying materials
Loading a background image
Animating the truck with keys
Adding lights
Zooming out the camera
Adding special effects
Rendering the final animation
4 |
Part I Learning the Max Interface |
fleshed-out storyboard. (I’d include a figure of my storyboard for this example, but it wouldn’t impress you, especially as the first figure in the book.)
The concept is a classic misdirection piece. This type of story is designed to get the viewer to position his line of thinking in one direction, and then to reveal more information that realigns his thinking. So, we start with a monster truck that is digging and grinding through a rough terrain as if it were part of a monster truck rally. The camera then dollies out of the scene to reveal a child’s sand bucket and shovel on the beach where the monster truck is actually a toy.
Now that we have a good concept for the animation, we need a game plan for walking through the example. To do this, the Quick Start is divided into several consecutive tutorials. Each successive tutorial builds upon the previous one, and the final goal is to complete a rendered animation. The tutorials include the following:
Creating the background terrain and scene
Importing a digital model of the monster truck
Adding props to the scene
Applying materials to all the scene elements
Loading a background image
Animating the truck’s movements
Adding lights to the scene
Adding a camera to the scene and animating its motion
Adding special effects
Rendering the final animation
This Quick Start is divided into separate tutorials, with each tutorial containing a series of easy-to-follow steps. These steps are intended to show you the results of performing certain Max operations, but feel free to deviate from these steps to create your own results. Being creative and exploring the software is the best way to learn.
On the |
After each of the following tutorials, I saved the scene file. You can find these files on the |
CD-ROM |
book’s CD along with the examples in the Quick Start directory. |
|
Tutorial: Creating the background terrain and scene
Our first step is to create the major elements that make up the scene. This gives the scene a perspective that the other objects can reference. The major elements of the beach are a ground plane of sand and another for the water. These can be created easily using Max primitive objects.
To create Plane objects for the sand and the sea, follow these steps:
1.Select Create Standard Primitives Plane, and drag in the Top viewport to create a Plane object. In the Name and Color rollout of the command panel, name this object Sea. Click the color swatch in the Name and Color rollout, select a blue color in the Object Color dialog box, and click OK.

Chapter QS Quick Start: Animating a Monster Truck at the Beach |
5 |
2.Click the Select and Move tool on the main toolbar (or press the W key), hold down the Shift key, and select and drag the Transform Gizmo’s Y axis downward. This clones the “Sea” plane object. Position it directly below its original so that the cloned object’s top edge is aligned with the “Sea” object’s bottom edge. A Clone Options dialog box appears; make sure that the Copy option is selected, type the name Sand for this object, and click OK. Click the object color swatch in the Name and Color rollout of the command panel, select a light brown color in the Object Color dialog box, and click OK.
3.With the “Sand” plane object selected, open the Modify panel and change the Length and Width Segment values to 20. This adds more faces to the “Sand” object. Then set the Scale Render Multiplier value to 4.0.
4.Select Modifiers Parametric Deformers Noise to apply the Noise modifier to the “Sand” object. Change the Z-axis Strength in the Parameters rollout to 10 to add some slight bumps to the “Sand” object.
5.Click the Select and Rotate tool on the main toolbar (or press the E key), and rotate the “Sand” object two or three degrees about its Z axis in the Left viewport.
6.Click the “Sea” object to select it, and change its Scale Render Multiplier value to 4.0.
The Scale Render Multiplier value changes the scale of the object when rendered, giving us a long stretch of sea and sand.
The results of this tutorial created a shoreline that isn’t perfectly straight, and the sea meets the sand along the entire edge. To see the results, select the Perspective viewport and choose Rendering ActiveShade Floater. This renders the active viewport in the ActiveShade Floater window, as shown in Figure QS-1. This tutorial is saved on the CD as Sea and sand.max.
Figure QS-1: The shoreline was created using two simple Plane objects.
6 |
Part I Learning the Max Interface |
Tutorial: Importing the monster truck model
Accurately modeling an object such as the monster truck can take many months of skilled work, which brings me to my first tip of modeling — don’t rebuild it when it’s already been done for you. You can find many repositories of digital models — from Web sites to software dealers, to the CD-ROM in the back of this book. An untold number of models exist, covering almost any possible subject matter you could think of. The difficult part is wading through all the available models to find the exact model you need, and if it doesn’t fit your exact needs, you can always modify an existing model to fit your needs.
Note The monster truck model was created and provided by Viewpoint Datalabs, and the book’s CD-ROM includes a version of this model that you can use.
Follow these steps to learn the easiest method for modeling:
1.Insert the CD-ROM from the back of the book, and then choose File Merge. The Merge File dialog box appears.
2.On the CD-ROM, locate the vp3417.max file in the Quick Start directory and click OK.
The Merge dialog box appears and lets you select which objects to merge with the existing scene. Click the All button, and then click OK.
3.The monster truck appears in the center of the viewports at the grid’s origin. The truck is made up of many different objects, and moving them all together is easier if they are grouped together, so while all the truck objects are still selected, choose Group Group. In the Group dialog box that appears, name the group Monster truck and
click OK.
4.If you look at the truck object in the Left viewport, you can see that its wheels are below the “Sand” object. To reposition the truck, select the Zoom Extents All Selected button in the Viewport Navigation Controls in the lower-right corner of the interface.
This button is found as a flyout under the Zoom Extents All button. Or you can just press the Z key. This zooms in on the selected object in all viewports.
5.Click the Select and Move tool on the main toolbar (or press the W key), and drag the truck upward and to the right in the Left viewport. Press the Z key again to center the truck in its new location. Continue to move the truck to the right in the Left viewport until it is in the center of the “Sand” plane.
6.Click the Select and Rotate (E) button on the main toolbar, and rotate the truck 90 degrees clockwise in the Top viewport.
This orients the truck so that it is parallel to the water.
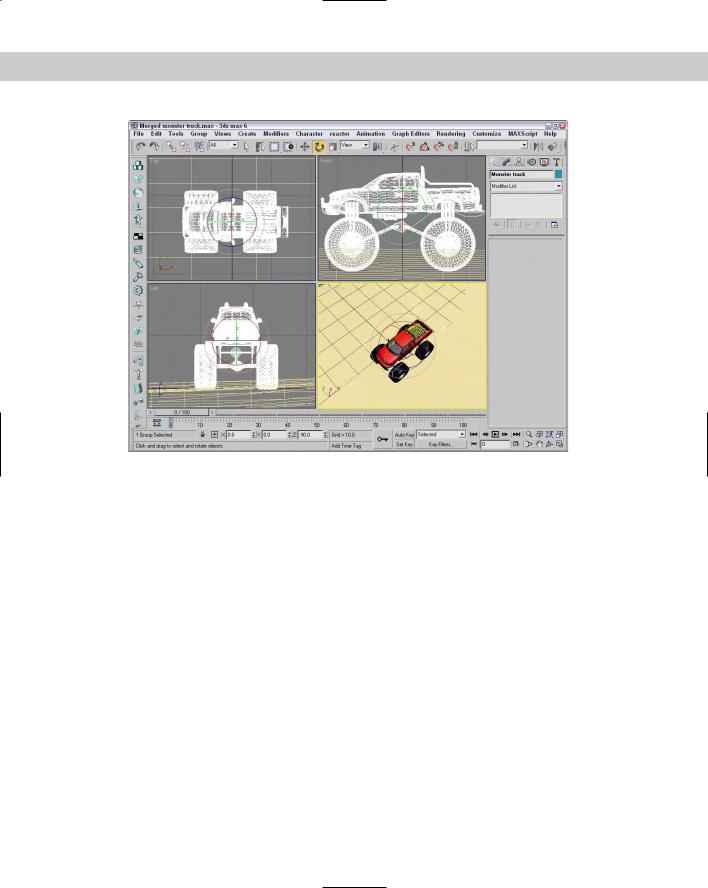
We now have our main actor in the scene and it is correctly positioned. This tutorial is saved as Merged monster truck.max, and Figure QS-2 shows the truck positioned on the seashore.
Chapter QS Quick Start: Animating a Monster Truck at the Beach |
7 |
Figure QS-2: The monster truck is in position and ready to go.
Tutorial: Adding scene props
Now that you have the scene elements and the main actor in place, you’ll want to dress up the scene with other props that add to the scene. For this animation, these items are key and provide the clues that help inform the viewer that the truck is really just a toy. The scale of these objects is important.
As scene props, I decided to go with a child’s sand pail and shovel. These items make it obvious that we’re at the beach and that that truck is only a toy. I’ve already created the shovel, but you get a chance to model the bucket using a spline and the Lathe and Shell modifiers.
To add scene props to the scene, follow these steps:
1.Select File Merge to open the Merge File dialog box. Locate and select the Toy shovel.max file in the Quick Start directory on the CD-ROM. Then select the Toy shovel object, and click OK.
2.With the shovel selected, press the Z key to zoom in on it in all viewports. The shovel is too big, so click the Select and Scale button on the main toolbar (or press the R key), and drag in the Top viewport until the shovel part is about as big as the truck object. Then click the Select and Move button (W), and drag the shovel in the Top viewport down and to the left so the shovel is positioned slightly in front of the truck.
8 |
Part I Learning the Max Interface |
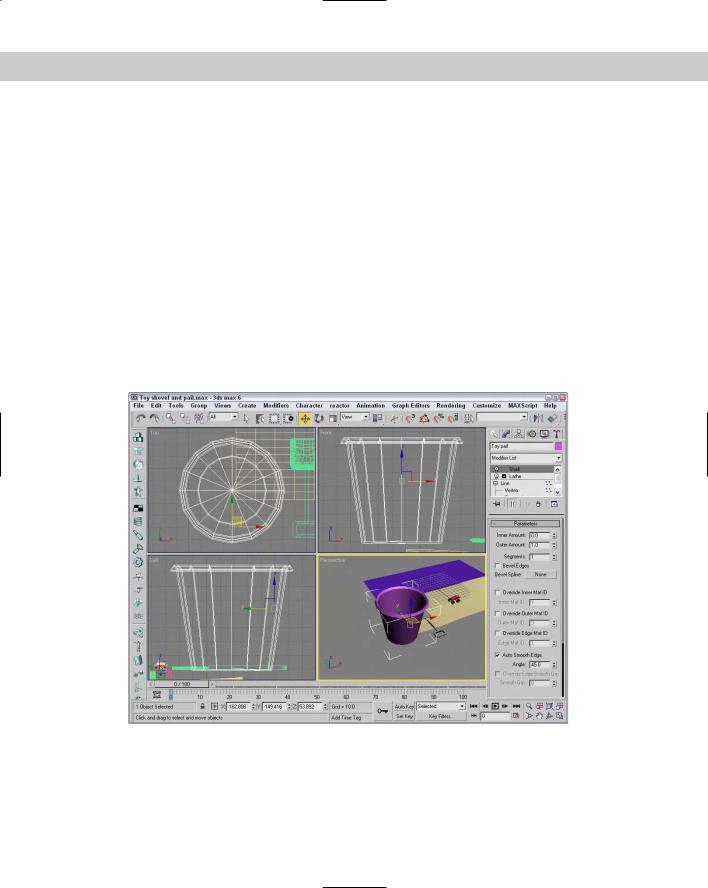
3.Select Create Shapes Line to enter line drawing mode. Then click in the Left viewport to create the profile of a toy pail. I created it with five clicks, including a lip at the top of the pail. Right-click in the Left viewport when you’re finished to exit line drawing mode. Name the Line01 object Toy pail.
4.With the line object selected, choose Modifiers Patch/Spline Editing Lathe to apply the Lathe modifier to the “Toy pail” object. In the Parameters rollout that appears, enter a Degrees value of 360 and click the Align Min button.
5.In the Perspective viewport, the pail appears black instead of the object color, indicating that there is a problem with the object’s normals. You could enable the Flip Normals option to fix the problem, but instead, select Modifiers Parametric Deformers Shell to apply the Shell modifier.
6.Click the Select and Move (W) button on the main toolbar, and drag the pail object in the Top viewport until it is positioned next to the shovel object.
7.Finally, press the Z key to zoom in on the “Toy pail” object.
Figure QS-3 shows the toys positioned on the same beach as the truck. This file is saved as Toy shovel and pail.max.
Figure QS-3: The viewports display the shovel and pail after being imported into Max.