

Chapter 7 Cloning Objects and Creating Object Arrays |
221 |
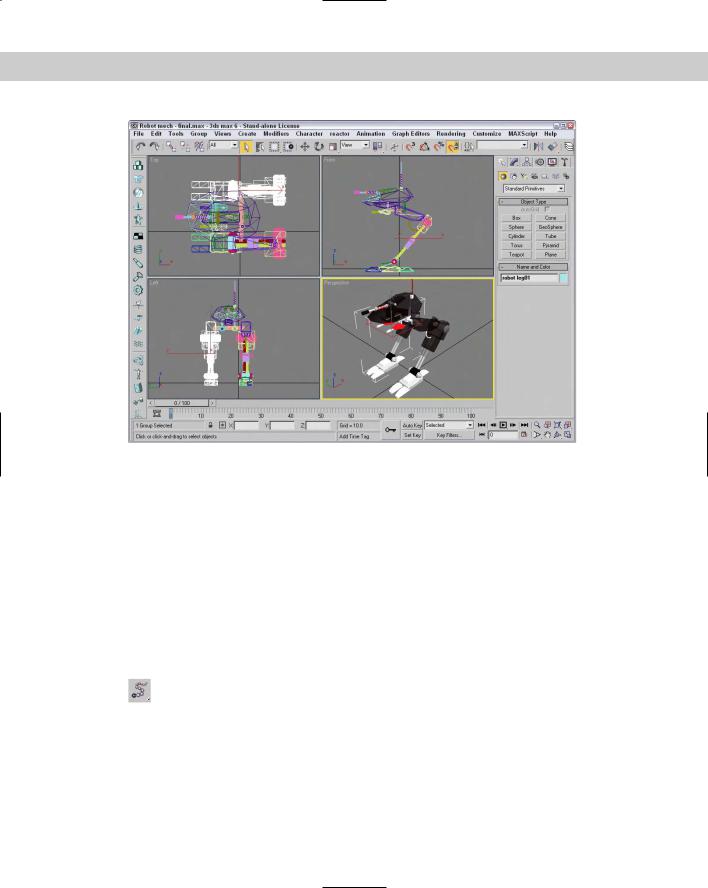
Figure 7-6: A perfectly symmetrical robot, compliments of the Mirror tool
Cloning over Time
Another useful way to create multiple copies of an object is to have them appear at different times in an animation. This cloning over time is accomplished with the Snapshot feature.
Using the Snapshot command
The Snapshot command creates copies, instances, references, or even meshes of a selected object as it follows an animation path. For example, you could create a series of stairs by positioning the bottom stair at frame 1 and the top stair at frame 100, and then choose Tools Snapshot and enter the number of steps to appear between these two in the Snapshot dialog box. Be aware that the Snapshot command works only with objects
that have an animation path defined.
You can open the Snapshot dialog box by choosing Tools Snapshot or by clicking the Snapshot button (under the Array flyout on the Extras toolbar). Snapshot is the second
button in the flyout. In the Snapshot dialog box, shown in Figure 7-7, you can choose to produce a single clone or a range of clones over a given number of frames. Selecting Single creates a single clone at the current frame.

222 Part II Working with Objects
Note |
When entering the number of Copies in the Snapshot dialog box, a copy is placed at both the |
|
beginning and end of the specified range, so if your animation path is a closed path, two |
|
objects are stacked on top of each other. For example, if you have a square animation path |
|
and you want to place a copy at each corner, you need to enter a value of 5. |
Figure 7-7: The Snapshot dialog box lets you clone a
Copy, Instance, Reference, or Mesh.
Tip |
The Snapshot tool can also be used with particle systems. |
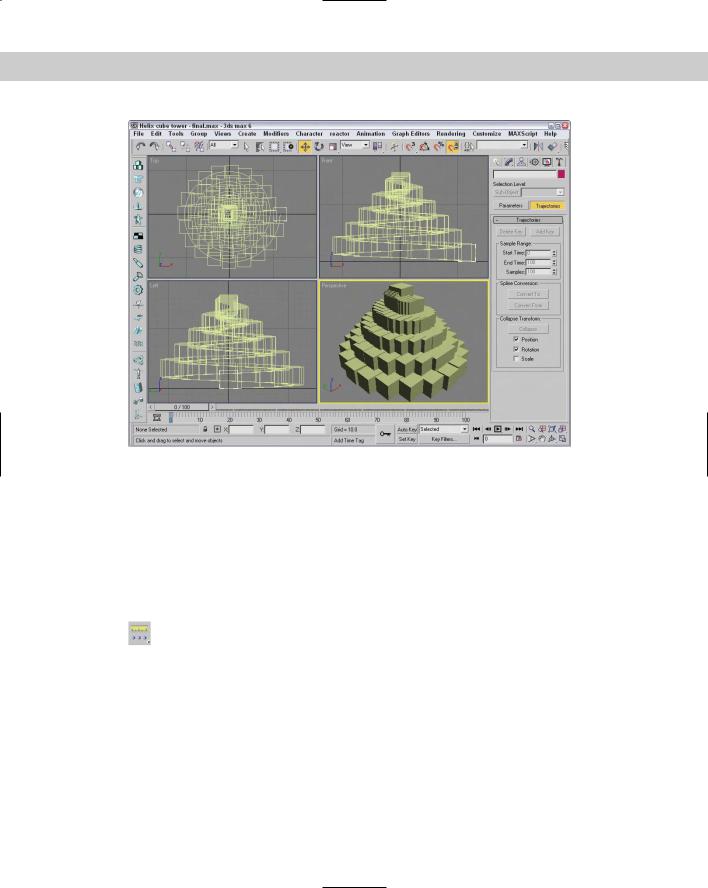
Tutorial: Creating a tower of cubes
The Snapshot tool can be used to create some interesting models. In this example, we create a tower of cubes quickly using a simple Cube primitive and a Helix spline.
To create a tower of cubes with the Snapshot tool, follow these steps:
1.Click on the Box button in the Create panel, select the Cube option in the Creation Method rollout, and drag in the Top viewport. In the Parameters rollout, set the cube’s dimensions to 30.
2.Select Create Shapes Helix, and click and drag in the Top viewport three times to create a helix spline. Set its Radius 1 value to 115, its Radius 2 to 0, its Height to 125, and the number of Turns to 5.
3.Select the cube object, open the Motion panel (it looks like a moving wheel) in the Command Panel, and click the Trajectories button. Set the Start Time to 0, the End Time to 100, and the Samples to 100. Then click the Convert From button, and select the helix spline in the viewports.
This animates the cube moving along the helix spline.
4.Select Tools Snapshot to open the Snapshot dialog box. Select the Range option, set the number of Copies to 100, and select the Instance option. Then click the OK button.
Figure 7-8 shows the tower of cubes after the Snapshot tool cloned the first one.
Chapter 7 Cloning Objects and Creating Object Arrays |
223 |
Figure 7-8: The Snapshot tool helps to build a tower of cubes in the shape of a helix.
Spacing Cloned Objects
The Snapshot tool offers a convenient way to clone objects along an animation path, but what if you want to clone objects along a path that isn’t animated? The answer is the Spacing tool. The Spacing tool can position clones at regular intervals along a path by either selecting a path and the number of cloned objects or by picking two points in the viewport.
Using the Spacing tool
You access the Spacing tool by clicking the last button in the flyout under the Array button on the Extras toolbar (the Extras toolbar can be made visible by right-clicking on
the main toolbar away from the buttons). You can also access it using the Tools Spacing Tool (Shift+I) menu command. When accessed, it opens the Spacing Tool dialog box, shown in Figure 7-9. At the top of this dialog box are two buttons: Pick Path and Pick Points. If a path is selected, its name appears on the Pick Path button.

224 Part II Working with Objects
Figure 7-9: The Spacing Tool dialog box lets you select how to position clones along a path.
|
You can also specify Count, Spacing, Start Offset, and End Offset values. The drop-down list |
|
offers several preset options, including Divide Evenly, Free Center, End Offset, and more. |
|
These values and preset options are used to define the number and spacing of the objects. |
|
The spacing and position of the objects depend on the values that are included. For example, |
|
if you include only a Count value, then the objects are evenly spaced along the path including |
|
an object at each end. If an offset value is included, then the first or last item is moved away |
|
from the end by the offset value. If a Spacing value is included, then the number of objects |
|
required to meet this value is included automatically. |
|
The Lock icons next to the Start and End Offset values force the Start or End Offset values to |
|
be the same as the Spacing value. This has the effect of pushing the objects away from their |
|
end points. |
|
Before you can use either the Pick Path or Pick Points buttons, you must select the object to |
|
be cloned. Using the Pick Path button, you can select a spline path in the scene, and cloned |
|
objects are regularly spaced according to the values you selected. The Pick Points method |
|
lets you click to select the Start point and click again to select an end point. The cloned |
|
objects are spaced in a straight line between the two points. |
|
The two options for determining the spacing width are Edges and Centers. The Edges option |
|
spaces objects from the edge of its bounding box to the edge of the adjacent bounding box, |
|
and the Centers option spaces objects based on their centers. The Follow option aligns the |
|
object with the path if the path is selected. Each object can be a copy, instance, or reference |
|
of the original. The text field at the bottom of the dialog box displays for your information the |
|
number of objects and the spacing value between each. |
Tip |
Lining up objects to correctly follow the path can be tricky. If the objects are misaligned, you |
|
can change the object’s pivot point so it matches the viewport coordinates. This makes the |
|
object follow the path with correct position. |
You can continue to modify the Spacing Tool dialog box’s values while the dialog box is open, but the objects are not added to the scene until you click the Apply button. The Close button closes the dialog box.
Chapter 7 Cloning Objects and Creating Object Arrays |
225 |
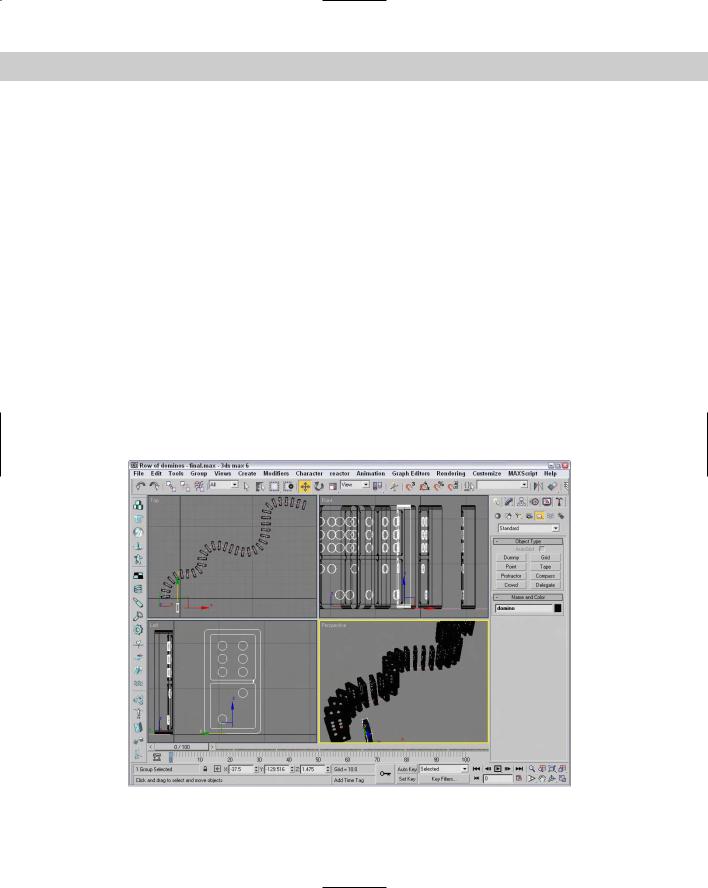
Tutorial: Stacking a row of dominoes
A good example of using the Spacing tool to accomplish something that is difficult in real life is to stack a row of dominoes. It is really a snap in Max regardless of the path.
To stack a row of dominoes using the Spacing tool, follow these steps:
1.Open the Row of dominoes.max file from the Chap 07 directory on the CD-ROM. This file includes a single domino and a wavy spline path.
2.Select the domino object, and open the Spacing tool by selecting the flyout button under the Array button on the Extras toolbar (or by pressing Shift+I).
3.In the Spacing Tool dialog box, click the Pick Path button and select the wavy path. The path name appears on the Pick Path button.
4.From the drop-down list in the Parameters section of the Spacing Tool dialog box, select the Count option with a value of 35.
This is the same as the Divide Evenly, Objects at Ends option in the drop-down list.
5.Select the Edges context option, check the Follow check box, and make all clones Instances. Click Apply when the result looks right, and close the Spacing Tool dialog box.
Figure 7-10 shows the simple results. The Spacing Tool dialog box remains open until you click the Close button.
Figure 7-10: These dominoes were much easier to stack than the set in my living room.