

- •Preface
- •About This Book
- •Acknowledgments
- •Contents at a Glance
- •Contents
- •Relaxing at the Beach
- •Dressing the Scene
- •Animating Motion
- •Rendering the Final Animation
- •Summary
- •The Interface Elements
- •Using the Menus
- •Using the Toolbars
- •Using the Viewports
- •Using the Command Panel
- •Using the Lower Interface Bar Controls
- •Interacting with the Interface
- •Getting Help
- •Summary
- •Understanding 3D Space
- •Using the Viewport Navigation Controls
- •Configuring the Viewports
- •Working with Viewport Backgrounds
- •Summary
- •Working with Max Scene Files
- •Setting File Preferences
- •Importing and Exporting
- •Referencing External Objects
- •Using the File Utilities
- •Accessing File Information
- •Summary
- •Customizing Modify and Utility Panel Buttons
- •Working with Custom Interfaces
- •Configuring Paths
- •Selecting System Units
- •Setting Preferences
- •Summary
- •Creating Primitive Objects
- •Exploring the Primitive Object Types
- •Summary
- •Selecting Objects
- •Setting Object Properties
- •Hiding and Freezing Objects
- •Using Layers
- •Summary
- •Cloning Objects
- •Understanding Cloning Options
- •Mirroring Objects
- •Cloning over Time
- •Spacing Cloned Objects
- •Creating Arrays of Objects
- •Summary
- •Working with Groups
- •Building Assemblies
- •Building Links between Objects
- •Displaying Links and Hierarchies
- •Working with Linked Objects
- •Summary
- •Using the Schematic View Window
- •Working with Hierarchies
- •Setting Schematic View Preferences
- •Using List Views
- •Summary
- •Working with the Transformation Tools
- •Using Pivot Points
- •Using the Align Commands
- •Using Grids
- •Using Snap Options
- •Summary
- •Exploring the Modifier Stack
- •Exploring Modifier Types
- •Summary
- •Exploring the Modeling Types
- •Working with Subobjects
- •Modeling Helpers
- •Summary
- •Drawing in 2D
- •Editing Splines
- •Using Spline Modifiers
- •Summary
- •Creating Editable Mesh and Poly Objects
- •Editing Mesh Objects
- •Editing Poly Objects
- •Using Mesh Editing Modifiers
- •Summary
- •Introducing Patch Grids
- •Editing Patches
- •Using Modifiers on Patch Objects
- •Summary
- •Creating NURBS Curves and Surfaces
- •Editing NURBS
- •Working with NURBS
- •Summary
- •Morphing Objects
- •Creating Conform Objects
- •Creating a ShapeMerge Object
- •Creating a Terrain Object
- •Using the Mesher Object
- •Working with BlobMesh Objects
- •Creating a Scatter Object
- •Creating Connect Objects
- •Modeling with Boolean Objects
- •Creating a Loft Object
- •Summary
- •Understanding the Various Particle Systems
- •Creating a Particle System
- •Using the Spray and Snow Particle Systems
- •Using the Super Spray Particle System
- •Using the Blizzard Particle System
- •Using the PArray Particle System
- •Using the PCloud Particle System
- •Using Particle System Maps
- •Controlling Particles with Particle Flow
- •Summary
- •Understanding Material Properties
- •Working with the Material Editor
- •Using the Material/Map Browser
- •Using the Material/Map Navigator
- •Summary
- •Using the Standard Material
- •Using Shading Types
- •Accessing Other Parameters
- •Using External Tools
- •Summary
- •Using Compound Materials
- •Using Raytrace Materials
- •Using the Matte/Shadow Material
- •Using the DirectX 9 Shader
- •Applying Multiple Materials
- •Material Modifiers
- •Summary
- •Understanding Maps
- •Understanding Material Map Types
- •Using the Maps Rollout
- •Using the Map Path Utility
- •Using Map Instances
- •Summary
- •Mapping Modifiers
- •Using the Unwrap UVW modifier
- •Summary
- •Working with Cameras
- •Setting Camera Parameters
- •Summary
- •Using the Camera Tracker Utility
- •Summary
- •Using Multi-Pass Cameras
- •Creating Multi-Pass Camera Effects
- •Summary
- •Understanding the Basics of Lighting
- •Getting to Know the Light Types
- •Creating and Positioning Light Objects
- •Viewing a Scene from a Light
- •Altering Light Parameters
- •Working with Photometric Lights
- •Using the Sunlight and Daylight Systems
- •Using Volume Lights
- •Summary
- •Selecting Advanced Lighting
- •Using Local Advanced Lighting Settings
- •Tutorial: Excluding objects from light tracing
- •Summary
- •Understanding Radiosity
- •Using Local and Global Advanced Lighting Settings
- •Working with Advanced Lighting Materials
- •Using Lighting Analysis
- •Summary
- •Using the Time Controls
- •Working with Keys
- •Using the Track Bar
- •Viewing and Editing Key Values
- •Using the Motion Panel
- •Using Ghosting
- •Animating Objects
- •Working with Previews
- •Wiring Parameters
- •Animation Modifiers
- •Summary
- •Understanding Controller Types
- •Assigning Controllers
- •Setting Default Controllers
- •Examining the Various Controllers
- •Summary
- •Working with Expressions in Spinners
- •Understanding the Expression Controller Interface
- •Understanding Expression Elements
- •Using Expression Controllers
- •Summary
- •Learning the Track View Interface
- •Working with Keys
- •Editing Time
- •Editing Curves
- •Filtering Tracks
- •Working with Controllers
- •Synchronizing to a Sound Track
- •Summary
- •Understanding Your Character
- •Building Bodies
- •Summary
- •Building a Bones System
- •Using the Bone Tools
- •Using the Skin Modifier
- •Summary
- •Creating Characters
- •Working with Characters
- •Using Character Animation Techniques
- •Summary
- •Forward versus Inverse Kinematics
- •Creating an Inverse Kinematics System
- •Using the Various Inverse Kinematics Methods
- •Summary
- •Creating and Binding Space Warps
- •Understanding Space Warp Types
- •Combining Particle Systems with Space Warps
- •Summary
- •Understanding Dynamics
- •Using Dynamic Objects
- •Defining Dynamic Material Properties
- •Using Dynamic Space Warps
- •Using the Dynamics Utility
- •Using the Flex Modifier
- •Summary
- •Using reactor
- •Using reactor Collections
- •Creating reactor Objects
- •Calculating and Previewing a Simulation
- •Constraining Objects
- •reactor Troubleshooting
- •Summary
- •Understanding the Max Renderers
- •Previewing with ActiveShade
- •Render Parameters
- •Rendering Preferences
- •Creating VUE Files
- •Using the Rendered Frame Window
- •Using the RAM Player
- •Reviewing the Render Types
- •Using Command-Line Rendering
- •Creating Panoramic Images
- •Getting Printer Help
- •Creating an Environment
- •Summary
- •Creating Atmospheric Effects
- •Using the Fire Effect
- •Using the Fog Effect
- •Summary
- •Using Render Elements
- •Adding Render Effects
- •Creating Lens Effects
- •Using Other Render Effects
- •Summary
- •Using Raytrace Materials
- •Using a Raytrace Map
- •Enabling mental ray
- •Summary
- •Understanding Network Rendering
- •Network Requirements
- •Setting up a Network Rendering System
- •Starting the Network Rendering System
- •Configuring the Network Manager and Servers
- •Logging Errors
- •Using the Monitor
- •Setting up Batch Rendering
- •Summary
- •Compositing with Photoshop
- •Video Editing with Premiere
- •Video Compositing with After Effects
- •Introducing Combustion
- •Using Other Compositing Solutions
- •Summary
- •Completing Post-Production with the Video Post Interface
- •Working with Sequences
- •Adding and Editing Events
- •Working with Ranges
- •Working with Lens Effects Filters
- •Summary
- •What Is MAXScript?
- •MAXScript Tools
- •Setting MAXScript Preferences
- •Types of Scripts
- •Writing Your Own MAXScripts
- •Learning the Visual MAXScript Editor Interface
- •Laying Out a Rollout
- •Summary
- •Working with Plug-Ins
- •Locating Plug-Ins
- •Summary
- •Low-Res Modeling
- •Using Channels
- •Using Vertex Colors
- •Rendering to a Texture
- •Summary
- •Max and Architecture
- •Using AEC Objects
- •Using Architectural materials
- •Summary
- •Tutorial: Creating Icy Geometry with BlobMesh
- •Tutorial: Using Caustic Photons to Create a Disco Ball
- •Summary
- •mental ray Rendering System
- •Particle Flow
- •reactor 2.0
- •Schematic View
- •BlobMesh
- •Spline and Patch Features
- •Import and Export
- •Shell Modifier
- •Vertex Paint and Channel Info
- •Architectural Primitives and Materials
- •Minor Improvements
- •Choosing an Operating System
- •Hardware Requirements
- •Installing 3ds max 6
- •Authorizing the Software
- •Setting the Display Driver
- •Updating Max
- •Moving Max to Another Computer
- •Using Keyboard Shortcuts
- •Using the Hotkey Map
- •Main Interface Shortcuts
- •Dialog Box Shortcuts
- •Miscellaneous Shortcuts
- •System Requirements
- •Using the CDs with Windows
- •What’s on the CDs
- •Troubleshooting
- •Index

Installing and Configuring 3ds max 6
Before you can enjoy all the great features in 3ds max, you have to install the software and get your system configured properly.
This appendix helps you do just that. After you’re finished here, you’re ready to go.
Choosing an Operating System
If you’re starting from scratch and have the luxury of customizing your system so that it works best with 3ds max, you can do several things to make life easier. One of your big decisions is what operating system to use to run Max.
If you have the option, run 3ds max on Windows XP Professional. Make sure that you have also installed the latest Service Pack (which you can download for free from Microsoft’s Web page at www.microsoft.com). These operating systems are more stable than other versions of Windows, and they do a better job of managing your computer’s resources (such as memory). They also enable you to run multiple copies of 3ds max at the same time on a single machine.
Note You can also run Max on XP Home without any trouble.
If this system is not an option, you can run Max on Windows 2000, but this system is not as robust as Windows XP, so you might encounter more program crashes. Also note that Windows 98 and Windows ME are not supported.
Hardware Requirements
To get good performance from 3ds max, you need a fairly meaty machine. A good default system to use would be a Pentium-IV or an AMD Athlon-based computer with 1GB or more of RAM (and 2GB of swap space) and a decent-sized hard drive and monitor. If need be, you can get by with a 300 MHz Pentium III (or AMD) packing as little as 512MB of RAM (with 500MB swap space), but you may spend lots
A BP P E N D I X
In This Appendix
Choosing an operating system
Understanding hardware requirements
Installing 3ds max 6
Using the software lock
Authorizing the software
Setting the display driver

1194 Appendixes
of time watching your computer churn furiously to keep up. A dual Intel Xeon or a dual AMD Athlon system is recommended.
Note Max under Windows 2000 or XP can take advantage of multiprocessor machines.
One element of your system that will probably have the greatest impact on the performance of 3ds max is the graphics card. Any good graphics card has specialized hardware that will take much of the workload off your computer’s CPU, freeing it up to do other tasks. All of Max is fairly graphics-intensive, and a little extra money in the graphics card department will go a long way toward boosting your performance.
The good news is that hardware accelerated graphics cards are becoming cheaper: You can get great cards for $200–$300. When searching for a graphics card, make sure that it can support a resolution of at least 1024×768 at 16-bit color and that it comes with drivers for OpenGL 1.1 or later and/or DirectX 8.1 or later. You’ll also want a minimum of 64MB on the graphics card or 128MB for 3D graphics acceleration. You can use some of the graphics boards built to run computer games; however, be aware that some boards claim to support OpenGL but actually support only a subset of it. Before going out to make your purchase, visit the Discreet Web site (www.discreet.com) to see performance metrics for various popular graphics cards.
For the complete installation, you need 650MB of hard drive space. You can get by with less if you choose the Compact installation option. Another handy piece of hardware to have is a scrollable mouse. A scrollable mouse makes moving through menus and the Command Panel easier, and it gives you a third button, which can be used to navigate the viewports.
Installing 3ds max 6
Installing Max is straightforward. Here’s what you need to do:
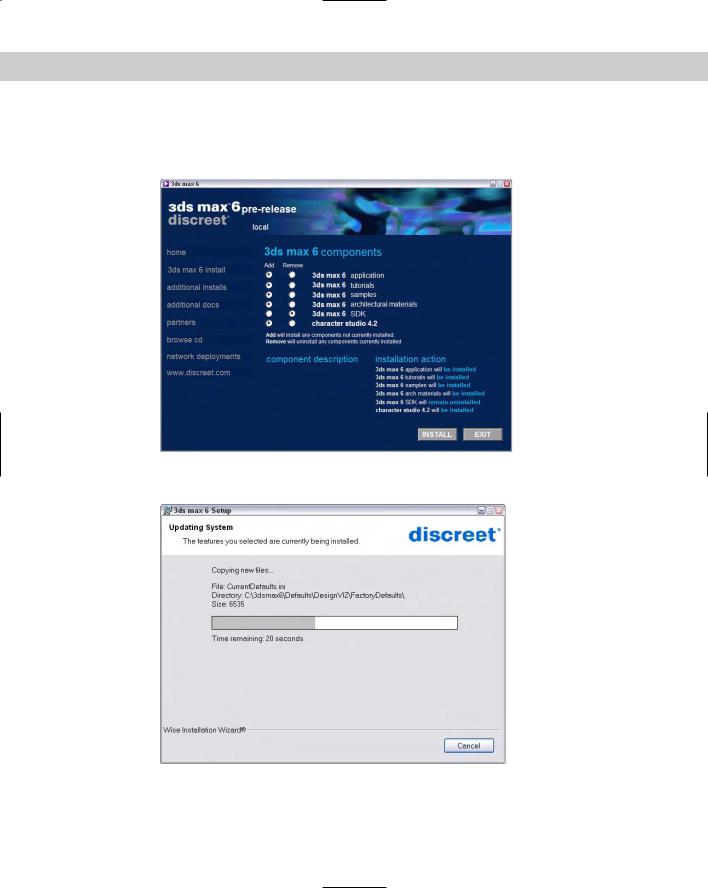
1.Insert the Max CD-ROM into the CD-ROM drive. The setup program starts up automatically. If you don’t have Windows Autorun enabled, or if the setup program doesn’t start, run the Setup.exe program on the CD-ROM.
2.When the setup program starts, the Choose Setup Program dialog box displays, as shown in Figure B-1. In addition to 3ds max, you can select to install additional components such as DirectX 9.0, the Autodesk License Manager tools, Internet Explorer 6 (so that you can use the online help system), and Apple’s QuickTime software (which lets you view QuickTime animations). Click the 3ds max 6 Install link to start the Max installation.
3.The 3ds max 6 Setup wizard first shows the Software License Agreement. Choose your country, and read the corresponding License Agreement. After you’ve read the agreement, click the now-enabled “I accept” button. Click Next to move on.
4.The next screen is User Information, which asks you to input your name and organization. You can also select the location where Max will be installed, and you need to enter the serial number and the CD-ROM key, both of which you can find on the software box. In the License Information section, you can choose to install as a stand-alone version or as a network version. If the Network option is selected, you need to enter the URL to the Network License Server. Then click Next.
Appendix B Installing and Configuring 3ds max 6 1195
The Install Wizard presents a screen where you can confirm all the information before beginning the installation. A dialog box, shown in Figure B-2, shows the progress of the installation.
Figure B-1: The installation program lets you install more than just Max.
Figure B-2: This screen shows the installation’s progress.
5.When the installation is complete, a screen appears informing you that the product was successfully installed. Click Finish to exit the install wizard.
1196 Appendixes
Max takes a few minutes to install completely. As part of the Max installation, backburner is also installed. backburner is the software that enables networking rendering.
Authorizing the Software
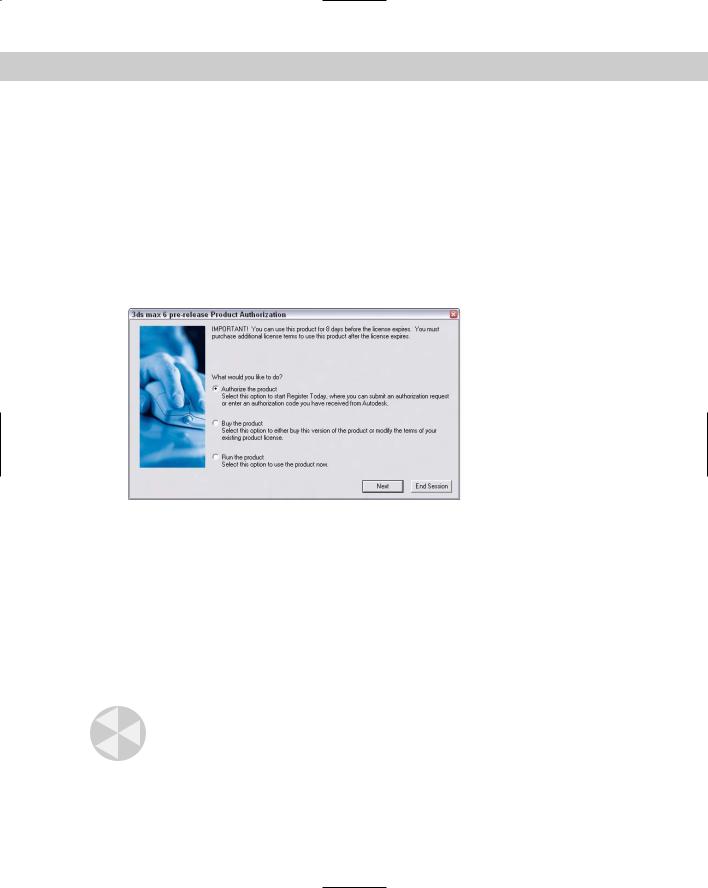
After Max is installed, you need to authorize the software through Discreet. The software continues to run for 15 days without authorization, but after 15 days it quits working.
Figure B-3 shows the screen that first appears after you start Max after installation. Using this screen, you can launch the Authorization Wizard, buy the software, or run the software unauthorized for 15 days. The Authorization Wizard automatically appears the first time you run Max and takes you through the authorization process.
Figure B-3: The first screen to appear after installation lets you authorize your software or run it without authorization.
The first screen of the Authorization Wizard lets you get an authorization code or enter an authorization code if you have one. To obtain an authorization code, you need to enter information such as your name, address, and company name. You can also specify whether this copy is an upgrade or not. If you’re upgrading your Max version, you need to include this number. The Serial Number and Request Code are automatically filled in using the numbers entered during the installation. You can authorize the software using a direct connection to the Web, fax, e-mail, or regular mail.
If you receive an authorization code via fax, e-mail, or mail, you can select the “Already have an authorization code” option on the first screen that appears when you run Max and click Next. A screen opens where you can enter the authorization code. The wizard registers this number with Max and completes the registration process.
Caution |
The authorization code is specific to a specific computer and works only for that computer. If |
|
you try to install and use the authorization code on a separate computer, you need to obtain |
|
another authorization code. |