

- •Preface
- •About This Book
- •Acknowledgments
- •Contents at a Glance
- •Contents
- •Relaxing at the Beach
- •Dressing the Scene
- •Animating Motion
- •Rendering the Final Animation
- •Summary
- •The Interface Elements
- •Using the Menus
- •Using the Toolbars
- •Using the Viewports
- •Using the Command Panel
- •Using the Lower Interface Bar Controls
- •Interacting with the Interface
- •Getting Help
- •Summary
- •Understanding 3D Space
- •Using the Viewport Navigation Controls
- •Configuring the Viewports
- •Working with Viewport Backgrounds
- •Summary
- •Working with Max Scene Files
- •Setting File Preferences
- •Importing and Exporting
- •Referencing External Objects
- •Using the File Utilities
- •Accessing File Information
- •Summary
- •Customizing Modify and Utility Panel Buttons
- •Working with Custom Interfaces
- •Configuring Paths
- •Selecting System Units
- •Setting Preferences
- •Summary
- •Creating Primitive Objects
- •Exploring the Primitive Object Types
- •Summary
- •Selecting Objects
- •Setting Object Properties
- •Hiding and Freezing Objects
- •Using Layers
- •Summary
- •Cloning Objects
- •Understanding Cloning Options
- •Mirroring Objects
- •Cloning over Time
- •Spacing Cloned Objects
- •Creating Arrays of Objects
- •Summary
- •Working with Groups
- •Building Assemblies
- •Building Links between Objects
- •Displaying Links and Hierarchies
- •Working with Linked Objects
- •Summary
- •Using the Schematic View Window
- •Working with Hierarchies
- •Setting Schematic View Preferences
- •Using List Views
- •Summary
- •Working with the Transformation Tools
- •Using Pivot Points
- •Using the Align Commands
- •Using Grids
- •Using Snap Options
- •Summary
- •Exploring the Modifier Stack
- •Exploring Modifier Types
- •Summary
- •Exploring the Modeling Types
- •Working with Subobjects
- •Modeling Helpers
- •Summary
- •Drawing in 2D
- •Editing Splines
- •Using Spline Modifiers
- •Summary
- •Creating Editable Mesh and Poly Objects
- •Editing Mesh Objects
- •Editing Poly Objects
- •Using Mesh Editing Modifiers
- •Summary
- •Introducing Patch Grids
- •Editing Patches
- •Using Modifiers on Patch Objects
- •Summary
- •Creating NURBS Curves and Surfaces
- •Editing NURBS
- •Working with NURBS
- •Summary
- •Morphing Objects
- •Creating Conform Objects
- •Creating a ShapeMerge Object
- •Creating a Terrain Object
- •Using the Mesher Object
- •Working with BlobMesh Objects
- •Creating a Scatter Object
- •Creating Connect Objects
- •Modeling with Boolean Objects
- •Creating a Loft Object
- •Summary
- •Understanding the Various Particle Systems
- •Creating a Particle System
- •Using the Spray and Snow Particle Systems
- •Using the Super Spray Particle System
- •Using the Blizzard Particle System
- •Using the PArray Particle System
- •Using the PCloud Particle System
- •Using Particle System Maps
- •Controlling Particles with Particle Flow
- •Summary
- •Understanding Material Properties
- •Working with the Material Editor
- •Using the Material/Map Browser
- •Using the Material/Map Navigator
- •Summary
- •Using the Standard Material
- •Using Shading Types
- •Accessing Other Parameters
- •Using External Tools
- •Summary
- •Using Compound Materials
- •Using Raytrace Materials
- •Using the Matte/Shadow Material
- •Using the DirectX 9 Shader
- •Applying Multiple Materials
- •Material Modifiers
- •Summary
- •Understanding Maps
- •Understanding Material Map Types
- •Using the Maps Rollout
- •Using the Map Path Utility
- •Using Map Instances
- •Summary
- •Mapping Modifiers
- •Using the Unwrap UVW modifier
- •Summary
- •Working with Cameras
- •Setting Camera Parameters
- •Summary
- •Using the Camera Tracker Utility
- •Summary
- •Using Multi-Pass Cameras
- •Creating Multi-Pass Camera Effects
- •Summary
- •Understanding the Basics of Lighting
- •Getting to Know the Light Types
- •Creating and Positioning Light Objects
- •Viewing a Scene from a Light
- •Altering Light Parameters
- •Working with Photometric Lights
- •Using the Sunlight and Daylight Systems
- •Using Volume Lights
- •Summary
- •Selecting Advanced Lighting
- •Using Local Advanced Lighting Settings
- •Tutorial: Excluding objects from light tracing
- •Summary
- •Understanding Radiosity
- •Using Local and Global Advanced Lighting Settings
- •Working with Advanced Lighting Materials
- •Using Lighting Analysis
- •Summary
- •Using the Time Controls
- •Working with Keys
- •Using the Track Bar
- •Viewing and Editing Key Values
- •Using the Motion Panel
- •Using Ghosting
- •Animating Objects
- •Working with Previews
- •Wiring Parameters
- •Animation Modifiers
- •Summary
- •Understanding Controller Types
- •Assigning Controllers
- •Setting Default Controllers
- •Examining the Various Controllers
- •Summary
- •Working with Expressions in Spinners
- •Understanding the Expression Controller Interface
- •Understanding Expression Elements
- •Using Expression Controllers
- •Summary
- •Learning the Track View Interface
- •Working with Keys
- •Editing Time
- •Editing Curves
- •Filtering Tracks
- •Working with Controllers
- •Synchronizing to a Sound Track
- •Summary
- •Understanding Your Character
- •Building Bodies
- •Summary
- •Building a Bones System
- •Using the Bone Tools
- •Using the Skin Modifier
- •Summary
- •Creating Characters
- •Working with Characters
- •Using Character Animation Techniques
- •Summary
- •Forward versus Inverse Kinematics
- •Creating an Inverse Kinematics System
- •Using the Various Inverse Kinematics Methods
- •Summary
- •Creating and Binding Space Warps
- •Understanding Space Warp Types
- •Combining Particle Systems with Space Warps
- •Summary
- •Understanding Dynamics
- •Using Dynamic Objects
- •Defining Dynamic Material Properties
- •Using Dynamic Space Warps
- •Using the Dynamics Utility
- •Using the Flex Modifier
- •Summary
- •Using reactor
- •Using reactor Collections
- •Creating reactor Objects
- •Calculating and Previewing a Simulation
- •Constraining Objects
- •reactor Troubleshooting
- •Summary
- •Understanding the Max Renderers
- •Previewing with ActiveShade
- •Render Parameters
- •Rendering Preferences
- •Creating VUE Files
- •Using the Rendered Frame Window
- •Using the RAM Player
- •Reviewing the Render Types
- •Using Command-Line Rendering
- •Creating Panoramic Images
- •Getting Printer Help
- •Creating an Environment
- •Summary
- •Creating Atmospheric Effects
- •Using the Fire Effect
- •Using the Fog Effect
- •Summary
- •Using Render Elements
- •Adding Render Effects
- •Creating Lens Effects
- •Using Other Render Effects
- •Summary
- •Using Raytrace Materials
- •Using a Raytrace Map
- •Enabling mental ray
- •Summary
- •Understanding Network Rendering
- •Network Requirements
- •Setting up a Network Rendering System
- •Starting the Network Rendering System
- •Configuring the Network Manager and Servers
- •Logging Errors
- •Using the Monitor
- •Setting up Batch Rendering
- •Summary
- •Compositing with Photoshop
- •Video Editing with Premiere
- •Video Compositing with After Effects
- •Introducing Combustion
- •Using Other Compositing Solutions
- •Summary
- •Completing Post-Production with the Video Post Interface
- •Working with Sequences
- •Adding and Editing Events
- •Working with Ranges
- •Working with Lens Effects Filters
- •Summary
- •What Is MAXScript?
- •MAXScript Tools
- •Setting MAXScript Preferences
- •Types of Scripts
- •Writing Your Own MAXScripts
- •Learning the Visual MAXScript Editor Interface
- •Laying Out a Rollout
- •Summary
- •Working with Plug-Ins
- •Locating Plug-Ins
- •Summary
- •Low-Res Modeling
- •Using Channels
- •Using Vertex Colors
- •Rendering to a Texture
- •Summary
- •Max and Architecture
- •Using AEC Objects
- •Using Architectural materials
- •Summary
- •Tutorial: Creating Icy Geometry with BlobMesh
- •Tutorial: Using Caustic Photons to Create a Disco Ball
- •Summary
- •mental ray Rendering System
- •Particle Flow
- •reactor 2.0
- •Schematic View
- •BlobMesh
- •Spline and Patch Features
- •Import and Export
- •Shell Modifier
- •Vertex Paint and Channel Info
- •Architectural Primitives and Materials
- •Minor Improvements
- •Choosing an Operating System
- •Hardware Requirements
- •Installing 3ds max 6
- •Authorizing the Software
- •Setting the Display Driver
- •Updating Max
- •Moving Max to Another Computer
- •Using Keyboard Shortcuts
- •Using the Hotkey Map
- •Main Interface Shortcuts
- •Dialog Box Shortcuts
- •Miscellaneous Shortcuts
- •System Requirements
- •Using the CDs with Windows
- •What’s on the CDs
- •Troubleshooting
- •Index
1056 Part X Rendering
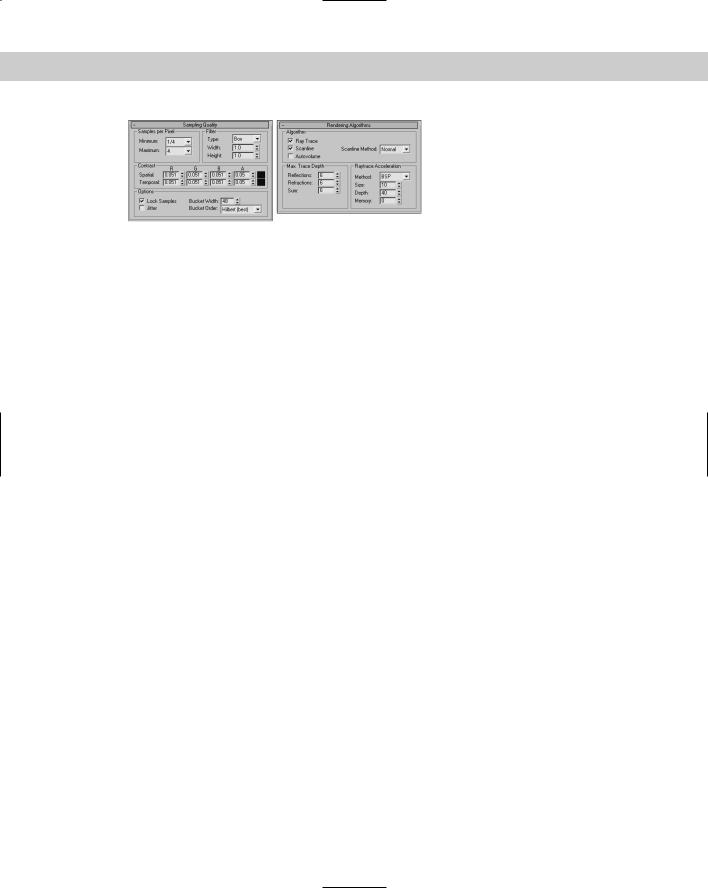
Figure 44-19: The Renderer panel includes several rollouts of settings for controlling the mental ray renderer.
The mental ray renderer uses several different algorithms, and you can specify which ones to ignore in order to speed up the rendering cycle. If a needed algorithm is disabled, the features that rely on that algorithm are skipped. You can also set the Trace Depth for Reflections and Refractions and control the Raytrace Acceleration values.
Advanced mental ray
The mental ray renderer also includes many additional features that you can take advantage of, including Depth of Field, Motion Blur, Contours, Displacement, and Camera Shaders. The settings for these additional features are located in rollouts at the bottom of the Renderer panel.
Summary
If you’re looking for a rendering option that perfectly calculates reflections, refractions, and transparencies, then raytracing is what you need. Raytracing settings can be set globally and applied to selected materials using materials and maps. And when raytracing needs an additional push, the mental ray renderer can be selected to render the scene.
In this chapter, you
Learned about the global raytracing settings
Explored the raytrace material
Worked with raytraced maps
Learned to enable the mental ray renderer
Created mental ray lights and materials
Worked with caustics and photons
Now that I’ve told you how to overload the rendering engine, the next chapter offers a way to get some help by rendering over the network.
|
|
|

Network Rendering
Max can help you create some incredible images and animations, but that power comes at a significant price — time.
Modeling scenes and animation sequences take enough time on their own, but after you’re finished, you still have to wait for the rendering to take place, which for a final rendering at the highest detail settings can literally take days or weeks. Because the time rendering takes is directly proportional to the amount of processing power you have access to, Max lets you use network rendering to add more hardware to the equation and speed up those painfully slow jobs.
This chapter shows you how to set up Max to distribute the rendering workload across an entire network of computers, helping you finish big rendering jobs in record time.
Understanding Network Rendering
When you use network rendering to render your animation, Max divides the work among several machines connected via a network, with each machine rendering some of the frames. The increase in speed depends on how many machines you can devote to rendering frames: Add just one computer, and you double the rate at which you can render. Add seven or eight machines, and instead of missing that important deadline by a week, you can get done early and take an extra day off.
The price of all this (besides the extra machines) is a time investment on your part. It does take a little work to get things set up properly, but it’s an investment that you have to make only once. If you take the time now to make sure that you do things right, you should be
up and running fairly quickly and have far fewer headaches down the road.
Machines connected to handle network rendering are often referred to collectively as a rendering farm. The basic process during a network rendering goes like this: One machine manages the entire process and distributes the work among all the computers in the farm. Each machine signals the managing computer when it is ready to work on another frame. The manager then sends or “farms out” a new frame, which gets drawn by a computer in the rendering
farm, and the finished frame gets saved in whatever format you’ve chosen.
45C H A P T E R
In This Chapter
Using network rendering
Meeting network requirements
Setting up a network rendering system
Rendering on a network
Using the Network
Rendering Manager
Using network rendering servers
Logging errors
Using the Monitor
Event notification
Setting up batch rendering

1058 Part X Rendering
The software in Max that makes network rendering possible is called backburner. You may have noticed that it was installed when Max was installed. Max has several features to make the network rendering process easier. If one of the computers in your rendering farm crashes or loses its connection with the manager, the manager reclaims the frame that was assigned to the down computer and farms it out to a different machine. You can monitor the status of any rendering job you have running, and you can even have Max e-mail you when a job is complete.
In this chapter, we step through the process of setting up network rendering on a small network. You’ll find out firsthand what’s involved so that setting up your own network can go smoothly.
Note One additional caveat to using network rendering is that you have no guarantee that the frames of your animation will be rendered in order. Each participating computer renders frames as quickly as possible and saves them as bitmap files, so you cannot use network rendering to create .AVI or .FLC files, for example. Instead, you have to render the scene with each frame saved as a separate bitmap file, and then use Video Post or a third-party program (such as Adobe Premiere) to combine them into an animation file format such as .AVI.
Network Requirements
Now that you’re anxious to get things under way, let’s look at what you need to set up a rendering farm:
Computers: First, of course, you need computers. The more the merrier, but all of them need to be connected via some sort of network and need to be running TCP/IP, a very common communications protocol (we’ll talk more about TCP/IP and setting it up later). As with most things related to computers, the more powerful the hardware you can get your hands on, the faster things go. All computers in your farm should meet at least the basic requirements for Max, but if they have more memory, more disk space, and faster processors, you’re better off. Also, having nothing else running on the machines is preferable. Rendering is a CPU-intensive process, so any other programs you have running compete for the processor and increase the time needed to finish your rendering job.
Networking hardware: Each computer needs some way to connect to the network. The most common way is to use a network adapter card in the computer and a cable that connects it to the rest of the network. If a computer is connected via a dial-up connection, then its networking hardware is a modem. Using network rendering on a single computer to do batch rendering is also possible, in which case only one computer is used instead of a real network. In this case, the network “hardware” isn’t hardware at all — it’s a piece of software that simulates a network adapter and tricks Max into thinking that it’s connected to a network.
Windows 2000 or XP: According to the Max documentation, each computer in your rendering farm must be running under Windows 2000 or Windows XP.
3ds max: Obviously, you need Max to do all this, but the good news is that only one machine in your farm needs to have an authorized copy of Max installed.

Chapter 45 Network Rendering 1059
Note No authorization whatsoever is needed on machines that are used for network rendering only. Simply install Max, and each network rendering machine gets its authorization from the computer that launched the render job.
Basically that’s all you need to network render with Max. But before we move on, you should remember two important things.
First, the display capabilities of the machines in your rendering farm are irrelevant. Max uses its own rendering engine, so in network rendering, a top-of-the-line graphics adapter won’t give you any better performance or quality than the cheap, factory-installed adapters that often come built into the motherboard. In fact, you can even omit the monitor on each rendering farm computer, which can really cut down on how much you have to invest to set up a good network rendering farm.
Second, if you don’t have access to a bunch of computers that can be exclusively dedicated to network rendering, don’t give up. Max has some great scheduling features that enable you to configure each computer so that it’s available to render at certain times of the day. If you have administrative access to additional computers at work or a university lab, you can use those computers at night or on weekends, when they are generally not being used.
Setting up a Network Rendering System
Before we get into the details of setting up Max and the network itself, understanding the different parts of the network rendering system is important. This list shows the major players involved:
Manager: The manager is a program (manager.exe) that acts as the network manager. It’s the network manager’s job to coordinate the efforts of all the other computers in your rendering farm. Only one machine on your network needs to be running the manager, and that same machine can also be used to render.
Server: A rendering server is any computer on your network that is used to render frames of your animation. When you run the server program (server.exe), it contacts the network manager and informs it that this particular computer is available to render. The server starts up Max when the manager sends a frame to be rendered.
3ds max: Some computer in your rendering farm must have an authorized copy of Max running, although it does not need to be the same computer that is running the manager. It is from this machine that you initiate a rendering job.
Monitor: The Monitor (monitor.exe) is a special program that lets you monitor your rendering farm. You can use it to check the current state of jobs that are running or that have been queued. You can also use it to schedule network rendering times. The Monitor is completely independent from the actual rendering process, so you can use it on one of the machines in your rendering farm, or you can use it to remotely check the status of things by connecting over the network.
We address the task of setting up the network rendering system in three stages. The first thing you need is a functioning network, so we first go through the steps of how to get it working. Next, we look at setting up the Max software on each computer, and finally we describe how to tell Max where to find scene data it needs and where to put the finished scenes.
1060 Part X Rendering
Setting up the network
To communicate with the different machines on the network, Max uses TCP/IP (Transmission Control Protocol/Internet Protocol), a very common network protocol. It’s so common, in fact, that if your computers are already set up with some sort of network, you might already have TCP/IP installed and configured properly. If so, you are saved from several hours of work. Each machine on a network is identified by an IP address, which is a series of four numbers, each between 0 and 255, separated by periods, such as
192.1.17.5
Each computer on a network has a unique IP address as well as a unique, human-readable name. In order to use Max to do network rendering, you need to find the IP address and name of each computer used on the network.
The precise details of what constitutes a “correct” IP address are too long and boring to go into here, but for a nonpublic network, all the addresses start with 192 or 10. The second and third numbers can be anything between 0 and 255 inclusive, and the last number can be between 1 and 254 inclusive (0 and 255 have special meanings). As an example, I’ve chosen to set up my home network as follows:
Machine Name |
IP Address |
Dungar |
10.0.0.1 |
Ramrod |
10.0.0.2 |
Slazenger |
10.0.0.3 |
Romulus |
10.0.0.4 |
Notice that each address is unique and that because it’s a private network, the first number in each address is 10.
Tutorial: Locating TCP/IP and gathering IP addresses
To get the computers to talk to one another, you need to make sure that each computer has the TCP/IP protocol installed, and you need to gather the IP addresses for all the machines on the network.
To see whether you already have TCP/IP installed and to find out the IP address and name of each computer, follow these steps:
1.Right-click the My Computer icon in Explorer, and select Properties from the pop-up menu. The System Properties dialog box opens. Select the Computer Name panel. This panel displays the Full computer name. Write the computer name in a list of all the computers that you are using to render via a network. Each computer on your network needs a unique name, so if the field is blank, enter a unique name and add the computer to your list.
Caution |
Remember that there are differences between Windows 2000 and Windows XP. These |
|
steps were written for Windows XP. |
2.Open the Windows Control Panel by going to the Windows taskbar and choosing Start Control Panel.
Chapter 45 Network Rendering 1061
3.Double-click the Network and Internet Connections icon to open the network connections window. In the next window, select the Network Connections option.
This window displays a list of network connections.
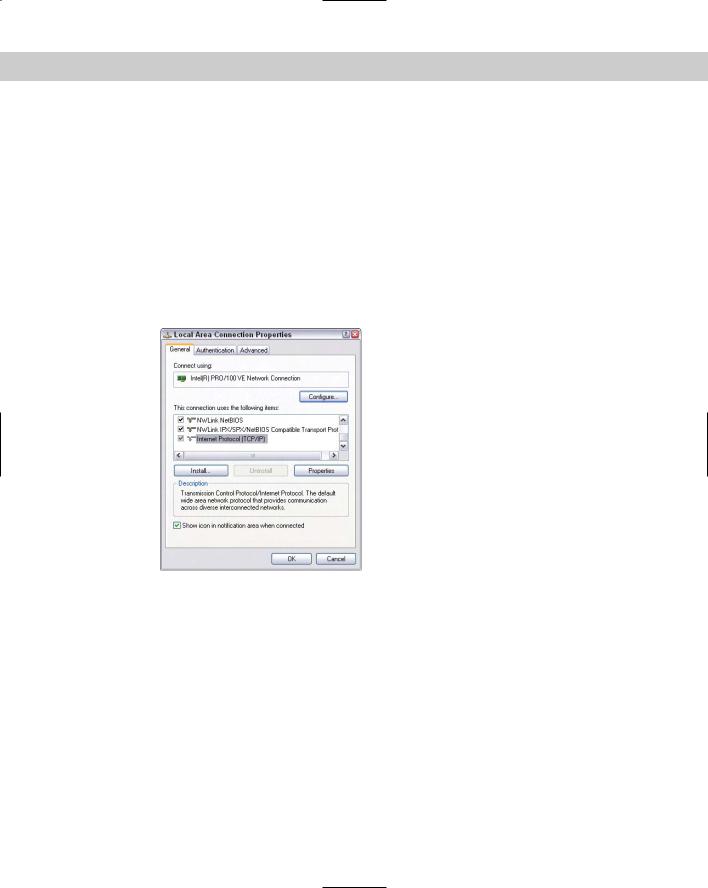
4.Select and right-click the network connection identified as Local Area Connection, and select Properties from the pop-up menu. The Local Area Connection Properties dialog box opens, which lists the installed protocols. At the top of the dialog box, you should see your network adapter (such as the brand and model of your Ethernet card). If it is not listed, you need to get it set up before proceeding. Under the network adapter is a list of installed network protocols, similar to the list in Figure 45-1. Look through the list until you find the Internet (TCP/IP) Protocol. If you find it, double-click it to bring up the TCP/IP Properties dialog box. If you don’t see the TCP/IP protocol anywhere, then you have to add it yourself in order to do network rendering.
Figure 45-1: A list of the network protocols installed on this computer
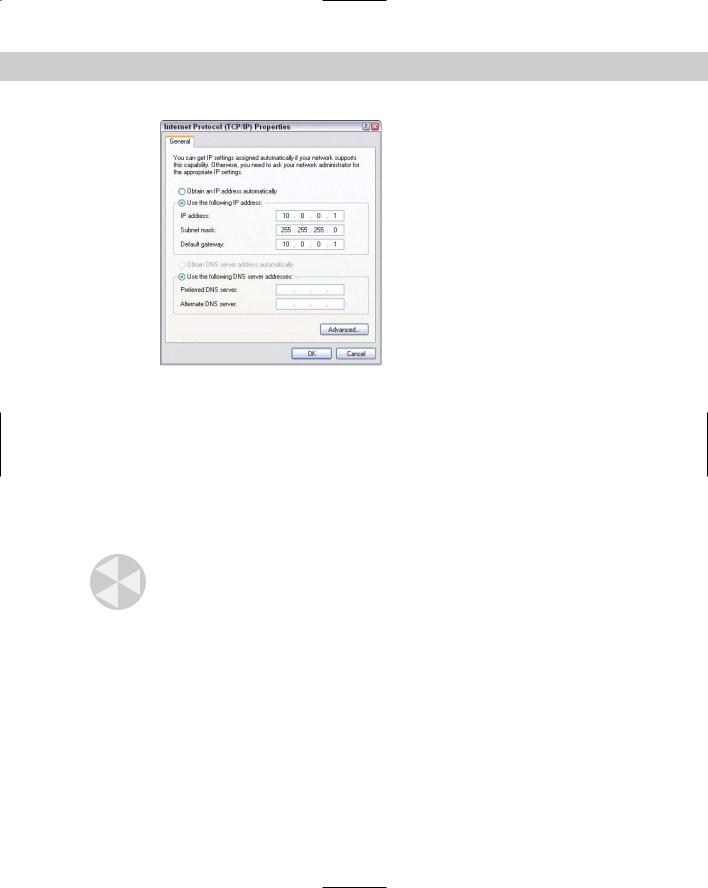
5.The Internet (TCP/IP) Protocol Properties dialog box has an important piece of information, called IP Address, shown in Figure 45-2. Do one of the following:
•If Obtain an IP address automatically is selected, you don’t have to worry about the exact IP address of this computer, because each time the computer connects to the network, it gets an IP address from a server, and the address it gets may be different every time.
•If Specify an IP address is selected, add the IP address to your written list of computers on the network. In the IP Address panel shown in the figure, the IP address has been statically assigned, which means that this computer will always have the same IP address.
1062 Part X Rendering
Figure 45-2: You can find the IP Address in the Internet Protocol (TCP/IP) Properties dialog box.
6.Repeat this procedure for each computer that will participate in your rendering farm. If you’re lucky and all your machines have TCP/IP installed and ready to go, you can skip the next section and move on to setting up Max on your network. If not, then follow the steps for configuring TCP/IP in the next section.
Tutorial: Installing and configuring TCP/IP
If your computer doesn’t already have TCP/IP installed, you have to install it in order to render via a network in Max.
Caution |
Be careful about changing the TCP/IP settings of computers that are on a public network or |
|
are part of a large corporate network. Incorrect settings can not only keep your computers |
|
from communicating properly but can also cause problems in many other computers on the |
|
network. |
If the computers you plan on using for your rendering farm are part of a public or corporate network, seek the assistance of the network administrator. If you’re in charge of the computers yourself, dig out your Windows XP installation CD-ROM, because you’re going to need it.
To install and configure TCP/IP, follow these steps:
1.Go to the General panel on the Local Area Connection Properties dialog box. To get there, click Start on the task bar, and then choose Control Panel. Double-click the Network and Internet Connections icon, and select the Network Connections links to open the network connections window. Select and right-click the network connection identified as Local Area Connection, and select Properties from the pop-up menu.

Chapter 45 Network Rendering 1063
2.Click the Install button to open the Select Network Component Type dialog box. Select Protocol, and click the Add button. From the list of protocols, select Internet (TCP/IP) Protocol and click OK.
3.At this point, Windows asks you whether you want to use DHCP. DHCP is a server that automatically assigns an IP address to you computer. If you know for sure that there is a DHCP server running, choose Yes. If you’re setting up the network yourself or you have no idea what DHCP is, choose No. If DHCP is already set up and working, it can save you lots of time, but if not and if you’re setting up the network yourself, I recommend steering away from it. You can change the settings to use DHCP at a later time if you’re feeling ambitious.
4.Now Windows starts looking for the files that it needs to install, and it pops up a dialog box asking for their location. The default path it lists is probably the right one, so you can just click OK and continue. If Windows guessed wrong, or if you have the CD-ROM in a different drive, correct the path and then click OK.
5.After Windows finishes copying the files, TCP/IP is installed but not configured. To configure the protocol, select it and click the Properties button. The Internet (TCP/IP) Protocol Properties dialog box opens, shown earlier in Figure 45-2.
6.In the General panel is a section where you choose whether you want to have an IP address assigned automatically using DHCP. If you’re not using DHCP, choose Specify an IP address and enter an IP address for this machine. Refer to the beginning of this section if you need help choosing a valid IP address. (If you’re a little confused about what numbers to use, you should be safe using the same numbers that I did.)
Caution |
It’s extremely important that you choose an IP address that is unique on the network. |
|
(Duplicate IP addresses are a great way to guarantee a nonfunctional rendering farm.) |
7.Below the IP address section, you have to enter a subnet mask. Enter
255.255.255.0
The subnet mask is used in conjunction with the IP address to identify different networks within the entire domain of every network in the world. If you do have to change this, be sure to change it in the 3dsnet.ini file that each rendering server creates (see “Using the Network Rendering Manager” later in this chapter).
8.Now select the Obtain DNS server address automatically option unless you know the IP address of your network’s DNS server.
This setting allows you to configure the TCP/IP protocol to check your local DNS when looking up addresses.
9.Click OK in the TCP/IP Properties dialog box to close it, and then click Close on the Local Area Connection Properties dialog box to close it.
Windows needs to shut down and restart in order for the changes to take effect. This computer now has the proper network setup for your rendering farm.
Remember to repeat these instructions for every computer that you want to use in your rendering farm. Each computer must be properly connected to the network and have

1064 Part X Rendering
TCP/IP installed and configured. This may seem like lots of work, but fortunately it’s a one-time investment.
Note
Tip
Tutorial: Setting up Max on the networked computers
If you’ve made it this far, then you’ll be happy to know that the worst is behind you. We’ve covered the most difficult parts of setting up a network rendering system; by comparison, everything else is relatively simple.
At this point, you should have a complete list of all the computers used in your network rendering system. Each computer should have a unique name and a unique IP address, and all should have TCP/IP installed and configured. You are now ready to move on to the actual Max installation for your rendering servers.
You have to set up Max on each computer in your rendering farm. Fortunately, this is as simple as a normal installation. To set up Max on each computer, follow these steps:
1.Run the setup.exe program on the Max installation CD-ROM.
You don’t have to have a CD-ROM drive in every computer in your rendering farm. After your computers are networked, you can map a drive from your current machine to a computer that has the Max CD-ROM in its CD-ROM drive. In Windows Explorer, choose Tools Map Network Drive and enter the path to the computer and drive with the CD-ROM.
2.Move past the first few introduction screens until you get to the Setup Type screen. Choose the Compact option so that Max installs only the minimum number of files it needs to be able to render. You also need to choose a destination directory where you want Max to be installed. If possible, just accept the displayed default destination and click Next.
Installing 3ds max in the same directory on every computer can save you some maintenance headaches later on. Managing bitmap and plug-in directories is much easier if each machine has the same directory layout.
3.Continue with the rest of the installation as you would do for a normal installation of Max (although you can skip installing the online reference manuals if you want to save some disk space).
After the installation files get copied over, you’ll probably have to reboot your computer for the changes to take effect.
Configuring shared directories
The last step in building your rendering farm is to tell Max where it can find the information it needs to render a scene. Max must be able to find textures and other information, and it must know where to put each frame that it renders.
Tutorial: Sharing directories
Instead of copying needed files to every machine in your rendering farm, you can share your directories across the network, which means that other computers on the network can use the files in that directory.
Chapter 45 Network Rendering 1065
To make a directory shared, follow these steps:
1.Open Windows Explorer by selecting Start on the Windows taskbar and then choosing My Computer.
2.Find the directory that you want to share, right-click it, and choose Sharing and Security.
The Properties dialog box opens for that directory.
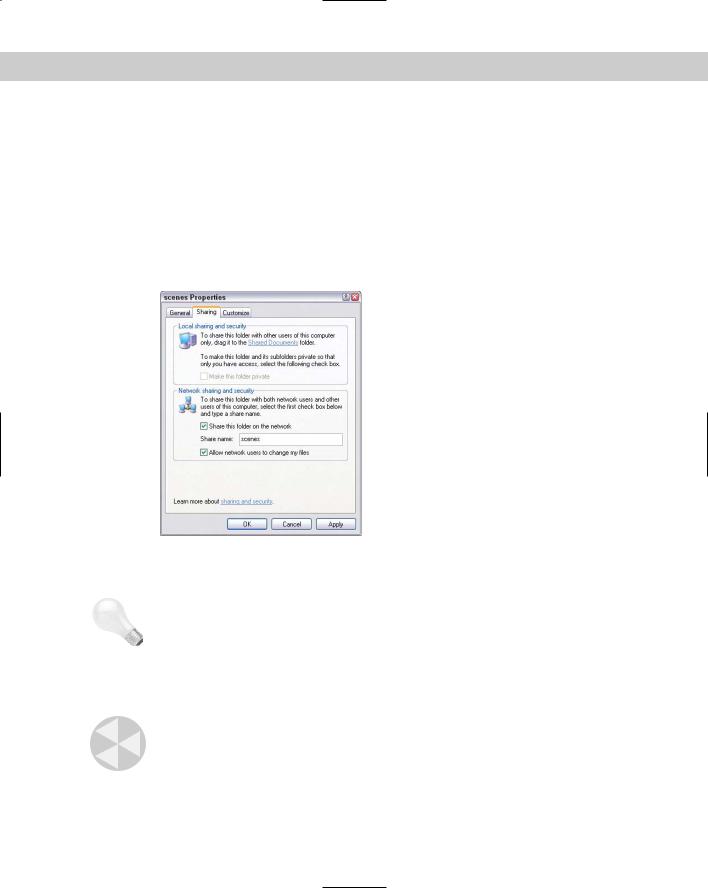
3.In the Sharing panel, choose the Share this Folder option and type a name for this directory in the Share Name field if it is blank. Figure 45-3 shows the “maps” directory being set up to be shared.
|
Figure 45-3: Sharing a directory so |
|
that other computers on the network |
|
can use it |
Tip |
Other computers will refer to the shared directory by its shared name instead of its actual |
|
name, so to keep things simple, accept the default of using the actual name for the |
|
shared name. |
4.Select the Make this folder Private option to control the access to the folder. This option lets you control who has access to this directory and how much access each person or group has (access could be restricted to read-only, for example). For now, make sure that the Allow network users to change my files option is selected.
Caution |
Enabling the Allow network users to change my files option gives all network users full con- |
|
trol access, letting everyone on the entire network read and write or erase the files in your |
|
shared directory. For now, leaving it this way until you’re sure everything is configured prop- |
|
erly is best. Later, however, restricting access to only those accounts that should have access |
|
would be a good idea. |

1066 Part X Rendering
5.Click OK in each dialog box to close them all until you’re back at the Windows Explorer. If you press F5, Windows refreshes the display and your directory now has a little blue hand holding the folder. Figure 45-4 shows the “maps” directory denoted as a shared directory.
Other computers can access your shared directory by specifying the full name of the directory’s location. In the example, we’ve been using, the “maps” directory is on a computer named “Dungar,” so the full path to that directory is as follows:
\\dungar\maps
You can test this by opening Windows Explorer (like we just did in the procedure) on a different computer, choosing Tools Map Network Drive, and entering the full path to that directory. After you’ve mapped a drive to a directory, Windows treats that directory as if it were an actual drive on your machine. In Figure 45-5, the Z drive is mapped to point to the “scenes” directory on Dungar.
Figure 45-4: Other computers can now access the shared “scenes” directory.
After you’ve mapped to a new drive, go back to Windows Explorer and press F5 to refresh the display again. You now have a new drive for that network directory.
Tutorial: Choosing shared directories
Now you need to decide where to put the maps and the output files. These directories are the place from which all machines in your rendering farm read maps and images and to which they all write finished frames of your animation. The following procedure takes you through the steps for doing this using the directories I’ve set up on my own rendering farm.