

- •Preface
- •About This Book
- •Acknowledgments
- •Contents at a Glance
- •Contents
- •Relaxing at the Beach
- •Dressing the Scene
- •Animating Motion
- •Rendering the Final Animation
- •Summary
- •The Interface Elements
- •Using the Menus
- •Using the Toolbars
- •Using the Viewports
- •Using the Command Panel
- •Using the Lower Interface Bar Controls
- •Interacting with the Interface
- •Getting Help
- •Summary
- •Understanding 3D Space
- •Using the Viewport Navigation Controls
- •Configuring the Viewports
- •Working with Viewport Backgrounds
- •Summary
- •Working with Max Scene Files
- •Setting File Preferences
- •Importing and Exporting
- •Referencing External Objects
- •Using the File Utilities
- •Accessing File Information
- •Summary
- •Customizing Modify and Utility Panel Buttons
- •Working with Custom Interfaces
- •Configuring Paths
- •Selecting System Units
- •Setting Preferences
- •Summary
- •Creating Primitive Objects
- •Exploring the Primitive Object Types
- •Summary
- •Selecting Objects
- •Setting Object Properties
- •Hiding and Freezing Objects
- •Using Layers
- •Summary
- •Cloning Objects
- •Understanding Cloning Options
- •Mirroring Objects
- •Cloning over Time
- •Spacing Cloned Objects
- •Creating Arrays of Objects
- •Summary
- •Working with Groups
- •Building Assemblies
- •Building Links between Objects
- •Displaying Links and Hierarchies
- •Working with Linked Objects
- •Summary
- •Using the Schematic View Window
- •Working with Hierarchies
- •Setting Schematic View Preferences
- •Using List Views
- •Summary
- •Working with the Transformation Tools
- •Using Pivot Points
- •Using the Align Commands
- •Using Grids
- •Using Snap Options
- •Summary
- •Exploring the Modifier Stack
- •Exploring Modifier Types
- •Summary
- •Exploring the Modeling Types
- •Working with Subobjects
- •Modeling Helpers
- •Summary
- •Drawing in 2D
- •Editing Splines
- •Using Spline Modifiers
- •Summary
- •Creating Editable Mesh and Poly Objects
- •Editing Mesh Objects
- •Editing Poly Objects
- •Using Mesh Editing Modifiers
- •Summary
- •Introducing Patch Grids
- •Editing Patches
- •Using Modifiers on Patch Objects
- •Summary
- •Creating NURBS Curves and Surfaces
- •Editing NURBS
- •Working with NURBS
- •Summary
- •Morphing Objects
- •Creating Conform Objects
- •Creating a ShapeMerge Object
- •Creating a Terrain Object
- •Using the Mesher Object
- •Working with BlobMesh Objects
- •Creating a Scatter Object
- •Creating Connect Objects
- •Modeling with Boolean Objects
- •Creating a Loft Object
- •Summary
- •Understanding the Various Particle Systems
- •Creating a Particle System
- •Using the Spray and Snow Particle Systems
- •Using the Super Spray Particle System
- •Using the Blizzard Particle System
- •Using the PArray Particle System
- •Using the PCloud Particle System
- •Using Particle System Maps
- •Controlling Particles with Particle Flow
- •Summary
- •Understanding Material Properties
- •Working with the Material Editor
- •Using the Material/Map Browser
- •Using the Material/Map Navigator
- •Summary
- •Using the Standard Material
- •Using Shading Types
- •Accessing Other Parameters
- •Using External Tools
- •Summary
- •Using Compound Materials
- •Using Raytrace Materials
- •Using the Matte/Shadow Material
- •Using the DirectX 9 Shader
- •Applying Multiple Materials
- •Material Modifiers
- •Summary
- •Understanding Maps
- •Understanding Material Map Types
- •Using the Maps Rollout
- •Using the Map Path Utility
- •Using Map Instances
- •Summary
- •Mapping Modifiers
- •Using the Unwrap UVW modifier
- •Summary
- •Working with Cameras
- •Setting Camera Parameters
- •Summary
- •Using the Camera Tracker Utility
- •Summary
- •Using Multi-Pass Cameras
- •Creating Multi-Pass Camera Effects
- •Summary
- •Understanding the Basics of Lighting
- •Getting to Know the Light Types
- •Creating and Positioning Light Objects
- •Viewing a Scene from a Light
- •Altering Light Parameters
- •Working with Photometric Lights
- •Using the Sunlight and Daylight Systems
- •Using Volume Lights
- •Summary
- •Selecting Advanced Lighting
- •Using Local Advanced Lighting Settings
- •Tutorial: Excluding objects from light tracing
- •Summary
- •Understanding Radiosity
- •Using Local and Global Advanced Lighting Settings
- •Working with Advanced Lighting Materials
- •Using Lighting Analysis
- •Summary
- •Using the Time Controls
- •Working with Keys
- •Using the Track Bar
- •Viewing and Editing Key Values
- •Using the Motion Panel
- •Using Ghosting
- •Animating Objects
- •Working with Previews
- •Wiring Parameters
- •Animation Modifiers
- •Summary
- •Understanding Controller Types
- •Assigning Controllers
- •Setting Default Controllers
- •Examining the Various Controllers
- •Summary
- •Working with Expressions in Spinners
- •Understanding the Expression Controller Interface
- •Understanding Expression Elements
- •Using Expression Controllers
- •Summary
- •Learning the Track View Interface
- •Working with Keys
- •Editing Time
- •Editing Curves
- •Filtering Tracks
- •Working with Controllers
- •Synchronizing to a Sound Track
- •Summary
- •Understanding Your Character
- •Building Bodies
- •Summary
- •Building a Bones System
- •Using the Bone Tools
- •Using the Skin Modifier
- •Summary
- •Creating Characters
- •Working with Characters
- •Using Character Animation Techniques
- •Summary
- •Forward versus Inverse Kinematics
- •Creating an Inverse Kinematics System
- •Using the Various Inverse Kinematics Methods
- •Summary
- •Creating and Binding Space Warps
- •Understanding Space Warp Types
- •Combining Particle Systems with Space Warps
- •Summary
- •Understanding Dynamics
- •Using Dynamic Objects
- •Defining Dynamic Material Properties
- •Using Dynamic Space Warps
- •Using the Dynamics Utility
- •Using the Flex Modifier
- •Summary
- •Using reactor
- •Using reactor Collections
- •Creating reactor Objects
- •Calculating and Previewing a Simulation
- •Constraining Objects
- •reactor Troubleshooting
- •Summary
- •Understanding the Max Renderers
- •Previewing with ActiveShade
- •Render Parameters
- •Rendering Preferences
- •Creating VUE Files
- •Using the Rendered Frame Window
- •Using the RAM Player
- •Reviewing the Render Types
- •Using Command-Line Rendering
- •Creating Panoramic Images
- •Getting Printer Help
- •Creating an Environment
- •Summary
- •Creating Atmospheric Effects
- •Using the Fire Effect
- •Using the Fog Effect
- •Summary
- •Using Render Elements
- •Adding Render Effects
- •Creating Lens Effects
- •Using Other Render Effects
- •Summary
- •Using Raytrace Materials
- •Using a Raytrace Map
- •Enabling mental ray
- •Summary
- •Understanding Network Rendering
- •Network Requirements
- •Setting up a Network Rendering System
- •Starting the Network Rendering System
- •Configuring the Network Manager and Servers
- •Logging Errors
- •Using the Monitor
- •Setting up Batch Rendering
- •Summary
- •Compositing with Photoshop
- •Video Editing with Premiere
- •Video Compositing with After Effects
- •Introducing Combustion
- •Using Other Compositing Solutions
- •Summary
- •Completing Post-Production with the Video Post Interface
- •Working with Sequences
- •Adding and Editing Events
- •Working with Ranges
- •Working with Lens Effects Filters
- •Summary
- •What Is MAXScript?
- •MAXScript Tools
- •Setting MAXScript Preferences
- •Types of Scripts
- •Writing Your Own MAXScripts
- •Learning the Visual MAXScript Editor Interface
- •Laying Out a Rollout
- •Summary
- •Working with Plug-Ins
- •Locating Plug-Ins
- •Summary
- •Low-Res Modeling
- •Using Channels
- •Using Vertex Colors
- •Rendering to a Texture
- •Summary
- •Max and Architecture
- •Using AEC Objects
- •Using Architectural materials
- •Summary
- •Tutorial: Creating Icy Geometry with BlobMesh
- •Tutorial: Using Caustic Photons to Create a Disco Ball
- •Summary
- •mental ray Rendering System
- •Particle Flow
- •reactor 2.0
- •Schematic View
- •BlobMesh
- •Spline and Patch Features
- •Import and Export
- •Shell Modifier
- •Vertex Paint and Channel Info
- •Architectural Primitives and Materials
- •Minor Improvements
- •Choosing an Operating System
- •Hardware Requirements
- •Installing 3ds max 6
- •Authorizing the Software
- •Setting the Display Driver
- •Updating Max
- •Moving Max to Another Computer
- •Using Keyboard Shortcuts
- •Using the Hotkey Map
- •Main Interface Shortcuts
- •Dialog Box Shortcuts
- •Miscellaneous Shortcuts
- •System Requirements
- •Using the CDs with Windows
- •What’s on the CDs
- •Troubleshooting
- •Index
518 Part III Modeling
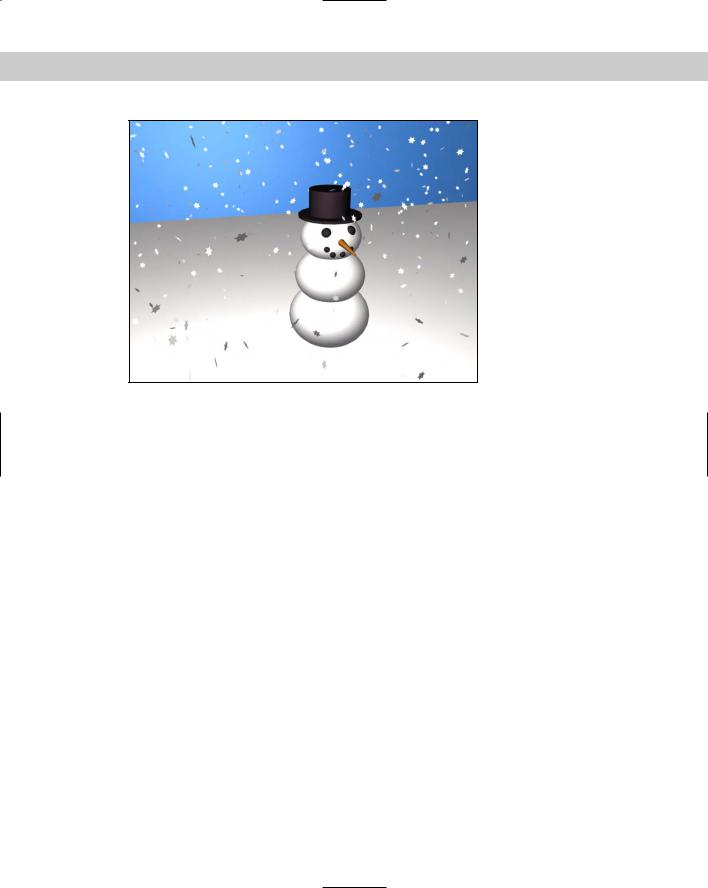
Figure 18-4: A simple snowstorm created with the Snow particle system
Using the Super Spray Particle System
If you think of the Spray particle system as a light summer rain shower, then the Super Spray particle system is like a fire hose. The Super Spray particle system is considerably more complex than its Spray and Snow counterparts. With this complexity comes a host of features that make this one of the most robust effects creation tools in Max.
Unlike the Spray and Snow particle systems, the Super Spray particle system includes several rollouts.
Super Spray Basic Parameters rollout
The Super Spray particle system emits all particles from the center of the emitter icon. The emitter icon is a simple cylinder and an arrow that points in the direction in which the particles will travel. In the Basic Parameters rollout, shown in Figure 18-5, the Off Axis value sets how far away from the icon’s arrow the stream of particles will travel. A value of 0 lines the particle stream with the icon’s arrow, and a value of 180 emits particles in the opposite direction. The Spread value can also range from 0 to 180 degrees and fans the particles equally about the specified axis. The Off Plane value spins the particles about its center axis, and the Spread value sets the distance from this center axis that particles can be created. If all these values are left at 0, then the particle system emits a single, straight stream of particles, and if all values are 180, then particles go in all directions from the center of the emitter icon.
The icon size can be set or the icon can be hidden in the viewport. You can also set the particles to be displayed in the viewport as Dots, Ticks, Meshes, or Bounding Boxes. The Percentage value is the number of the total particles that are visible in the viewport and should be kept low to ensure rapid viewport updates.

Chapter 18 Creating Particles and Particle Flow |
519 |
Figure 18-5: The Basic Parameters rollout lets you specify where and how the particles appear in the viewports.
Particle Generation rollout
The Particle Generation rollout, shown in Figure 18-6, is where you set the number of particles to include in a system as either a Rate or Total value. The Rate value is the number of particles per frame that are generated. The Total value is the number of particles generated over the total number of frames. Use the Rate value if you want the animation to have a steady stream of particles throughout the animation; use the Total value if you want to set the total number of particles that will appear throughout the entire range of frames.
Figure 18-6: The Particle Generation rollout lets you control the particle motion.
In the Particle Motion group, the Speed value determines the initial speed and direction of particles. The Variation value alters this initial speed as a percentage of the Speed value. A high Variation value results in particles with all sorts of different speeds.
In the Particle Timing group, you can set when the emitting process starts and stops. Using the Display Until value, you can also cause the particles to continue displaying after the emitting has stopped. The Life value is how long particles stay around, which can vary based on another Variation setting.
When an emitter is animated (such as moving back and forth), the particles can clump together where the system changes direction. This clumping effect is called puffing. The Subframe Sampling options help reduce this effect. The three options are Creation Time (which controls emitting particles over time), Emitter Translation (which controls emitting
520 Part III Modeling
particles as the emitter is moved), and Emitter Rotation (which controls emitting particles as the emitter is rotated. All three options can be enabled, but each one that is enabled adds the computation time required to the render.
Note The Subframe Sampling options increase the rendering time and should be used only if necessary.
You can specify the particle size along with a Variation value. You can also cause the particles to grow and fade for a certain number of frames.
The Seed value helps determine the randomness of the particles. Clicking the New button automatically generates a new Seed value.
Particle Type rollout
The Particle Type rollout, shown in Figure 18-7, lets you define the look of the particles. At the top of the rollout are three Particle Type options: Standard Particles, MetaParticles, and Instanced Geometry.
Figure 18-7: The Particle Type rollout (shown in four parts) lets you define how the particles look.
If you select Standard Particles as the particle type, you can select which geometric shape you want to use from the Standard Particles section. The options are Triangle, Special, Constant, Six Point, Cube, Facing, Tetra, and Sphere.
The Special type consists of three intersecting planes, which are useful if you apply maps to them. The Facing type is also useful with maps; it creates a simple, square face that always faces the viewer. The Constant type maintains the same pixel size, regardless of the distance from the camera or viewer. Six Point renders each particle as a 2D six-pointed star. All other types are common geometric objects.
Tutorial: Creating a fireworks fountain
For an example of the Super Spray particle system, you create a firework fountain. Fireworks are essentially just lots of particles with a short life span and a high amount of self-illumination. (Tell yourself that the next time you watch a fireworks display.)
Cross- |
The ready-made material for this example uses the Glow Render effect to make the particles |
Reference |
glow. You can learn more about render effects in Chapter 43, “Using Render Elements and |
|
|
|
Effects.” |
To create a fireworks fountain using a particle system, follow these steps:

Chapter 18 Creating Particles and Particle Flow |
521 |
Tip
Caution
1.Open the Fireworks fountain.max file from the Chap 18 directory on the CD-ROM.
This file includes a simple fountain base and the Gravity space warp to cause the particles to curve back toward the ground.
Some of the most amazing special effects are made possible by combining particle systems with Space Warps.
2.Select the Create Particles Super Spray menu command, drag in the Top view, and position the system at the top of the cylinder with the direction arrow pointing toward the sky.
3.Open the Modify panel, and set the Off Axis Spread to 45 and the Off Plane Spread to 90. In the Particle Generation rollout, set the Total of particles to 2000 with a Speed of 20 and a Variation of 100. Set the Emit Start to 0 and the Emit Stop to 100. Set the Display Until to 100 and the Life to 25 with a Variation of 20. The Size of the particles should be 5.
4.Open the Material Editor (by pressing the M key), and select the first sample slot. This slot includes a material named Spark. Drag the material from the Material Editor to the particle system’s icon.
5.Select the Super Spray icon, right-click it to open the pop-up menu, and select the Properties menu option. In the Object Properties dialog box, select the Object Motion Blur option.
When viewing the animation, maximize a single viewport. If Max tries to update all four viewports at once with this many particle objects, the update is slow.
Figure 18-8 shows sparks emitting from the fireworks fountain.
Figure 18-8: The Super Spray particle system is used to create fireworks sparks.
522 Part III Modeling
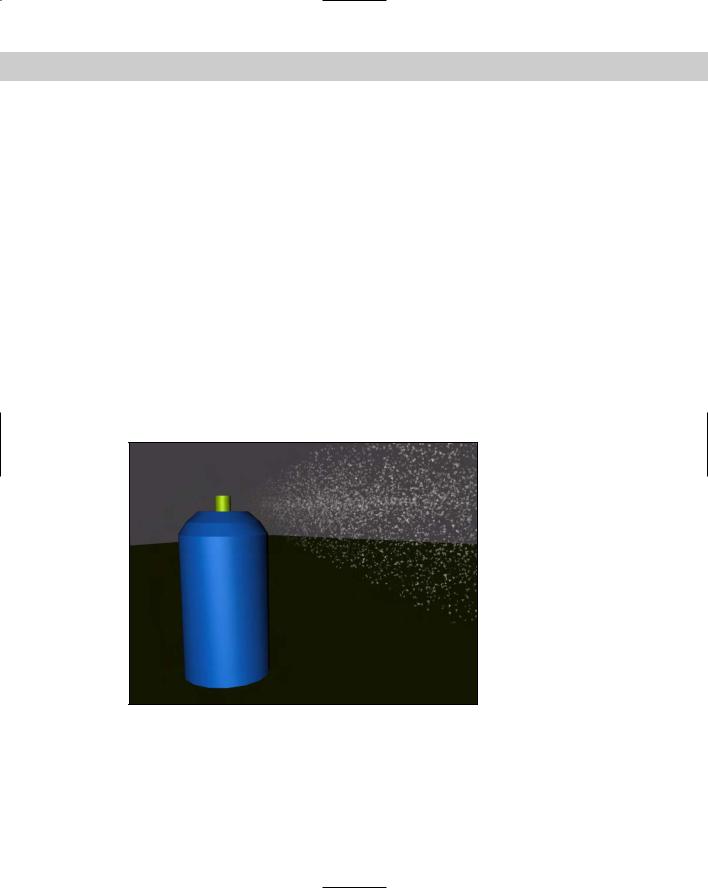
Tutorial: Adding spray to a spray can
The Super Spray particle system is complex enough to warrant another example. What good is a spray can without any spray? In this tutorial, we create a spray-can model and then use the Super Spray particle system to create the spray coming from it.
To create a stream of spray for a spray can, follow these steps:
1.Open the Spray can.max file from the Chap 18 directory on the CD-ROM.
This file includes a simple spray-can object created using a cylinder for the can base and the nozzle and a lathed spline for the top of the can.
2.Select the Particle Systems subcategory button, and click the Super Spray button. Drag in the Top viewport to create the Super Spray icon, and position it at the mouth of the nozzle.
3.Set the Off Axis Spread to 20 and the Off Plane Spread to 90. In the Particle Generation rollout, set the Emit Rate to 1000, the Speed to 20, and the Life to 30. Set the Size of the particles to 5.
4.Open the Material Editor (by pressing M), and select the material named Spray Mist. Then drag this material onto the Super Spray icon to apply this material to the Super Spray particle system.
Figure 18-9 shows the fine spray from an aerosol can.
Figure 18-9: Using a mostly transparent material, you can create a fine mist spray.
Using the MetaParticles option
The MetaParticles option in the Particle Type rollout makes the particle system release Metaball objects. Metaballs are viscous spheres that, like mercury, flow into each other when close. These particles take a little longer to render but are effective for simulating water and

Chapter 18 Creating Particles and Particle Flow |
523 |
liquids. The MetaParticles type is available for the Super Spray, Blizzard, PArray, and PCloud particle systems.
Selecting the MetaParticles option in the Particle Types section enables the MetaParticle Parameters group. In this group are options for controlling how the MetaParticles behave. The Tension value determines how easily objects blend together. MetaParticles with a high tension resist merging with other particles. You can vary the amount of tension with the Variation value.
Because MetaParticles can take a long time to render, the Evaluation Coarseness settings enable you to set how computationally intensive the rendering process is. This can be set differently for the viewport and the renderer — the higher the value, the quicker the results. You can also set this to Automatic Coarseness, which automatically controls the coarseness settings based on the speed and ability of the renderer. The One Connected Blob option speeds the rendering process by ignoring all particles that aren’t connected.
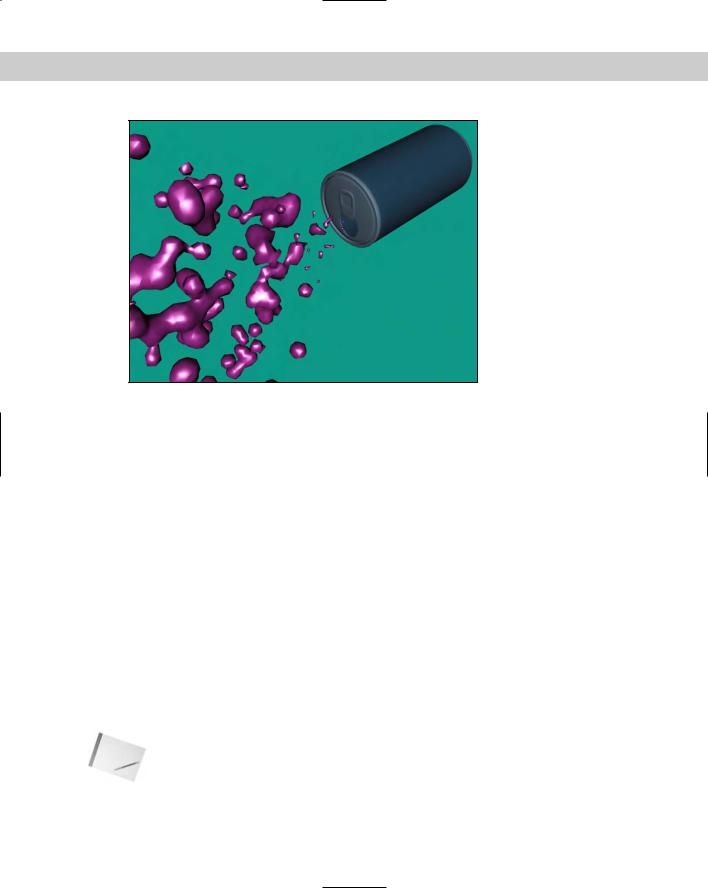
Tutorial: Spilling soda from a can
MetaParticles are a good option to use to create drops of liquid, like those from a soda can.
To create liquid flowing from a can, follow these steps:
1.Open the MetaParticles from a soda can.max file from the Chap 18 directory on the CD-ROM.
This file includes a soda can model created by Zygote Media positioned so the can is on its side.
2.Select the Create Particles Super Spray menu command, and drag the icon in the Front viewport. Position the icon so that its origin is at the opening of the can and the directional vector is pointing outward.
3.With the Super Spray icon selected, open the Modify panel, and in the Basic Parameters rollout, set the Off Axis and Off Plane Spread values to 40.
4.In the Particle Generation rollout, keep the default Rate and Speed values, but set the Speed Variation to 50 to alter the speed of the various particles. Set the Particle Size to 20.
5.In the Particle Type rollout, select the MetaParticles option, set the Tension value to 1, and make sure that the Automatic Coarseness option is selected.
6.Open the Material Editor (by pressing the M key), and drag the Purple Soda material to the particle system icon.
Figure 18-10 shows a rendered image of the MetaParticles spilling from a soda can at frame 25.
Instanced Geometry
Using the Particle Type rollout, you can select an object to use as the particle. If the Instanced Geometry option is selected as the particle type, you can select an object to use as the particle. To choose an object to use as a particle, click the Pick Object button and then select an object from the viewport. If the Use Subtree Also option is selected, then all child objects are also included.
Caution |
Using complicated objects as particles can slow down a system and increase the |
|
rendering time. |
524 Part III Modeling
Figure 18-10: MetaParticles emitting from the opening of a soda can
The Animation Offset Keying option determines how an animated object that is selected as the particle is animated. The None option animates all objects the same, regardless of when they are born. The Birth option starts the animation for each object when it is created, and the Random option offsets the timing randomly based on the Frame Offset value. For example, if you have selected an animated bee that flaps its wings as the particle, and you select None as the Animation Offset Keying option, all the bees flap their wings in concert. Selecting the Birth option instead starts them flapping their wings when they are born, and selecting Random offsets each instance differently.
For materials, the Time and Distance values determine the number of frames or the distance traveled before a particle is completely mapped. You can apply materials to the icon that appears when the particle system is created. The Get Material From button lets you select the object from which to get the material. The options include the icon and the Instanced Geometry.
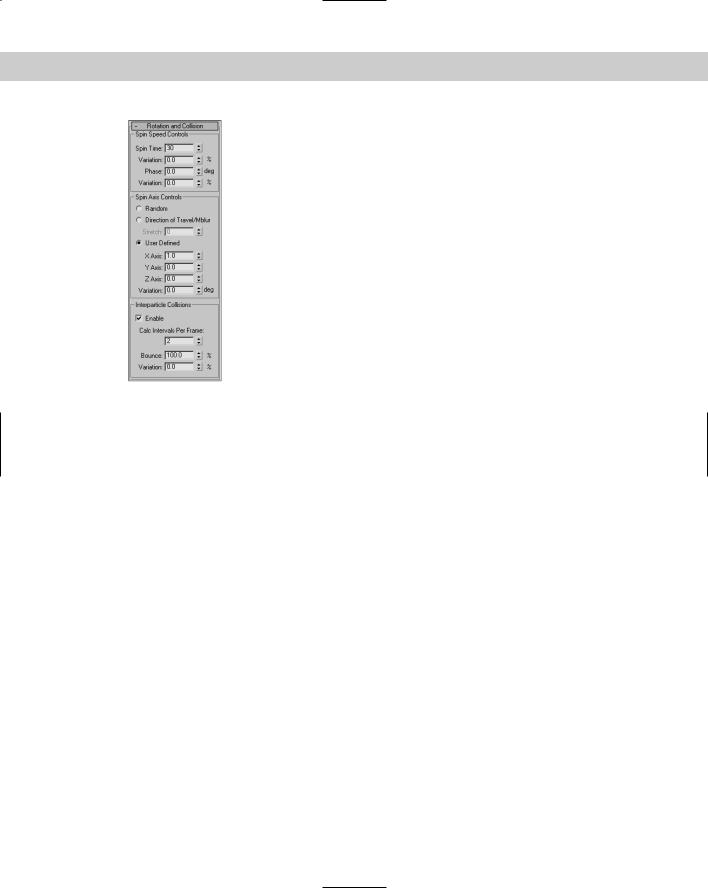
Rotation and Collision rollout
In the Rotation and Collision rollout is an option to enable interparticle collisions. This option causes objects to bounce away from one another when their object boundaries overlap.
The Rotation and Collision rollout, shown in Figure 18-11, contains several controls to alter the rotation of individual particles. The Spin Time is the number of frames required to rotate a full revolution. The Phase value is the initial rotation of the particle. You can vary both of these values with Variation values.
Note |
The Rotation and Collision rollout options can also increase the rendering time of a scene. |
Chapter 18 Creating Particles and Particle Flow |
525 |
Figure 18-11: The Rotation and Collision rollout options can control how objects collide with one another.
You can also set the axis about which the particles rotate. Options include Random, Direction of Travel/MBlur, and User Defined. The Stretch value under the Direction of Travel option causes the object to elongate in the direction of travel. The User Defined option lets you specify the degrees of rotation about each axis.
Interparticle collisions are computationally intensive and can easily be enabled or disabled with the Enable option. You can also set how often the collisions are calculated. The Bounce value determines the speed of particles after collisions as a percentage of their collision speed. You can vary the amount of Bounce with the Variation value.
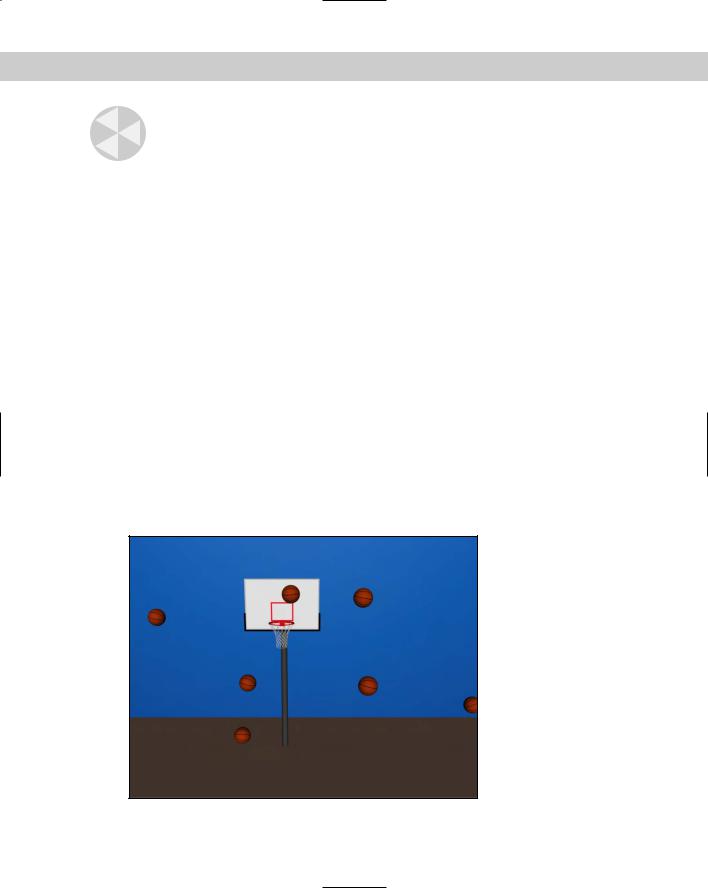
Tutorial: Basketball shooting practice
When an entire team is warming up before a basketball game, the space around the basketball hoop is quite chaotic — with basketballs flying in all directions. In this tutorial, we use a basketball object as a particle and spread it around a hoop. (Watch out for flying basketballs!)
To use a basketball object as a particle, follow these steps:
1.Open the Basketballs at a hoop.max file from the Chap 18 directory on the CD-ROM. This file includes basketball and basketball hoop models created by Zygote Media.
2.Select the Create Particles Super Spray menu command, and drag the icon in the viewport. Position the icon in the Front view so that its origin is above and slightly in front of the hoop and the directional vector is pointing down (you need to rotate the emitter icon).
3.Open the Modify panel, and in the Basic Parameters rollout, set the Off Axis Spread value to 90 and the Off Plane Spread value to 40; this randomly spreads the basketballs around the hoop. In the Viewport Display group of the Basic Parameters rollout, select the Mesh option. Set the Percentage of Particles to 100 percent to see the position of each basketball object in the viewport.
526 Part III Modeling
Caution |
Because the basketball is a fairly complex model, using the Mesh option severely slows |
|
down the viewport update. You can speed the viewport display using the Bbox option, but |
|
you’ll need to choose it after selecting the Instanced Geometry option. |
4.In the Particle Generation rollout, select the Use Total option, and enter 30 for the value. (This number is reasonable and not uncommon during warm-ups.) Set the Speed value to 0.2 and the Life value to 100 because we don’t want basketballs to disappear. Because of the low number of particles, you can disable the Subframe Sampling options. Set the Grow For and Fade For values to 0.
5.In the Particle Type rollout, select the Instanced Geometry option, and click the Pick Object button. Make sure that the Use Subtree Also option is selected to get the entire group, and then select the basketball group in the viewport. At the bottom of this rollout, select the Instanced Geometry option and click the Get Material From button to give all the particles the same material as the original object.
6.In the Rotation and Collision rollout, set the Spin Time to 100 to make the basketballs spin as they move about the scene. Set the Spin Axis Control to Random. Also enable the Interparticle Collisions option, and set the Calculation Interval to 1 and the Bounce value to 100.
With the Collisions option enabled, the basketballs are prevented from overlapping one another.
7.At the floor of the basketball hoop is a Deflector Space Warp. Click the Bind to Space Warp button on the main toolbar, and drag from this floor deflector to the Super Spray icon.
This makes the basketballs bounce off the floor.
Figure 18-12 shows a rendered image of the scene at frame 30 with several basketballs bouncing chaotically around a hoop.
Figure 18-12: Multiple basketball particles flying around a hoop

Chapter 18 Creating Particles and Particle Flow |
527 |
Object Motion Inheritance rollout
The settings on the Object Motion Inheritance rollout, shown in Figure 18-13, determine how the particles move when the emitter is moving. The Influence value defines how closely the particles follow the emitter’s motion; a value of 100 has particles follow exactly, and a value of 0 means they don’t follow at all.
Figure 18-13: The Object Motion Inheritance rollout sets how the particles inherit the motion of their emitter.
The Multiplier value can exaggerate or diminish the effect of the emitter’s motion. Particles with a high multiplier can actually precede the emitter.
Bubble Motion rollout
The Bubble Motion rollout, also shown in Figure 18-13, simulates the wobbling motion of bubbles as they rise in a liquid. Three values define this motion, each with variation values. Amplitude is the distance that the particle moves from side to side. Period is the time that it takes to complete one side-to-side motion cycle. The Phase value defines where the particle starts along the amplitude curve.
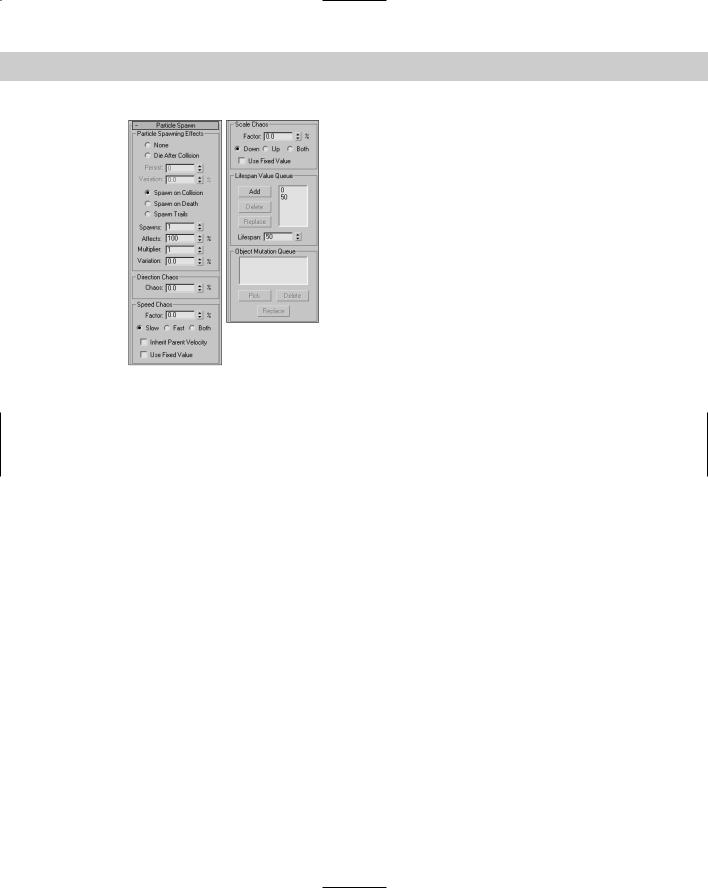
Particle Spawn rollout
The Particle Spawn rollout, shown in Figure 18-14, sets options for spawning new particles when a particle dies or collides with another particle. If the setting is None, colliding particles bounce off one another and dying particles simply disappear. The Die After Collision option causes a particle to disappear after it collides. The Persist value sets how long the particle stays around before disappearing. The Variation value causes the Persist value to vary by a defined percentage.
The Spawn on Collision, Spawn on Death, and Spawn Trails options all enable the spawn controls and define when particles spawn new particles. The Spawns value is the number of times a particle can spawn other particles. The Affects value is the percentage of particles that can spawn new particles; lowering this value creates some duds that do not spawn. The Multiplier value determines the number of new particles created.
Note The Spawn Trails option causes every particle to spawn a new particle at every frame. This option can very quickly create an enormous number of particles and should be used with caution.
The Chaos settings define the direction and speed of the spawned particles. A Direction Chaos value of 100 gives the spawned particles the freedom to travel in any direction, whereas a setting of 0 moves them in the same direction as their originator.
528 Part III Modeling
Figure 18-14: The Particle Spawn rollout (shown in three parts) can cause particles to spawn new particles.
The Chaos Speed Factor is the difference in speed between the spawned particle and its originator. This factor can be faster or slower than the original. Selecting the Both option speeds up some particles and slows others randomly. You can also choose to have spawned particles use their parent’s velocity or use the factor value as a fixed value.
The Scale Chaos Factor works similarly to the Chaos Speed Factor, except that it scales particles to be larger or smaller than their originator.
The Lifespan Value Queue lets you define different lifespan levels. Original particles have a lifespan equal to the first entry in the queue. The particles that are spawned from those spawned particles last as long as the second value, and so on. To add a value to the list, enter the value in the Lifespan spinner and click the Add button. The Delete button removes values from the list, and the Replace button switches value positions.
If Instanced Geometry is the selected particle type, you can fill the Object Mutation Queue with additional objects to use at each spawn level. These objects appear after a particle is spawned. To pick a new object to add to the queue, use the Pick button. You can select several objects, and they are used in the order in which they are listed.
Load/Save Presets rollout
You can save and load each particle configuration using the Load/Save Presets rollout, shown in Figure 18-15. To save a configuration, type a name in the Preset Name field and click the Save button. All saved presets are displayed in the list. To use one of these preset configurations, select it and click the Load button.