

- •Preface
- •About This Book
- •Acknowledgments
- •Contents at a Glance
- •Contents
- •Relaxing at the Beach
- •Dressing the Scene
- •Animating Motion
- •Rendering the Final Animation
- •Summary
- •The Interface Elements
- •Using the Menus
- •Using the Toolbars
- •Using the Viewports
- •Using the Command Panel
- •Using the Lower Interface Bar Controls
- •Interacting with the Interface
- •Getting Help
- •Summary
- •Understanding 3D Space
- •Using the Viewport Navigation Controls
- •Configuring the Viewports
- •Working with Viewport Backgrounds
- •Summary
- •Working with Max Scene Files
- •Setting File Preferences
- •Importing and Exporting
- •Referencing External Objects
- •Using the File Utilities
- •Accessing File Information
- •Summary
- •Customizing Modify and Utility Panel Buttons
- •Working with Custom Interfaces
- •Configuring Paths
- •Selecting System Units
- •Setting Preferences
- •Summary
- •Creating Primitive Objects
- •Exploring the Primitive Object Types
- •Summary
- •Selecting Objects
- •Setting Object Properties
- •Hiding and Freezing Objects
- •Using Layers
- •Summary
- •Cloning Objects
- •Understanding Cloning Options
- •Mirroring Objects
- •Cloning over Time
- •Spacing Cloned Objects
- •Creating Arrays of Objects
- •Summary
- •Working with Groups
- •Building Assemblies
- •Building Links between Objects
- •Displaying Links and Hierarchies
- •Working with Linked Objects
- •Summary
- •Using the Schematic View Window
- •Working with Hierarchies
- •Setting Schematic View Preferences
- •Using List Views
- •Summary
- •Working with the Transformation Tools
- •Using Pivot Points
- •Using the Align Commands
- •Using Grids
- •Using Snap Options
- •Summary
- •Exploring the Modifier Stack
- •Exploring Modifier Types
- •Summary
- •Exploring the Modeling Types
- •Working with Subobjects
- •Modeling Helpers
- •Summary
- •Drawing in 2D
- •Editing Splines
- •Using Spline Modifiers
- •Summary
- •Creating Editable Mesh and Poly Objects
- •Editing Mesh Objects
- •Editing Poly Objects
- •Using Mesh Editing Modifiers
- •Summary
- •Introducing Patch Grids
- •Editing Patches
- •Using Modifiers on Patch Objects
- •Summary
- •Creating NURBS Curves and Surfaces
- •Editing NURBS
- •Working with NURBS
- •Summary
- •Morphing Objects
- •Creating Conform Objects
- •Creating a ShapeMerge Object
- •Creating a Terrain Object
- •Using the Mesher Object
- •Working with BlobMesh Objects
- •Creating a Scatter Object
- •Creating Connect Objects
- •Modeling with Boolean Objects
- •Creating a Loft Object
- •Summary
- •Understanding the Various Particle Systems
- •Creating a Particle System
- •Using the Spray and Snow Particle Systems
- •Using the Super Spray Particle System
- •Using the Blizzard Particle System
- •Using the PArray Particle System
- •Using the PCloud Particle System
- •Using Particle System Maps
- •Controlling Particles with Particle Flow
- •Summary
- •Understanding Material Properties
- •Working with the Material Editor
- •Using the Material/Map Browser
- •Using the Material/Map Navigator
- •Summary
- •Using the Standard Material
- •Using Shading Types
- •Accessing Other Parameters
- •Using External Tools
- •Summary
- •Using Compound Materials
- •Using Raytrace Materials
- •Using the Matte/Shadow Material
- •Using the DirectX 9 Shader
- •Applying Multiple Materials
- •Material Modifiers
- •Summary
- •Understanding Maps
- •Understanding Material Map Types
- •Using the Maps Rollout
- •Using the Map Path Utility
- •Using Map Instances
- •Summary
- •Mapping Modifiers
- •Using the Unwrap UVW modifier
- •Summary
- •Working with Cameras
- •Setting Camera Parameters
- •Summary
- •Using the Camera Tracker Utility
- •Summary
- •Using Multi-Pass Cameras
- •Creating Multi-Pass Camera Effects
- •Summary
- •Understanding the Basics of Lighting
- •Getting to Know the Light Types
- •Creating and Positioning Light Objects
- •Viewing a Scene from a Light
- •Altering Light Parameters
- •Working with Photometric Lights
- •Using the Sunlight and Daylight Systems
- •Using Volume Lights
- •Summary
- •Selecting Advanced Lighting
- •Using Local Advanced Lighting Settings
- •Tutorial: Excluding objects from light tracing
- •Summary
- •Understanding Radiosity
- •Using Local and Global Advanced Lighting Settings
- •Working with Advanced Lighting Materials
- •Using Lighting Analysis
- •Summary
- •Using the Time Controls
- •Working with Keys
- •Using the Track Bar
- •Viewing and Editing Key Values
- •Using the Motion Panel
- •Using Ghosting
- •Animating Objects
- •Working with Previews
- •Wiring Parameters
- •Animation Modifiers
- •Summary
- •Understanding Controller Types
- •Assigning Controllers
- •Setting Default Controllers
- •Examining the Various Controllers
- •Summary
- •Working with Expressions in Spinners
- •Understanding the Expression Controller Interface
- •Understanding Expression Elements
- •Using Expression Controllers
- •Summary
- •Learning the Track View Interface
- •Working with Keys
- •Editing Time
- •Editing Curves
- •Filtering Tracks
- •Working with Controllers
- •Synchronizing to a Sound Track
- •Summary
- •Understanding Your Character
- •Building Bodies
- •Summary
- •Building a Bones System
- •Using the Bone Tools
- •Using the Skin Modifier
- •Summary
- •Creating Characters
- •Working with Characters
- •Using Character Animation Techniques
- •Summary
- •Forward versus Inverse Kinematics
- •Creating an Inverse Kinematics System
- •Using the Various Inverse Kinematics Methods
- •Summary
- •Creating and Binding Space Warps
- •Understanding Space Warp Types
- •Combining Particle Systems with Space Warps
- •Summary
- •Understanding Dynamics
- •Using Dynamic Objects
- •Defining Dynamic Material Properties
- •Using Dynamic Space Warps
- •Using the Dynamics Utility
- •Using the Flex Modifier
- •Summary
- •Using reactor
- •Using reactor Collections
- •Creating reactor Objects
- •Calculating and Previewing a Simulation
- •Constraining Objects
- •reactor Troubleshooting
- •Summary
- •Understanding the Max Renderers
- •Previewing with ActiveShade
- •Render Parameters
- •Rendering Preferences
- •Creating VUE Files
- •Using the Rendered Frame Window
- •Using the RAM Player
- •Reviewing the Render Types
- •Using Command-Line Rendering
- •Creating Panoramic Images
- •Getting Printer Help
- •Creating an Environment
- •Summary
- •Creating Atmospheric Effects
- •Using the Fire Effect
- •Using the Fog Effect
- •Summary
- •Using Render Elements
- •Adding Render Effects
- •Creating Lens Effects
- •Using Other Render Effects
- •Summary
- •Using Raytrace Materials
- •Using a Raytrace Map
- •Enabling mental ray
- •Summary
- •Understanding Network Rendering
- •Network Requirements
- •Setting up a Network Rendering System
- •Starting the Network Rendering System
- •Configuring the Network Manager and Servers
- •Logging Errors
- •Using the Monitor
- •Setting up Batch Rendering
- •Summary
- •Compositing with Photoshop
- •Video Editing with Premiere
- •Video Compositing with After Effects
- •Introducing Combustion
- •Using Other Compositing Solutions
- •Summary
- •Completing Post-Production with the Video Post Interface
- •Working with Sequences
- •Adding and Editing Events
- •Working with Ranges
- •Working with Lens Effects Filters
- •Summary
- •What Is MAXScript?
- •MAXScript Tools
- •Setting MAXScript Preferences
- •Types of Scripts
- •Writing Your Own MAXScripts
- •Learning the Visual MAXScript Editor Interface
- •Laying Out a Rollout
- •Summary
- •Working with Plug-Ins
- •Locating Plug-Ins
- •Summary
- •Low-Res Modeling
- •Using Channels
- •Using Vertex Colors
- •Rendering to a Texture
- •Summary
- •Max and Architecture
- •Using AEC Objects
- •Using Architectural materials
- •Summary
- •Tutorial: Creating Icy Geometry with BlobMesh
- •Tutorial: Using Caustic Photons to Create a Disco Ball
- •Summary
- •mental ray Rendering System
- •Particle Flow
- •reactor 2.0
- •Schematic View
- •BlobMesh
- •Spline and Patch Features
- •Import and Export
- •Shell Modifier
- •Vertex Paint and Channel Info
- •Architectural Primitives and Materials
- •Minor Improvements
- •Choosing an Operating System
- •Hardware Requirements
- •Installing 3ds max 6
- •Authorizing the Software
- •Setting the Display Driver
- •Updating Max
- •Moving Max to Another Computer
- •Using Keyboard Shortcuts
- •Using the Hotkey Map
- •Main Interface Shortcuts
- •Dialog Box Shortcuts
- •Miscellaneous Shortcuts
- •System Requirements
- •Using the CDs with Windows
- •What’s on the CDs
- •Troubleshooting
- •Index

Automating with MAXScript
The Max designers went to great lengths to make sure that you are limited only by your imagination in terms of what you can do in
Max. They’ve packed in so many different features and so many different ways to use those features that you could use Max for years and still learn new ways of doing things.
Despite Max’s wide range of capabilities, there may come a time when you wish for a new Max feature. With MAXScript, you can actually extend Max to meet your needs, customize it to work the way you want, and even have it do some of the more monotonous tasks for you.
What Is MAXScript?
In this chapter, we look at MAXScript — what it’s for and why in the world you would ever want to use it. But before we get into the nittygritty details, let’s start with a brief overview.
Simply put, MAXScript is a tool that you can use to expand the functionality of Max. You can use it to add new features or to customize how Max behaves, so that it’s tailored to your needs and style. You can also use MAXScript as a sort of VCR; it can record your actions so you can play them back later, eliminating repetitive tasks.
You can use MAXScript to “talk” to Max about a scene and tell it what you want to happen, either by having Max watch what you do or by typing in a list of instructions that you want Max to execute.
The beauty of MAXScript lies in its flexibility and simplicity: It is easy to use and was designed from the ground up to be an integral part of Max. But don’t let its simplicity fool you; MAXScript as a language is rich enough to let you control just about anything.
In fact, you have already used MAXScript without even knowing it. Some of the buttons and rollouts use bits of MAXScript to carry out your commands. And after you’ve created a new feature with
MAXScript, you can integrate it into Max transparently and use it just as easily as any other Max feature.
MAXScript is a fully functional and very powerful computer language, but you don’t have to be a computer programmer or even have any
48C H A P T E R
In This Chapter
Getting acquainted with MAXScript
Learning the MAXScript tools, such as the MAXScript editor and Listener windows
Recording scripts with the Macro Recorder
Discovering the various script types
Writing your own scripts
Understanding the Visual MaxScript Editor interface
Building a custom rollout with the Visual MAXScript Editor

1118 Part XII MAXScript and Plug-Ins
previous programming experience to benefit from MAXScript. In the next few sections, we look at some simple ways to use MAXScript. For now, just think of a script in Max as you would a script in a movie or play — it tells what’s going to happen, who’s going to do what, and when it’s going to happen. With your scene acting as the stage, a script directs Max to put on a performance for you.
One final note before we dive in: MAXScript is so powerful that an entire book could be written about it and every last feature it supports, but that is not the purpose here. This chapter is organized to give you an introduction to the world of MAXScript and to teach you the basic skills you need to get some mileage out of it. What is given here is a foundation that you can build upon according to your own interests and needs.
MAXScript Tools
MAXScript is pervasive and can be found in many different places. This section looks at the MAXScript tools and how different scripts are created and used.
Let’s look at some of the tools used in working with MAXScript. Max has several tools that make creating and using scripts as simple as possible.
The MAXScript menu
The MAXScript menu includes commands that you can use to create a new script, open and run scripts, open the MAXScript Listener window (keyboard shortcut, F11), or enable the Macro Recorder.
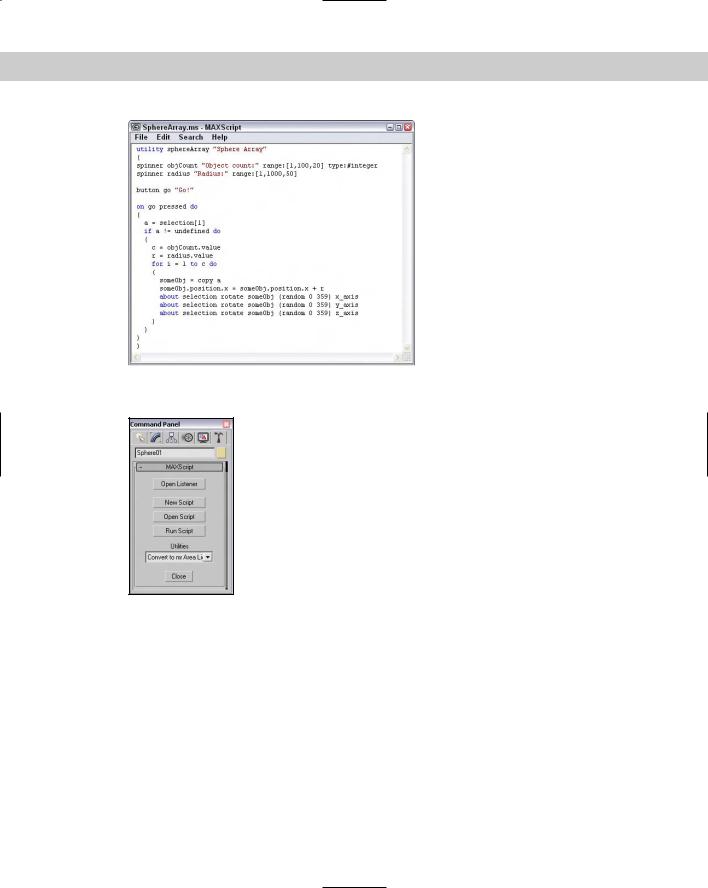
The New Script command opens a MAXScript editor window, a simple text editor in which you write your MAXScript. See the “MAXScript editor windows” section later in this chapter for more on this editor window. The Open Script command opens a file dialog box that you can use to locate a MAXScript file. When opened, the script file is opened in a MAXScript editor window, as shown in Figure 48-1. MAXScript files have an .MS or an .MCR extension. The Run Script command also opens a file dialog box where you can select a script to be executed.
Note |
When you use Run Script, some scripts do something right away, whereas others install |
|
themselves as new tools. |
The MAXScript Listener command opens the MAXScript Listener window. You can also open this window by pressing the F11 keyboard shortcut. The Macro Recorder command starts recording a MAXScript macro. The MAXScript Listener and recording macros are covered later in this chapter.
The MAXScript Utility rollout
You access the MaxScript Utility rollout, shown in Figure 48-2, by opening the Utilities panel in the Command Panel and clicking the MAXScript button. This opens a rollout where you can do many of the same commands as the MAXScript menu.
Chapter 48 Automating with MAXScript 1119
Figure 48-1: MAXScript is written using standard syntax in a simple text editor window.
Figure 48-2: The MAXScript rollout on the Utilities panel is a great place to start working with MAXScript.
The MAXScript rollout also includes a Utilities drop-down list, which holds any installed scripted utilities. Each scripted utility acts as a new feature for you to use. The parameters for these utilities are displayed in a new rollout that appears below the MAXScript rollout.
Tutorial: Using the SphereArray script
Here’s a chance for you to play around a little and get some experience with MAXScript in the process. In the Chap 48 directory of the CD-ROM is a simple script called SphereArray.ms. It’s similar to the Array command found in the Tools menu, except that SphereArray creates copies of an object and randomly positions them in a spherical pattern.
1120 Part XII MAXScript and Plug-Ins
To load and use the SphereArray script, follow these steps:
1.Select Create Standard Primitives Box, and drag in the Top viewport to create a Box object that has a Length of 10 and Width and Height values of 1.0.
2.Select the box object, open the Utilities panel in the Command Panel (the icon is a hammer), and click the MAXScript button.
The MAXScript rollout appears.
3.Click the Run Script button in the MAXScript rollout to open the Choose Editor file dialog box, locate the SphereArray.ms file from the Chap 48 directory on the CD-ROM, and click Open.
The SphereArray utility installs and appears in the Utilities drop-down list. (Because SphereArray is a scripted utility, running it only installs it.)
4.Choose SphereArray from the Utilities drop-down list. Make sure that the box object is selected.
5.In the Sphere Array rollout, enter 50 in the Object Count field and 2.0 for the Radius field. Now click the Go! button to run the script.
The script adds 50 copies of your box to the scene and randomly positions them two units away from the box’s position.
Figure 48-3 shows the results of the SphereArray MAXScript utility. Notice that the SphereArray script looks much like any other function or tool in Max.
Figure 48-3: The results of the SphereArray MAXScript utility
Chapter 48 Automating with MAXScript 1121
The MAXScript Listener window
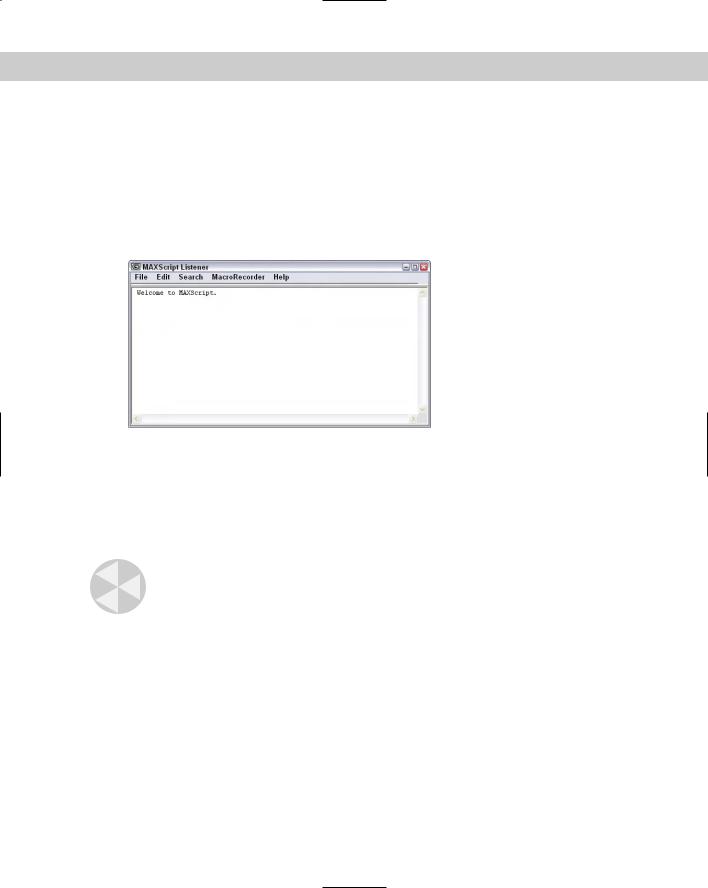
Figure 48-4 shows the MAXScript Listener window (keyboard shortcut, F11), which lets you work interactively with the part of Max that interprets MAXScript commands. The top pane of the Listener window (the pink area) lets you enter MAXScript commands; the results are reported in the bottom pane (the white area) of the Listener window. You can also type MAXScript commands in the bottom pane, but typing them in the top pane keeps the commands separated from the results. If you drag the spacer between the two panes, you can resize both panes as needed.
Figure 48-4: The MAXScript Listener window interprets your commands.
When you type commands into either pane and press Enter, the MAXScript interpreter evaluates the command and responds with the results. For example, if you type a simple mathematical expression such as 2+2 and press Enter, then the result of 4 is displayed in blue on the next line. Most results appear in blue, but the results display in red for any errors that occur. For example, if you enter the command hello there, then a Type error result appears in red because the MAXScript interpreter doesn’t understand the command.
Caution |
The MAXScript interpreter is very fickle. A misspelling generates an error, but MAXScript is case- |
|
insensitive, which means that uppercase and lowercase letters are the same as far as Max is |
|
concerned. Thus, you can type sphere, Sphere, or SPHERE, and Max sees no difference. |
The Listener window has these menus:
File: You can use this menu to close the window (Ctrl+W), save your work (Ctrl+S), run scripts (Ctrl+R), open a script for editing (Ctrl+O), or create a new script from scratch (Ctrl+N).
Edit: This menu is where you access all the common editing functions you need, such as cutting, pasting, and undoing.
Search: You use this menu for searching through the window to find specific text (Ctrl+F), find the next instance (Ctrl+G), or replace text (Ctrl+H).
MacroRecorder: This menu lets you set various options for the MAXScript Macro Recorder.
Help: This menu provides access to the MAXScript Reference (F1).

1122 Part XII MAXScript and Plug-Ins
Tutorial: Talking to the MAXScript interpreter
This tutorial gives you a little experience in working with the MAXScript Listener window and a chance to try some basic MAXScript commands.
To start using MAXScript, follow these steps:
1.Choose File Reset to reset Max.
2.Choose MAXScript MAXScript Listener or press F11 to open the MAXScript Listener window.
3.Click anywhere in the bottom pane of the Listener window, type the following, and press Enter:
sphere()
A sphere object with default parameters is created.
4.Next enter the following in the lower pane, and press the Enter key: torus radius1:50 radius2:5
Max creates a torus and adds it to your scene. As you specified in your MAXScript, the outer radius (radius1) is 50, and the radius of the torus itself (radius2) is 5. The output tells you that Max created a new torus at the origin of the coordinate system and gave that torus a name: Torus01.
5.Now use MAXScript to move the torus. In the Listener window, type the following: $Torus01.position.x = 20
After you press Enter, you see the torus move along the positive X axis. Each object in Max has certain properties or attributes that describe it, and what you’ve done is access one of these properties programmatically instead of by using the rollout or the mouse. In this case, you’re telling Max, “Torus01 has a position property. Set the X coordinate of that position to 20.”
Note |
The $ symbol identifies a named object. You can use it to refer to any named object. |
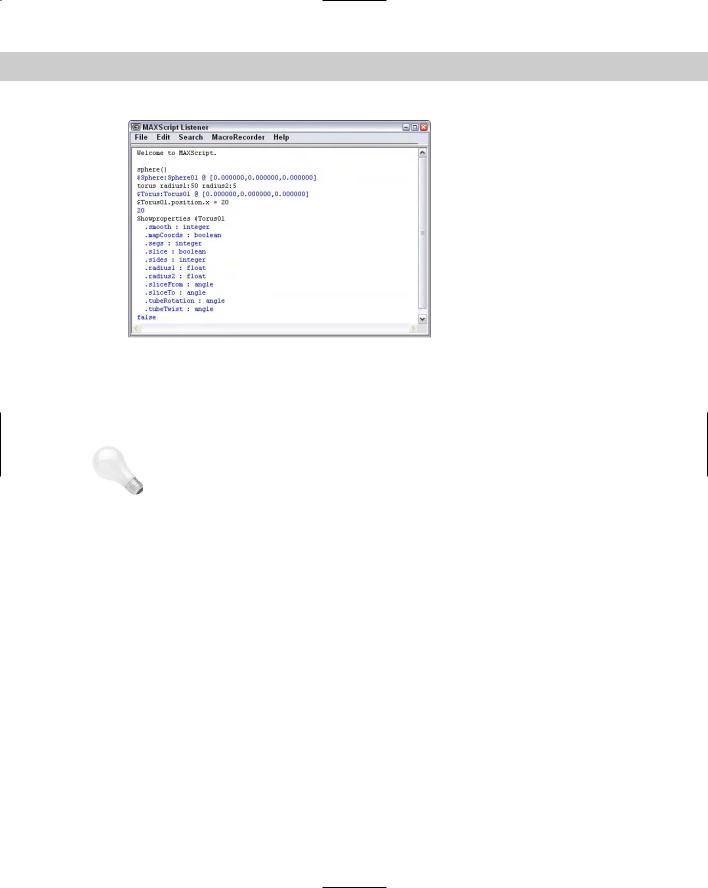
6.To see a list of some of the properties specific to a torus, type the following:
Showproperties $Torus01
A list of the Torus01 properties appears in the window.
Figure 48-5 shows the MAXScript Listener window with all the associated commands and results.
Chapter 48 Automating with MAXScript 1123
Figure 48-5: Use the MAXScript Listener window to query
Max about an object’s properties.
An important thing to understand from this tutorial is that you can do almost anything with MAXScript. Any property of any object that you can access via a rollout is also available via MAXScript. You could go so far as to create entire scenes using just MAXScript, although the real power comes from using MAXScript to do things for you automatically.
Tip Max remembers the value of the last MAXScript command that it executed, and you can access that value through a special variable: ? (a question mark). For example, if you type 5 + 5 in the Listener window, Max displays the result, 10. You can then use that result in your next MAXScript command by using the question mark variable. For example, you could type $Torus01.radius2 = ?, and Max would internally substitute the question mark with the number 10.
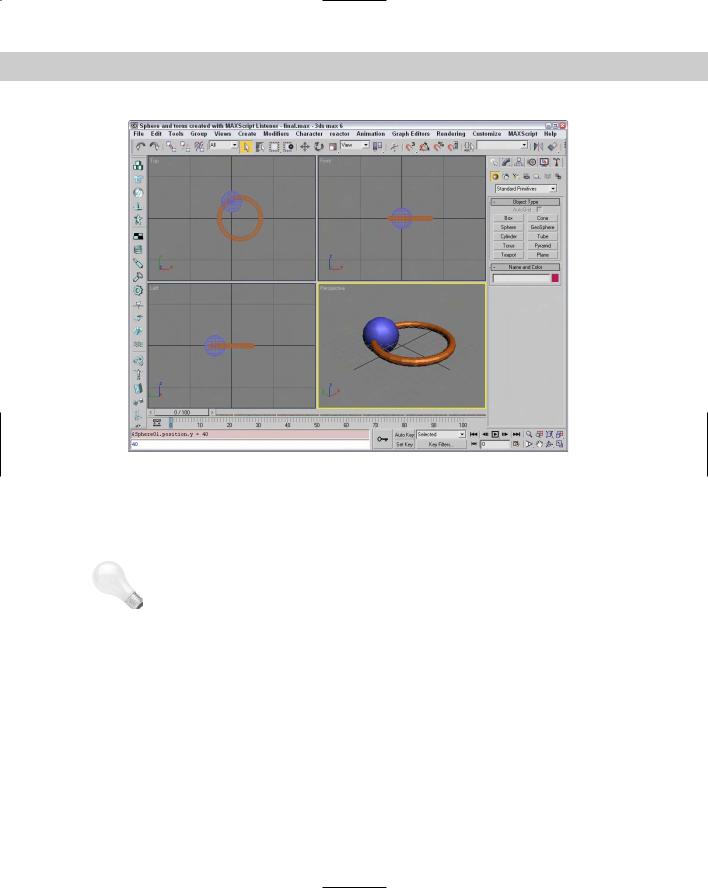
At the left end of the status bar, you can access the MAXScript Mini Listener control by dragging the left edge of the status bar to the right. By right-clicking in this control, you can open a Listener Window and view all the current commands recorded by the Listener. Figure 48-6 shows this control with another command along with the objects from the last example.
MAXScript editor windows
The MAXScript editor window enables you to open and edit any type of text file, although its most common use is for editing MAXScript files. Although you can have only one Listener window open, you can open as many editor windows as you want.
To open a new MaxScript editor window, you can choose MAXScript New Script, choose File New from the MAXScript Listener window, or click the New Script button in the MAXScript rollout in the Utility panel. You can also use MaxScript editor windows to edit existing scripts.
1124 Part XII MAXScript and Plug-Ins
|
Figure 48-6: The resulting objects created via the MAXScript Listener window |
|
For creating a new script, opening both an editor window and the Listener window is usually |
|
best. Then you can try out things in the Listener window, and when the pieces of the |
|
MAXScript work, you can cut and paste them into the main editor window. Then you can |
|
return to the Listener window, work on the next new thing, and continue creating, cutting, |
|
and pasting until the script is done. |
Tip |
You can also send text back to the Listener window for Max to evaluate. Just select some text |
|
with the cursor or mouse, and press Shift+Enter (or just Enter on the numeric keypad). Max |
|
copies the selected text to the Listener window and evaluates it for you. |
|
The File, Search, and Help menus in the MAXScript editor window are the same as those used |
|
for the Listener window, with the exception of the Evaluate All command. This command |
|
(choose File Evaluate All to access it) is a fast way of having Max evaluate your entire |
|
script. The result is the same as if you had manually selected the entire text, copied it to the |
|
Listener window, and pressed Enter. |
|
The Edit menu includes commands to Undo (Ctrl+Z), Cut (Ctrl+X), Copy (Ctrl+C), Paste |
|
(Ctrl+V), or Delete (Delete) text. It also includes access to the Visual MAXScript window with |
|
the New Rollout and Edit Rollout (F2) menu commands. The pop-up menu also includes a |
|
command to Select All (Ctrl+A). You can also access this menu as a pop-up menu by right- |
|
clicking in the window. |

Chapter 48 Automating with MAXScript 1125
The Macro Recorder
The MAXScript Macro Recorder is a tool that records your actions and creates a MAXScript that can be recalled to duplicate those actions. Using the Macro Recorder is not only a quick and easy way to write entire scripts, but it is also a great way to make a working version of a script that you can then refine. After the Macro Recorder has created a MAXScript from your recorded actions, you can edit the script using a MAXScript editor window to make any changes you want.
You can turn the Macro Recorder on and off either by choosing MAXScript Macro Recorder or by choosing Macro Recorder Enable in the MAXScript Listener window. The check mark next to Macro Recorder command on the MAXScript menu indicates that the Macro Recorder is turned on.
When the Macro Recorder is on, every action is converted to MAXScript and sent to the MAXScript Listener window’s top pane. You can then take the MAXScript output and save it to a file or copy it to a MAXScript editor window for additional editing. The Macro Recorder continues to monitor your actions until you turn it off, which is done in the same way as turning it on.
The MacroRecorder menu in the MAXScript Listener window includes several options for customizing the macro recorder, including
Enable: This option turns the Macro Recorder on or off.
Explicit scene object names: With this option, the Macro Recorder writes the MAXScript using the names of the objects you modify so that the script always modifies those exact same objects, regardless of what object you have selected when you run the script again. For example, if the Macro Recorder watches you move a pyramid named $Pyramid01 in your scene, then the resulting MAXScript will always and only operate on the scene object named $Pyramid01.
Selection-relative scene object names: With this option, the Macro Recorder writes MAXScript that operates on whatever object is currently selected. So if (when you recorded your script) you moved the pyramid named $Pyramid01, you could later select a different object and run your script, and the new object would move instead.
Note |
To decide which of these options to use, ask yourself, “Do I want the script to always manip- |
|
ulate this particular object, or do I want the script to manipulate whatever I have selected?” |
Absolute transform assignments: This tells the Macro Recorder that any transformations you make are not relative to an object’s current position or orientation. For example, if you move a sphere from (0,0,0) to (10,0,0), the Macro Recorder writes MAXScript that says, “Move the object to (10,0,0).”
Relative transforms operations: Use this option to have the Macro Recorder apply transformations relative to an object’s current state. For example, if you move a sphere from (0,0,0) to (10,0,0), the Macro Recorder says, “Move the object +10 units in the X-direction from its current location.”
Explicit subobject sets: If you choose this option and then record a script that manipulates a set of subobjects, running the script again always manipulates those same subobjects, even if you have other subobjects selected when you run the script again.

1126 Part XII MAXScript and Plug-Ins
Selection-relative subobject sets: This tells the Macro Recorder that you want the script to operate on whatever subobjects are selected when you run the script.
Show command panel switchings: This option tells the Macro Recorder whether or not to write MAXScript for actions that take place on the Command Panel.
Show tool selections: If this option is selected, the Macro Recorder records MAXScript to change to different tools.
Show menu item selections: This option tells the Macro Recorder whether or not you want it to generate MAXScript for menu items you select while recording your script.
Tutorial: Recording a simple script
In this tutorial, we create a simple script that squashes whatever object you have selected and turns it purple.
To create a script using the Macro Recorder, follow these steps:
1.Open the Purple pyramid.max file from the Chap 48 directory on the CD-ROM. This file includes a simple pyramid object.
2.With the pyramid object selected, choose MAXScript MAXScript Listener (or press F11) to open the MAXScript Listener window.
3.In the Listener window, open the MacroRecorder menu and make sure that all the options are set to the relative and not the absolute object settings, thereby telling the script to work on any object that is selected instead of always modifying the same object.
4.Returning to the MacroRecorder menu, select Enable. The Macro Recorder is now on and ready to start writing MAXScript. Minimize the Macro Recorder window (or at least move it out of the way so you can see the other viewports).
5.Dock the MAXScript Listener window to the Left viewport by right-clicking the viewport name and choosing Views Extended MAXScript Listener.
Now you can keep things out of the way while you work.
6.Choose Modifiers Parametric Deformers XForm to add an XForm modifier to the object.
7.Select the non-uniform scale tool and restrict it to the Y axis. Right-click anywhere in the Front viewport to make it active (if it’s not already), and then drag the Y-axis gizmo downward to squash the pyramid.
8.In the Modify panel, click the color swatch next to the object name field to open the Object Color dialog box. Pick one of the purple colors, and click OK.
9.The script is done, so in the MAXScript Listener window, choose MacroRecorder Enable to turn off the Macro Recorder.