

212 Part II Working with Objects
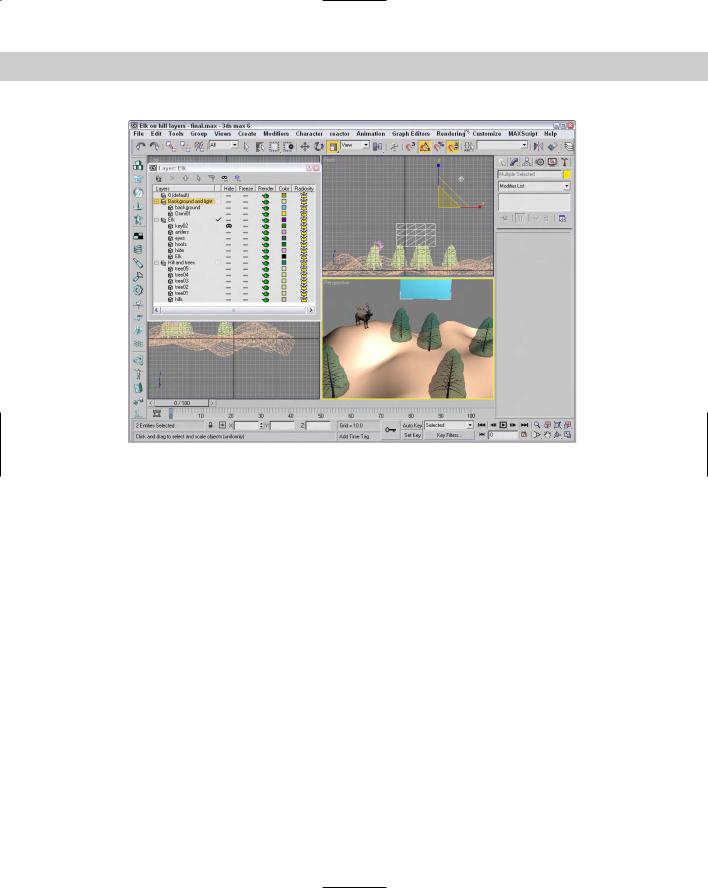
Figure 6-18: All objects assigned to a layer can be viewed in the Layer Properties dialog box.
Summary
Selecting objects enables you to work with them, and Max includes many different ways to select objects. In this chapter, you’ve done the following:
Learned how to use selection filters
Selected objects with the Edit menu by Name, Color, and Region
Selected multiple objects and used a named selection set to find the set easily
Selected objects using other interfaces
Accessed the Object Properties dialog box to set Display and Rendering settings for an object
Learned how to hide and freeze objects
Separated objects using layers
In the next chapter, you work more with multiple objects by learning how to clone objects. Using these techniques, you could very quickly have too many objects (and you were worried that there weren’t enough objects).
|
|
|
Cloning Objects
and Creating
Object Arrays
The only thing better than one perfect object is two perfect objects. Cloning objects is the process of creating copies of
objects. These copies can maintain an internal connection (called an instance or a reference) to the original object that allows them to be modified along with the original object. For example, if you create a school desk from a Box primitive and modify its parameters, the same resulting effect is applied to all instances of the original.
An array is a discrete set of objects that are regularly ordered. So creating an array of objects involves cloning several copies of an object in a pattern, such as in rows and columns or in a circle.
I’m sure you have the concept for that perfect object in your little bag of tricks, and this chapter lets you copy it over and over after you get it out.
Cloning Objects
You can clone objects in Max in a couple of ways (and cloning luckily has nothing to do with DNA or gene splices). One method is to use the Edit Clone (Ctrl+V) menu command, and another method is to transform an object while holding down the Shift key. You won’t need to worry about these clones attacking anyone (unlike Star Wars: Episode II).
Using the Clone command
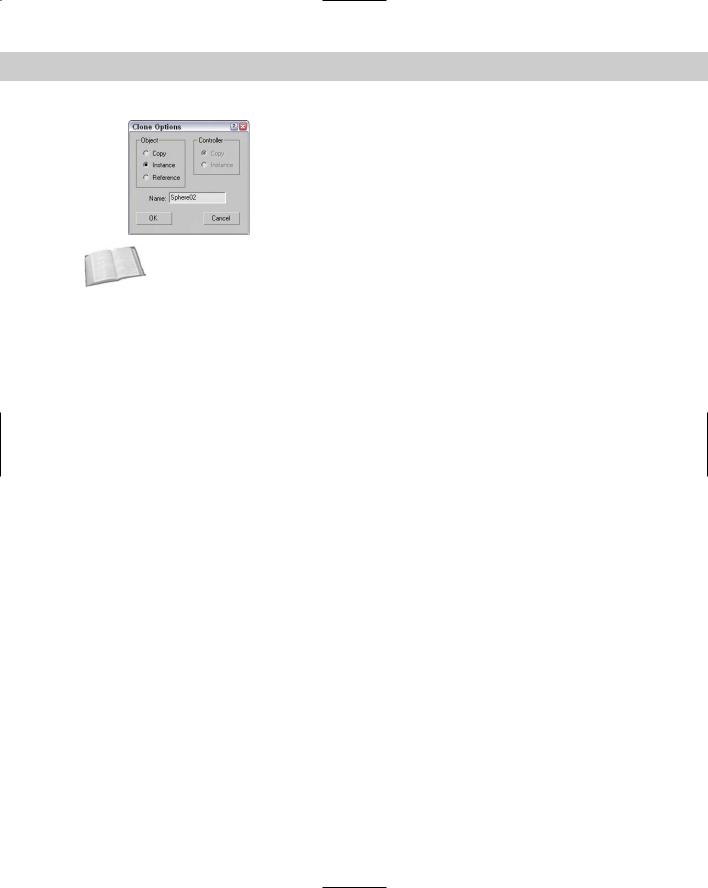
You can create a duplicate object by choosing the Edit Clone (Ctrl+V) menu command. You must select an object before the Clone command becomes active, and you must not be in a Create mode. Selecting this command opens the Clone Options dialog box, shown in Figure 7-1, where you can give the clone a name and specify it as a Copy, Instance, or Reference. You can also copy any controllers associated with the object as a Copy or an Instance.
Caution |
The Edit menu doesn’t include the common cut, copy, and paste |
|
commands because many objects and subobjects cannot be eas- |
|
ily pasted into a different place. However, you will find a Clone |
|
(Ctrl+V) command, which can duplicate a selected object. |
C 7H A P T E R
In This Chapter
Cloning objects
Understanding copies, instances, and references
Using the Mirror and Snapshot tools
Spacing clones along a path with the Spacing tool
Creating object arrays
Using the Ring Array system
214 Part II Working with Objects
Cross-
Reference
Figure 7-1: The Clone Options dialog box defines the new object as a Copy, Instance, or Reference.
The difference between Copy, Instance, and Reference is discussed in the “Understanding Cloning Options” section in this chapter.
When a clone is created with the Clone menu, it is positioned directly on top of the original, which makes distinguishing it from the original difficult. To verify that a clone has been created, open the Select by Name dialog box by pressing H and look for the cloned object (it has the same name, but an incremented number has been added). To see both objects,
click the Select and Move button on the main toolbar and move one of the objects away from the other.
Using the Shift-clone method
An easier way to create clones is with the Shift key. You can use the Shift key when objects are transformed using the Select and Move, Select and Rotate, and Select and Scale commands. Holding down the Shift key while you use any of these commands on an object clones the object and opens the Clone Options dialog box. This Clone Options dialog box is identical to the dialog box previously shown, except it includes a spinner to specify the number of copies.
Performing a transformation with the Shift key held down defines an offset that is applied repeatedly to each copy. For example, holding down the Shift key while moving an object five units to the left (with the Number of Copies set to 5) places the first cloned object five units away from the original, the second cloned object ten units away from the original object, and so on.
Tutorial: Cloning dinosaurs
The story behind Jurassic Park is pretty exciting, but in Max we can clone dinosaurs without their DNA.
To investigate cloning objects, follow these steps:
1.Open the Cloning dinosaurs.max file found in the Chap 07 directory of the CD-ROM.
2.Select the dinosaur object by clicking it in one of the viewports.
3.With the dinosaur model selected, choose Edit Clone (or press Ctrl+V). The Clone Options dialog box appears.
Chapter 7 Cloning Objects and Creating Object Arrays |
215 |
4.Name the clone First clone, select the Copy option, and click OK.
5.Click the Select and Move button (or press the W key) on the main toolbar. Then in the Top viewport, click and drag the dinosaur model to the right.
As you move the model, the original model beneath it is revealed.
6.Select each model in turn, and notice the name change in the Create panel’s Name field. Notice that the clone is even the same object color as the original.
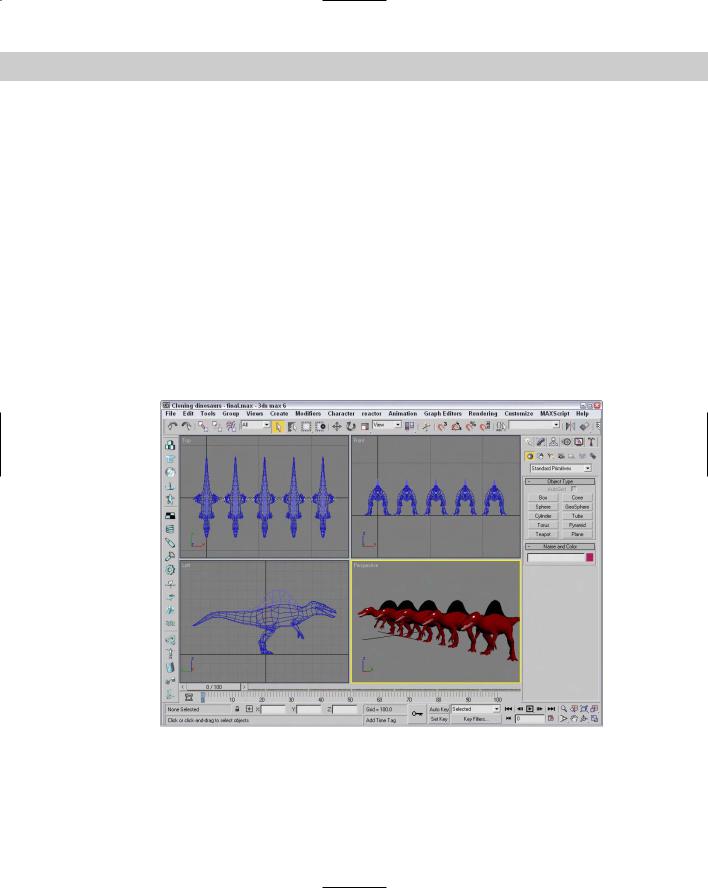
7.With the Select and Move button still active, hold down the Shift key, click the cloned dinosaur in the Top viewport, and move it to the right again. In the Clone Options dialog box that appears, select the Copy option, set the Number of Copies to 3, and click OK.
8.Click the Zoom Extents All button (or press Shift+Ctrl+Z) in the lower-right corner to view all the new dinosaurs.
Three additional dinosaurs have appeared, equally spaced from each other. The spacing was determined by the distance that you moved the second clone before releasing the mouse. Figure 7-2 shows the results of our dinosaur cloning experiment. (Now you’ll need to build a really strong fence.)
Figure 7-2: Cloning multiple objects is easy with the Shift-clone feature.