

216 Part II Working with Objects
Understanding Cloning Options
When cloning in Max, you’re offered the option to create the copy as a copy, an instance, or a reference. This is true not only for objects, but for materials, modifiers, and controllers as well.
Working with copies, instances, and references
When an object is cloned, the Clone Options dialog box appears. This dialog box enables you to select to make a copy, an instance, or a reference of the original object. Each of these clone types is unique and offers different capabilities.
A copy is just what it sounds like — an exact replica of the original object. The new copy maintains no ties to the original object and is a unique object in its own right. Any changes to the copy do not affect the original object, and vice versa.
Instances are different from copies in that they maintain strong ties to the original object. All instances of an object are interconnected, so that any geometry modifications (done with modifiers or object parameters) to any single instance changes all instances. For example,
if you create several instances of a mailbox and then use a modifier on one of them, all instances are also modified.
Note |
Instances and references can have different object colors, materials, transformations (moving, |
|
rotating, or scaling), and object properties. |
References are objects that inherit modifier changes from their parent objects, but do not affect the parent when modified. Referenced objects get all the modifiers applied to the parent and can have their own modifiers as well. For example, suppose that you have an apple object and a whole bunch of references to that apple. Applying a modifier to the base apple changes all the remaining apples, but you can also apply a modifier to any of the references without affecting the rest of the bunch.
At any time, you can break the tie between objects with the Make Unique button in the Modifier Stack.
When an object is selected, all its instances and references are surrounded with an orange bounding box.
Tutorial: Creating instanced doughnuts
Learning how the different clone options work will save you lots of future modifications. To investigate these options, let’s take a quick trip to the local doughnut shop.
To clone some doughnuts, follow these steps:
1.Create a doughnut using the Torus primitive by selecting Create Standard PrimitivesTorus and dragging and clicking twice in the Top viewport to create a torus object.
2.Click the torus object in the Top viewport to select it.
3.With the doughnut model selected, click the Select and Move button (or press the W key). Hold down the Shift key, and in the Top viewport, move the doughnut upward. In the Clone Options dialog box, select the Instance option, set the Number of Copies to 5,
Chapter 7 Cloning Objects and Creating Object Arrays |
217 |
Cross-
Reference
and click OK. Click the Zoom Extents All (or press the Shift+Ctrl+Z key) button to widen your view.
4.Select all objects with the Edit Select All (Ctrl+A) command, and then Shift+drag the doughnuts in the Top viewport to the right. In the Clone Options dialog box, select the Instance option again and 3 for the Number of Copies and click OK. This creates a nice array of two dozen doughnuts. Click the Zoom Extents All (or press the Z key) button to see all the doughnuts.
5.Select a single doughnut, and in the Parameters rollout of the Modify panel, set Radius1 to 20 and Radius2 to 10.
This makes a nice doughnut and changes all doughnuts at once.
6.Select the Modifiers Parametric Deformers Twist command. Then in the Parameters rollout of the Command Panel, enter 25 in the Angle field and select the Y Twist Axis.
This adds a slight bend to the doughnuts.
You can use modifiers to alter geometry. You can learn about using modifiers in Chapter 11, “Introducing Modifiers for Basic Object Deformation.”
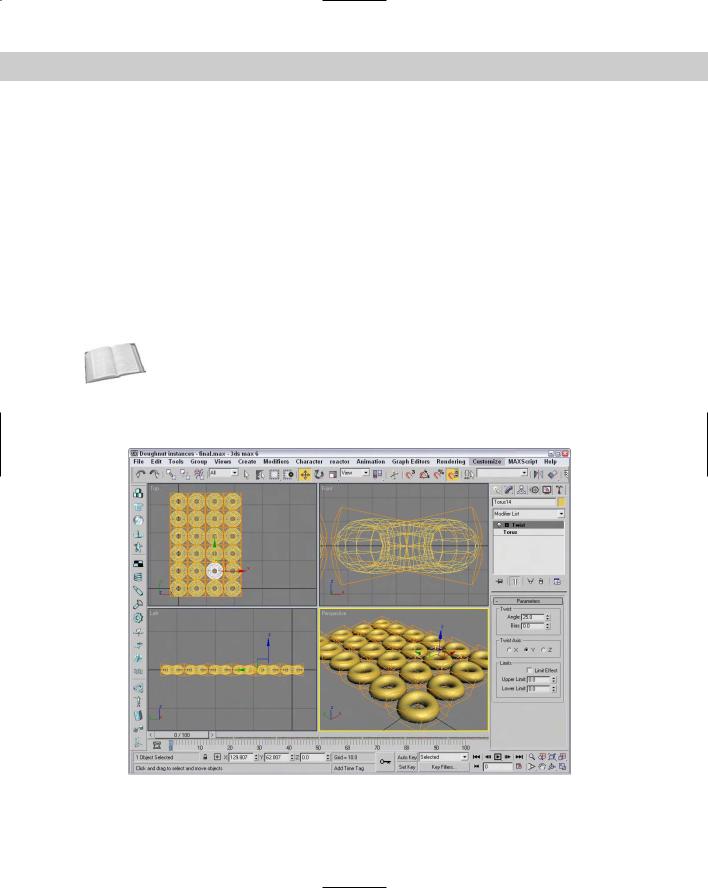
Figure 7-3 shows the doughnuts all changed exactly the same. You can imagine the amount of time it would take to change each doughnut individually. Using instances made these changes easy.
Figure 7-3: Two dozen doughnut instances ready for glaze

218 Part II Working with Objects
Tutorial: Working with referenced apples
Now that we have filled our bellies with doughnuts, we need some healthy food for balance. What better way to add balance than to have an apple or two to keep the doctor away?
To create a bunch of apples using referenced clones, follow these steps.
1.Open the Referenced Apples.max file from the Chap 07 directory on the CD-ROM.
2.Select the apple, and Shift+drag with the Select and Move (W) tool in the Top viewport to create a cloned reference. Select the Reference option in the Clone Options dialog box.
3.Select the original apple again, and repeat Step 2 until several referenced apples surround the original apple.
4.Select the original apple in the middle again, and choose the Modifiers Subdivision Surfaces MeshSmooth command. In the Subdivision Amount rollout, set the number of Iterations to 2.
This smoothes all the apples.
5.Select one of the surrounding apples, and apply the Modifiers Parametric Deformers Taper command. Set the Amount value to 1.0 about the Z-axis.
6.Select another of the surrounding apples, and apply the Modifiers Parametric Deformers Squeeze command. Set the Axial Bulge Amount value to 0.3.
7.Select another of the surrounding apples, and apply the Modifiers Parametric Deformers Squeeze command. Set the Radial Squeeze Amount value to 0.2.
Note |
As you apply modifiers to a referenced object, notice the thick gray bar in the Modifier Stack. |
|
This bar, called the Derived Object Line, separates which modifiers get applied to all refer- |
|
enced objects (below the line) and which modifiers get applied to only the selected object |
|
(above the line). If you drag a modifier from above the gray bar to below the gray bar, then |
|
that modifier is applied to all references. |
Using referenced objects, you can apply the major changes to similar objects, but still make minor changes to objects to make them a little different. Figure 7-4 shows the apples. Notice that they are not all exactly the same.

Chapter 7 Cloning Objects and Creating Object Arrays |
219 |
Figure 7-4: Even apples from the same tree should be slightly different.
Mirroring Objects
Have you ever held the edge of a mirror up to your face to see half your head in the mirror? Many objects have a natural symmetry that you can exploit to require that only half an object be modeled. The human face is a good example. You can clone symmetrical parts using the Mirror command.
Using the Mirror command
The Mirror command creates a clone (or No Clone if you so choose) of the selected object about the current coordinate system. To open the Mirror dialog box, shown in
Figure 7-5, choose Tools Mirror, or click the Mirror button located on the main toolbar. You can access the Mirror dialog box only if an object is selected.
Within the Mirror dialog box, you can specify an axis or plane about which to mirror the selected object. You can also define an offset value. As with the other clone commands, you can specify whether the clone is to be a Copy, an Instance, or a Reference, or you can choose No Clone, which flips the object around the axis you specify. The dialog box also lets you mirror Inverse Kinematics Limits, which reduces the number of IK parameters that need to be set.
220 Part II Working with Objects
Figure 7-5: The Mirror dialog box can create an inverted clone of an object.
Cross- |
Learn more about inverse kinematics in Chapter 37, “Using Inverse Kinematics.” |
Reference |
|
Tutorial: Mirroring a robot’s leg
Many characters have symmetry that you can use to your advantage, but to use symmetry, you can’t just clone one half. Consider the position of the right character’s ear relative to its right eye. If you clone the ear, then the position of each ear will be identical, with the ear to the right of the eye, which would make for a strange looking creature. What you need to use is the Mirror command, which rotate the object about a selected axis.
In this example, we have a complex mechanical robot with one of its legs created. Using Mirror, you can quickly clone and position its second leg.
To mirror a robot’s leg, follow these steps:
1.Open the Robot mech.max file from the Chap 07 directory on the CD-ROM. This file includes a robot with one of its legs deleted.
2.Select all objects that make up the robot’s leg in the Left viewport and open the Mirror dialog box with the Tools Mirror menu command.
3.In the Mirror dialog box, select X as the Mirror Axis and Instance as the Clone Selection. Change the Offset value until the cloned leg is in position, which should be at around –2.55.
Any changes made to the dialog box are immediately shown in the viewports.
4.Click OK to close the dialog box.
Note By making the clone selection an instance, you can ensure that any future modifications to the right half of the figure are automatically applied to the left half.
Figure 7-6 shows the resulting robot — who won’t be falling over now.